Brown Butter Glazed Doughnuts
The softest homemade doughnuts coated in a rich brown butter glaze. The dough’s made with a tangzhong & proved overnight for extra flavour & easier handling.
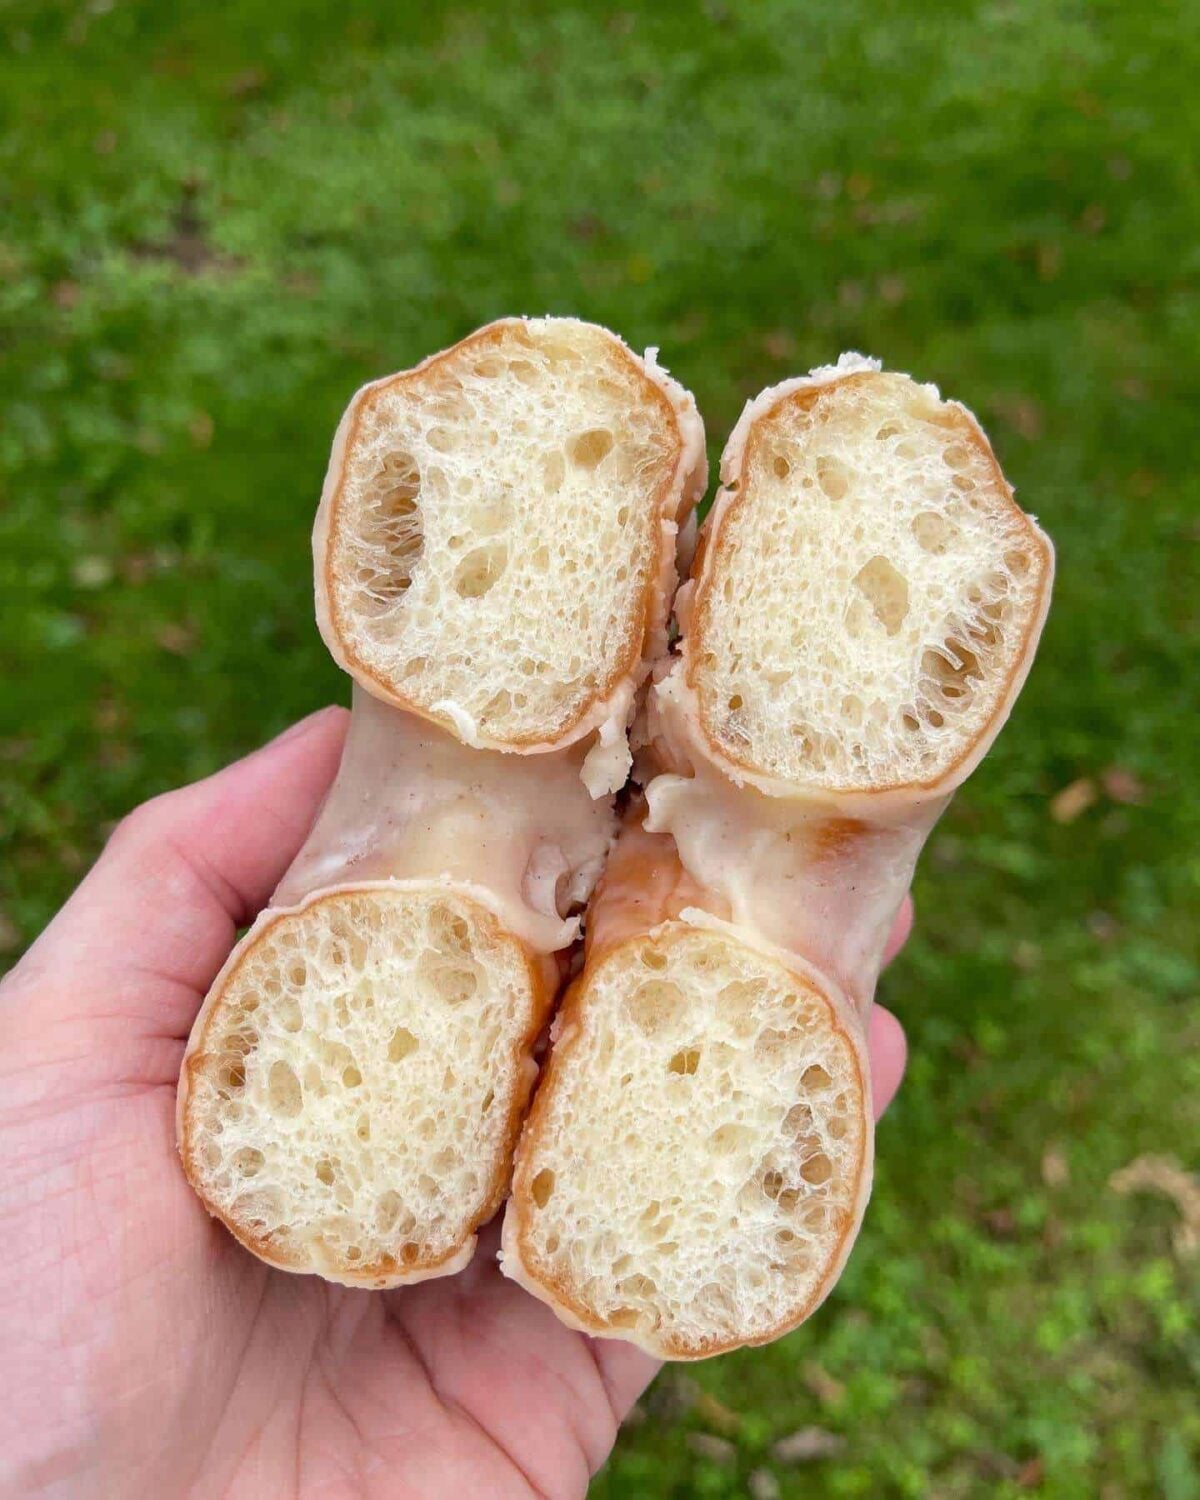
Fluffy homemade ring doughnuts glazed Krispy Kreme style with a simple icing that’s made with brown butter, for extra flavour! These doughnuts are made with an overnight tangzhong dough that gives them a softer, fluffier texture and loads more flavour. They’ll rival any bakery doughnuts but are still incredibly easy to make at home. It’s easily the best batch of doughnuts that I’ve ever made & you get fried doughnut holes to snack on as well…
This recipe takes a batch of classic glazed doughnut & takes them to the next level! We’re using a couple of easy techniques to improve the flavour & texture, including adding a tangzhong to the dough & using a longer, cold ferment instead of a quick room temperature rise. This also makes it a lot easier to shape & handle the dough.
Then there’s the brown butter glaze. This only takes a few minutes to make and has a nutty, caramelised flavour that complements the fried doughnuts perfectly & gives them that glossy finish that glazed doughnuts are known for. These doughnuts aren’t overly sweet though so feel free to swap the brown butter glaze out for another type. A chocolate or maple glaze would be a great swap! You can roll them in sugar instead of glazing as well, they’re great either way.
For more baking recipes, check out every growing baking recipe collection! There’s plenty to choose from here, from chocolate chip cookies & brownies, to even more homemade breads, pastry & loads more.
What Is A Tangzhong?
A technique that originates from Asia, a tangzhong is where a small amount of the flour & liquid in a bread recipe is pre cooked in a saucepan to make a thick paste (like a roux). This paste is then cooled down & added in to the dough along with the remaining flour & water.
Why You’ll Love These Doughuts
- They’re ultra fluffy – This dough is made with a tangzhong which gives the doughnuts an extra soft & fluffy texture.
- They’re easy to make – Making bakery style doughnuts at home is suprisingly easy!
- The dough is cold proved – An overnight cold prove in the fridge improves the flavour & texture of the doughnuts & makes the dough easier to handle.
- The glaze is simple but full of flavour – The brown butter glaze only uses a few ingredients but is full of flavour & takes these homemade doughnuts to another level!
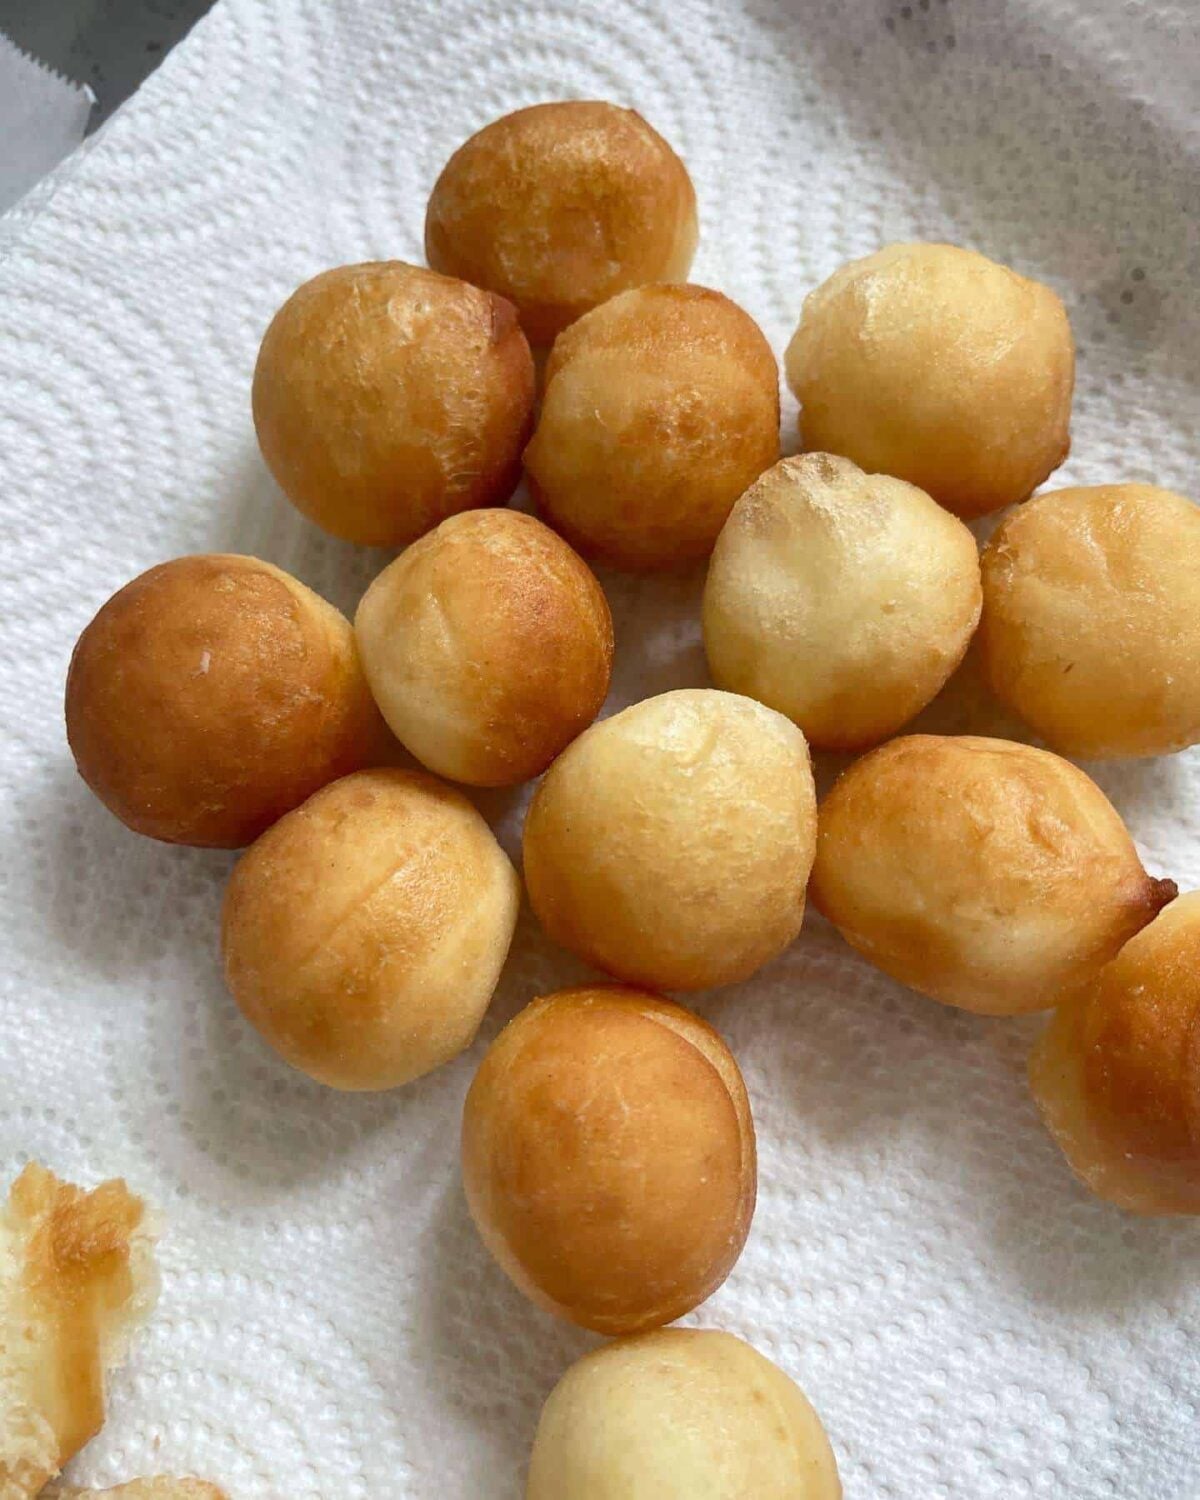
- You get doughnut holes as well – Any scraps of doughnut dough can be fried as well, to make a tasty snack.
Ingredients Used To Make Glazed Doughnuts
- Strong White Bread Flour – A strong white bread flour is needed for the long, cold prove that we give this dough. Pretty much any brand will work but if you’re in the UK, as long as it has a protein content between 12-14%. I use a Canadian white bread flour from Shipton Mill.
- Yeast – I like to use dried active yeast for cold proved bread doughs, as I find that it gives the best rise & texture. Dried active yeast needs to be activated in warm milk before being used. Instant & fresh yeast will also work & I’ve explained how to use them in the post below.
- Milk, Eggs & Butter – For the best results, doughnuts need to be made with an dough that has been enriched with whole milk, eggs & butter. This makes a more flavourful doughnut with a soft, fluffy texture. For the glaze, brown butter is used to add a subtle, nutty flavour & milk is used for a smooth texture and rich flavour.
- Sugar – You’ll need 2 types of sugar for this recipe; caster sugar for the dough & icing sugar for the glaze. As the glaze is sweet, the dough only uses a small amount of sugar. Just enough to give the doughnuts a soft texture & a touch of sweetness.
- Salt – A good quality sea salt works best for almost all bread doughs. My go to amount is a baker’s percentage of 2% as I find that it provides the right balance between flavour & dough structure. I use Maldon sea salt but any good quality fine sea salt will work.
- Vanilla – For an extra hit of flavour, we’re adding vanilla into both the dough & glaze. A small amount of high quality vanilla goes a long way! I like to use vanilla extract for the dough but vanilla paste for the glaze, so that we get those beautiful specks of vanilla seed.
How To Make Overnight Tangzhong Doughnuts
The key to making a batch of ultra soft & fluffy homemade doughnuts is adding a tangzhong into the dough & allowing the dough to cold prove in the fridge overnight! The cold fermentation actually makes it easier to shape the dough as well.
Step 1 – Make The Tangzhong
A tangzhong is made like a roux. To make, simply whisk white bread flour, milk & water together in a pan then cook over a low heat until a thick paste forms. This will take roughly 30 seconds so make sure to stir it constantly!
The tangzhong needs to be at room temperature when it goes into the dough so will need to cool down for around 30 minutes. Transferring the tangzhong into a bowl speeds this process up.
Step 2 – Mix The Dough
Activating The Yeast
To make the dough, we need to activate the yeast in warm milk first. To do this, warm the milk to 38°c/100°f, whisk in the yeast then leave somewhere warm for 5-10 minutes, until the mix turns frothy.
Mixing The Dough
Next, place bread flour, salt, sugar, egg, the tangzhong & activated yeast mixture into the bowl of a stand mixer. Knead this for 5 minutes, until smooth then mix in softened butter a small piece at a time.
Once all of the butter has been incorporated, continue kneading the dough for another 5-10 minutes until smooth. You’ll know when the dough is ready when it passes the windowpane test (more on this below).
Step 3 – Room Temperature Prove
The next step is a short, room temperature prove. This is only for 30 minutes then the dough goes into the fridge, to prove overnight.
Step 4 – Overnight Cold Prove
To improve the dough’s flavour, we’re giving it an overnight prove in the fridge. This will take between 12-18 hours. This improves the dough’s flavour, texture & crumb. This step is key to making the softest, fluffiest doughnuts!
Step 5 – Rolling Out & Cutting
The following day, cut the dough into rings. To do this, use a rolling pin to roll the dough out to a thickness of half an inch. Next use a 3¼” round cutter to cut out as many doughnuts out of the dough as possible then use a 1″ cutter to cut a hole in the centre of each.
With any leftover dough, you can either cut out more 1″ doughnut holes or gently re roll it. This dough works best if only rolled out once so I’d recommend going for the doughnut hole option. Any scraps of dough can also be fried, for a rustic snack!
Step 7 – Fry The Doughnuts
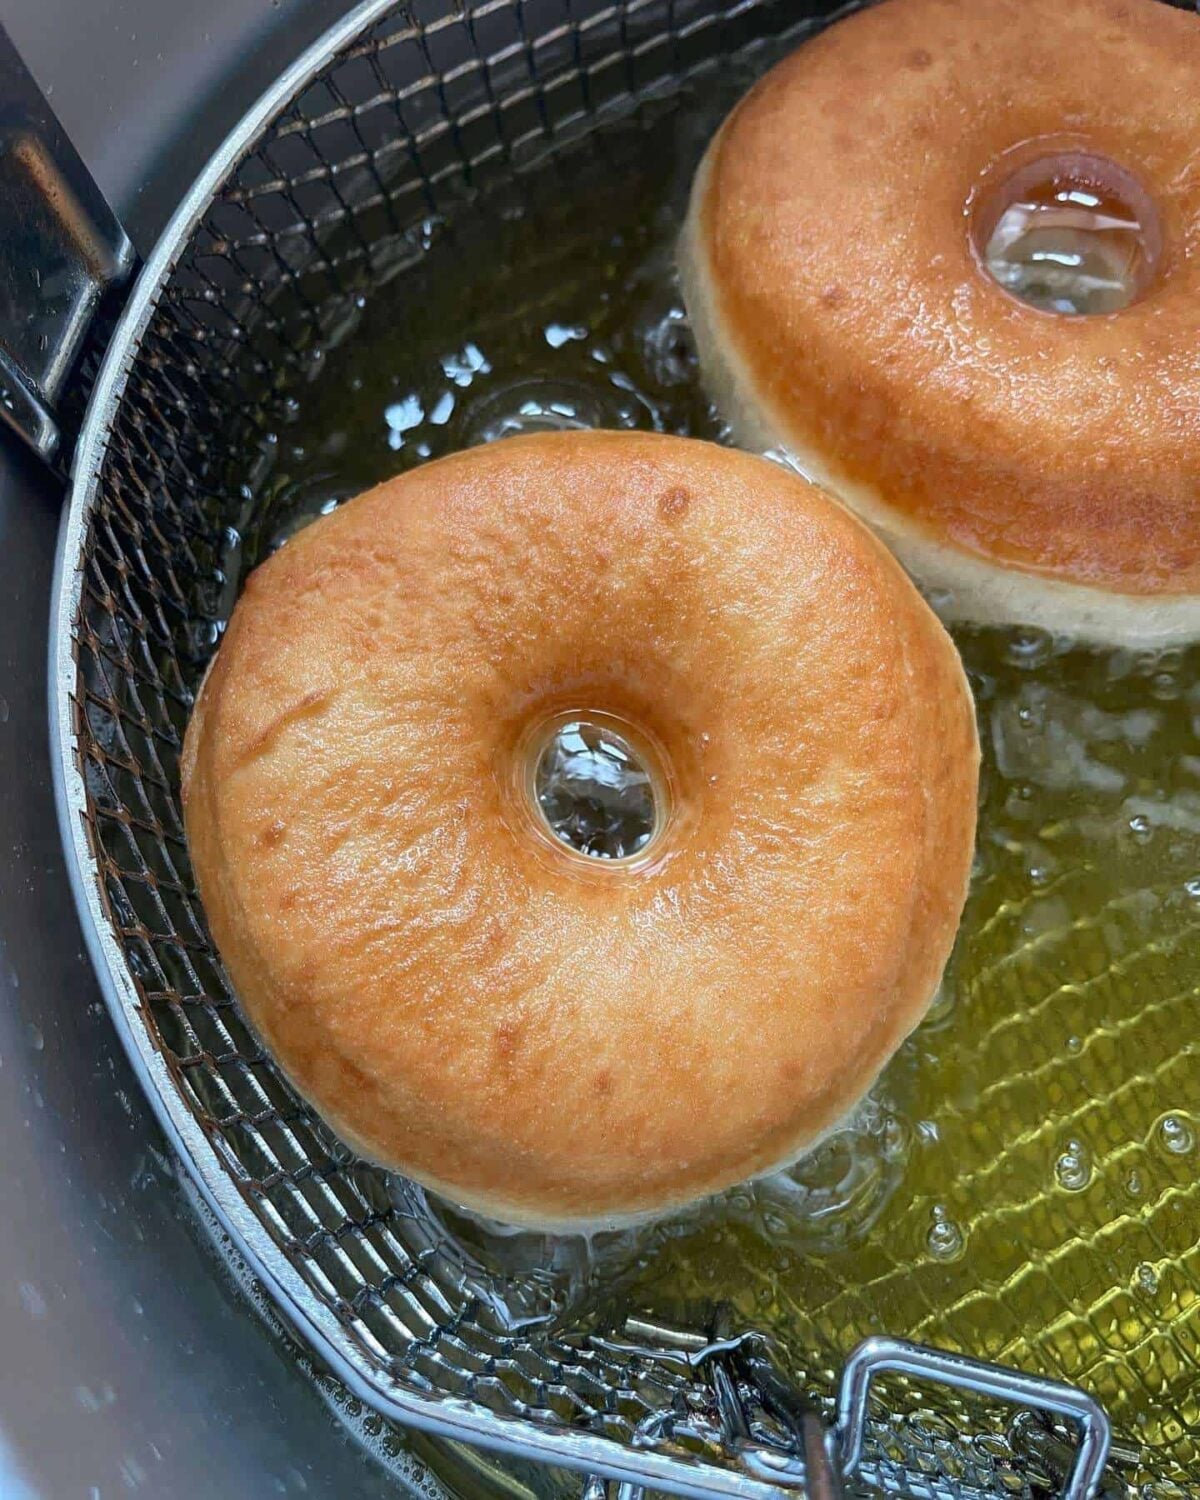
You’ll either need a deep fat fryer to cook these doughnuts or a pan of oil heated on the stove. If possible I’d use a fryer as it is much safer & more accurate.
To cook the doughnuts, the oil needs to be at a temperature of 190°c/375°f. The doughnuts will cook in a matter of minutes & should be a deep, golden brown colour. We’re talking 1-2 minutes on each side! The doughnut holes will cook in a much shorter amount of time. Around 30 seconds – 1 minute on each side.
You’ll need to fry your doughnuts in batches, to avoid over crowding the deep fryer. To do this, carefully flip a doughnut off its parchment paper, into the hot oil then fry for 2-3 minutes on each, until golden brown all over. Once cooked, transfer the doughnut onto a wire rack set over a baking tray & allow to drain. Using a slotted spoon to flip & lift the doughnuts works best.
Step 8 – Glaze The Doughnuts
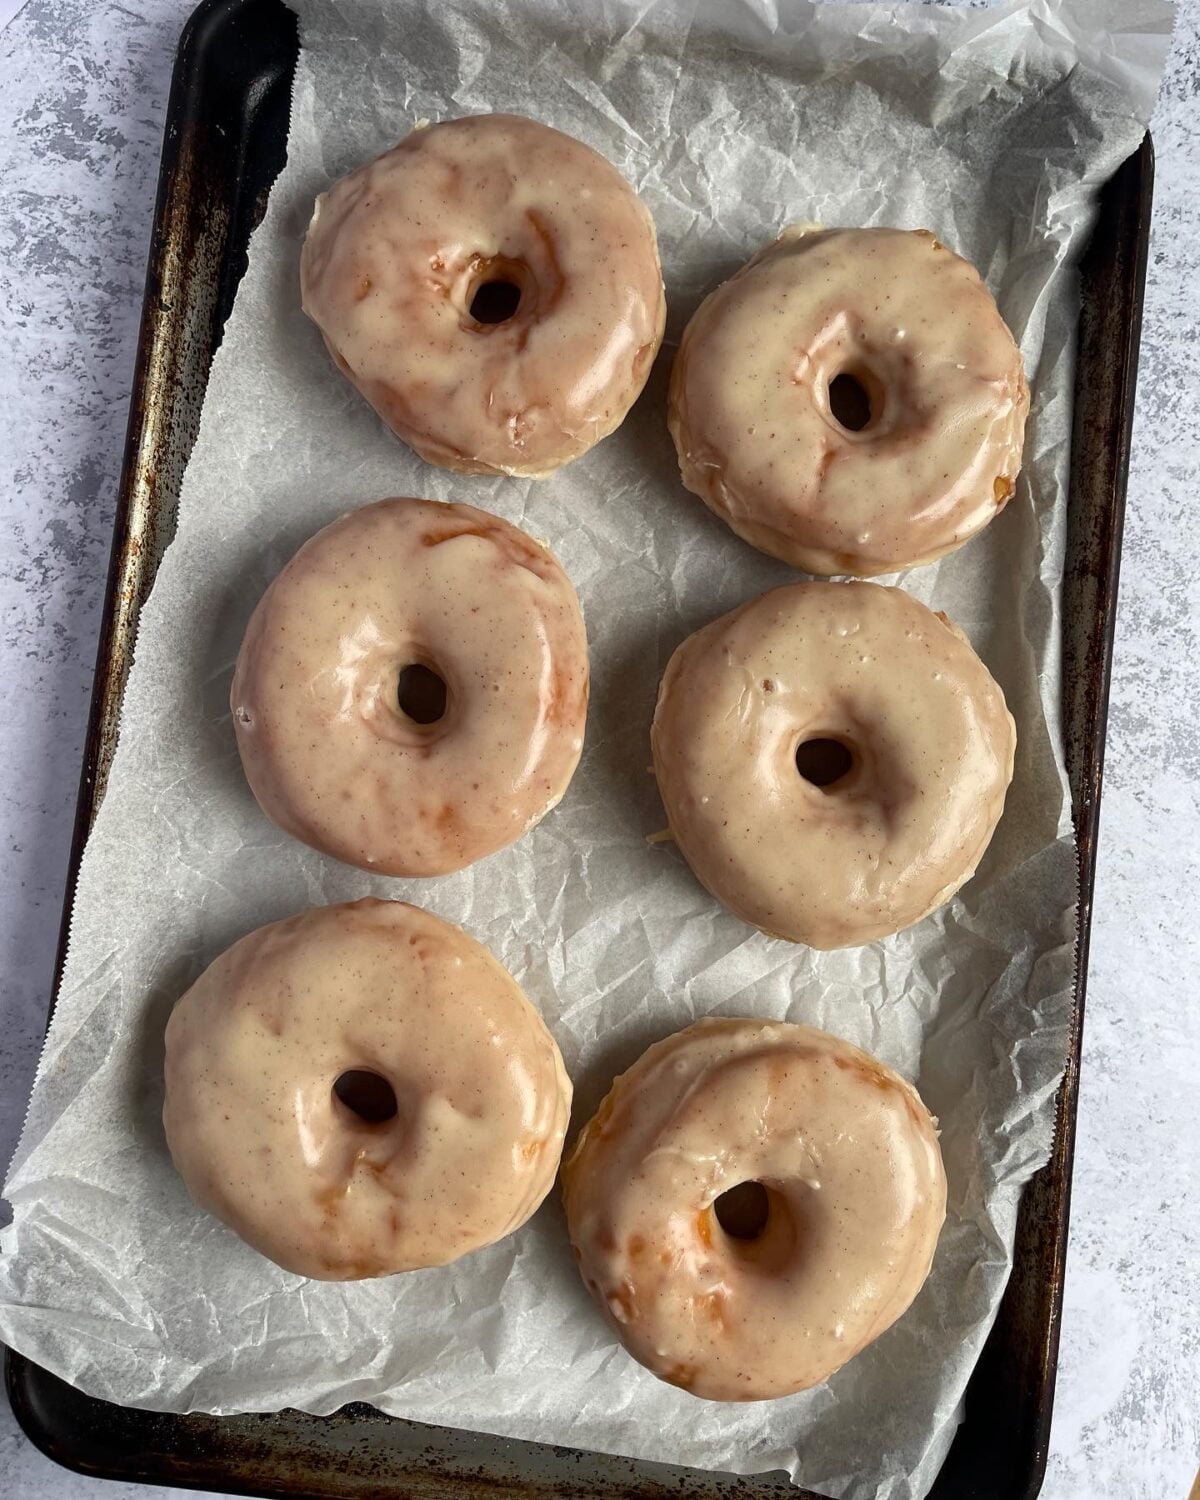
The final step is the glaze. To make this, make a batch of brown butter on the stove then leave to cool whilst you cook the doughnuts. Once cool, add icing sugar, brown butter, milk, vanilla paste & a pinch of salt into a mixing bowl then whisk to make a smooth icing.
The doughnuts need to be glazed whilst they are still warm, as the glaze will coat them more evenly. To glaze, dunk a doughnut in the icing, gently roll it around so that it gets completely coated then transfer to a wire rack so that it can set. Repeat this process, 1 doughnut at a time.
The glaze will take around 20 minutes to set then the doughnuts should either be eaten immediately or stored in the fridge for up to 2 days. To learn more about making brown butter, have a look at my how to make brown butter guide. It’s great for all sorts of dishes, not just baking!
The Windowpane Test
We use the windowpane method to assess how the gluten is developing in bread dough. To perform the windowpane test, take a small amount of dough & stretch it between your fingers. If it stretches thin enough to see through, it’s ready. If it tears, it needs to be kneaded for longer. This is a method that I use for all of my bread recipes!
Homemade Doughnuts Pro Tips
- For an extra soft & fluffy texture, use a tangzhong in your doughnut dough.
- For the best flavour, let the dough prove in the fridge overnight. This also makes it easier to roll & shape the doughnuts.
- Make sure to double check the temperature of your cooking oil with a digital food probe. Domestic deep fryers tend to be a bit inaccurate so it’s best to double check the temperature of the oil.
- Place each doughnut onto its own square of baking parchment. This makes it easier to place the doughnuts into the hot oil, without knocking any air out.
- Make the doughnut glaze with brown butter, for a rich, caramelised flavour.
- Serve the doughnuts on the same day as cooking them, as they’ll be as soft & fluffy as possible.
Troubleshooting Doughnuts
- Why aren’t my doughnuts fluffy?
Homemade doughnuts that aren’t fluffy tends to be caused by under proved dough or dough that hasn’t achieved proper gluten development. To make fluffy homemade doughnuts make sure to knead the dough until it is smooth & passes the windowpane test & let the dough prove until it has doubled in size. - Why is my doughnut dough too sticky?
Doughnut dough tends to be slightly stickier than regular bread dough but if it is too sticky, it will be because too much liquid was added, your flour didn’t have a high enough protein content or if the dough hasn’t been kneaded for long enough. It’s best to avoid adding too much extra flour though, as this can make your homemade doughnuts dense. - Why are my doughnuts greasy?
Homemade doughnuts will become greasy if the cooking oil is not hot enough. To avoid greasy doughnuts, make sure to preheat the oil & double check the temperature with a digital food probe. You’ll also need to let the oil come back up to temperature between batches of doughnuts. - Why are my doughnuts raw in the middle?
Doughnuts will be raw or under cooked in the middle if the cooking oil is too hot. To avoid this, make sure to check that the oil is at the correct temperature before cooking. - Why did my doughnut dough not rise?
Doughnut dough that didn’t rise will be caused by inactive yeast. To avoid this, make sure to use fresh, active yeast. You can check if yeast is active by stirring a small amount into warm water with a small amount of sugar. If it becomes bubbly after 5-10 minutes, the yeast is active still! - My doughnut glaze is too thin!
If your doughnut glaze is too thin, too much liquid was added or too little icing sugar was used. To fix the glaze, simply stir in more icing sugar. If the glaze becomes too thick, stir in a splash of milk (or water).
Frequently Asked Questions
Yes, but with some small changes. To use fresh yeast, you’ll need to use double the amount & activate it in warm milk. To use instant yeast, use the same amount as dried active yeast but it keep in mind that it won’t need activating in warm milk before being added to the dough.
Yes, for these glazed doughnuts you will need to deep fry them in order to get the softest texture & best rise. If you haven’t got a deep fat fryer, you could use a pan of oil warmed up on the stove instead. Do this really carefully though!
A neutral oil with a high smoke point is best for cooking doughnuts in. Popular oil choices include vegetable oil, peanut oil & rapeseed oil (canola oil).
As doughnut glaze contains milk, these homemade doughnuts need to be stored in the fridge. I’d recommend letting them sit at room temperature for 10 minutes before serving though, for the best texture.
More Bread Recipes To Try!
- Tangzhong Burger Buns
- Tangzhong Dinner Rolls
- Carrot Cake Hot Cross Buns
- Overnight Focaccia
- Pizza Oven Pittas
- Everything Bagels – New York Style
If you have enjoyed this recipe for glazed doughnuts, it would mean a lot if you could leave a review & rating. And if you’d like to stay up to date with future recipes, follow us on Instagram & TikTok or subscribe to our newsletter!

Overnight Tangzhong Doughnuts
Equipment
- Stand Mixer
- Deep Fat Fryer
- Digital Food Probe
- Medium Saucepan
- Large Mixing Bowl
- Digital Scales
- Rolling Pin
- Heatproof Jug
- Slotted Spoon
- Circular Cutters 3¼" & 1"
- Cooling Rack
Ingredients
Tangzhong
- 15 g Strong White Bread Flour (See Notes)
- 30 g Whole Milk
- 30 g Water
Dough
- 100 g Whole Milk
- 3 g Dried Active Yeast
- 285 g Strong White Bread Flour
- 6 g Fine Sea Salt
- 45 g Caster Sugar
- 1 Large Egg
- 1 Egg Yolk
- 1 tsp Vanilla Extract
- 55 g Unsalted Butter (At Room Temperature)
Brown Butter Glaze
- 50 g Unsalted Butter
- 300 g Icing Sugar (Sifted)
- 50 g Whole Milk
- 1 tsp Vanilla Paste
- A Pinch Of Table Salt
Instructions
Tangzhong
- For the tangzhong, place the flour, milk & water into a saucepan & whisk to combine. Cook over a low heat until you have a thick paste, stirring constantly with a spatula. Transfer to a bowl & leave to cool to room temperature.
Dough
- Place the milk into a jug & warm in the microwave to 38°c/100°f (alternatively you could heat this up in a saucepan then transfer to a jug), then whisk in the yeast & leave to go bubbly, 5-10 minutes.
- Place the bread flour, salt & sugar into the bowl of a stand mixer then stir together. Next, add in the egg, yolk & tangzhong. Give the yeast & milk another whisk then add into the flour.
- Using the dough hook, knead the dough on a medium speed until it's smooth & starting to come away from the sides of the bowl. This will take around 5 minutes.
- With the mixer still going, add in the butter a small amount at a time, incorporating each piece fully before adding more. Once all the butter has been incorporated, keep mixing until the dough passes the window pane test, this will take 5-10 minutes.See the post above for more info on the windowpane test!
- Transfer the dough into a lightly greased bowl then cover with clingfilm. Leave to prove at room temperature for 30 minutes then transfer into the fridge & leave to cold prove in the fridge for at least 12-18 hours.
Shaping
- The next day, transfer the dough onto a lightly floured surface then use a rolling pin to roll out to a thickness of ½".
- Using a 3¼" (82mm) circular cutter, cut out as many doughnuts from the dough as possible. You should get at least 6. Use a 1" (25mm) to cut a hole out of the centre of each doughnut.If you dip the cutters into flour before cutting the dough, they won't stick.
- Transfer each doughnut onto it's own square of baking parchment & place the doughnut holes onto a lined baking tray.With any remaining dough, you can either cut them into small pieces with the 1" cutter or gently re roll it & cut more doughnuts out – see notes.
- Cover the doughnuts with an upside down baking/roasting tray & leave to prove for 1-1½ hours, until the dough is at room temperature & each doughnut has risen slightly.If you press on the dough lightly, the indent should fill back in slowly.
Brown Butter Glaze – Part 1
- Place the butter for the glaze into a saucepan & set over a medium heat. Cook until browned then pour into a mixing bowl & set aside to cool.
Frying
- Preheat a deep fat fryer to 175°c/347°f.I'd recommend double checking the oil temperature with a digital food probe to make sure that it's at the correct temperature.
- Cook the doughnut holes first.To do this, gently drop them into the hot oil & cook for 1-2 minutes, flipping over with a slotted spoon halfway through. Once they're golden brown, remove from the oil & leave to drain on a cooling rack set over a tray.
- Next, carefully flip a doughnut off its baking parchment, into the hot oil then cook for 2-3 minutes on each side, using a slotted spoon to flip over. The doughnut should be a deep, golden brown on each side. Once cooked, remove from the oil & place onto a wire rack set over a tray, to drain.Alternatively carefully place the doughnut into the oil, parchment side up then remove using a pair of tongs.
- Repeat the cooking process with the remaining doughnuts. Depending on the size of your fryer you might be able to cook two or three at a time.
Brown Butter Glaze – Part 2
- Don't worry about letting the doughnuts cool, they need to be glazed whilst they are still slightly warm! To make the glaze, add the icing sugar, cooled brown butter, milk, vanilla & salt into a mixing bowl then whisk to combine.
- Dip each doughnut & doughnut hole (one at a time) into the glaze, to completely cover then place back onto the cooling rack to drain. Leave for 20 minutes to set then serve immediately.Alternatively, store the doughnuts in the fridge, in an airtight container for up to 2 days.
Notes
❤️ Stay connected with Salt Butter Smoke
The Prep List is my free weekly newsletter with seasonal recipes, kitchen notes and behind-the-scenes from my kitchen. Add Salt Butter Smoke as a Google Preferred Source to see more of my recipes in Search.


These donuts were amazing. I’ve tried so many recipes, but this is the best one by far. The texture is very similar to Krispy Kreme donuts which I’ve tried to recreate multiple times, and I’m so happy to have finally made donuts similar to them. Of course, these taste so much better than Krispy Kreme. I am definitely saving this recipe forever. Thank you!!
That’s awesome to hear, so glad you liked them!
I had to add an extra 60g flour to make my dough less of a puddle, but the results were very nice.
Thank you for the recipe 🙂
Thank you for the feedback, glad you liked them!
Do you really need to cold proof? Or i can fry the same day after proofing?
The cold prove does help add flavour to the dough & makes it easier to shape but I’m sure it would work fine if you shaped & cooked the same day! I’d let the dough double in size during the first rise before shaping, which would take around 1-1.5 hours.
Hi Ben! I followed these measurements weighing all my ingredients in grams but when I added the milk – the batter basically turned into a cake / muffin batter consistency, it was really really wet. It would not roll up into a smooth ball that I could knead. Can you double check the liquid measurements for the milk? Maybe it’s supposed to be in ml not grams?
Hi, sorry that the recipe didn’t work properly. I’m currently making a batch of doughnuts to double check the measurements!
Hi! I’ve just updated the doughnut recipe & have decreased the amount of milk in the dough, which will make it a lot easier to work with! The dough now uses 100 grams of whole milk.
Hi Ben, i have a questions The next day, after dough removed from fridge how long it will take before shaping, when the dough was cold before the dough relax
30 or 60 minutes,thank you
Hi! You should be able to roll & shape the dough as soon as it comes out of the fridge, I find it easier to do this when the dough is still cold. Then once shaped, the dough needs to prove for 1-1½ hours, to bring them back to room temperature.