Honey Roast Ham & Swiss Cheese Quiche
The ultimate ham and cheese quiche! There’s crisp, flaky pastry, a creamy mustard & creme fraiche custard and plenty of honey roast ham and Swiss cheese.
A good homemade quiche is a staple dinner dish in my family and you can’t go wrong with a ham and cheese quiche! This isn’t your regular quiche though. It’s made with honey roasted ham, a generous amount of Swiss cheese (Gruyere or Emmental), a mustard & creme fraiche custard and a seriously flaky pie crust.
Where a lot of quiches are baked in a tart case, this one’s baked in a 9″ pie dish so you get a deeper set custard and more ham and cheese! If you’ve got the time, it’s best to make your own pie crust but a good quality ready made one will work too.
This easy quiche is perfect on its own at lunchtime or can served with sides at dinner time, for a hearty, filling meal. I’d serve it with a simple green salad and some crispy sautéed new potatoes…
Take a look at our ever growing collection of main course recipes for more dinner inspiration! Here you’ll find steaks, pasta dishes, barbecue, burritos & loads more. And for lighter dishes, check out or lunch recipes. Here you’ll find salads, sandwiches, pies and more.
Ingredients For Ham & Cheese Quiche
- Honey Roast Ham – You can use thickly sliced ham from the butcher’s or supermarket or if you’ve got leftover gammon, that would be even better!
- Swiss Cheese – I used Gruyere for my quiche but another Swiss cheese like Emmental will work as well. Or you could use a mature cheddar instead if you’d prefer.
- Creme Fraiche – Using creme fraiche in the custard gives the filling a richer, creamier flavour and texture.
- Double Cream – I like using double cream to make the custard as rich as possible but for a lighter quiche, you can use milk instead.
- Eggs – You’ll need large eggs for this recipe, each should weigh around 55 grams out of the shell.
- Mustard – Ham, cheese and mustard is a classic combo, so I’ve added a generous amount into the filling. I went with Dijon mustard for a sharp flavour but if you wanted a serious kick of mustard, use English mustard instead!
- Herbs – It’s up to you whether you put herbs into your quiche filling. I went with some finely chopped fresh thyme but rosemary, sage or oregano will work as well.
- Paprika – Smoked paprika adds a subtle, sweet smoky flavour. This works great with the ham!
- Pie Crust – You can use a homemade or ready made pie crust for this quiche, though I’d highly recommend making your own! I’ve included my easy pie crust in the recipe.


How To Make Ham & Cheese Quiche
This ham & cheese quiche is made inside a pie crust instead of the usual tart case. This gives it a flakier crust and a deeper filling! This style of quiche is even easier than a normal one but for the best results, you’ll need to make sure to chill the pastry before blind baking and the filling, after baking.
1. Homemade Pie Crust
You can use pretty much any single pie crust for this quiche but I’ve included my recipe as it’s the one that I like best! I make mine with a mix of butter & lard for the best balance of flavour & texture. It’s crisp & flaky, so works perfectly with the creamy custard filling.
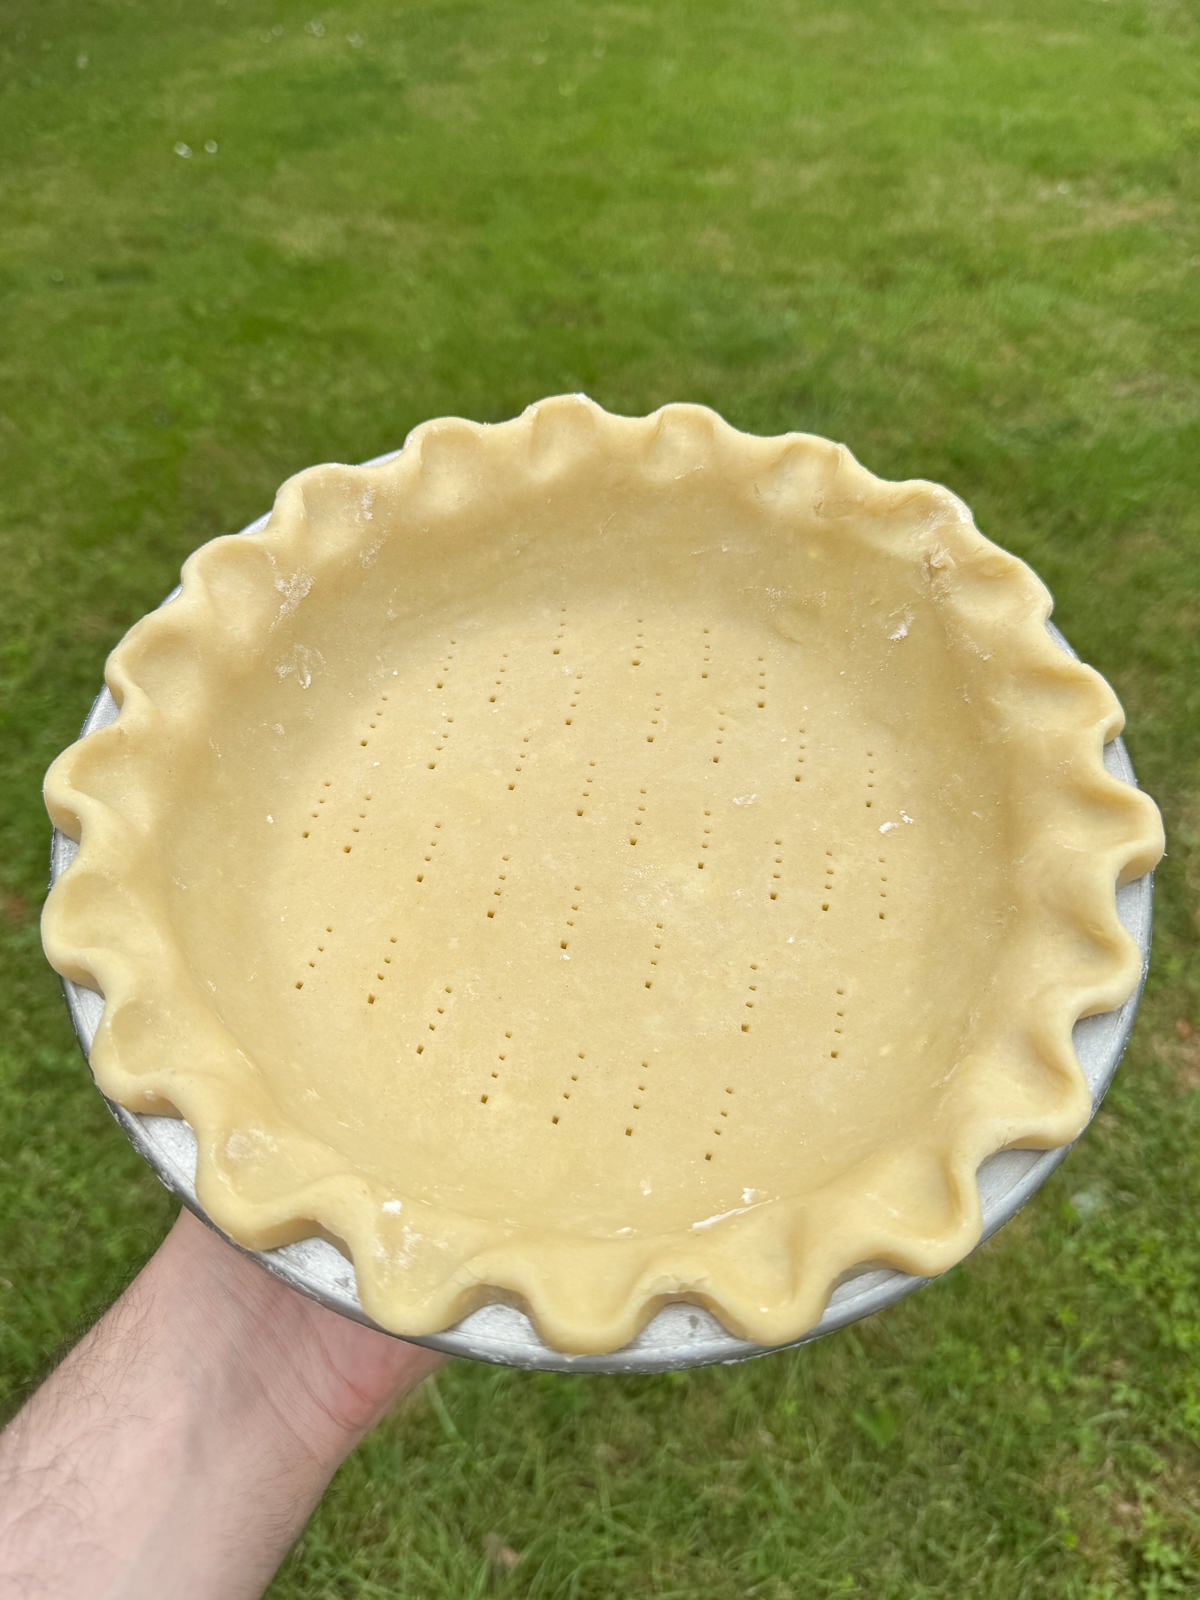
This pastry is made the classic way, by rubbing the fats into flour then mixing in ice cold water & a small amount of vinegar, to make a dough. Once made, the pastry needs to chill in the fridge for at least 2 hours before being used. Then you can roll it out, use it to line a 9″ pie dish then crimp the edges however you like. My go to crimp is a fluted edge!
You’ll also need to chill the crust for another 2 hours (at least) before blind baking, to prevent shrinkage. If I’m feeling organised, I’ll make the pastry & line the pie dish the day before making the quiche, to give it plenty of time to chill.
2. Blind Baking
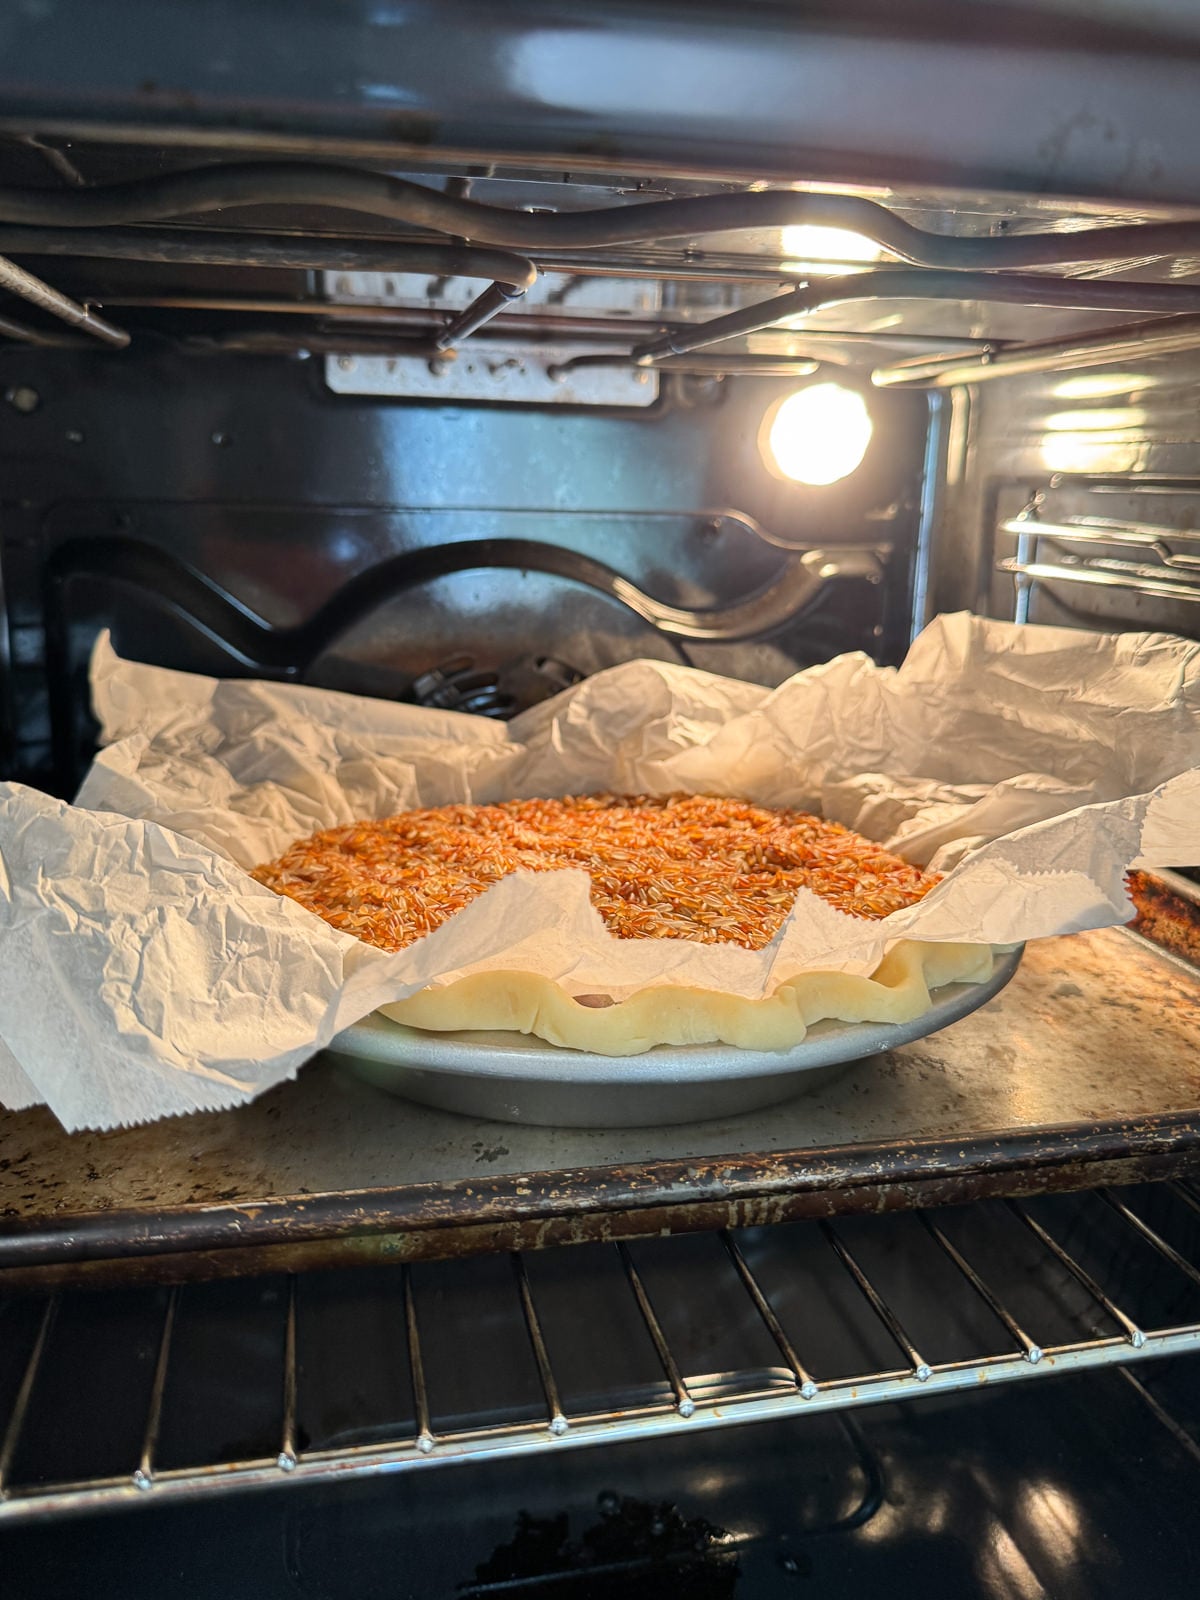
The way that I blind bake pie crusts is designed to crisp the bottom of the crust up, which is key when you’re working with a wet filling like a quiche egg custard. So, you cook the crust at a fairly high temperature but you preheat a large baking tray at the same time as your oven then sit the pie dish on top, to bake. The heat from the tray helps cook the bottom of the crust properly, meaning that it won’t go soggy.
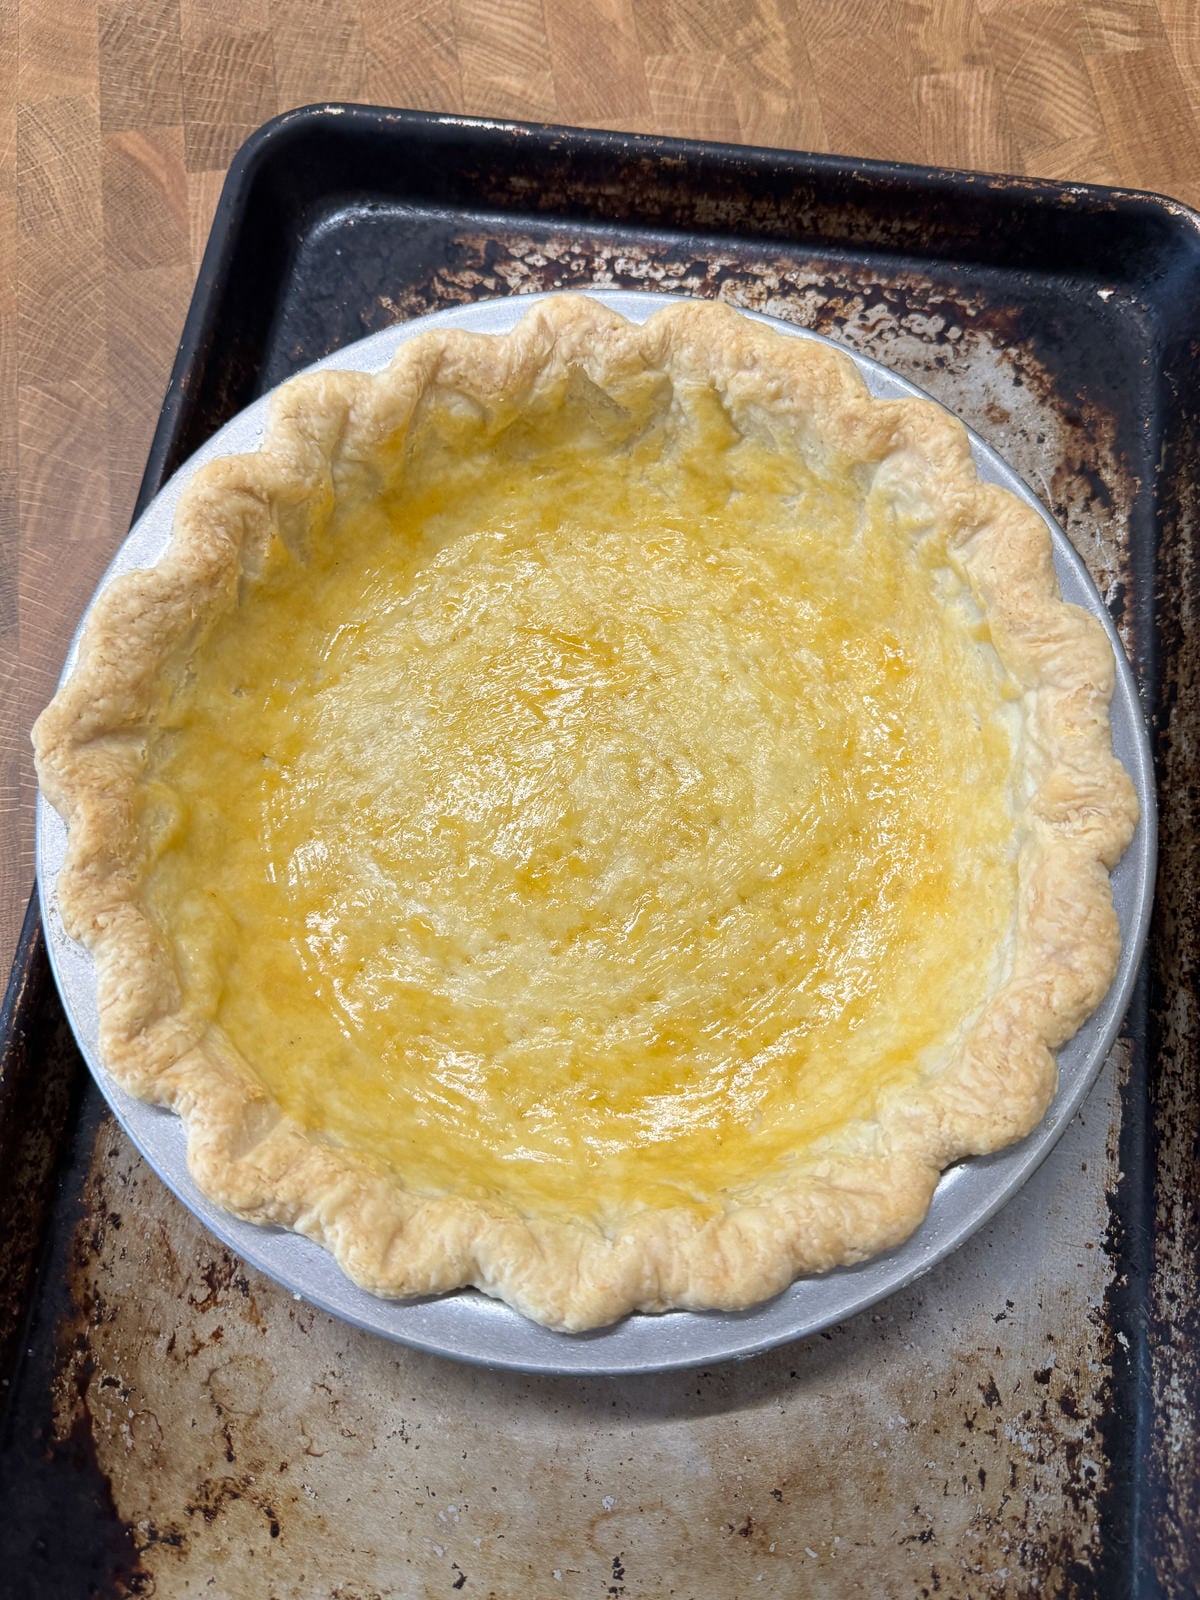
Other than that, we’re blind baking the crust the same as usual, by filling it with parchment baking beans (or rice) then baking until a pale golden brown. To seal up any holes, we brush the inside of the pie crust with a light coating of egg yolk once baked before baking for another 30 seconds or so, to set.
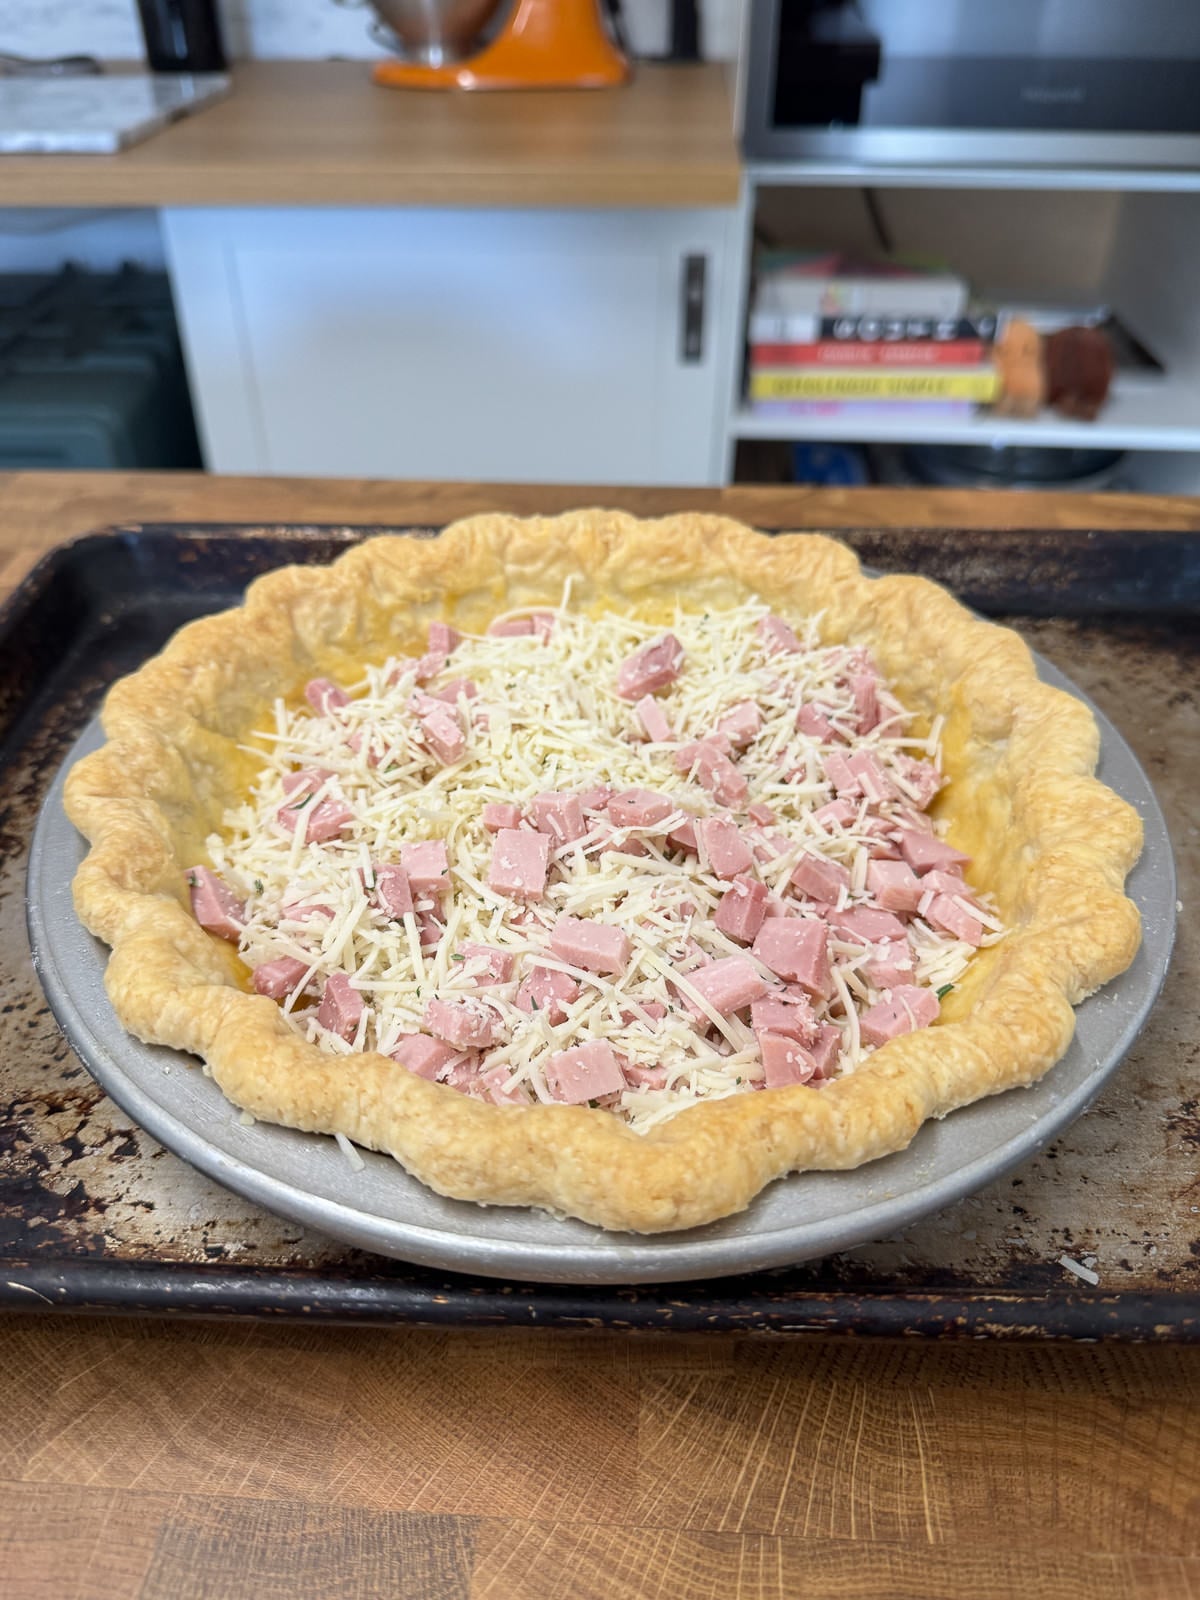
3. Filling Prep
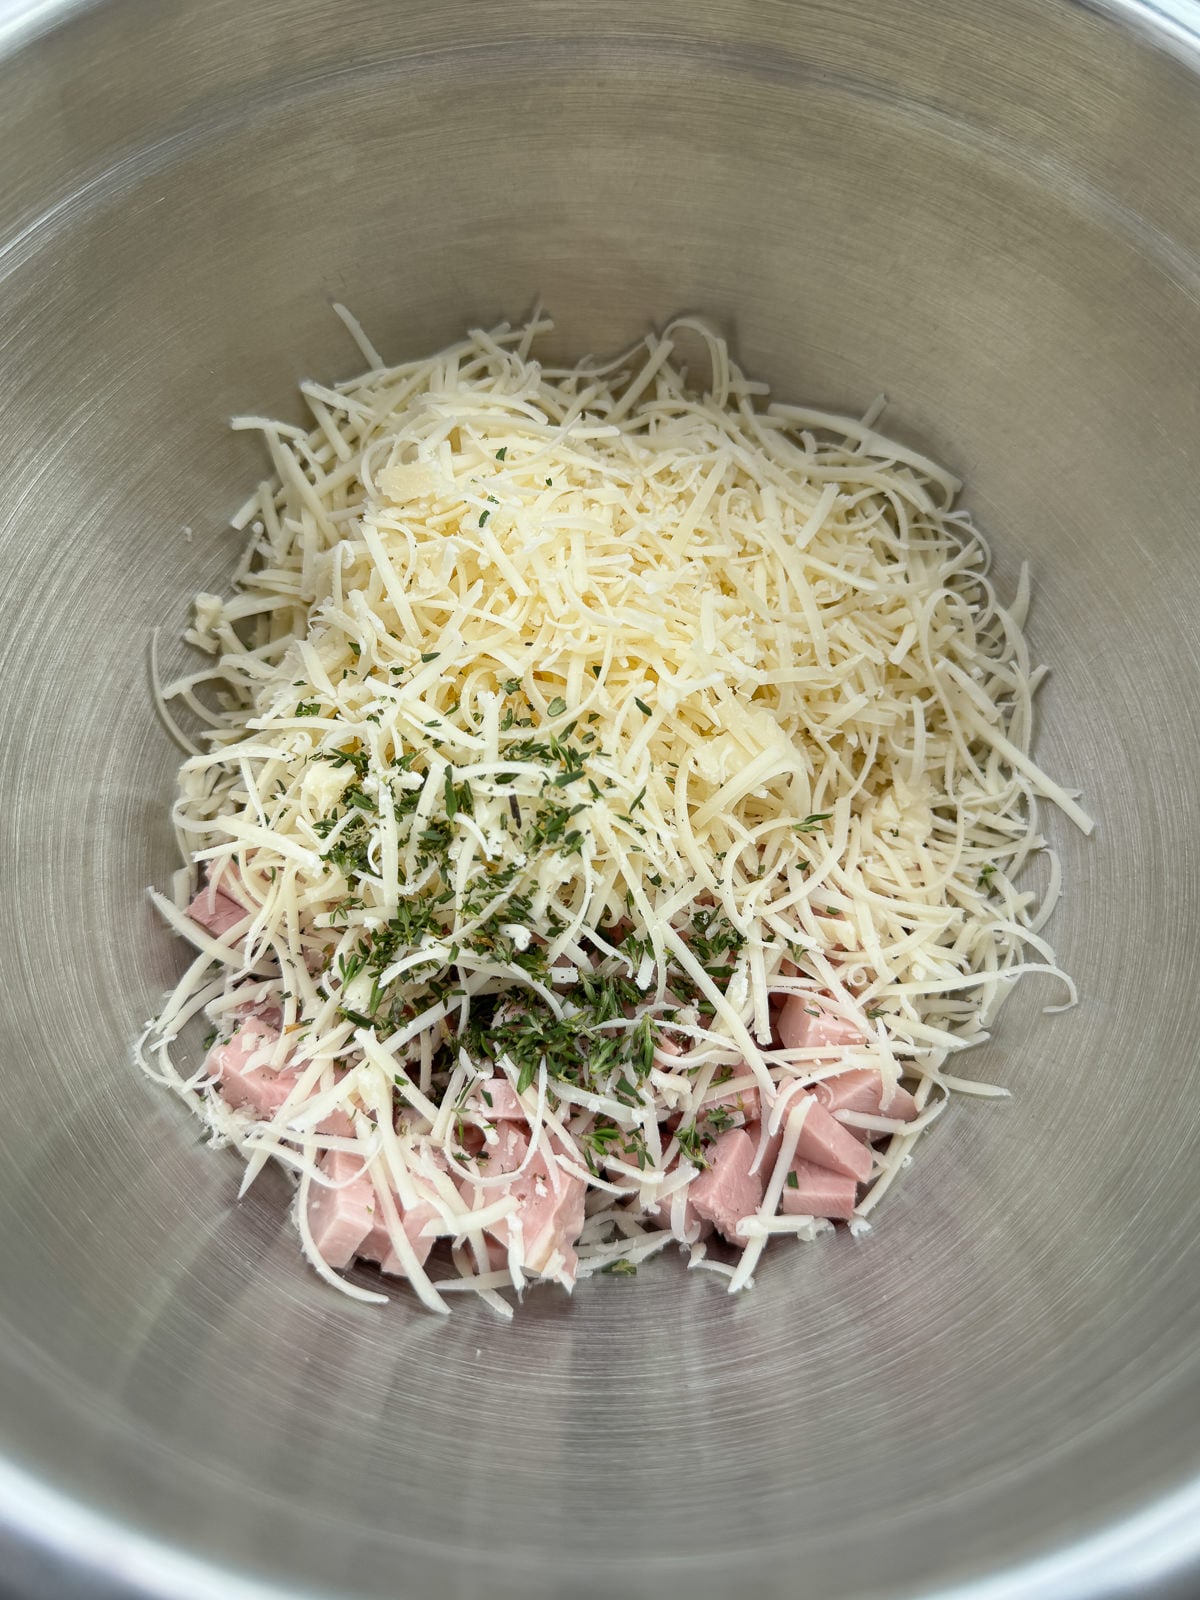
To evenly distribute the fillings through the quiche, it’s best to mix the ham and cheese together before adding into the pie crust. I’ve found that it’s best chop the ham into 1cm chunks and to grate the cheese on the fine side of a box grater, so that it melts properly. I also added some finely chopped thyme into the filling but this is optional.
4. Creme Fraiche Custard
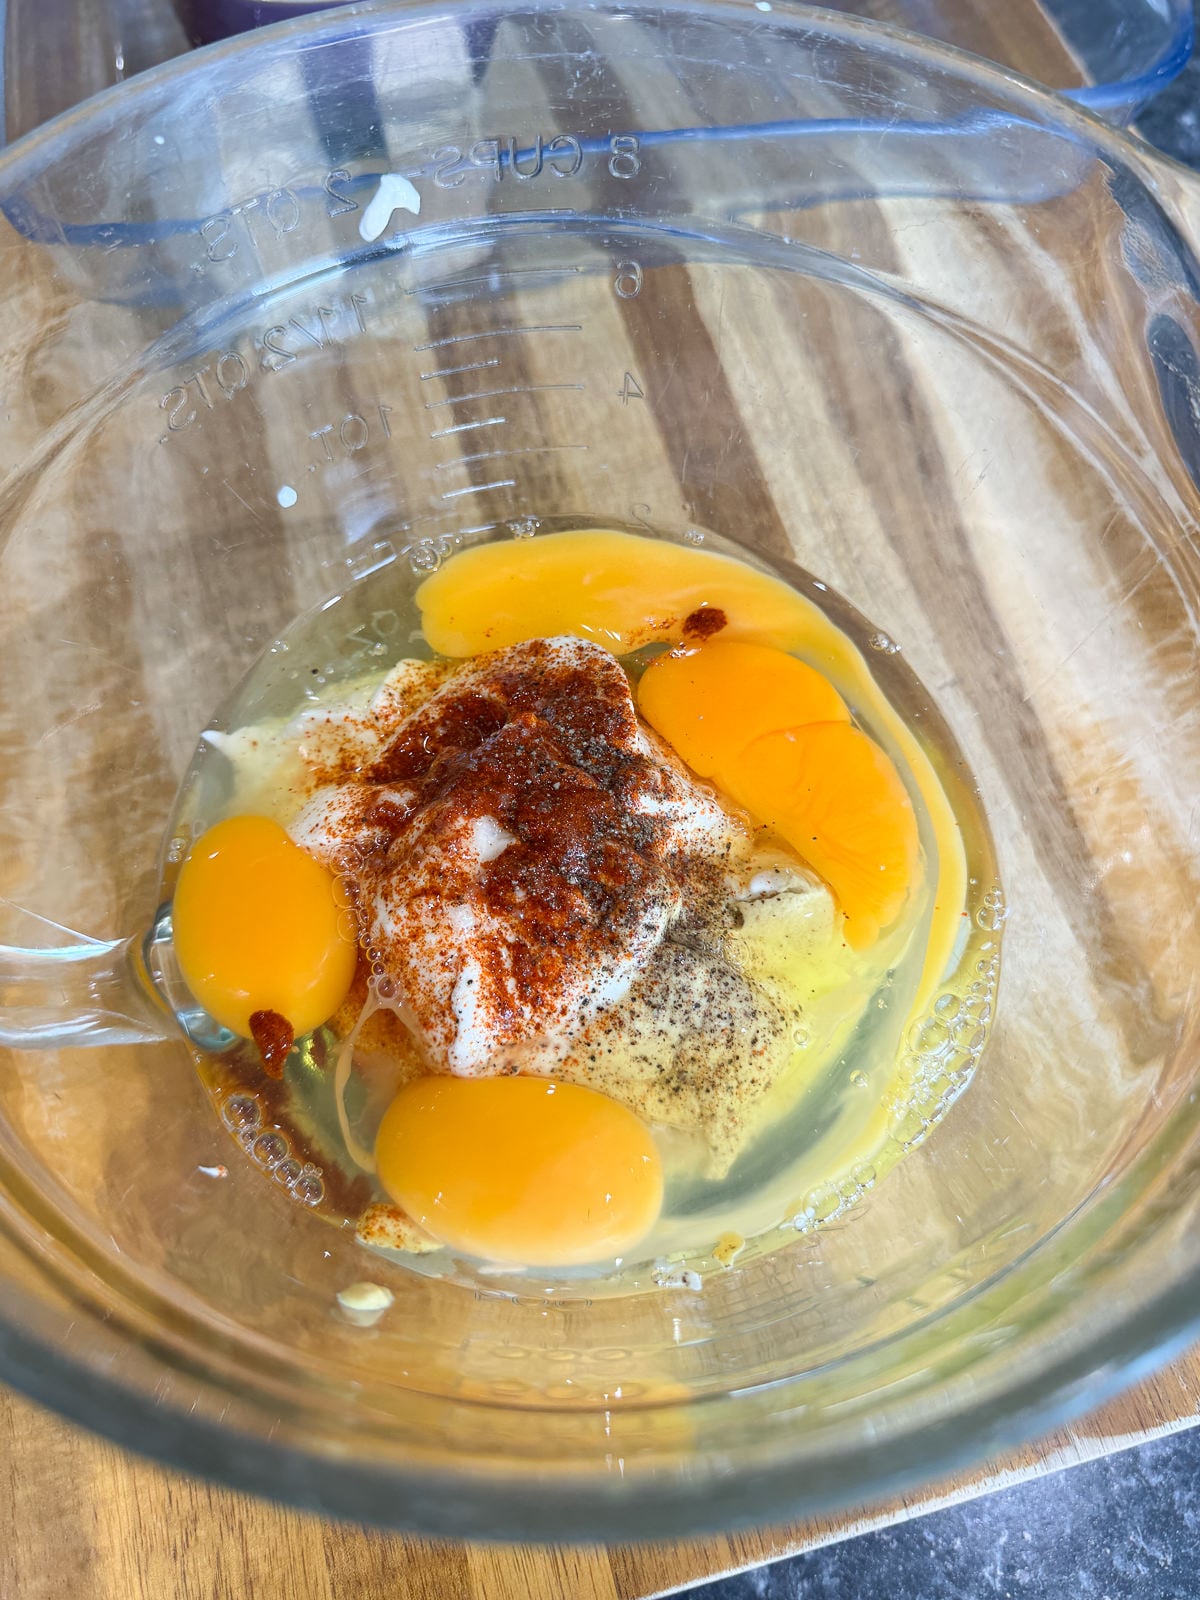
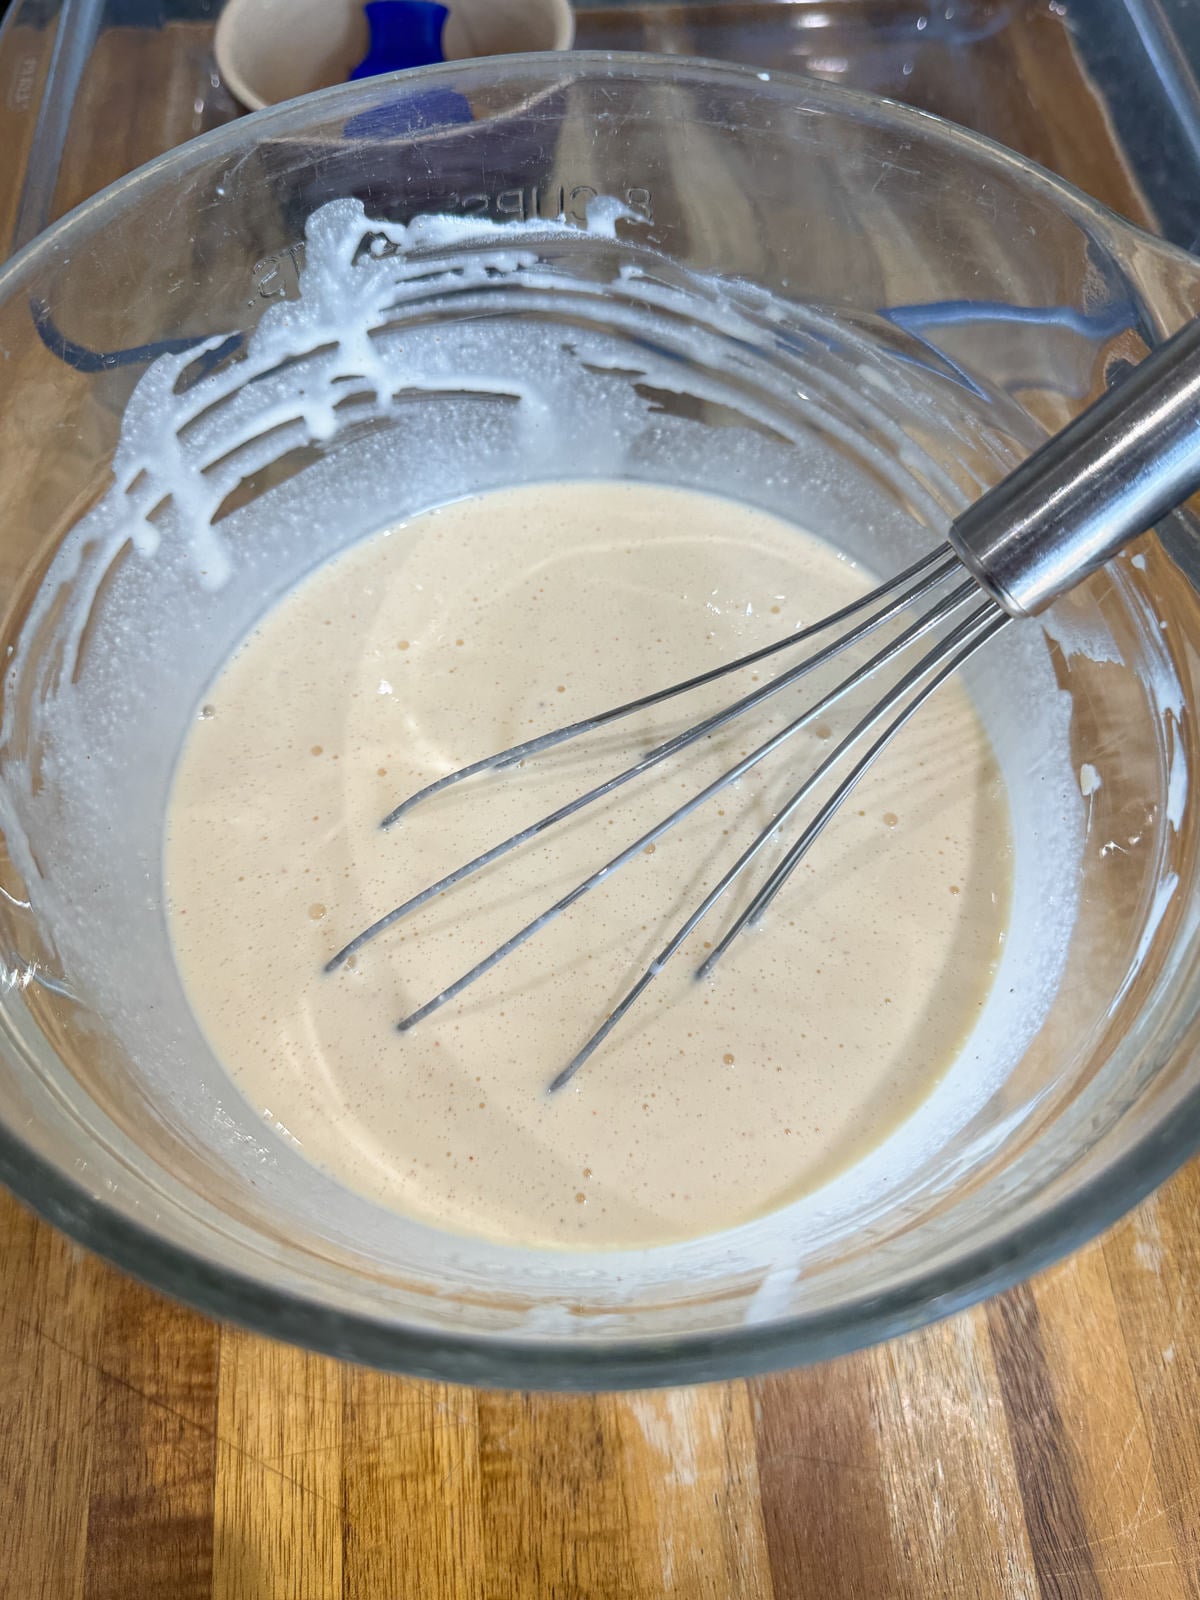
The great thing about this quiche custard is that it’s incredibly quick to make. All you do here, is add crème fraiche into a mixing bowl, along with eggs, mustard, smoked paprika, salt & pepper then whisk to combine. Then you add in double cream (or milk) then whisk again to bring it all together. That’s it!
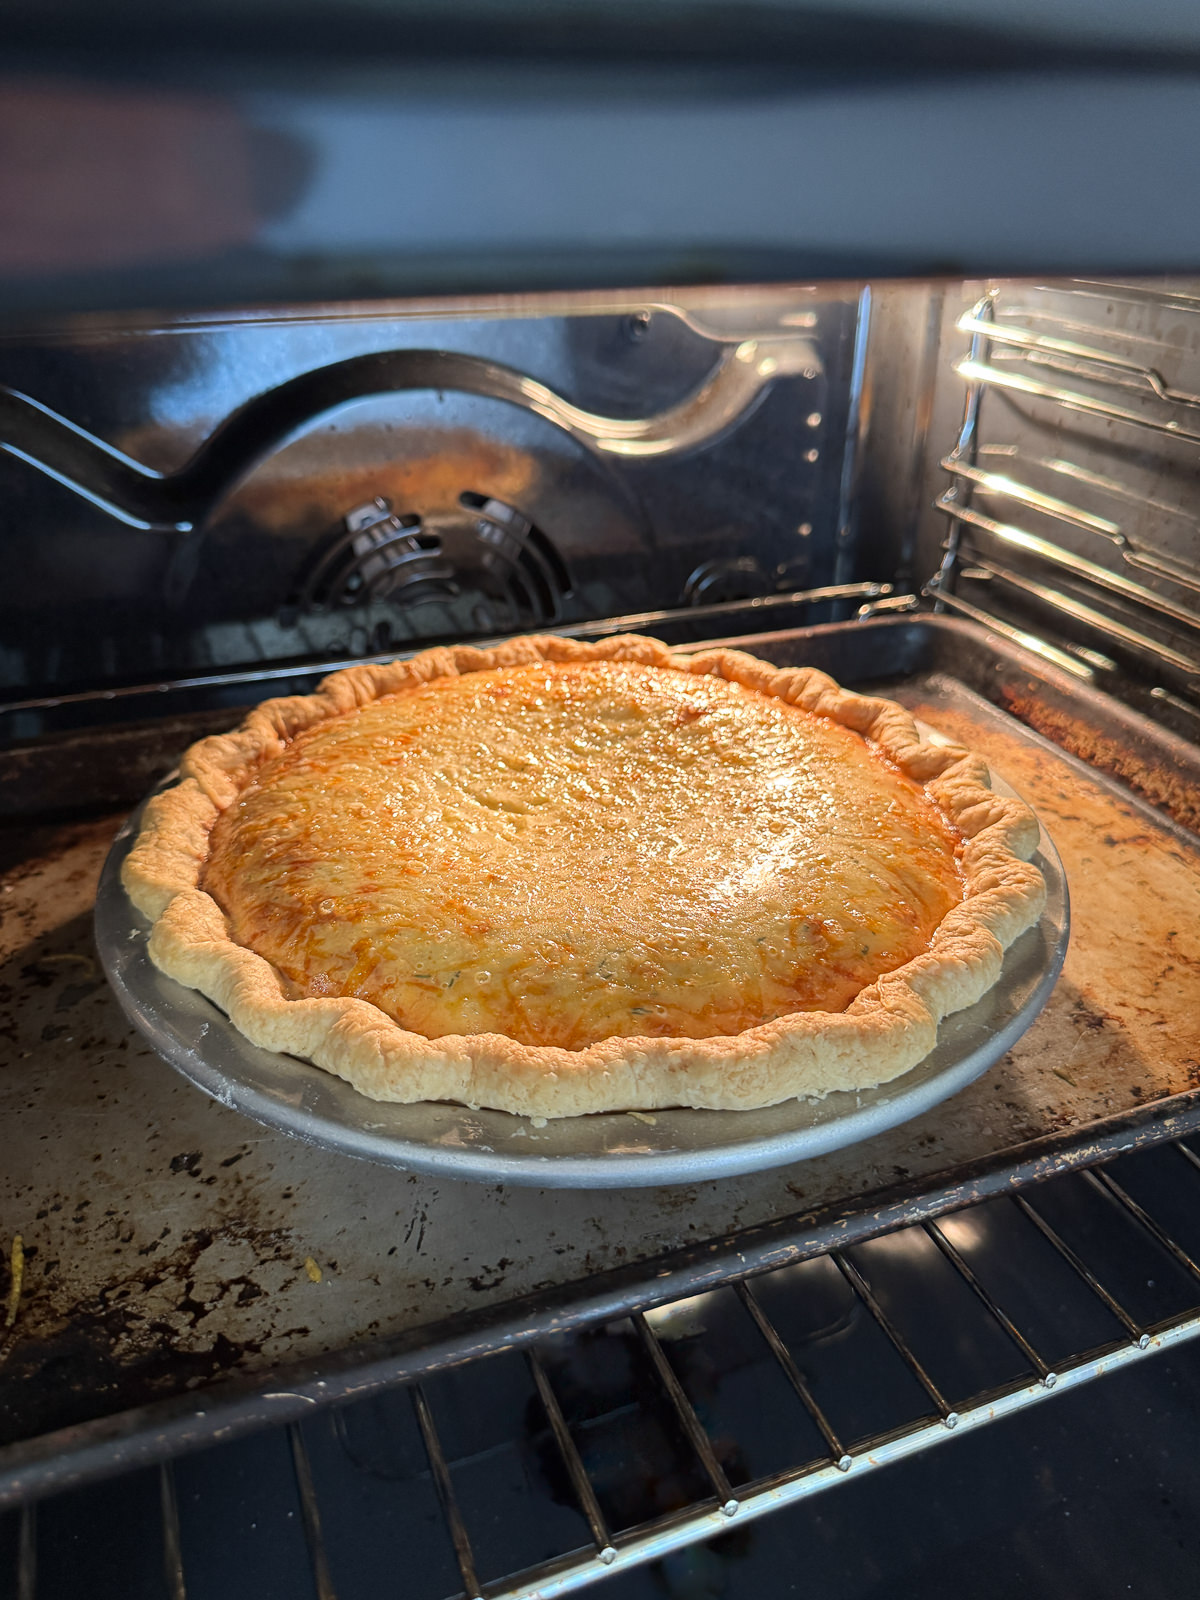
5. Baking
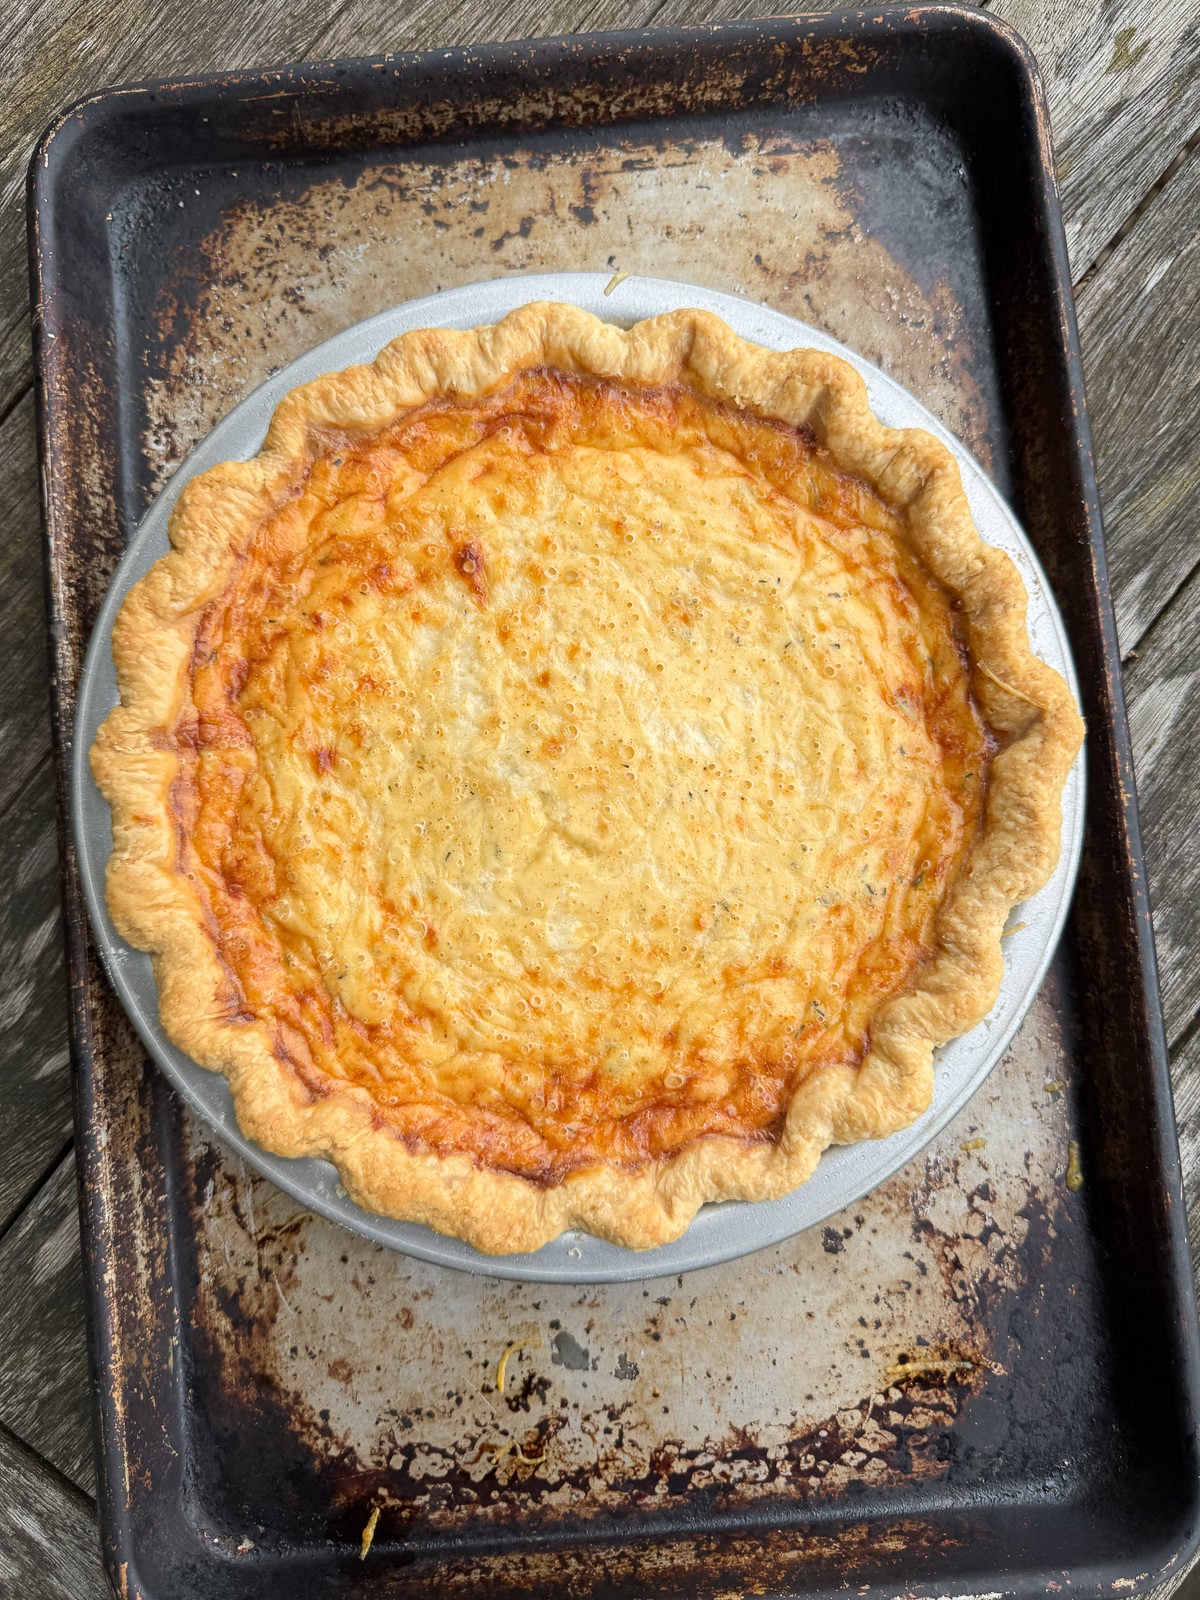
I bake my quiche at 180°c/356°f as I’ve found that this cooks the filling perfectly whilst browning the cheese on top (more on this below!). It’s key to bake the quiche until the filling is set but with a slight wobble in the centre. The filling will continue to bake after you take the quiche out of the oven then will set as it cools, so important not to over cook! You’ll end up with a rubbery, scrambled filling otherwise.
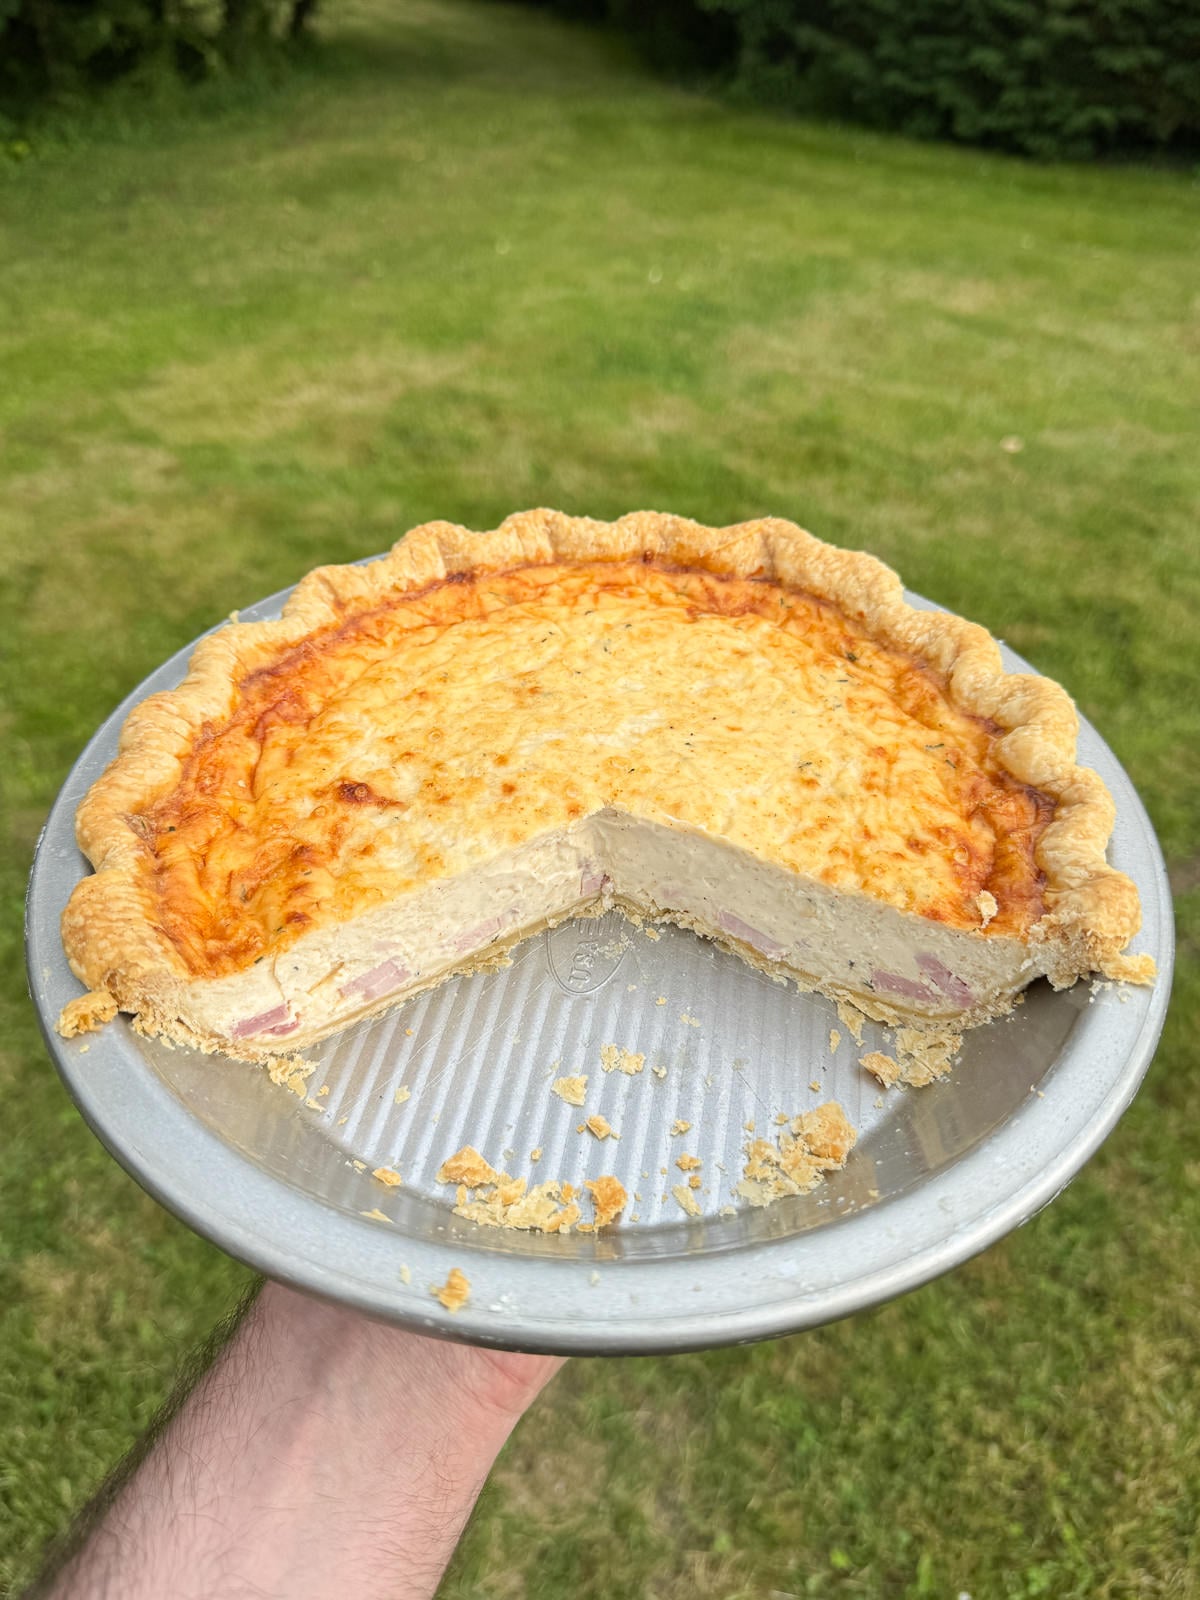
6. Cooling & Slicing
With this quiche, I’d highly recommend letting it cool completely then chill it in the fridge for at least a few hours before cutting into it. This just gives the filling plenty of time to set. Then you can serve it cold or reheat slices in the oven!
Recipe Development
Some recipes take quite a bit of testing & development to get perfect and I’ll only ever share a recipe on my blog that I’m 100% happy with. So I’ve decided to add a section on some of my recipes to show any changes, substitutions or techniques that I used for each version. Let me know if you find this interesting!
A homemade quiche doesn’t really have many components so once you’ve got a good crust, it’s more about using the best ratio of eggs & dairy and getting the cook right with the filling. I knew that I wanted my quiche to be made in a 9″ pie dish, with a flaky pie crust. Luckily I have a go-to recipe for this already, so that was sorted.
Custard Filling
With the filling, I knew I wanted to use creme fraiche in the custard as the creamy, tangy flavour works perfectly with the salty ham and nutty Swiss cheese. This was a fairly simple change to make, you just treat the creme fraiche as the dairy (instead of just milk/cream) then combine it with cream or milk to give it the correct consistency. I tried both milk & cream for this quiche and cream came out on top, as it gives the quiche a richer, creamier filling. The filling does work with milk though, so if you wanted a lighter quiche use whole or semi skimmed milk instead.
When you add mix ins to a quiche, you need to ensure that they’re cooked, especially if they’re watery ingredients as this will effect the texture of the custard. Fortunately, ham is cooked already and cheese melts into the filling. Through testing, I found that it’s best to grate the cheese on the finer side of a box grater otherwise it didn’t melt properly. The ham can be chopped pretty much any size but 1cm chunks won’t get lost in the custard.
Baking
Lastly, let’s talk about the baking times & temperatures. The first quiche I made, I baked the filling at a lower temperature of 170°c/338°f, which meant that by the time the custard was cooked, the cheese on top wasn’t golden. If I baked it enough to melt the cheese properly, the filling would’ve been over cooked. So for the next batch, I increased the oven temperature to 180°c/356°f and baked for slightly less time. This temperature was perfect, by the time the custard was set with a wobble, the top had turned a deep golden brown!
Serving Suggestions
Quiche is really good served on its own and be served hot, cold or at room temperature. To serve this ham and cheese quiche as a hearty main meal, you could serve it with a simple green salad, crispy sautéed new potatoes, steamed vegetables or some homemade bread. For a ham and cheese quiche, I’d highly recommend serving a spoonful of English mustard or Branston pickle on the side!
Reheating
In my opinion, this ham & cheese quiche is best served warm as the cheese will be melty, although it’s good served cold or at room temperature too. The best way to reheat quiche is to place slices onto a baking tray then bake at 175°c/350°f for 10-15 minutes until hot. To serve at room temperature, let slices of quiche sit out of the fridge for 15-20 minutes before serving.
Frequently Asked Questions
Par bake the pie crust on a grid shelf placed onto the floor of the roasting oven. To bake the quiche filling, cook in the baking oven, on the bottom set of runners.
Ham and cheese quiche needs to be stored in the fridge & is best eaten within 3 days. You can also freeze quiche once it has been baked & cooled (whole or in slices) and it will keep for up to 3 months. Make sure to let the quiche defrost completely in the fridge before serving.
In order to cook the pastry properly, yes you will have to blind the crust. If you don’t blind bake, the filling will be cooked before the pastry, making the crust soggy and un cooked.
Quiche is cooked when the filling is set but still has a slight wobble in the middle. The filling will continue to cook after it’s been taken out of the oven so it’s key to take it out when the filling isn’t completely firm. The egg will turn rubbery & scrambled if the filling is over cooked.
More Dinner Recipes To Try
- Tex-Mex Chicken & Pineapple Nachos
- Hoisin Honey Fried Chicken Drumsticks
- Gochujang Fish Cakes
- Sticky Toffee Glazed Ham
- Honey Roast Ham, Egg & Chips
- Smoked Beef Short Rib, Guinness & Bone Marrow Pie
If you have enjoyed this ham & cheese quiche recipe, it would mean a lot if you could leave a review & rating. And if you’d like to stay up to date with future recipes, follow us on Instagram & TikTok or subscribe to our newsletter!

Honey Roast Ham & Swiss Cheese Quiche
Equipment
- 9" Pie Dish
- Large Baking Tray
- Mixing Bowls
- Cheese Grater
- Rolling Pin
- Baking Beans/Rice
Ingredients
Pie Crust
- 220 g Plain Flour
- ½ tsp Table Salt
- 90 g Unsalted Butter (Cold & Diced)
- 60 g Lard (Cold & Diced)
- 30 g Ice Cold Water
- 1 tsp Apple Cider Vinegar
- 1 Egg Yolk (For Blind Baking)
Quiche Filling
- 150 g Gruyere (Or Another Swiss Cheese)
- 130 g Honey Roast Ham (See Notes)
- 1 tsp Finely Chopped Thyme (See Notes)
- 300 g Creme Fraiche (Room Temperature)
- 4 Large Eggs (55g Each Out Of The Shell)
- 2 tsp Dijon Mustard
- ¼ tsp Fine Sea Salt
- ¼ tsp Smoked Paprika
- Freshly Cracked Black Pepper
- 150 g Double Cream
Instructions
Pie Crust
- Place the flour & salt into a mixing bowl, whisk together then add in the butter & lard. Rub the fats into the flour by hand until the mix resembles coarse breadcrumbs but with some larger chunks of fat still visible.Don't make the fats too small! The larger chunks are what makes the pie crust flaky.
- Add in the cold water & vinegar then mix by hand to make a rough dough.
- Tip the dough out onto a clean work surface & knead gently until smooth (be careful not to overwork the pastry) then flatten into a disc & wrap in clingfilm. Refrigerate for at least 2 hours.
Rolling Out
- Take the pastry out of the fridge & leave to sit at room temperature for 10-15 minutes. This makes the pastry more pliable & easier to roll out.
- Roll the pastry out on a lightly floured work surface into a disc that's around 4mm thick. For a 9" pie dish, your disc of pastry should be around 12" wide.Lightly dust the top of the pastry with flour as well, to stop your rolling pin from sticking! Don't use too much flour though as this can dry the pastry out.
- Carefully roll the pastry around your rolling pin then unroll into a 9" pie tin. Gently press the pastry into the tin, letting the excess pastry overhang the pie dish by a couple of centimetres. Use a pair of scissors to trim any excess pastry off if necessary.
- Next, take the overhanging pastry & tuck it underneath itself, so that the edge of the pie crust sits flush with the edge of the dish. We're looking to make a thicker crust around the edge so that we can crimp it.A small amount of the overhanging pastry might go down the inside edge of the pie dish as you fold it to form the crust. This is totally fine!
- Next, use your fingers or a fork to crimp the pastry along the edge of the pie dish. Chill the pie crust in the fridge for at least 2 hours before baking, or for up to 3 days. I went for a fluted edge for my quiche but crimp yours however you like!
Blind Baking
- Preheat an oven to 200°c/392°f (180°c/356°f fan). Place a large metal baking tray into the oven now as well, so that it can heat up. We'll be baking the pie crust on top of the tray, so that the base cooks properly.Make sure to give your oven & the tray plenty of time to fully saturate with heat. This is key to baking a crisp, flaky pie crust!
- Next, take a large piece of baking parchment, scrunch it up then place inside your pie crust. Fill the crust with baking beans (or uncooked rice) then place the pie dish onto the tray that's in the oven.
- Bake the pie crust for 20-25 minutes, until the edges are starting to turn a light golden brown. If you carefully lift the parchment up, the pastry shouldn't be stuck and should look dry on the surface.
- Next, carefully lift the baking parchment & baking beans out of the pie crust and set aside to cool. Then return the pie crust to the oven and bake for another 4-6 minutes, until the inside is a very light golden brown.
- Once baked, let the pastry cool for a couple of minutes then brush a thin layer of egg yolk over the bottom & sides (not the top edge!), to seal up any holes.
- Place the pie crust back into the oven then bake for another 30 seconds – 1 minutes to set the egg. Be careful not to over bake as the egg will scramble.
- Set the blind baked crust to one side whilst you prepare the filling. You'll also need to turn your oven down to 180°c/356°f (160°c/320°f fan).Turn the oven down as soon as the pie crust comes out! Keep the pie crust on the tray, as it will be easier to place back into the oven once it's filled.
Quiche Filling
- First, grate the cheese on the fine side of a box grater. Set 40 grams to one side, for sprinkling on top of the quiche. Place the remaining cheese into a mixing bowl.
- Cut the ham into 1cm cubes then add into the bowl with the cheese, along with the chopped thyme. Give this a stir to combine (I use my hands for this).
- Next, add the creme fraiche, eggs, mustard, salt & paprika into a separate mixing bowl. Season with a generous amount of freshly cracked black pepper then whisk to combine.
- Pour the cream into the eggs then whisk again, to incorporate. Be careful not to over whisk the custard though!
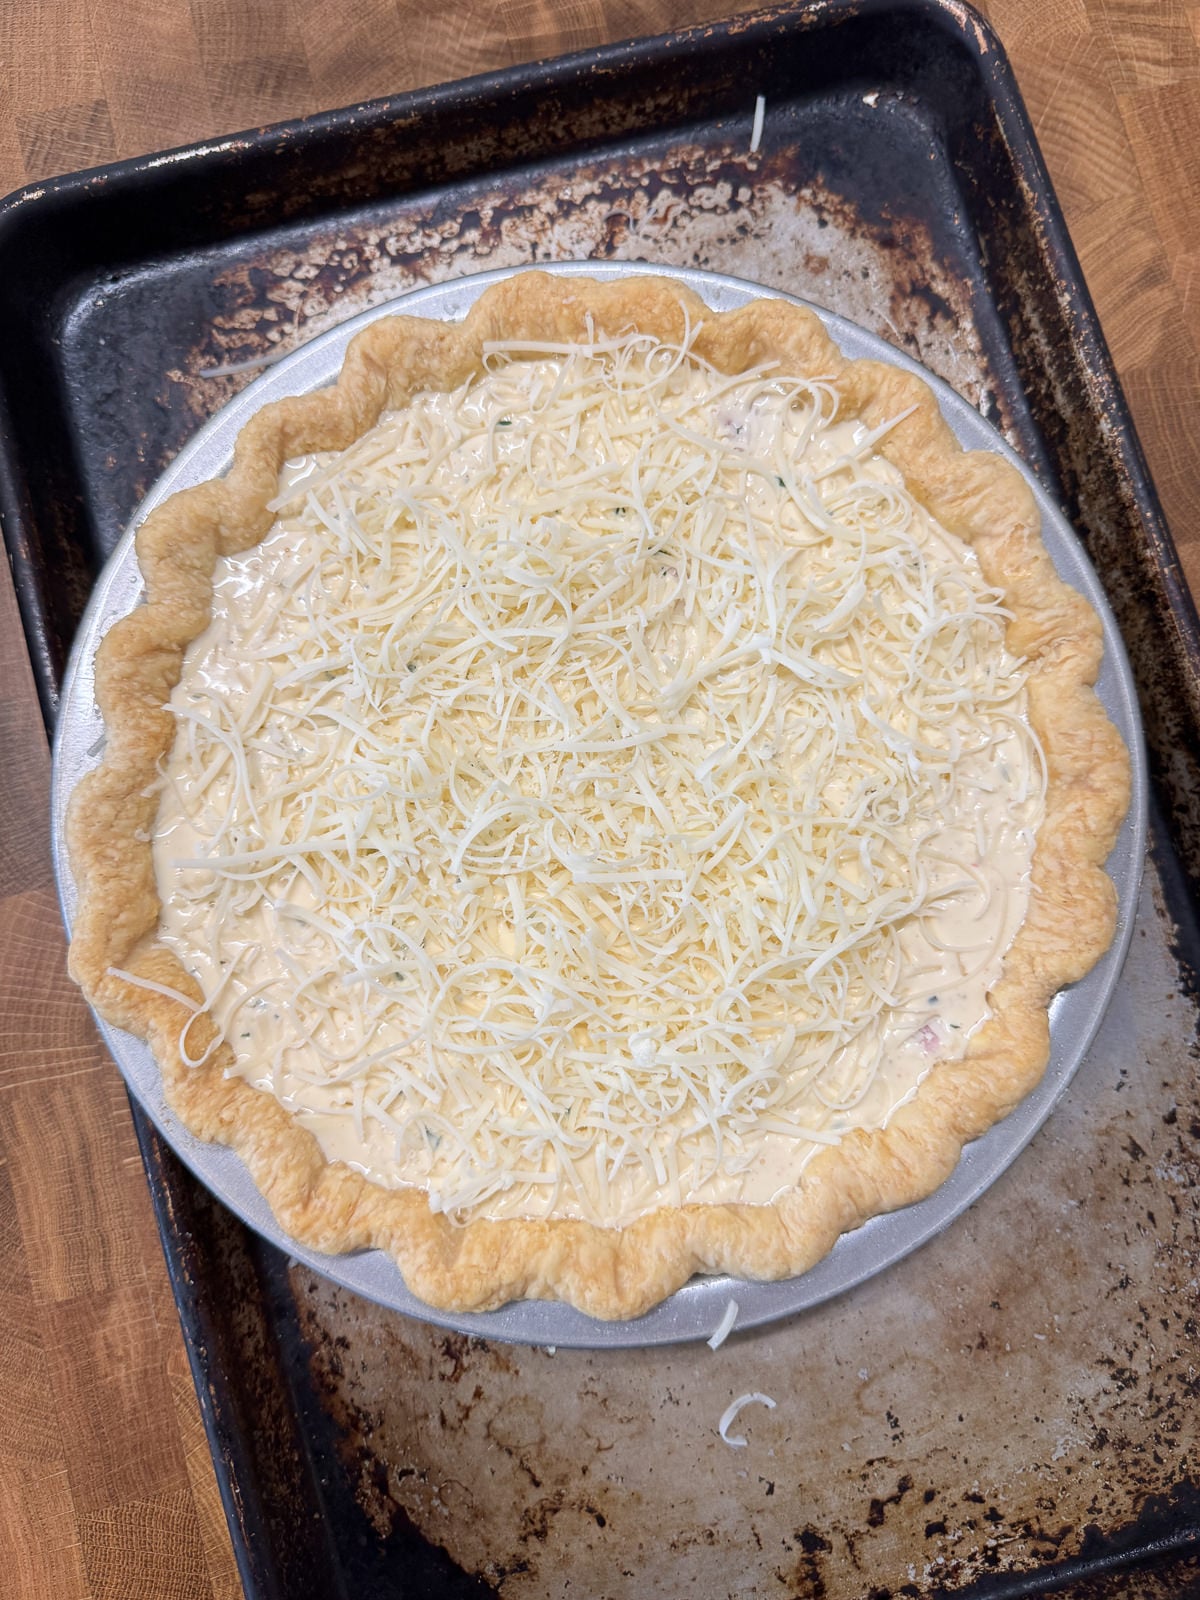
- Next, add the ham & cheese mix into the blind baked pie crust, making sure that the ham is well distributed then pour the custard over the top.
- Sprinkle the reserved grated cheese on top of the quiche then bake for 45-50 minutes, until the filling is set but with a slight wobble in the centre. Be careful not to over bake the filling!
- Once baked, let the quiche cool completely then refrigerate for at least 4 hours before cutting. For the cleanest slices, wipe your knife clean between cuts.
Notes
❤️ Stay connected with Salt Butter Smoke
The Prep List is my free weekly newsletter with seasonal recipes, kitchen notes and behind-the-scenes from my kitchen. Add Salt Butter Smoke as a Google Preferred Source to see more of my recipes in Search.