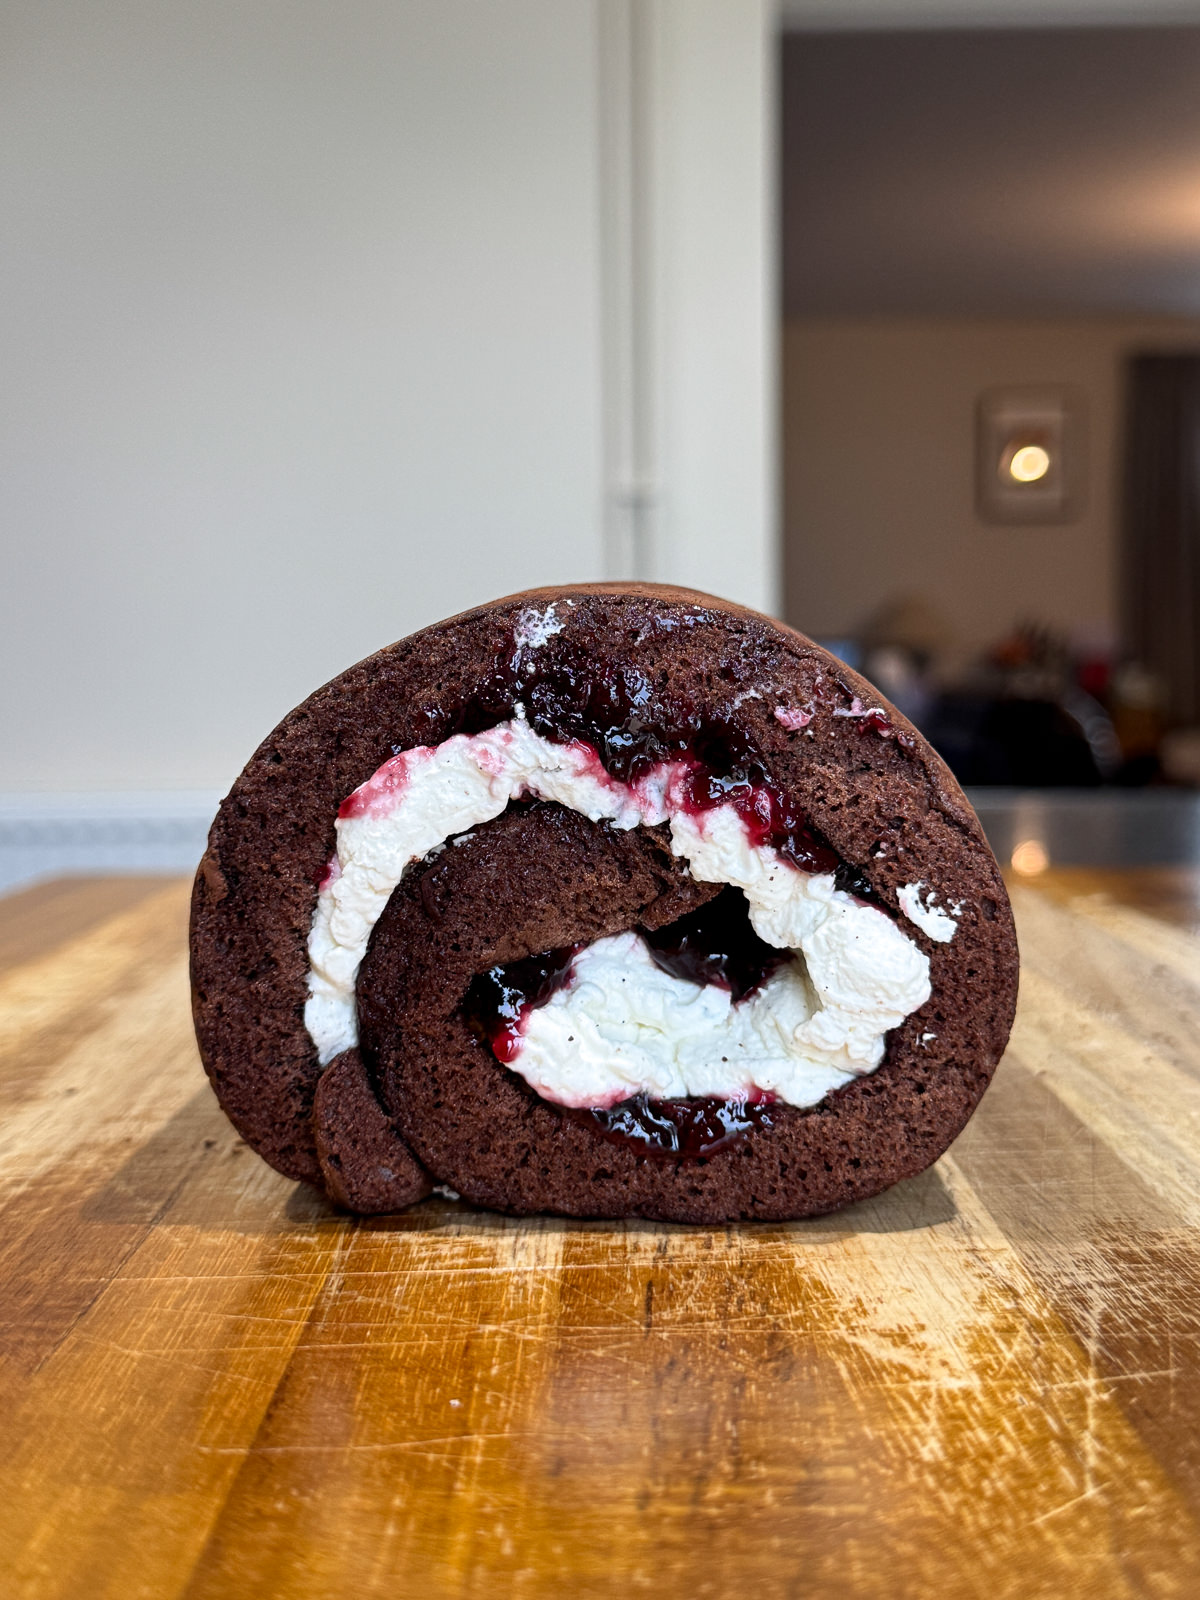
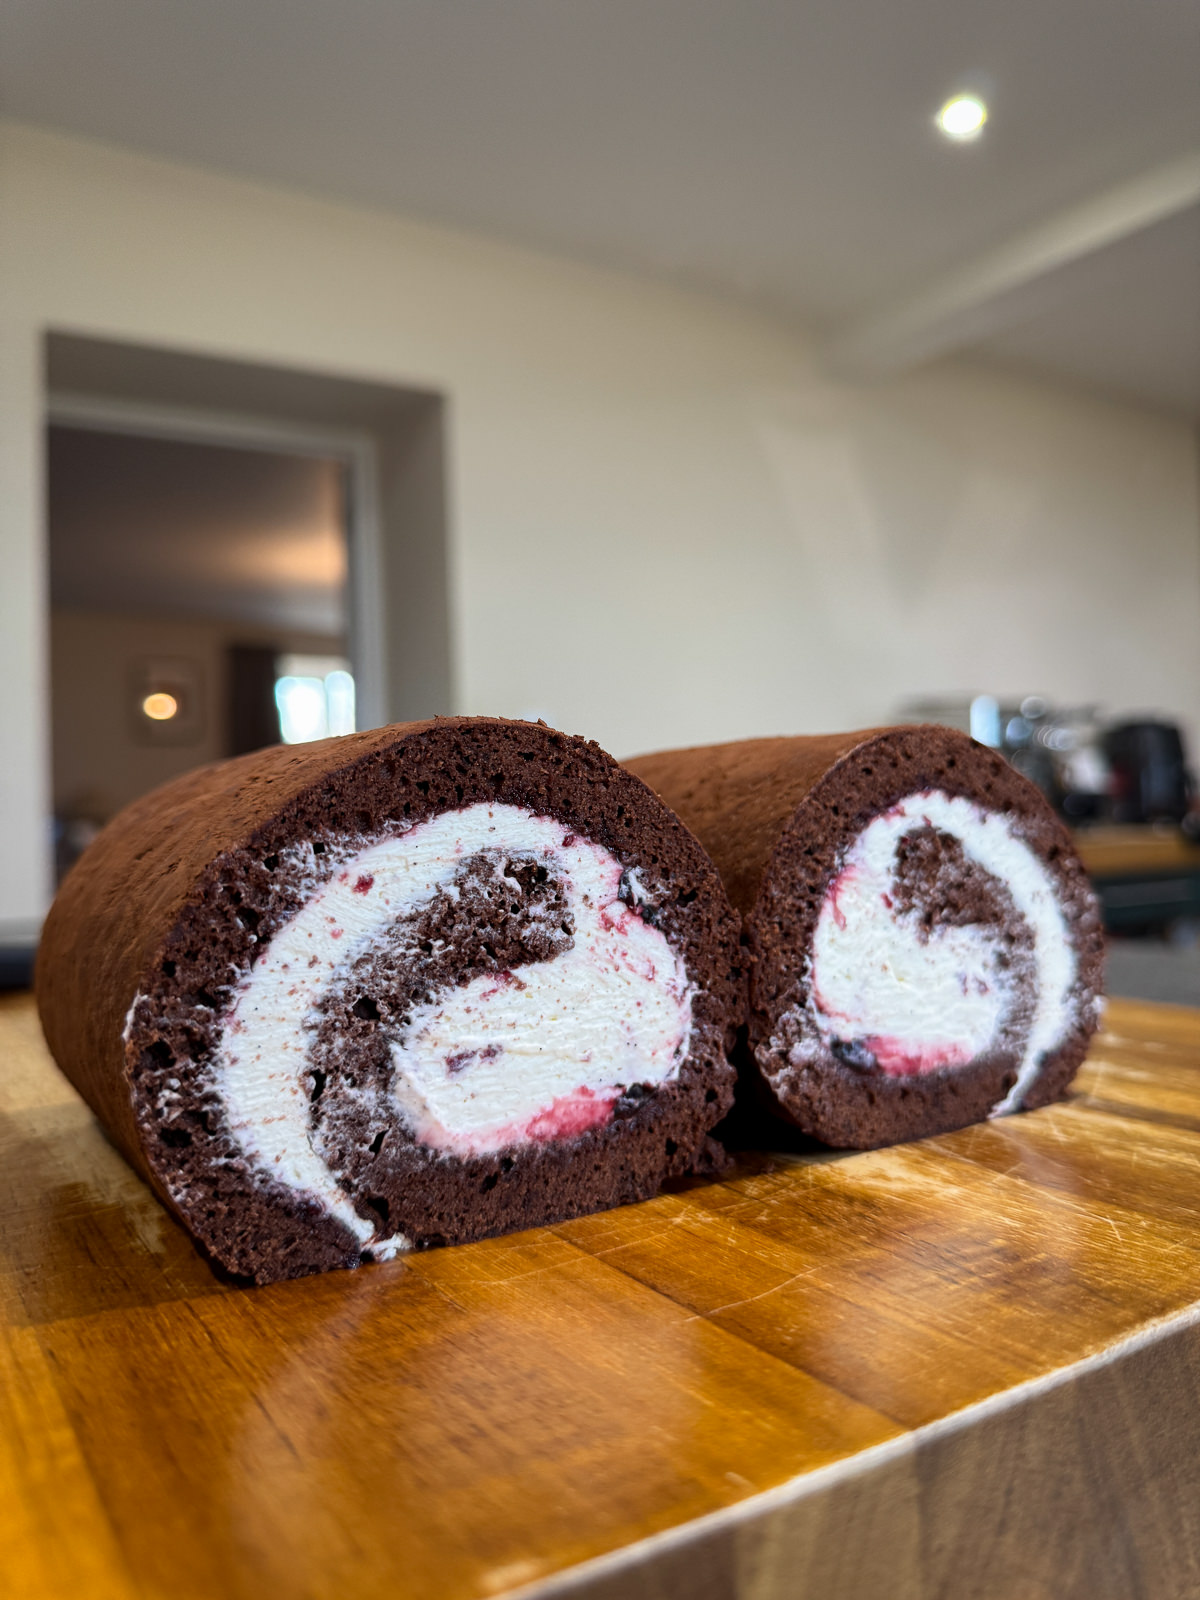
Chocolate Cherry Swiss Roll
A soft chocolate Swiss roll, filled with cherry jam & a lightly sweetened, fluffy vanilla mascarpone whipped cream. This is a black forest version of the classic dessert!

Here’s a chocolate & cherry, black forest version of a classic Swiss roll! There’s a soft & fluffy chocolate sponge, a layer of black cherry jam & a generous amount of vanilla whipped cream, which we’re stabilising with mascarpone so it keeps it’s fluffy texture for longer!
This recipe has quickly become a family favourite, which is good because I’ve made many batches of this Swiss roll (seriously a lot!) during my quest for Swiss roll perfection! You can’t really complain when it’s your job to develop recipes though & I’d gladly makes & eat this cake anytime, it’s that good. Plus, it’s super easy to prepare. And great for trifles!
In this post, I’ve included some handy tips & tricks for making a perfect Swiss roll, without any cracks. There’s also a troubleshooting guide for some common issues that people get when making a Swiss roll (by people, I mean me!). I’ve tried to make it as easy as possible for anyone to make a really good Swiss roll at home, whilst avoiding tearing, under baking or over mixing!
For more cakes & bakes, check out our ever growing collection of baking recipes! There’s lots to choose from here, from classic sponge cakes to brownies, cookies & blondies.
What You’ll Need
- Cocoa Powder – For the best, richest flavour, make sure to use Dutch processed cocoa powder for the sponge. This can be found in most supermarkets. If you’re in the UK, I’d recommend Green & Black’s.
- Eggs – You’ll need large eggs for the Swiss roll batter. Large eggs should each weigh around 55 grams out of the shell. This means that in total, you’ll need 150g of whites & 70g of yolks. It’s best not to use super fresh eggs as they don’t whisk as well as slightly older ones.
- Oil – Adding a neutral oil (we’re using vegetable oil) to Swiss roll batter makes it easier to roll without tearing or cracking. It makes the sponge more flexible!
- Milk – Adding a small amount of milk in the cake batter gives it the ideal consistency & makes the sponge soft, tender & moist.
- Sugar – We’re using caster sugar for the Swiss roll sponge & icing sugar for the whipped cream.
- Flour – You’ll need plain flour (all purpose) for the cake batter. We’re adding a small amount of baking powder to the batter but less than what is in self raising flour!
- Espresso Powder – Adding espresso powder to chocolate cake enhances the flavours from the chocolate. I like to make my own but you can buy it from the supermarket/online as well. You can also leave it out completely as well if you haven’t got any.
- Baking Powder – You’ll only need to use a small amount of baking powder when making Swiss roll batter.
- Cream Of Tartar – Used to make a more stable meringue. You’ll only need a quarter teaspoon.
- Salt – We’re using table salt for the cake batter.
- Cherry Jam – The cherry part of this Swiss roll! I used a good quality shop bought cherry jam (Bonne Mamam black cherry) but you could use homemade jam instead.
- Whipped Cream – The filling for this Swiss roll is a lightly sweetened vanilla whipped cream that’s stabilised with mascarpone.
How To Make A Chocolate Cherry Swiss Roll
Although Swiss rolls aren’t too tricky to make, there’s a couple of common issues that can happen, including cracking, tearing & under baking! Luckily these are all easily avoided & I’ve made my recipe as easy to follow as possible.
Making The Sponge
A classic chocolate Swiss roll sponge is made by whisking egg yolks & whites separately with sugar then gently folding in flour, cocoa powder, baking powder & salt. I’ve added some neutral vegetable oil to this batter to make the sponge more flexible, as well as some milk to make the sponge softer.
A note on Swiss roll tins: For this recipe, I used a Nordic Ware Swiss roll/jelly roll tin that measures 15″ x 10.5″ x 1″. Other brands will work but make sure to use a tin that measures as closely to this as possible!
- We’re baking this Swiss roll at 175°c/347°f. Make sure to preheat your oven well ahead of time as the batter only takes a short amount of time to prepare. You’ll also need to grease & line a Swiss roll tin with baking parchment.
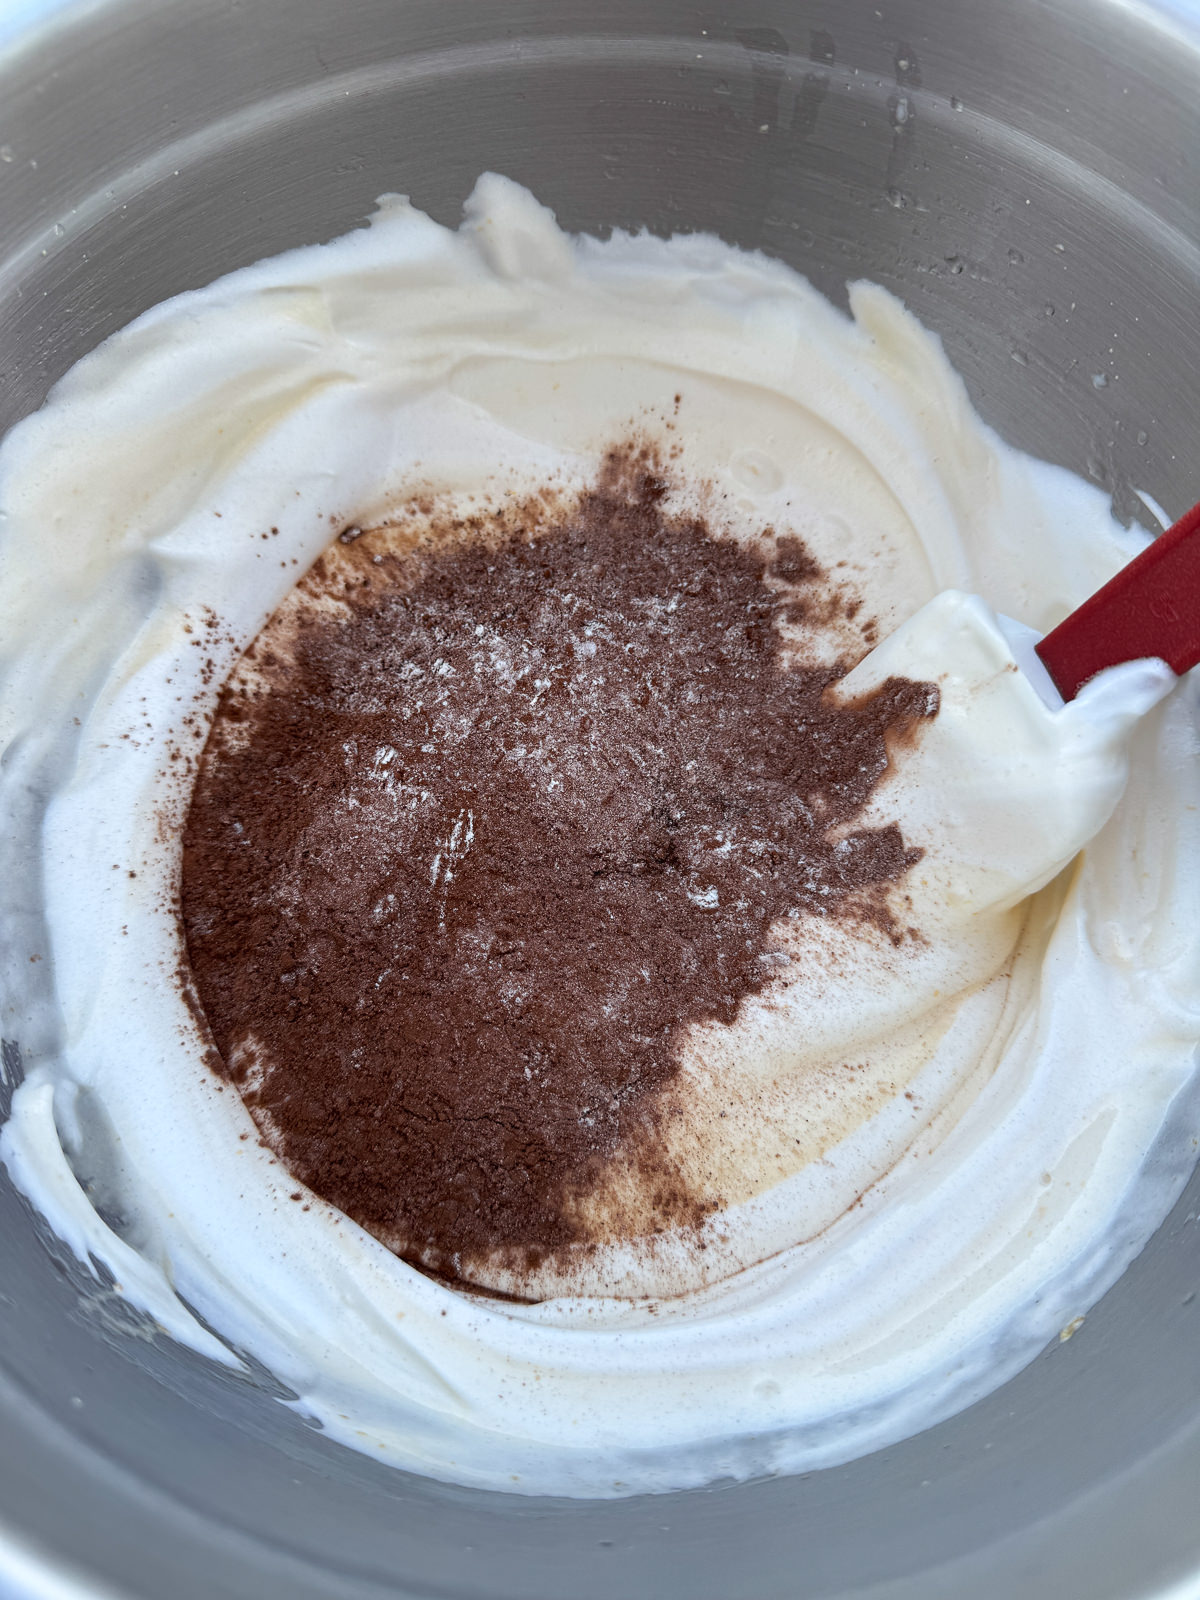
- First, we’re going to sift the flour, cocoa powder, espresso powder & salt into a mixing bowl, whisk to combine thoroughly then set to one side. You’ll need the sieve again, so don’t get rid of it!
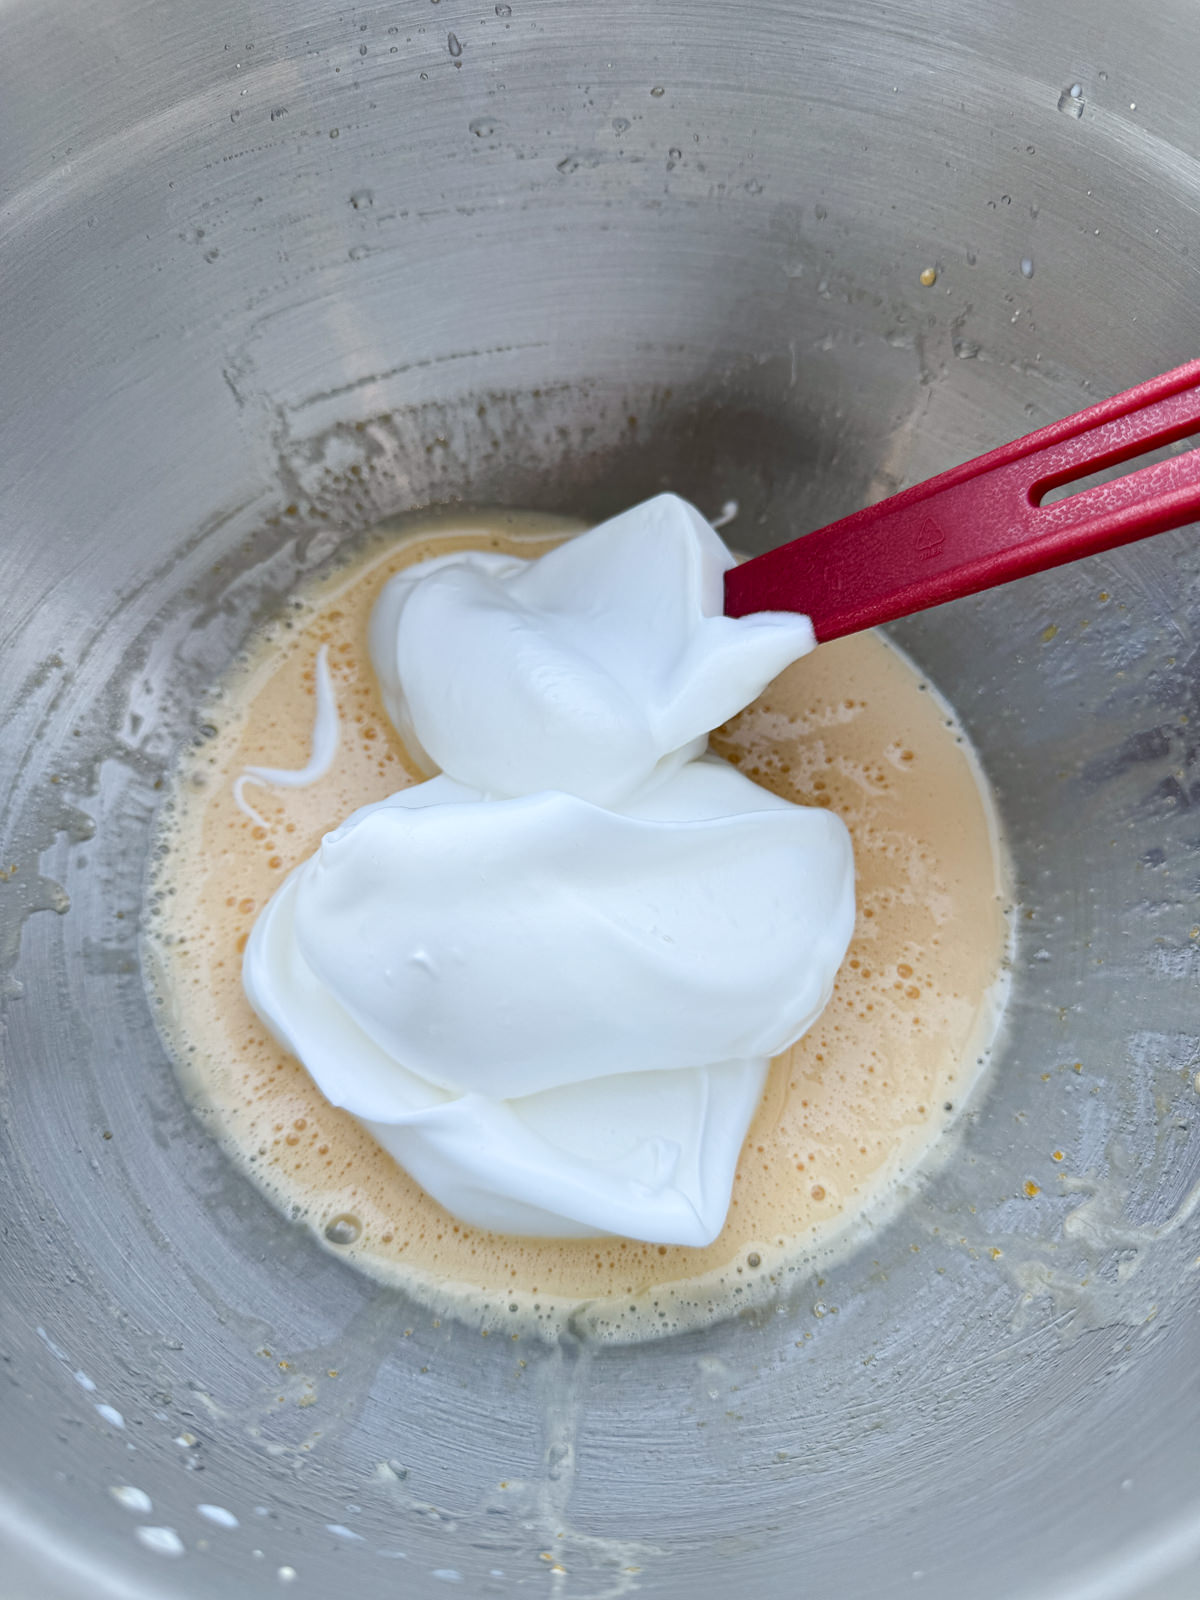
- Next, we need to separate the eggs. The yolks go into a large mixing bowl with 50 grams of the caster sugar. The whites go into the bowl of a stand mixer with a quarter teaspoon of cream of tartar.
- We’re going to whisk the yolks first with an electric hand mixer until they’re pale & fluffy, which will take 4-5 minutes. Then we’re going to mix in the veg oil, milk & vanilla extract.
- Then it’s onto the whites. We’re basically making a meringue here, so we whisk them on a medium speed to soft peaks, gradually add in the rest of our caster sugar then continue whisking to medium peaks. Once the sugar has been added, the meringue will take around 3-4 minutes to reach medium peaks.
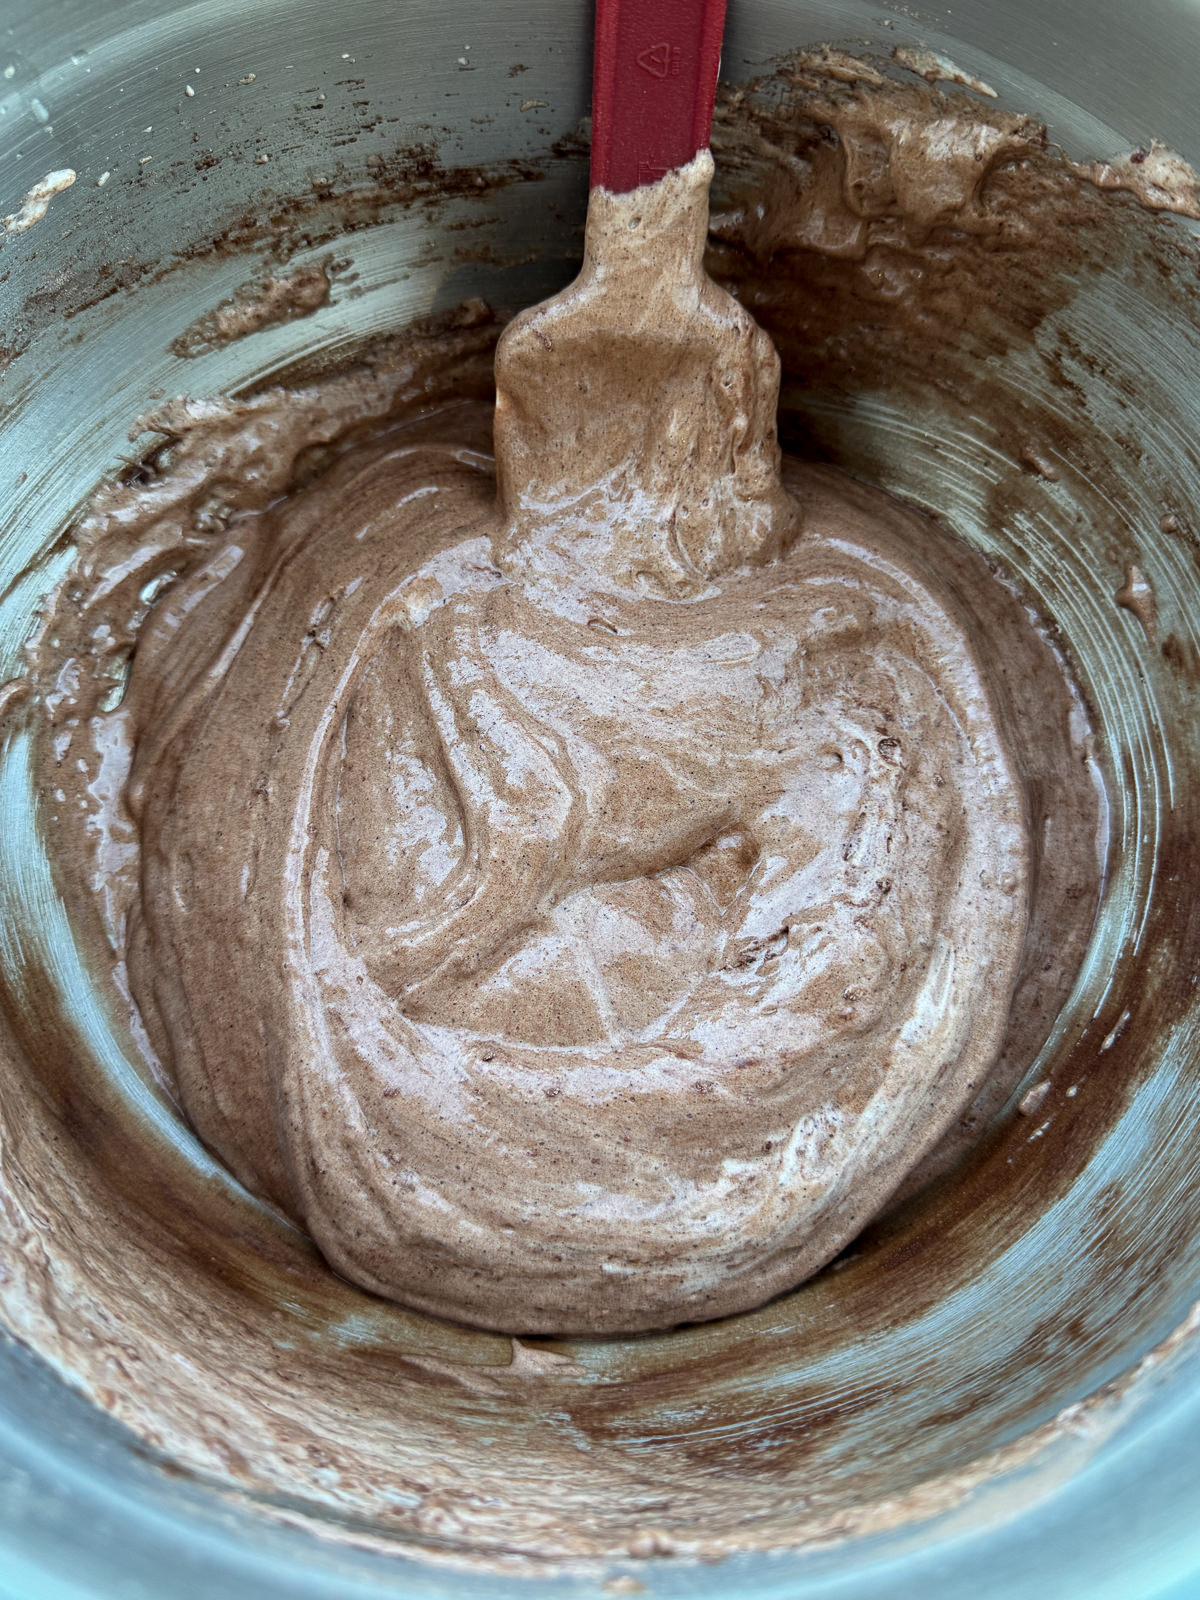
- Now to bring the batter together. To do this, we gently fold the meringue into the yolks in 2 additions, until mostly combined. Then we sift half of the dry ingredients in, fold again then sift the rest in then fold until just combined. It’s key not to over mix the batter when folding it together!
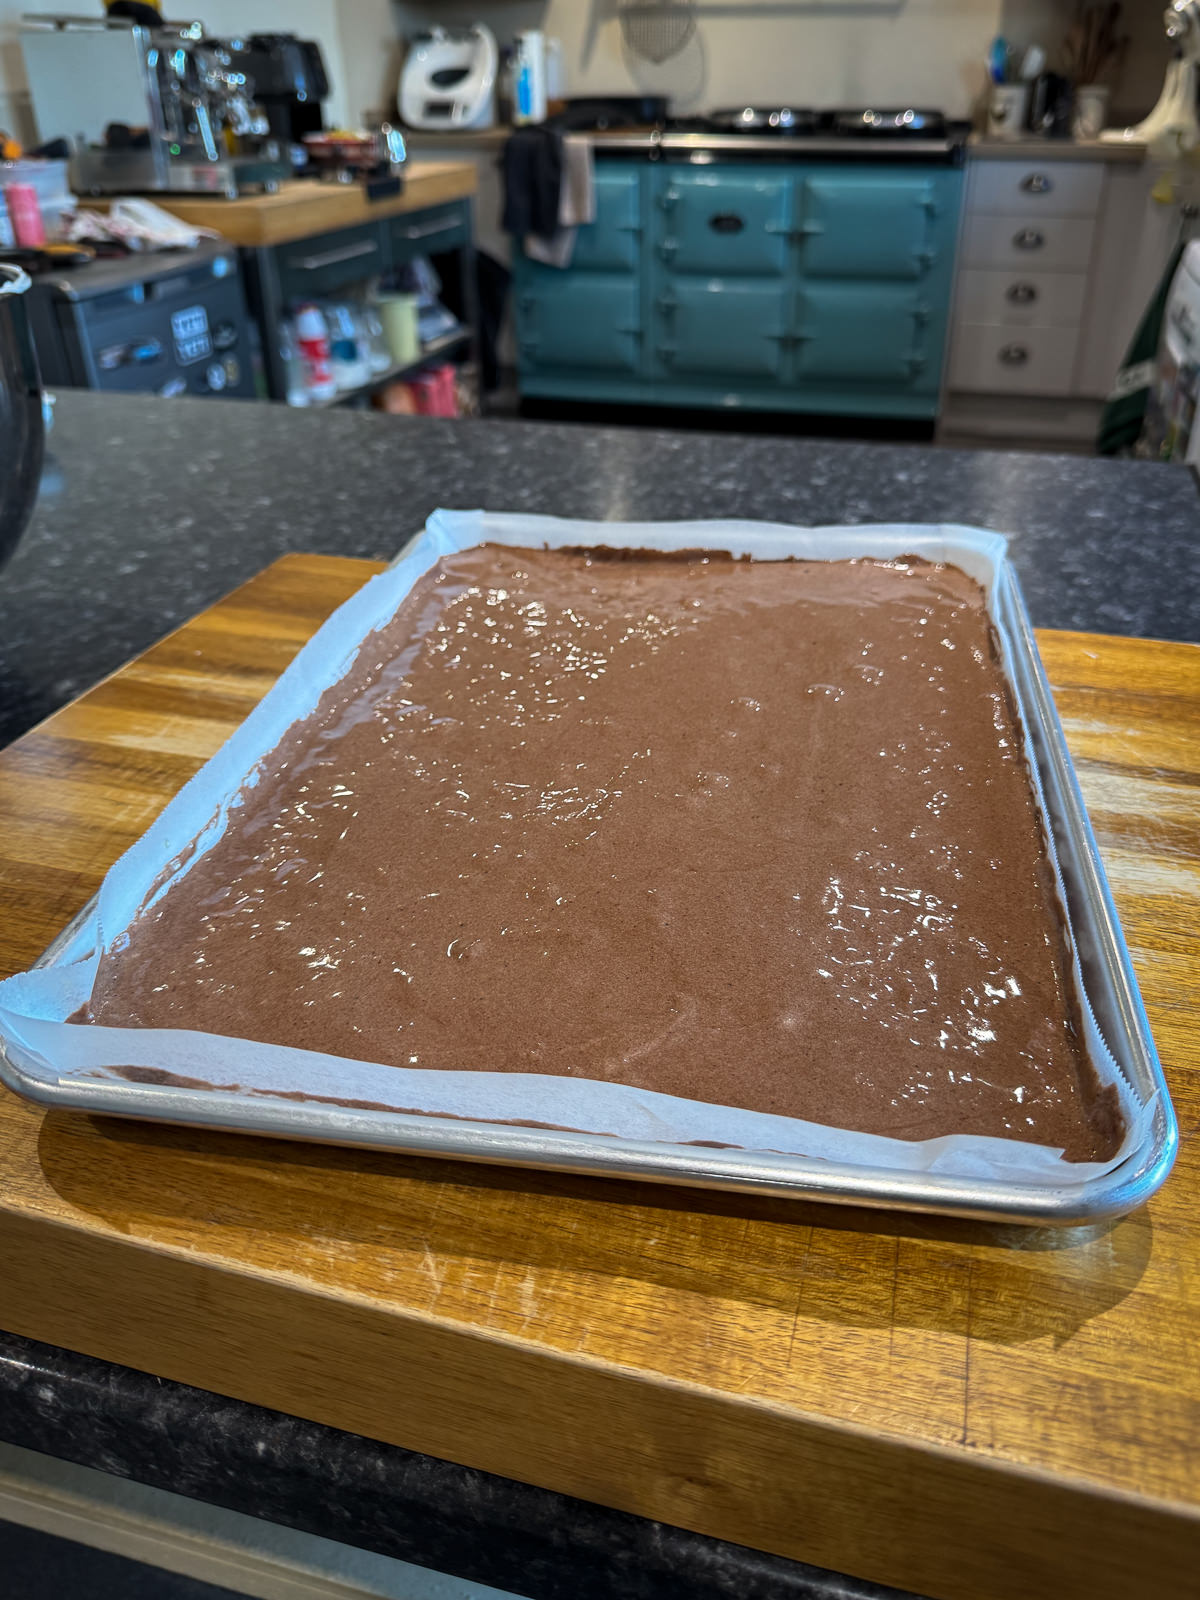
- Once the batter’s mixed, we going to gently transfer it to the lined Swiss roll tin, spread out into a flat, even layer with a palette knife then give the tin a few firm taps on the counter to pop any large air bubbles.
- Now we need to bake the sponge straight away. This will take 12-14 minutes & you’ll know when the sponge is ready when it springs back when lightly pressed. The sides of the sponge will have also started to pull away from the sides of the tin.
Cooling – To Avoid Cracks!
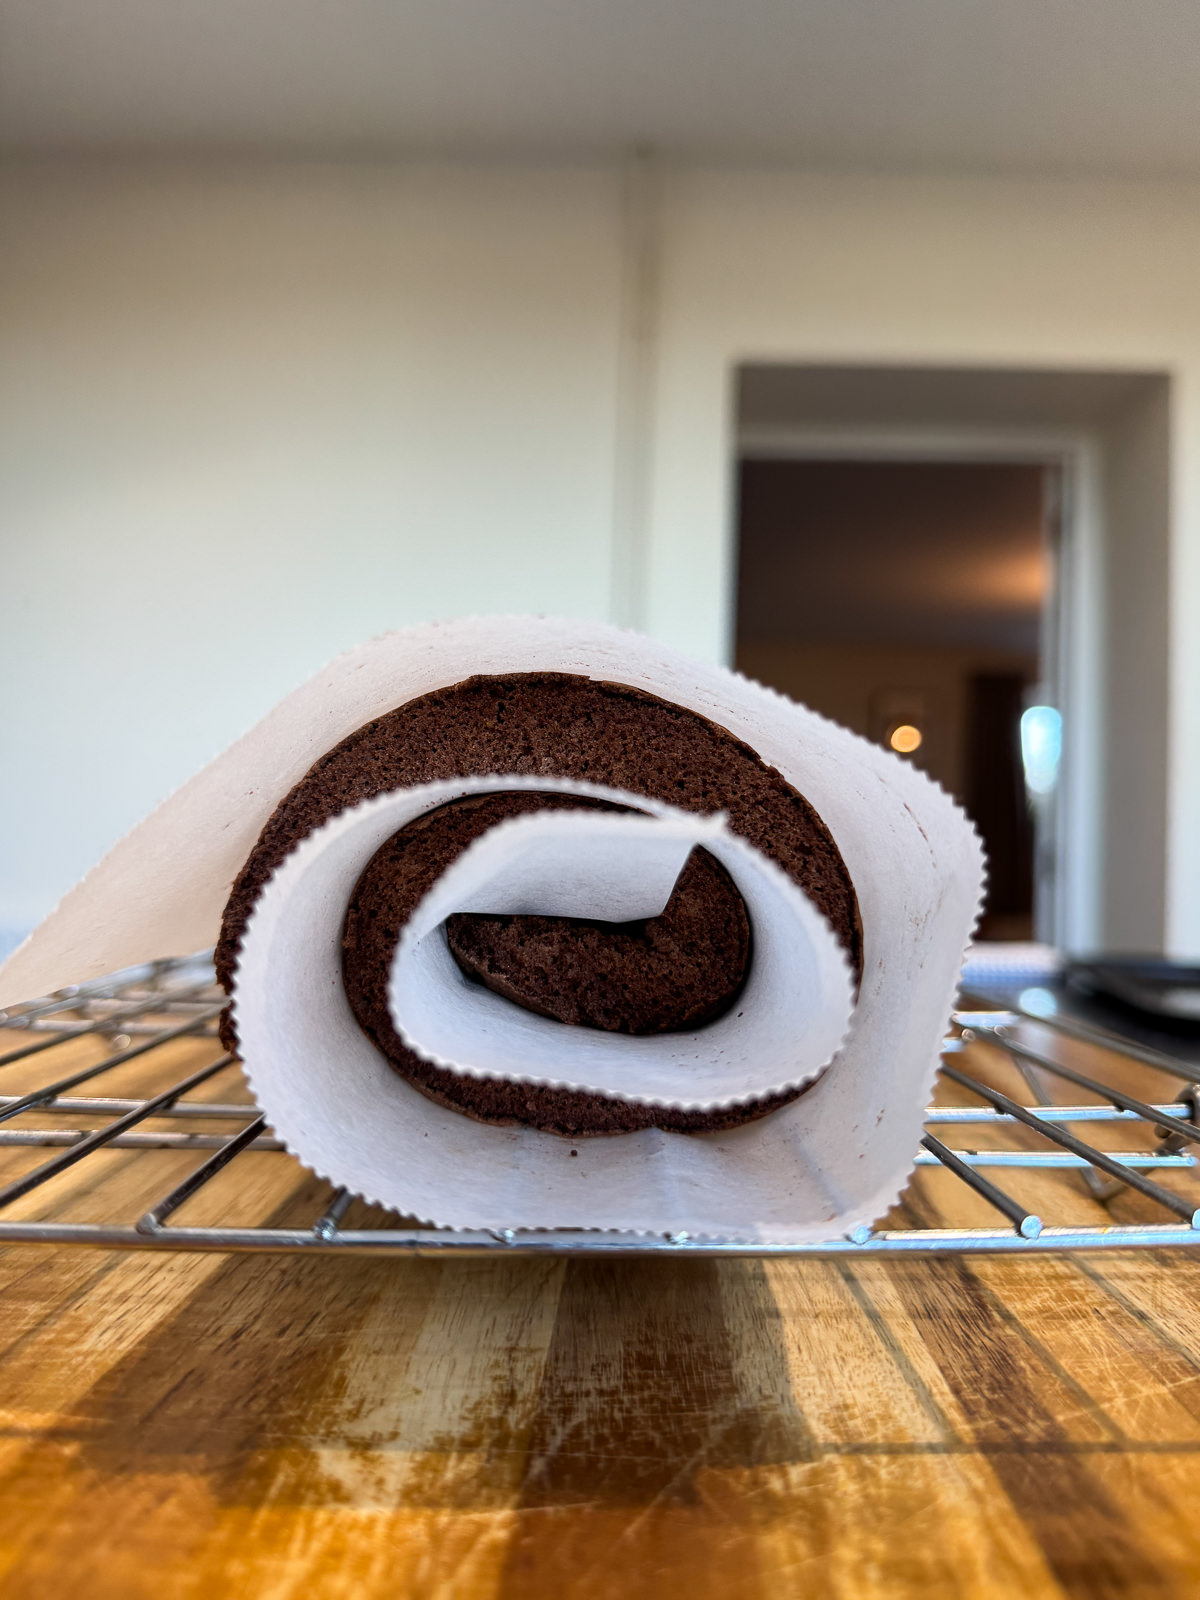
The key to avoiding a cracked Swiss roll sponge is to roll it up in baking parchment whilst it’s still warm. However, if you roll the sponge up as soon as it comes out of the oven, the steam from the sponge will make the baking parchment stick! To avoid this, we let the sponge cool in the tin for 5 minutes before turning it out & rolling it up.
- Once baked, let the Swiss roll sponge cool in the tin for 5 minutes. In the meantime, tear off a large sheet of baking parchment.
- Next, dust the top of the sponge with a light, even layer of sifted cocoa powder. You’ll need around a tablespoon. Place the sheet of baking parchment on top, followed by a large baking tray.
- Working confidently & in 1 smooth motion, flip the tin Swiss roll tin upside down so that the sponge inverts out onto the tray.
- Carefully slide the sponge (on the parchment) off the tray & onto a clean work surface then remove the baking parchment from the top of the sponge.
- Using the baking paper underneath the sponge, tightly roll the sponge up, starting at the shortest end closest to you. You’ll want to roll the sponge up tight enough so that it hold its’ shape but don’t go too crazy!
- Place the sponge onto a cooling rack then leave to cool completely. This will take a couple of hours.
Assembly
Once the sponge is cool, you’ll need to make the whipped cream (more on this below) & weigh out some cherry jam. I’d recommend preparing the filling before you unroll the sponge! Here’s how to properly fill a chocolate cherry Swiss roll…
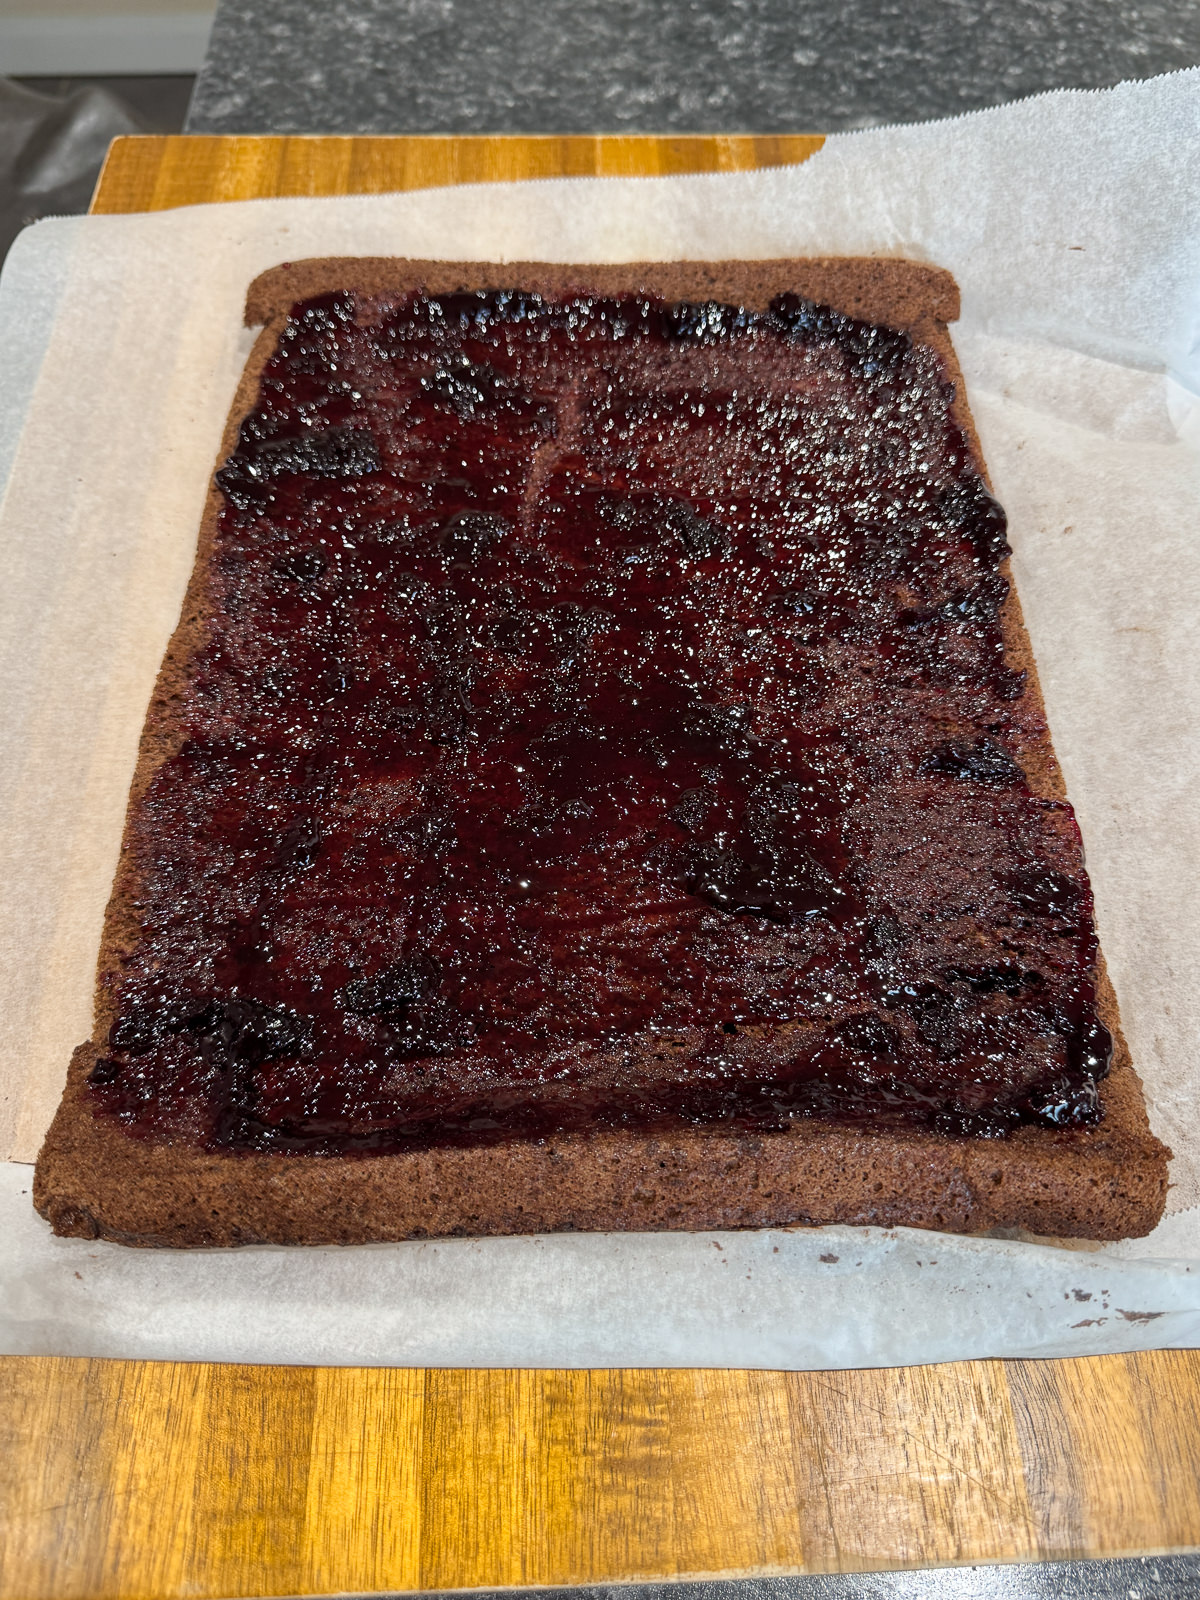
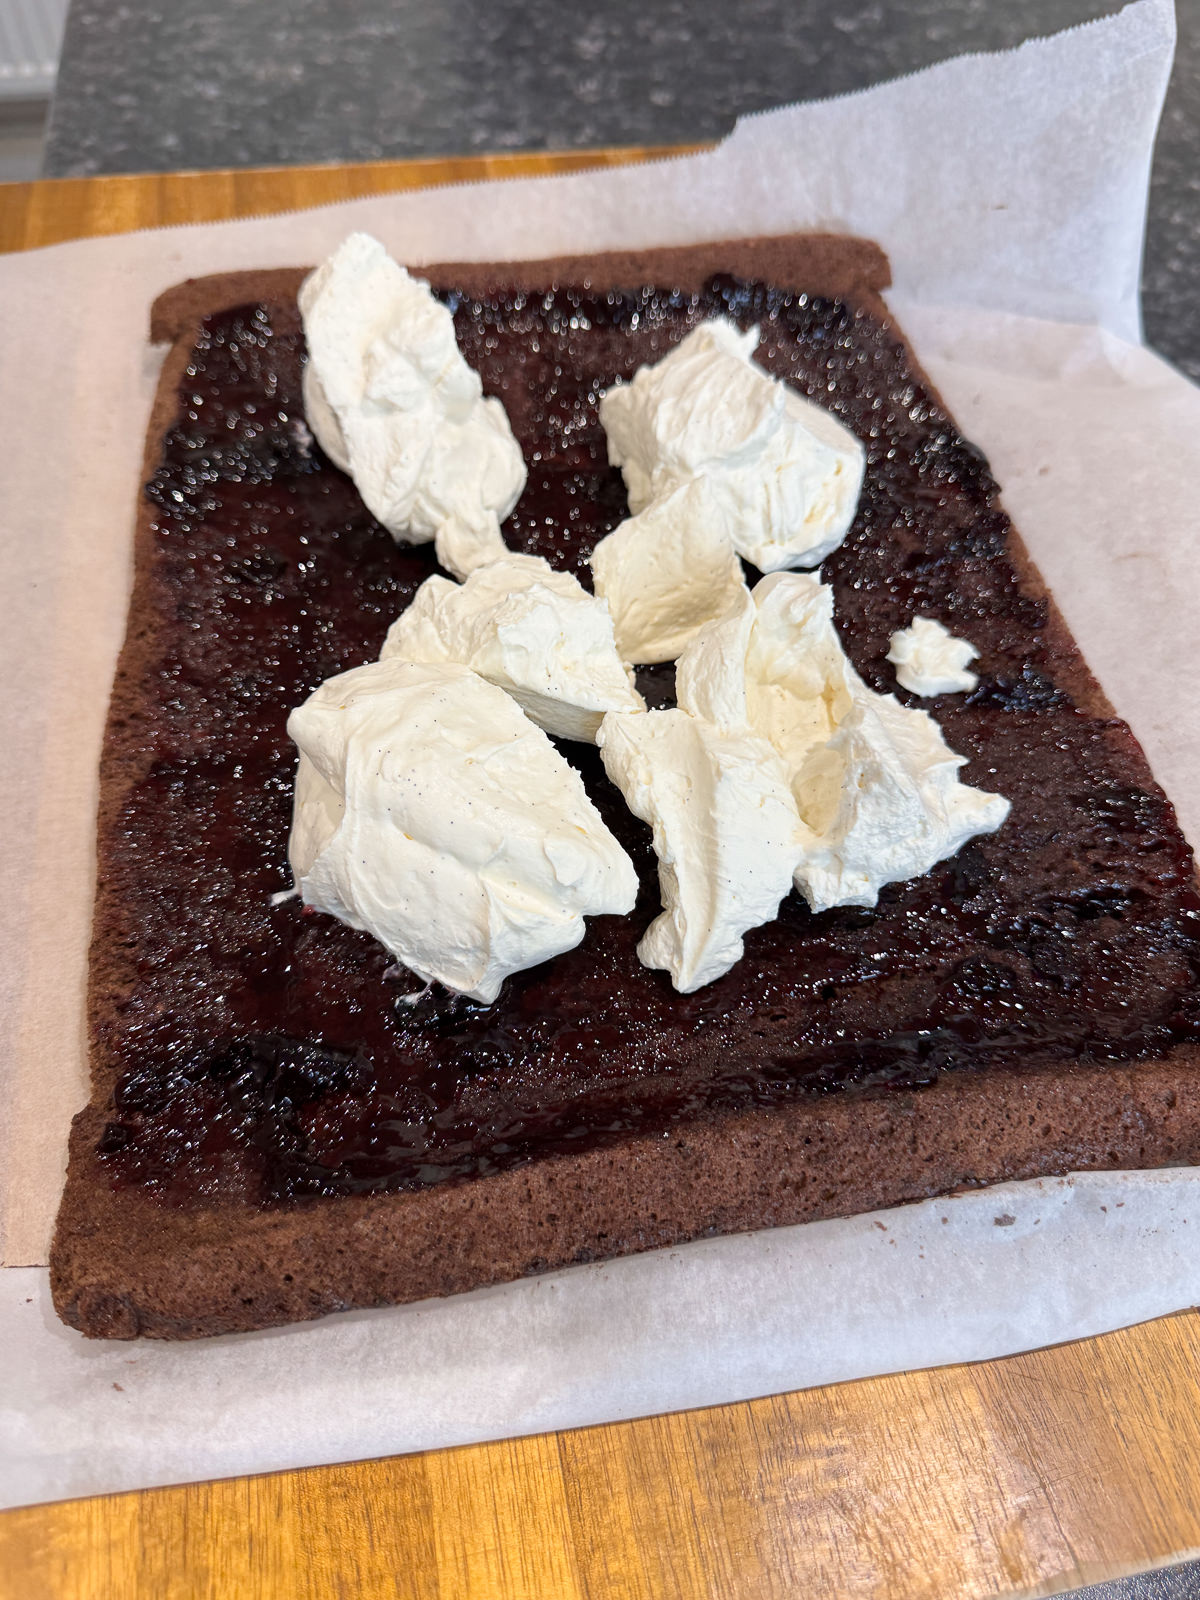
- Carefully unroll the chocolate sponge then spoon the jam on top. Use a palette knife to spread the jam out into a thin, even layer. Leave a 1 cm border with nothing on, on both of the shortest sides. Don’t be tempted to add more jam in, as it will leak out of the Swiss roll &/or mix with the cream layer. We want 2 distinct layers!
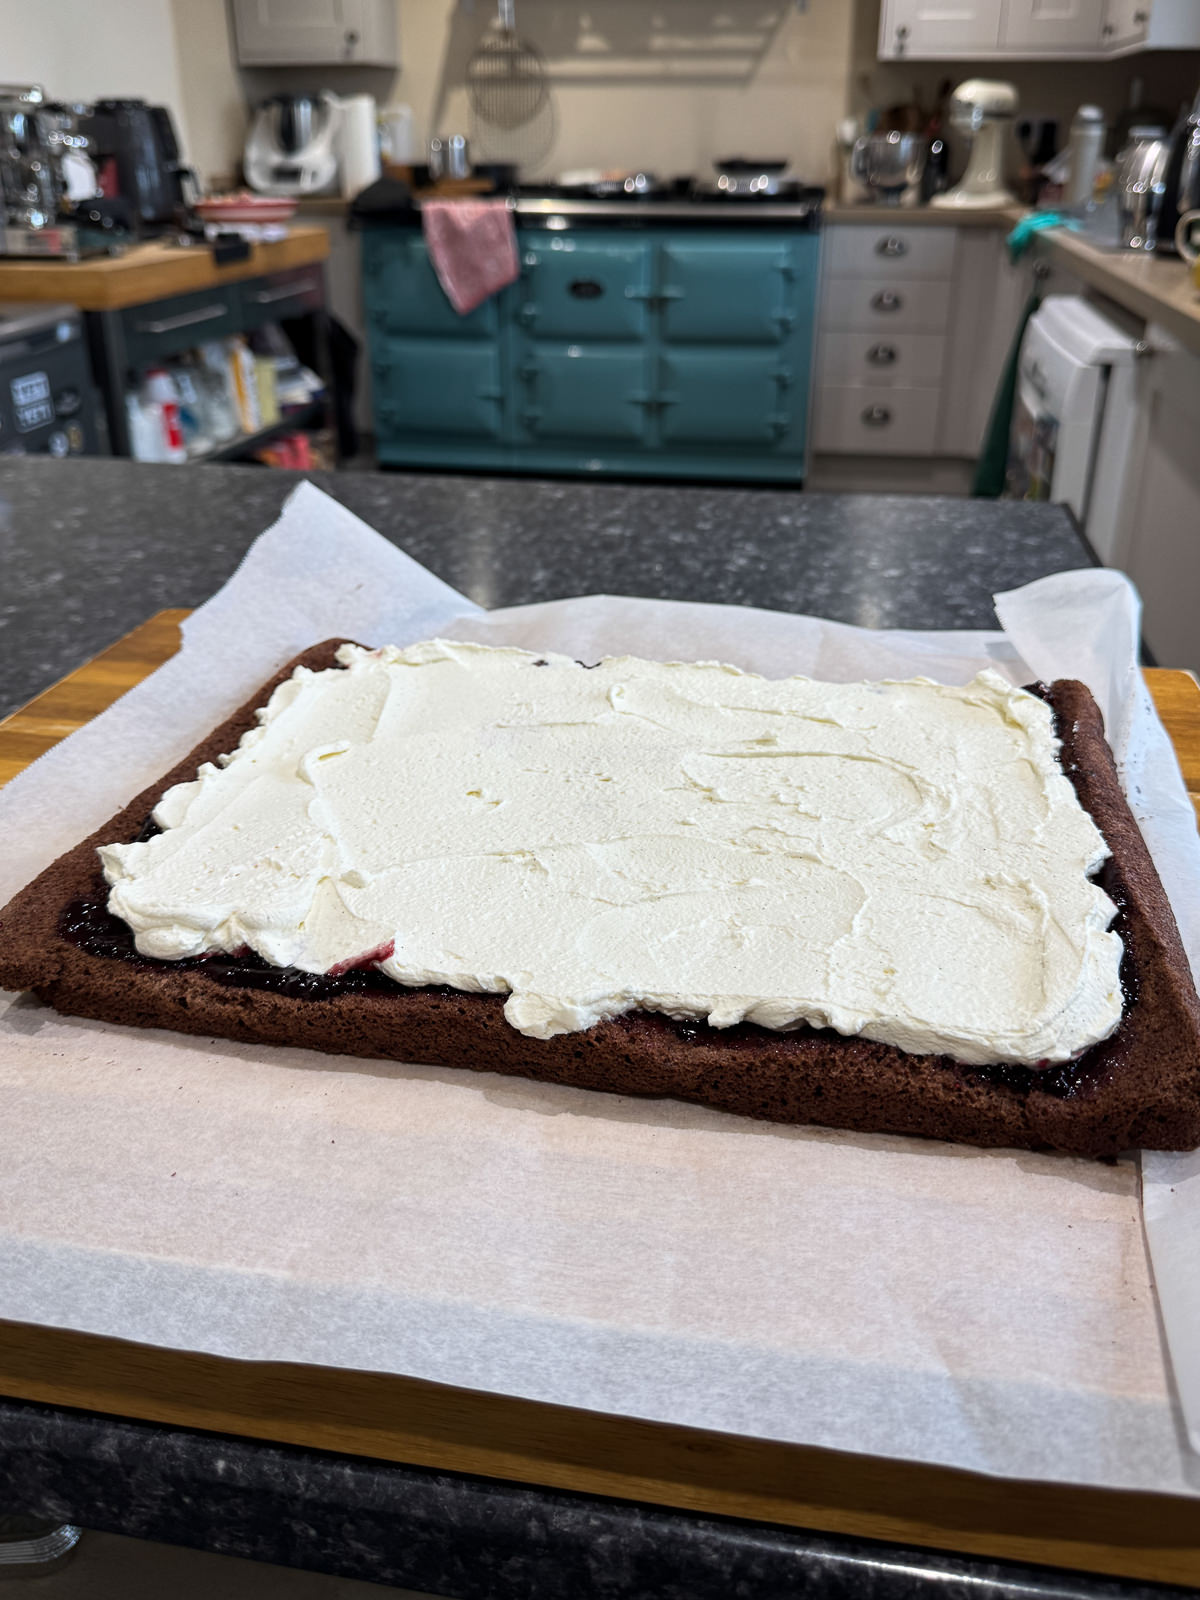
- Next, spoon the whipped cream on top of the jam then gently spread out into an even layer. Be careful not to mix the jam & cream together! You can pipe the cream on top of the jam if you’d find it easier.
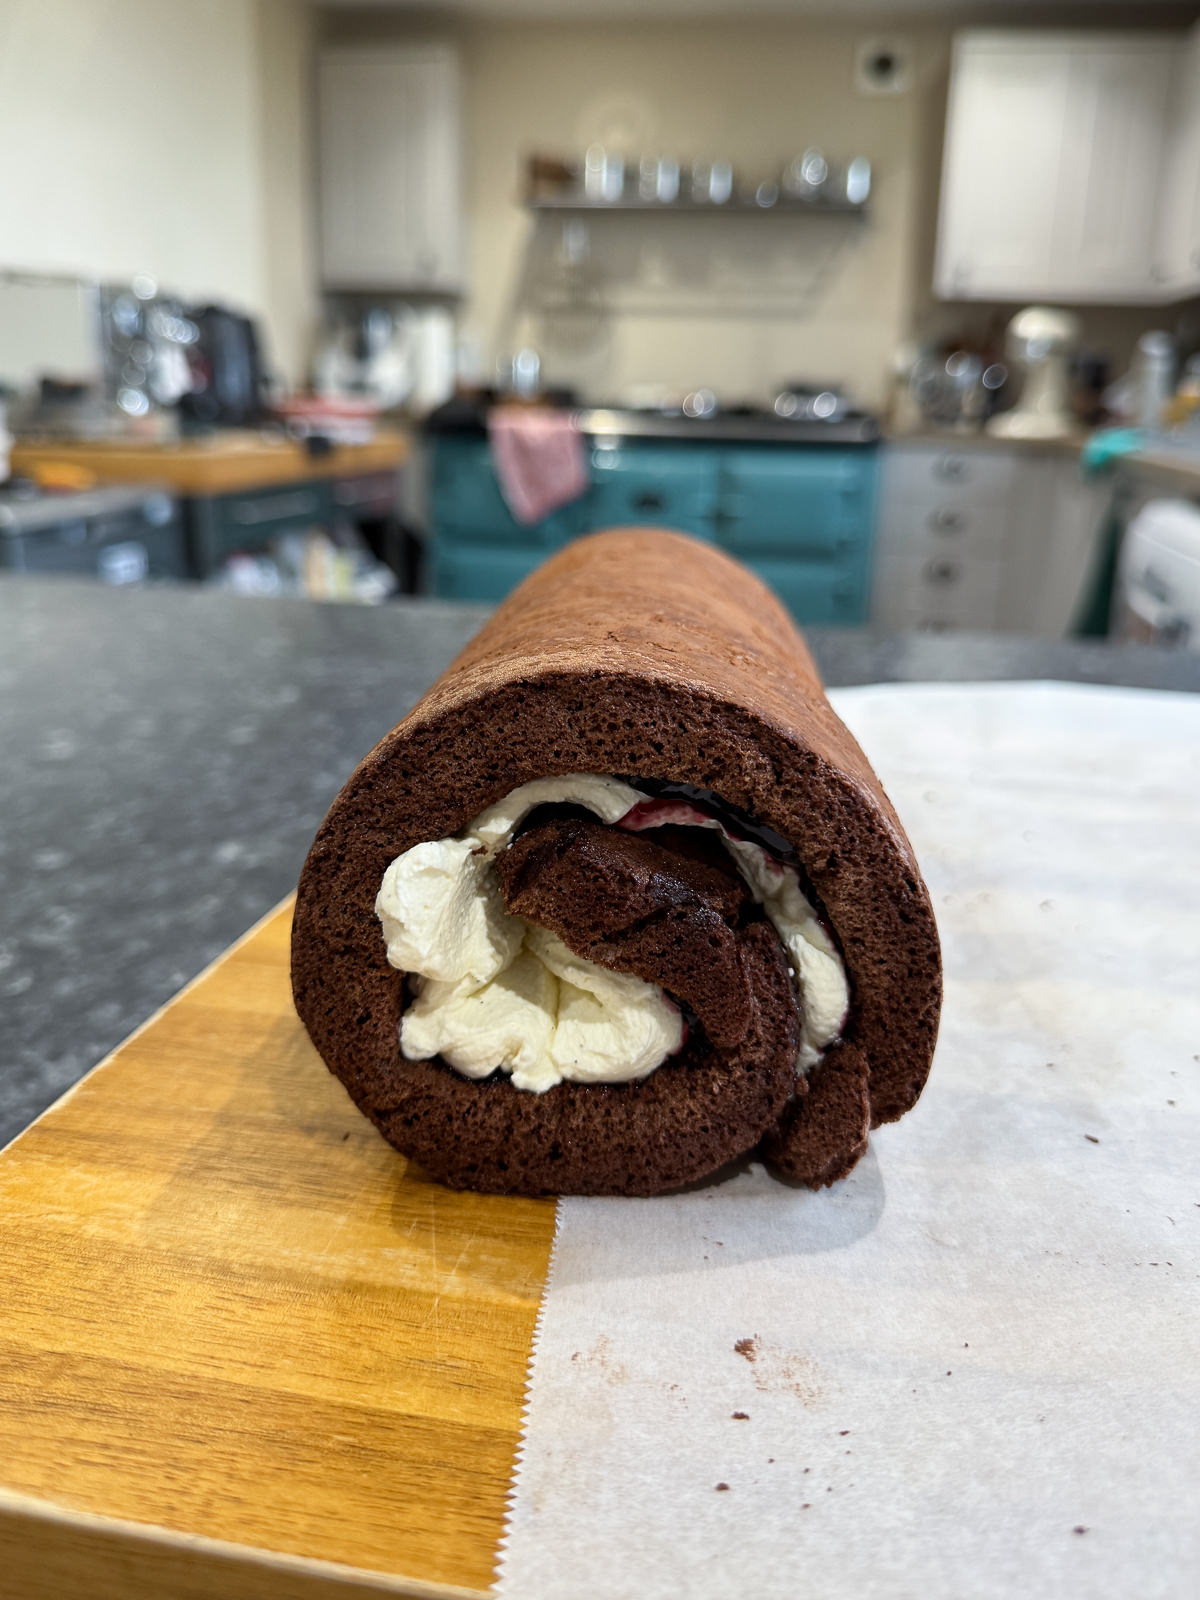
- To roll the sponge up, start at the shortest end closest to you then tightly roll up, without the baking parchment. Once rolled, the Swiss roll should be sitting with the seam on the bottom.
- Transfer your Swiss roll to a serving plate then chill in the fridge for an hour before serving. This just helps the Swiss roll set slightly which will make it easier to slice. If you’re storing your Swiss roll for longer than this, I’d recommend wrapping it in a double layer of clingfilm.
Mascarpone Whipped Cream
One of the easiest & tastiest fillings for a Swiss roll is some lightly sweetened, vanilla whipped cream. To stabilise the whipped cream so that it keeps it’s fluffy texture for several days, we’re going to be adding a small amount of mascarpone to the cream before whipping it. There’s a few different ways to stabilise whipped cream but using mascarpone is probably the easiest!
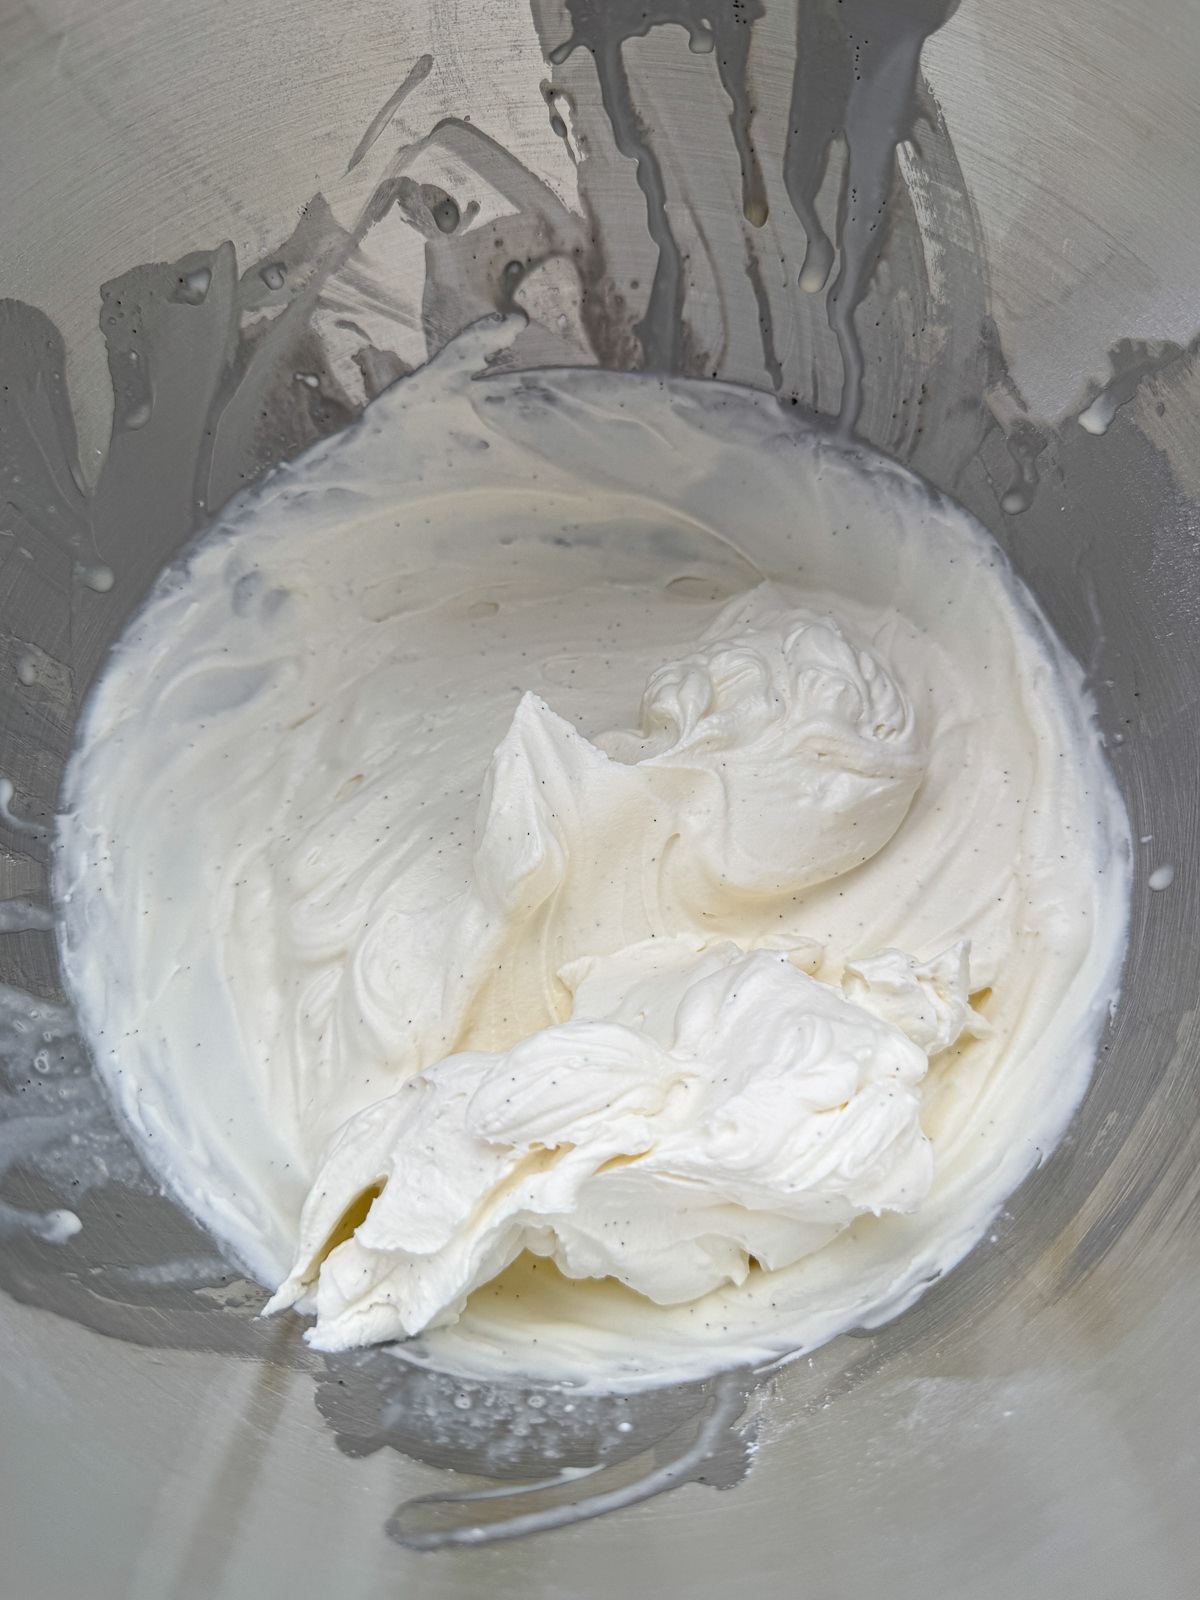
So making mascarpone whipped cream is pretty much the same as making regular whipped cream. But to avoid getting lumps in your whipped cream, we mix the mascarpone with a small amount of the cream, plus icing sugar & vanilla paste first until smooth then add in the rest of the cream & whisk to firm peaks.
Serving Suggestions
You really don’t need to serve anything with your Swiss roll, it’s great on its’ own! However, this chocolate cherry Swiss roll makes a fantastic base for a chocolate trifle or a baked Alaska. I used mine for a black forest trifle, so keep an eye out on the blog for that recipe very soon!
Swiss Roll Troubleshooting
I’ll be honest, this Swiss roll recipe has taken me weeks & many many batches to get right. I’m pretty sure I’ve made every mistake possible on the hunt for Swiss roll perfection! So here’s a list of the most common issues people have when making a homemade Swiss roll & how to avoid them.
- Sponge Cracked When Rolled – Make sure to roll the Swiss roll up whilst it’s still warm! A small amount of vegetable oil in the batter helps make the sponge more flexible.
- Baking Parchment Stuck To Sponge – Your sponge was under baked or there was too much milk in the batter. To avoid this, cook the sponge until it springs back when lightly pressed & the sides have started to come away from the sides of the tin. And make sure to weigh out the ingredients accurately.
- Swiss Roll Sponge Has Holes In – This is called “tunneling” & can happen if there’s too much baking powder in the batter, if the batter was over mixed or if the raising agents weren’t distributed through the batter properly. To avoid tunneling, weigh out the baking powder accurately, double sift the dry ingredients & don’t mix the batter too much!
- Filling Falls Out When Rolling – This happens if you add too much filling into your Swiss roll, if the whipped cream wasn’t whipped enough or if you don’t leave a border around the edge of the sponge when spreading on the filling.
- Whipped Cream Loses Volume/Texture – You need to stabilise the whipped cream! The easiest way to do this is to add a small amount of mascarpone to the cream before whipping it. I use roughly 25% of the cream’s weight in mascarpone.
Frequently Asked Questions
To bake Swiss roll in an Aga, bake on a grid shelf placed onto to the floor of the baking oven.
Chocolate cherry Swiss roll will keep for up to 3 days in the fridge. To keep it fresh, you should store Swiss roll wrapped in clingfilm or in an airtight container. I’d recommend storing your Swiss roll unsliced, to prevent it from drying out.
There’s a couple of things that you’ll need to do prevent Swiss roll from cracking or tearing. With the batter, you’ll need to add in a small amount of neutral oil to make the sponge more flexible. Then once the sponge is baked, you need to roll it up in baking parchment whilst it’s still warm then let it cool, so that it is in the correct shape whilst it’s still flexible. If you roll the sponge when it’s cold, it will tear & crack.
Swiss roll will stick to the baking parchment that you rolled it up in, if the sponge wasn’t baked for long enough or if the batter has too much moisture in. To avoid this, make sure to bake the sponge until it springs back when gently pressed & weigh out the ingredients accurately. Also, I’d recommend letting the sponge cool in the tin for 5 minutes before rolling it up, otherwise the steam from the hot sponge will make the parchment stick.
More Baking Recipes To Try!
- Lemon Drizzle Cookies
- Classic School Cake
- Tres Leches Cake (3 Milk Cake)
- Brown Butter & Miso Pecan Pie Bars
- Baileys Gingerbread Loaf Cake
- Rapeseed Oil Lemon Drizzle Loaf Cake
- Brown Butter Biscoff Rice Krispie Treats
If you have enjoyed this chocolate cherry Swiss roll recipe, it would mean a lot if you could leave a review & rating. And if you’d like to stay up to date with future recipes, follow us on Instagram & TikTok or subscribe to our newsletter!

Chocolate Cherry Swiss Roll
Equipment
- Swiss Roll Tin (15" x 10.5" x 1")
- Stand Mixer
- Electric Hand Mixer
- Large Mixing Bowl
- Sieve
- Palette Knife
Ingredients
Chocolate Swiss Roll
- 75 g Plain Flour
- 35 g Dutch Processed Cocoa Powder (Plus Extra For Dusting)
- 1 tsp Espresso Powder (Optional – See Notes)
- ½ tsp Baking Powder
- ¼ tsp Table Salt
- 4 Large Eggs (See Notes)
- 140 g Caster Sugar
- 65 g Vegetable Oil
- 30 g Whole Milk
- 1 tsp Vanilla Extract
- ¼ tsp Cream Of Tartar
Mascarpone Whipped Cream
- 250 g Double Cream
- 65 g Mascarpone
- 40 g Icing Sugar (Sifted)
- 1 tsp Vanilla Paste
Filling
- 150 g Cherry Jam
Instructions
Chocolate Swiss Roll
- Preheat an oven to 175°c/155°c fan (347°f/311°f). Grease & line a Swiss roll tin (jelly roll tin) with baking parchment. Lightly grease the top of the parchment as well (with veg oil).I used a Swiss roll tin that measures 15" x 10.5" x 1".
- Sift the flour, cocoa powder, baking powder, espresso powder & salt into a bowl, whisk to combine thoroughly then set to one side.
- Next, separate the eggs. Place the yolks into a large mixing bowl & the whites into the bowl of a stand mixer. You should roughly get 150g of egg whites & 70g of yolks. If you haven't got a stand mixer, place the egg whites into a separate large mixer bowl.
- Add 50g of the caster sugar into the yolks and place the remaining 90g of caster into a small separate bowl & set to one side (this is for the whites).
- Using an electric hand mixer, whisk the yolks & sugar on a medium-high speed until pale & fluffy. This will take 4-5 minutes & the yolks should leave a trial on top when you lift the whisks out.
- With the mixer still running, gradually drizzle in the veg oil, followed by the milk. Mix in the vanilla then set the yolks to one side.
- Next, add the cream of tartar to the egg whites then whisk on a medium speed for 2-3 minutes until they reach soft peaks. Turn the speed down slightly then gradually add in the remaining caster sugar (90g), letting each addition incorporate fully before adding in more.If you haven't got a stand mixer, use an electric hand mixer. Make sure to clean the whisks & dry them well first though! I find that adding a tablespoon of sugar into the whites every 20 seconds or so works best.
- Once all the sugar has been added to the whites, turn the mixer speed back up to medium then continue whisking until the whites reach medium peaks (not quite stiff!). This will take 3-4 minutes.
- Next, add half of the whites into the yolks then gently fold in with a spatula, until mostly incorporated. Add in the remaining whites then fold again. Don't worry if the whites aren't quite fully incorporated at this point.It's important not to over mix the batter!
- Sift half of the dry ingredients into the batter then gently fold in with your spatula until mostly combined. Sift in the rest of the dry ingredients then gently fold again until fully combined. Be careful not to over mix the batter, it should be light & airy.
- Gently transfer the batter to the lined tin, holding the bowl as close to the tin as possible to avoid knocking any air out. Then use a palette knife to gently spread the batter into a flat, even layer.
- Give the tin a couple of firm taps on the counter then immediately place into the preheated oven & bake for 12-14 minutes, until the sponge springs back when lightly pressed. The sponge should be starting to come away from the sides of the tin. Once baked, let the sponge cool in the tin for 5 minutes.
- Next, dust the top of the sponge with a light, even layer of sifted cocoa powder then place a large sheet of baking parchment on top followed by a large baking tray. Then in one smooth motion, flip the Swiss roll tin upside down, so that the sponge inverts out onto the baking paper & tray. You'll need around 1 tbsp of cocoa powder for dusting. If needed, run a palette around the edge of the tin to release the sponge.
- Carefully slide the sponge (on the parchment) off the tray & onto a clean work surface then remove the baking parchment from the top of the sponge. Then using the baking paper underneath the sponge, tightly roll the sponge up, starting at the shortest end closest to you. Place the sponge onto a cooling rack then leave to cool completely. This will take a couple of hours.The baking parchment should be rolled up inside the Swiss roll, to stop the sponge sticking to itself. There's a visual guide to this in the post above.
Mascarpone Whipped Cream
- Make the whipped cream once the sponge is cool. To do this, first add the mascarpone, icing sugar, vanilla paste & 100 grams of the double cream into the bowl of a stand mixer. Whisk on a medium-low speed until combined & smooth. This will only take a minute or so of mixing.
- Next, add the remaining 150 grams of double cream to the bowl then whisk on a medium speed until the cream reaches firm peaks but isn't over whisked!
Assembly
- Carefully unroll the chocolate sponge then spoon the jam on top. Use a palette knife to spread the jam out into a thin, even layer. Leave a 1 cm border with nothing on, on both of the shortest sides.If needed, place the jam into a small bowl then stir with a spoon to make it easier to spread.
- Next, spoon the whipped cream on top of the jam then gently spread out into an even layer. Be careful not to mix the jam & cream together!You can pipe the cream on top if you'd prefer. The way I do it, is to spoon dollops of the cream all over the sponge then spread it out carefully.
- To roll the sponge up, start at the shortest end closest to you then tightly roll up, without the baking parchment. Once rolled, the Swiss roll should be sitting with the seam on the bottom.
- Next, transfer the Swiss roll to a serving plate then chill in the fridge for an hour before slicing & serving. If you're chilling the Swiss roll for longer than this, I'd recommend wrapping it in a double layer of clingfilm. This will help it hold its' shape & keep it tasting fresh!