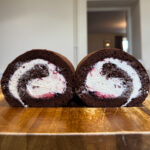
Chocolate Cherry Swiss Roll
A soft chocolate Swiss roll, filled with cherry jam & a lightly sweetened, fluffy vanilla mascarpone whipped cream. This is a black forest version of the classic dessert!
Servings: 10 People
Equipment
- Swiss Roll Tin (15" x 10.5" x 1")
- Stand Mixer
- Electric Hand Mixer
- Large Mixing Bowl
- Sieve
- Palette Knife
Ingredients
Chocolate Swiss Roll
- 75 g Plain Flour
- 35 g Dutch Processed Cocoa Powder (Plus Extra For Dusting)
- 1 tsp Espresso Powder (Optional - See Notes)
- ½ tsp Baking Powder
- ¼ tsp Table Salt
- 4 Large Eggs (See Notes)
- 140 g Caster Sugar
- 65 g Vegetable Oil
- 30 g Whole Milk
- 1 tsp Vanilla Extract
- ¼ tsp Cream Of Tartar
Mascarpone Whipped Cream
- 250 g Double Cream
- 65 g Mascarpone
- 40 g Icing Sugar (Sifted)
- 1 tsp Vanilla Paste
Filling
- 150 g Cherry Jam
Instructions
Chocolate Swiss Roll
- Preheat an oven to 175°c/155°c fan (347°f/311°f). Grease & line a Swiss roll tin (jelly roll tin) with baking parchment. Lightly grease the top of the parchment as well (with veg oil).I used a Swiss roll tin that measures 15" x 10.5" x 1".
- Sift the flour, cocoa powder, baking powder, espresso powder & salt into a bowl, whisk to combine thoroughly then set to one side.
- Next, separate the eggs. Place the yolks into a large mixing bowl & the whites into the bowl of a stand mixer. You should roughly get 150g of egg whites & 70g of yolks. If you haven't got a stand mixer, place the egg whites into a separate large mixer bowl.
- Add 50g of the caster sugar into the yolks and place the remaining 90g of caster into a small separate bowl & set to one side (this is for the whites).
- Using an electric hand mixer, whisk the yolks & sugar on a medium-high speed until pale & fluffy. This will take 4-5 minutes & the yolks should leave a trial on top when you lift the whisks out.
- With the mixer still running, gradually drizzle in the veg oil, followed by the milk. Mix in the vanilla then set the yolks to one side.
- Next, add the cream of tartar to the egg whites then whisk on a medium speed for 2-3 minutes until they reach soft peaks. Turn the speed down slightly then gradually add in the remaining caster sugar (90g), letting each addition incorporate fully before adding in more.If you haven't got a stand mixer, use an electric hand mixer. Make sure to clean the whisks & dry them well first though! I find that adding a tablespoon of sugar into the whites every 20 seconds or so works best.
- Once all the sugar has been added to the whites, turn the mixer speed back up to medium then continue whisking until the whites reach medium peaks (not quite stiff!). This will take 3-4 minutes.
- Next, add half of the whites into the yolks then gently fold in with a spatula, until mostly incorporated. Add in the remaining whites then fold again. Don't worry if the whites aren't quite fully incorporated at this point.It's important not to over mix the batter!
- Sift half of the dry ingredients into the batter then gently fold in with your spatula until mostly combined. Sift in the rest of the dry ingredients then gently fold again until fully combined. Be careful not to over mix the batter, it should be light & airy.
- Gently transfer the batter to the lined tin, holding the bowl as close to the tin as possible to avoid knocking any air out. Then use a palette knife to gently spread the batter into a flat, even layer.
- Give the tin a couple of firm taps on the counter then immediately place into the preheated oven & bake for 12-14 minutes, until the sponge springs back when lightly pressed. The sponge should be starting to come away from the sides of the tin. Once baked, let the sponge cool in the tin for 5 minutes.
- Next, dust the top of the sponge with a light, even layer of sifted cocoa powder then place a large sheet of baking parchment on top followed by a large baking tray. Then in one smooth motion, flip the Swiss roll tin upside down, so that the sponge inverts out onto the baking paper & tray. You'll need around 1 tbsp of cocoa powder for dusting. If needed, run a palette around the edge of the tin to release the sponge.
- Carefully slide the sponge (on the parchment) off the tray & onto a clean work surface then remove the baking parchment from the top of the sponge. Then using the baking paper underneath the sponge, tightly roll the sponge up, starting at the shortest end closest to you. Place the sponge onto a cooling rack then leave to cool completely. This will take a couple of hours.The baking parchment should be rolled up inside the Swiss roll, to stop the sponge sticking to itself. There's a visual guide to this in the post above.
Mascarpone Whipped Cream
- Make the whipped cream once the sponge is cool. To do this, first add the mascarpone, icing sugar, vanilla paste & 100 grams of the double cream into the bowl of a stand mixer. Whisk on a medium-low speed until combined & smooth. This will only take a minute or so of mixing.
- Next, add the remaining 150 grams of double cream to the bowl then whisk on a medium speed until the cream reaches firm peaks but isn't over whisked!
Assembly
- Carefully unroll the chocolate sponge then spoon the jam on top. Use a palette knife to spread the jam out into a thin, even layer. Leave a 1 cm border with nothing on, on both of the shortest sides.If needed, place the jam into a small bowl then stir with a spoon to make it easier to spread.
- Next, spoon the whipped cream on top of the jam then gently spread out into an even layer. Be careful not to mix the jam & cream together!You can pipe the cream on top if you'd prefer. The way I do it, is to spoon dollops of the cream all over the sponge then spread it out carefully.
- To roll the sponge up, start at the shortest end closest to you then tightly roll up, without the baking parchment. Once rolled, the Swiss roll should be sitting with the seam on the bottom.
- Next, transfer the Swiss roll to a serving plate then chill in the fridge for an hour before slicing & serving. If you're chilling the Swiss roll for longer than this, I'd recommend wrapping it in a double layer of clingfilm. This will help it hold its' shape & keep it tasting fresh!
Notes
1. To Bake In An Aga - Bake the Swiss roll on a grid shelf placed onto to the floor of the baking oven.
2. Cocoa Powder - For the best flavour, make sure to use Dutch processed cocoa powder (not sweetened!). This is available in most supermarkets. If you're in the UK, I'd recommend Green & Black's.
3. Eggs - You'll need large eggs for this recipe, which should each weigh around 55 grams out of the shell. I've included the measurements for the separated whites & yolks but weighing them out isn't necessary.
4. Espresso Powder - Adding espresso powder to chocolate cake enhances the chocolate flavours but adding it in is optional, your Swiss roll will taste great with or without it! You can buy espresso powder in some supermarkets or online but it's cheaper to make it yourself with espresso grounds. My guide to doing this can be found here.
5. Vanilla - It's best to use a good quality vanilla extract for the cake batter & vanilla paste for the whipped cream!
6. Whipped Cream - We're adding mascarpone to the whipped cream, for the filling as it will stabilise it. This makes the whipped cream stay the same texture & means that the Swiss roll will keep for up to 3 days. If you're serving your Swiss roll straight away, you could just make regular whipped cream instead. I'd leave out the mascarpone & use 300g of double cream instead.
7. Jam - Using a good quality cherry jam makes all the difference with this Swiss roll! I used Bonne Maman black cherry jam.
8. Storage - Swiss roll needs to be stored in the fridge & is best eaten within 3 days. I'd recommend leaving your Swiss roll unsliced to store it, to prevent it from drying out. Make sure to wrap your Swiss roll in clingfilm or store it in an airtight container.
❤️ Stay connected with Salt Butter Smoke
The Prep List is my free weekly newsletter with seasonal recipes, kitchen notes and behind-the-scenes from my kitchen. Add Salt Butter Smoke as a Google Preferred Source to see more of my recipes in Search.