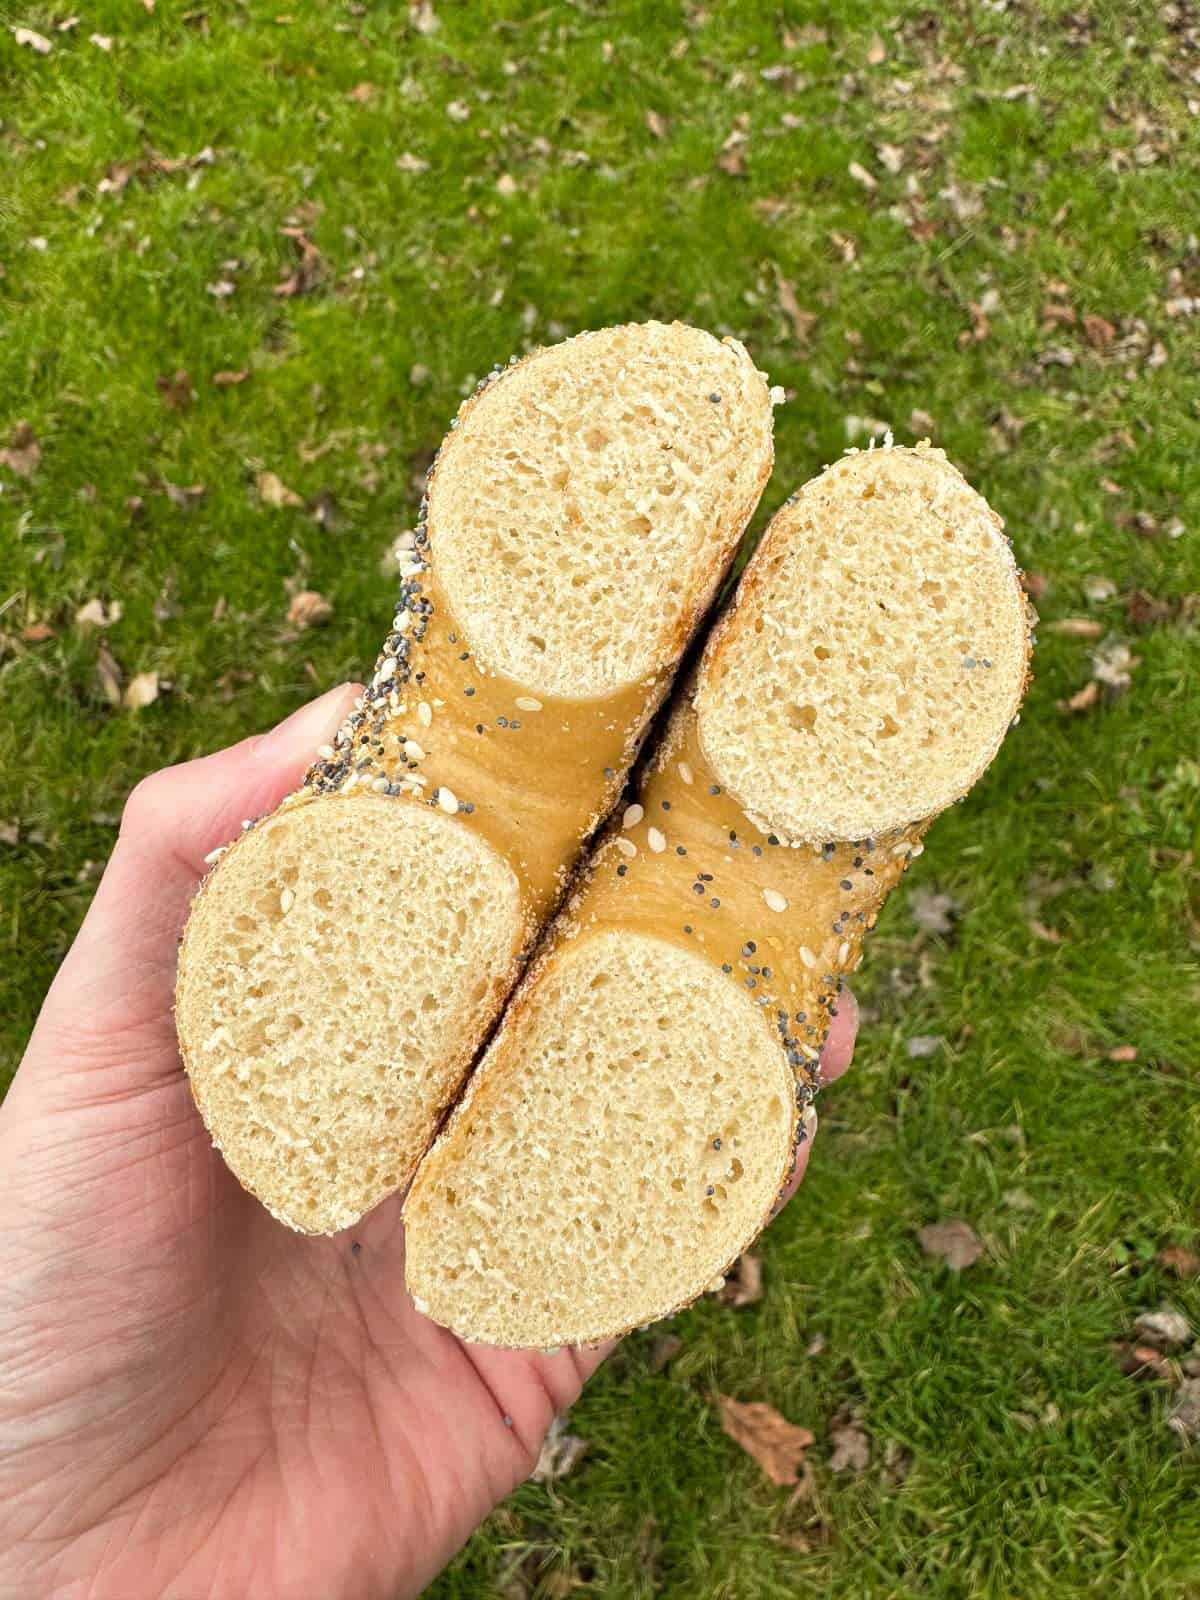
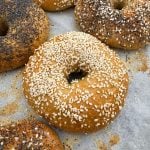
Overnight New York Style Bagels
These New York style bagels are perfectly chewy & are cold proved overnight for extra flavour. They make great sandwiches & are super easy to prepare!
This post contains affiliate links.

Here’s how to make a batch of bakery quality New York style bagels at home! We’re making these as authentic as possible, which includes the use of barley malt extract in the dough & the all important boiling process before baking that gives New York bagels their distinctive crust & chewy texture.
To give our bagels extra flavour, we’re going to be giving them a long, cold prove in the fridge before baking them. This gives them a more developed flavour & also means that we don’t need to keep an eye on them as they prove. These bagels can also be boiled & baked straight from the fridge which is a win in my eyes!
Homemade New York style bagels make fantastic sandwiches, whether they’re filled with cream cheese & smoked salmon, bacon, egg & cheese or pastrami, mustard & pickles. If you’ve got a favourite bagel filling, we’d love to hear about it in the comments at the bottom of this page…
For more recipes, take a look at our ever growing collection of bread recipes! There’s buns, rolls, sourdough, pizza doughs, doughnuts & lots more…
What You’ll Need
- Flour – When making New York style bagels, it’s key to use a strong white bread flour with a protein content of at least 14% as this is what gives bagels their chewy texture.
- Malt Extract – Malt extract syrup is what gives New York style bagels their authentic flavour. We’re using this in the bagel dough & in the boiling liquid. Malt extract is available in some supermarkets or online.
- Yeast – I find that cold proved doughs work best with dried active yeast (the type that needs activating first) as appose to instant yeast.
- Salt – A good sea salt works best when making bread doughs. I tend to use Maldon salt.
- Bicarbonate Of Soda – Added to the boiling liquid. This gives the bagels a deeper colour once baked.
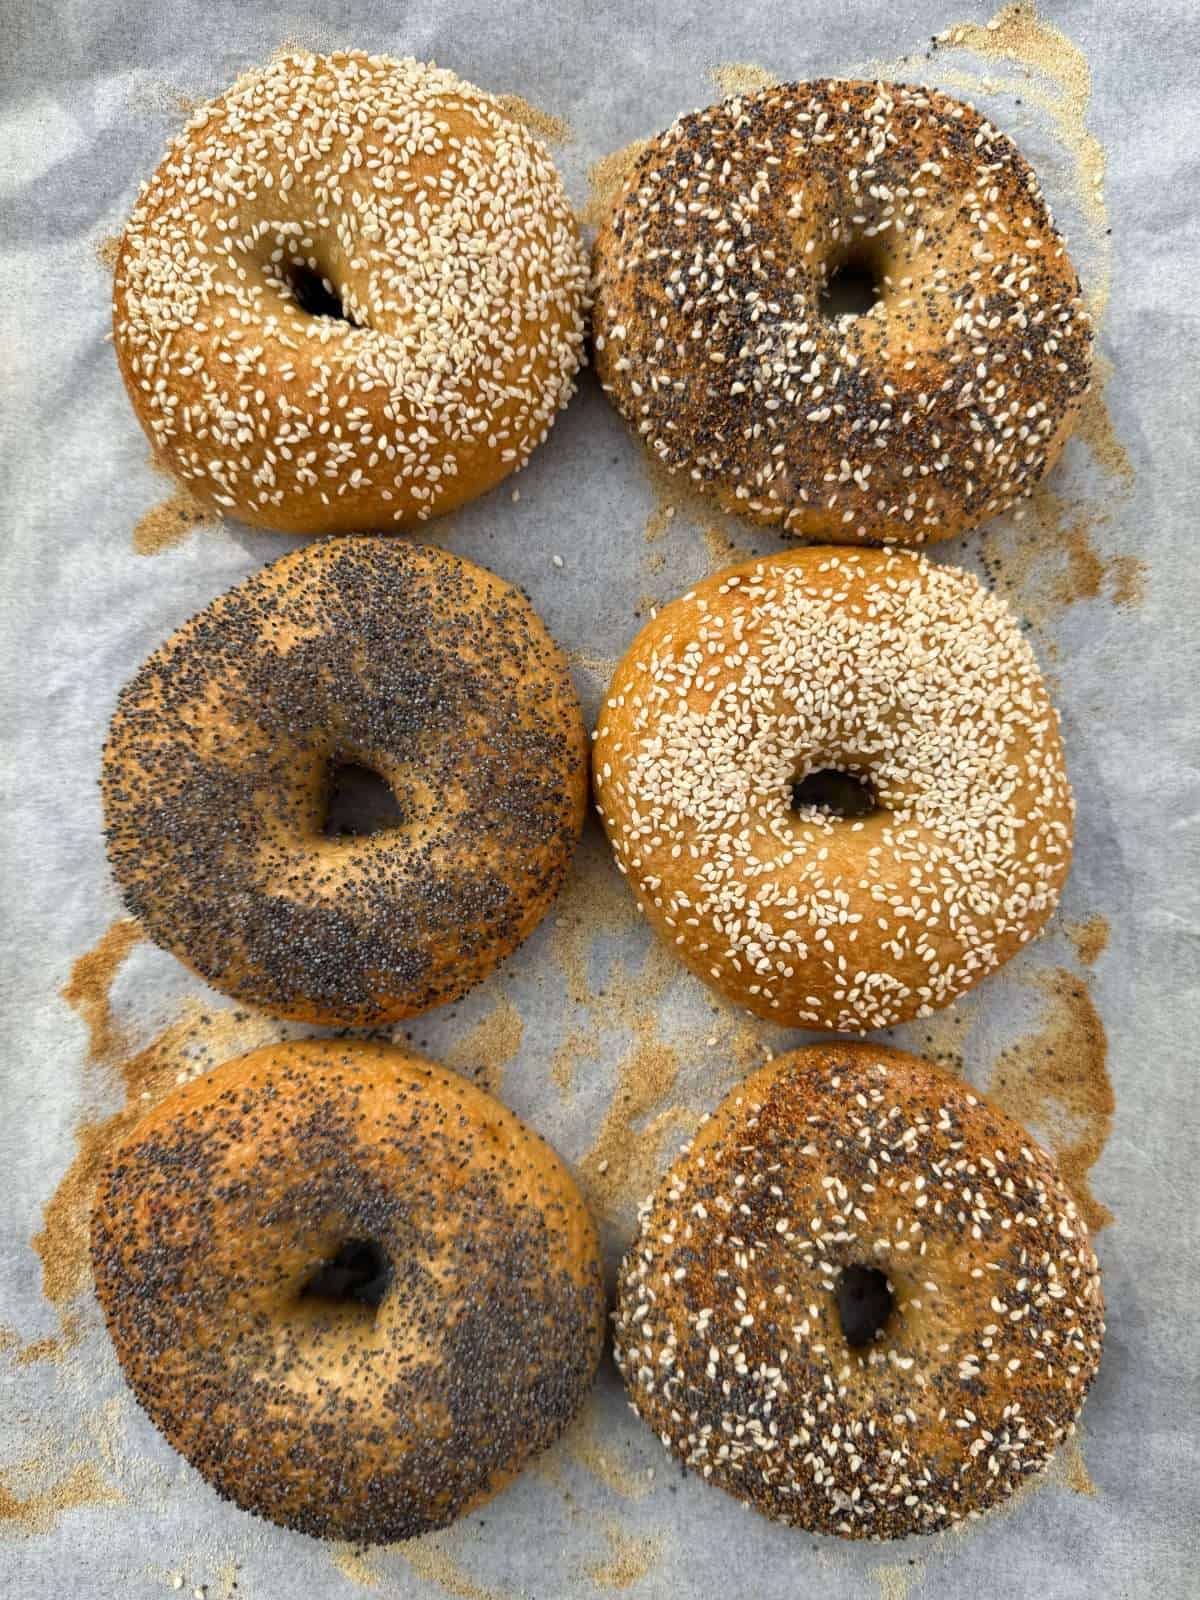
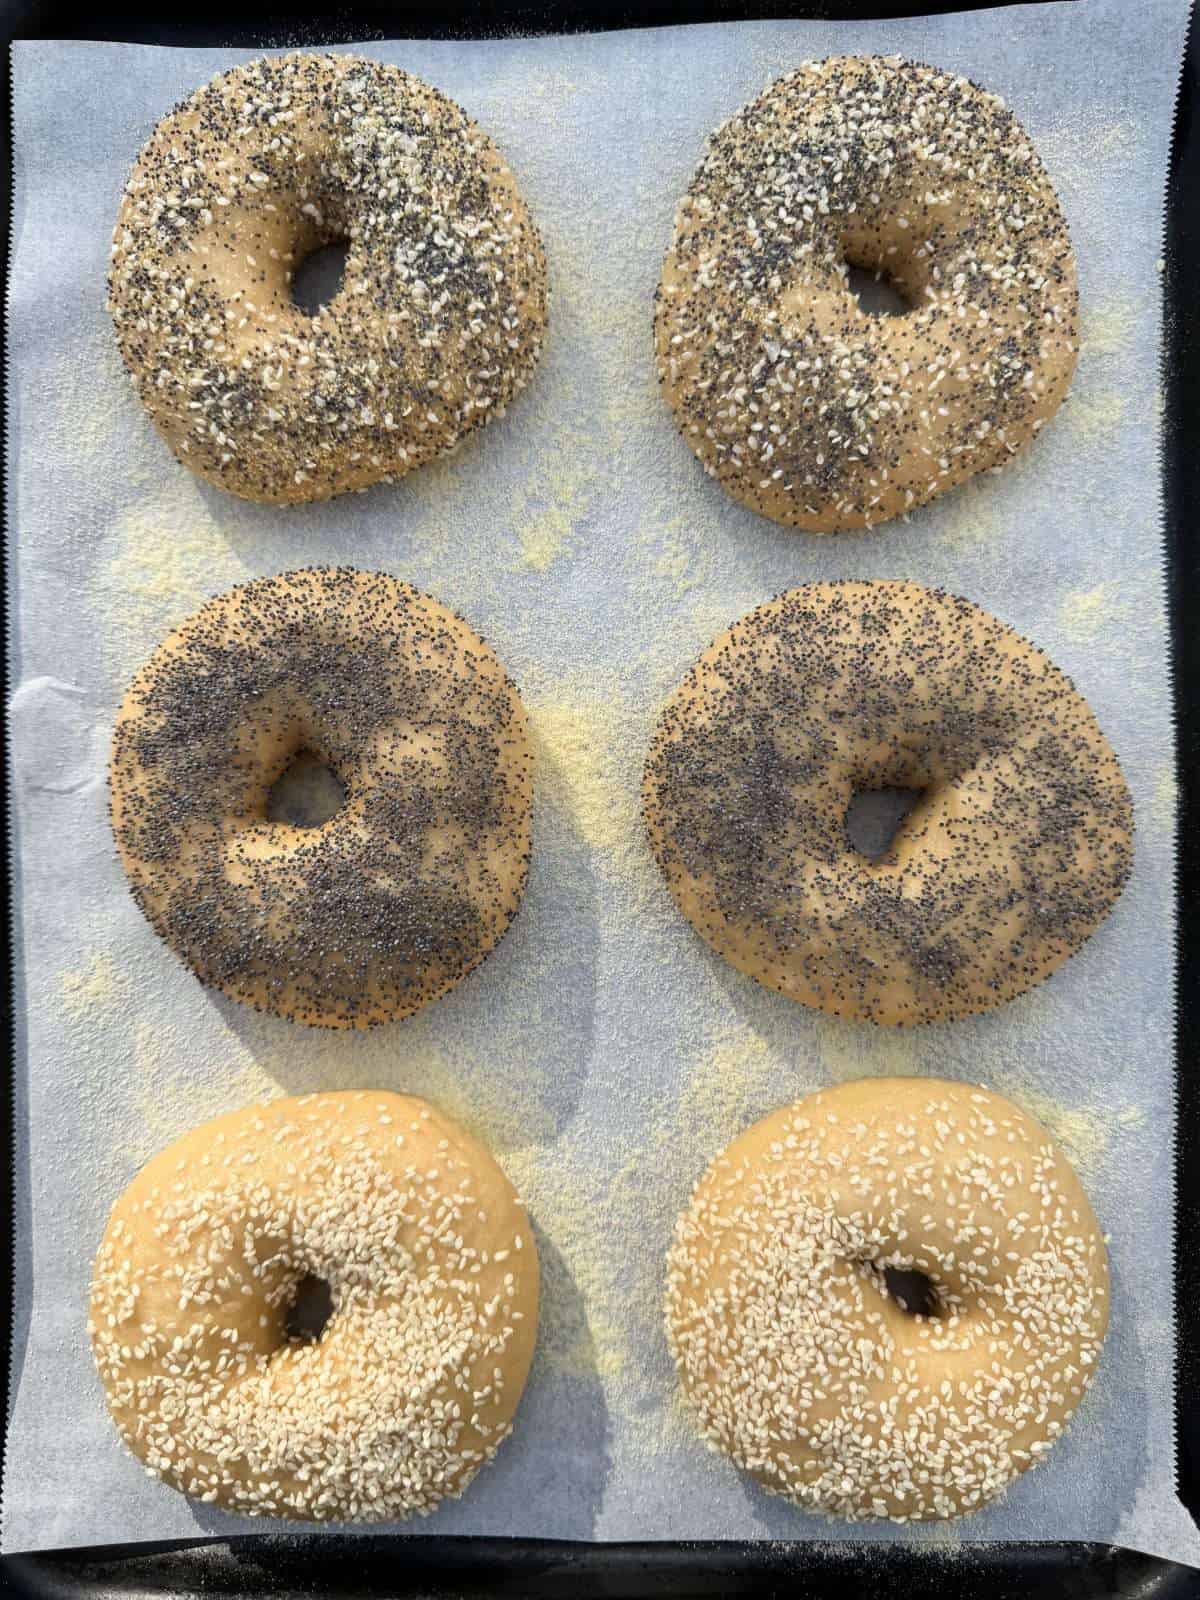
- Toppings – You can top your bagels with pretty much whatever you like! I used poppy seeds, sesame seeds & a homemade everything bagel seasoning.
- Semolina – New York style bagels are often baked on top of a light sprinkling of semolina or cornmeal to stop them sticking to the baking paper. This also adds some extra texture but is entirely optional.
How To Make Overnight New York Bagels
These New York style bagels are made with an overnight dough for extra flavour! Here we mix the dough, give it a quick rest then shape & prove in the fridge overnight. The long cold prove gives these bagels a more complex flavour & means that we can shape them the day before & cook straight out of the fridge.
Overnight bagel doughs are a bit different to regular bread dough as in it doesn’t need to double in size before shaping. In fact it only needs a very short rest after being mixed. We’re talking 10 minutes or so! It just needs enough time to relax the gluten so that it’s easy to shape. Then once shaped, we give the bagels a day in the fridge to ferment. It’s a super easy way to make bagels & you don’t have to keep an eye on them!
1. Bagel Dough
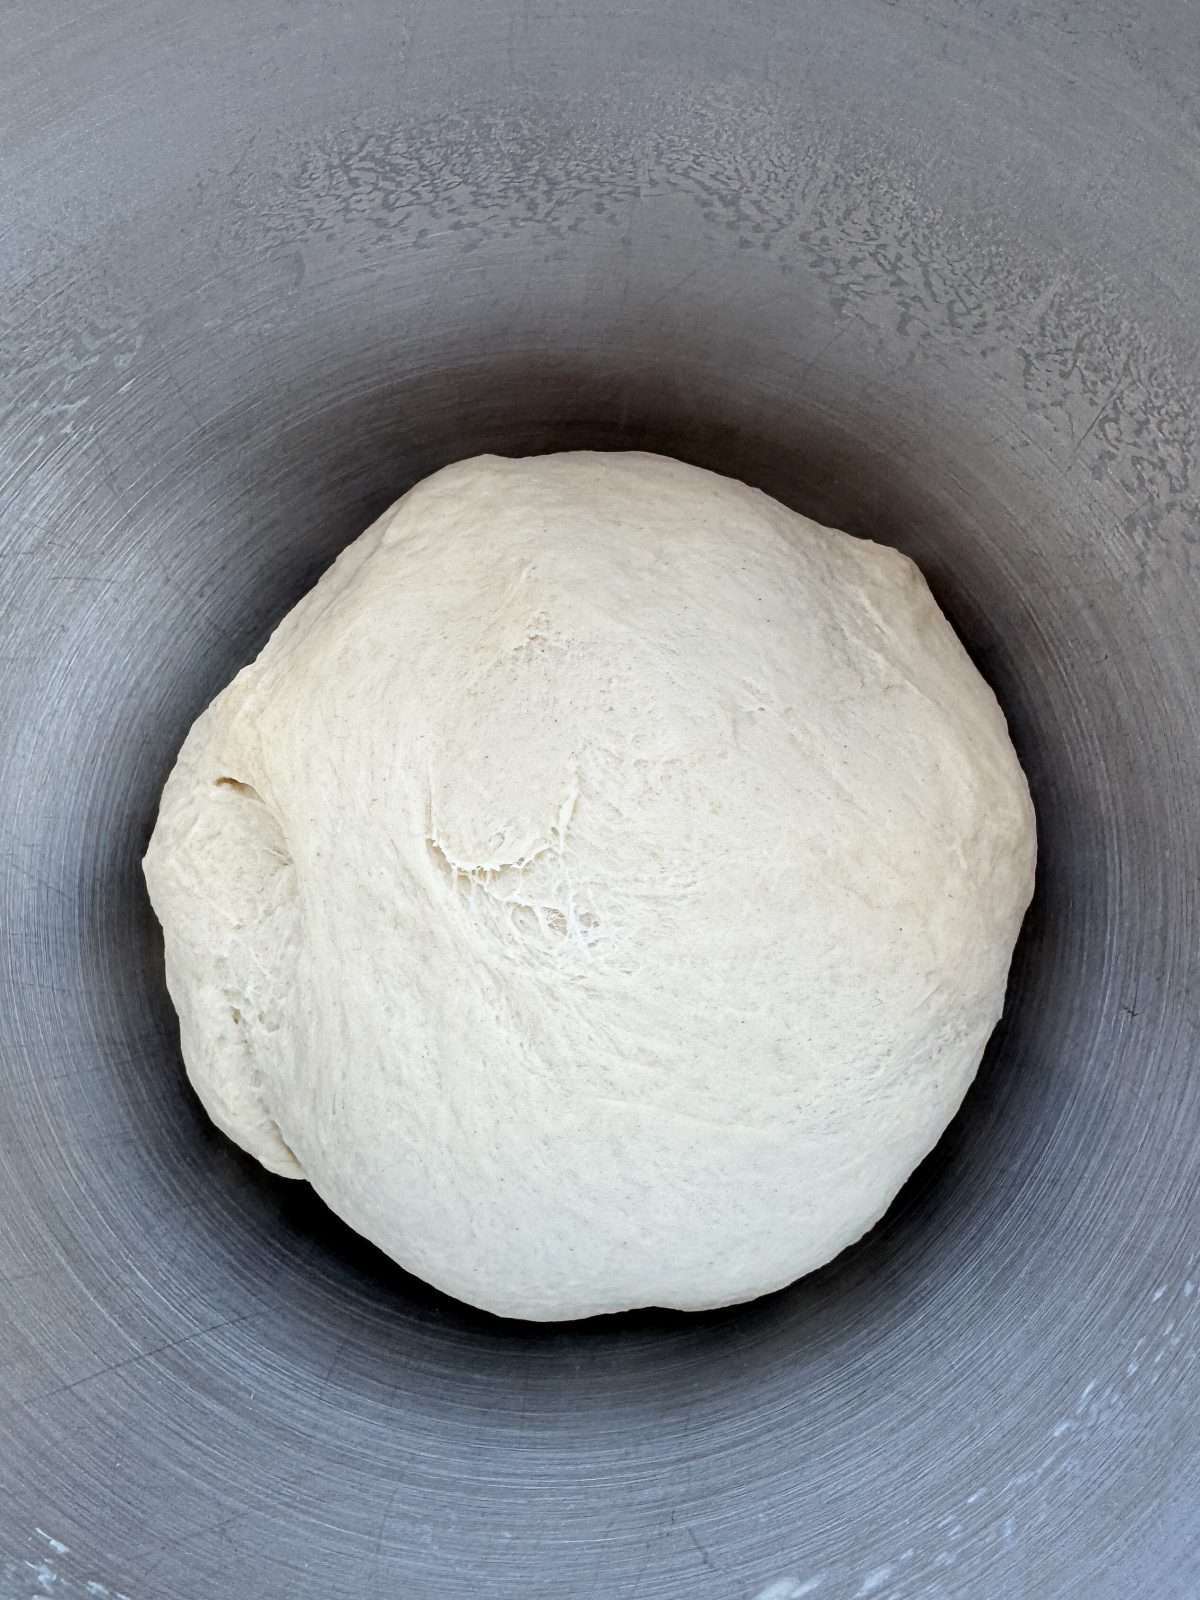
To make our bagel dough, first we stir water (warmed to 38°c/100°f) with dried active yeast then leave to go frothy. Then we add the yeast & water to the bowl of a stand mixer along with strong white bread flour, sea salt & malt extract syrup. This gets mixed on a medium-low speed until we get a smooth dough that passes the windowpane test. This will take around 10 minutes on a medium-low speed.
Once mixed, we cover the dough with a tea towel then let it rest for 10 minutes before shaping.
The Windowpane Test
The best way to assess the gluten development in your dough is by using the windowpane test. Here, you take a small piece of dough & stretch it between your fingers. If it stretches thin enough so that you are able to see through it, enough gluten has been developed. If it tears, more kneading is required.
2. Shaping
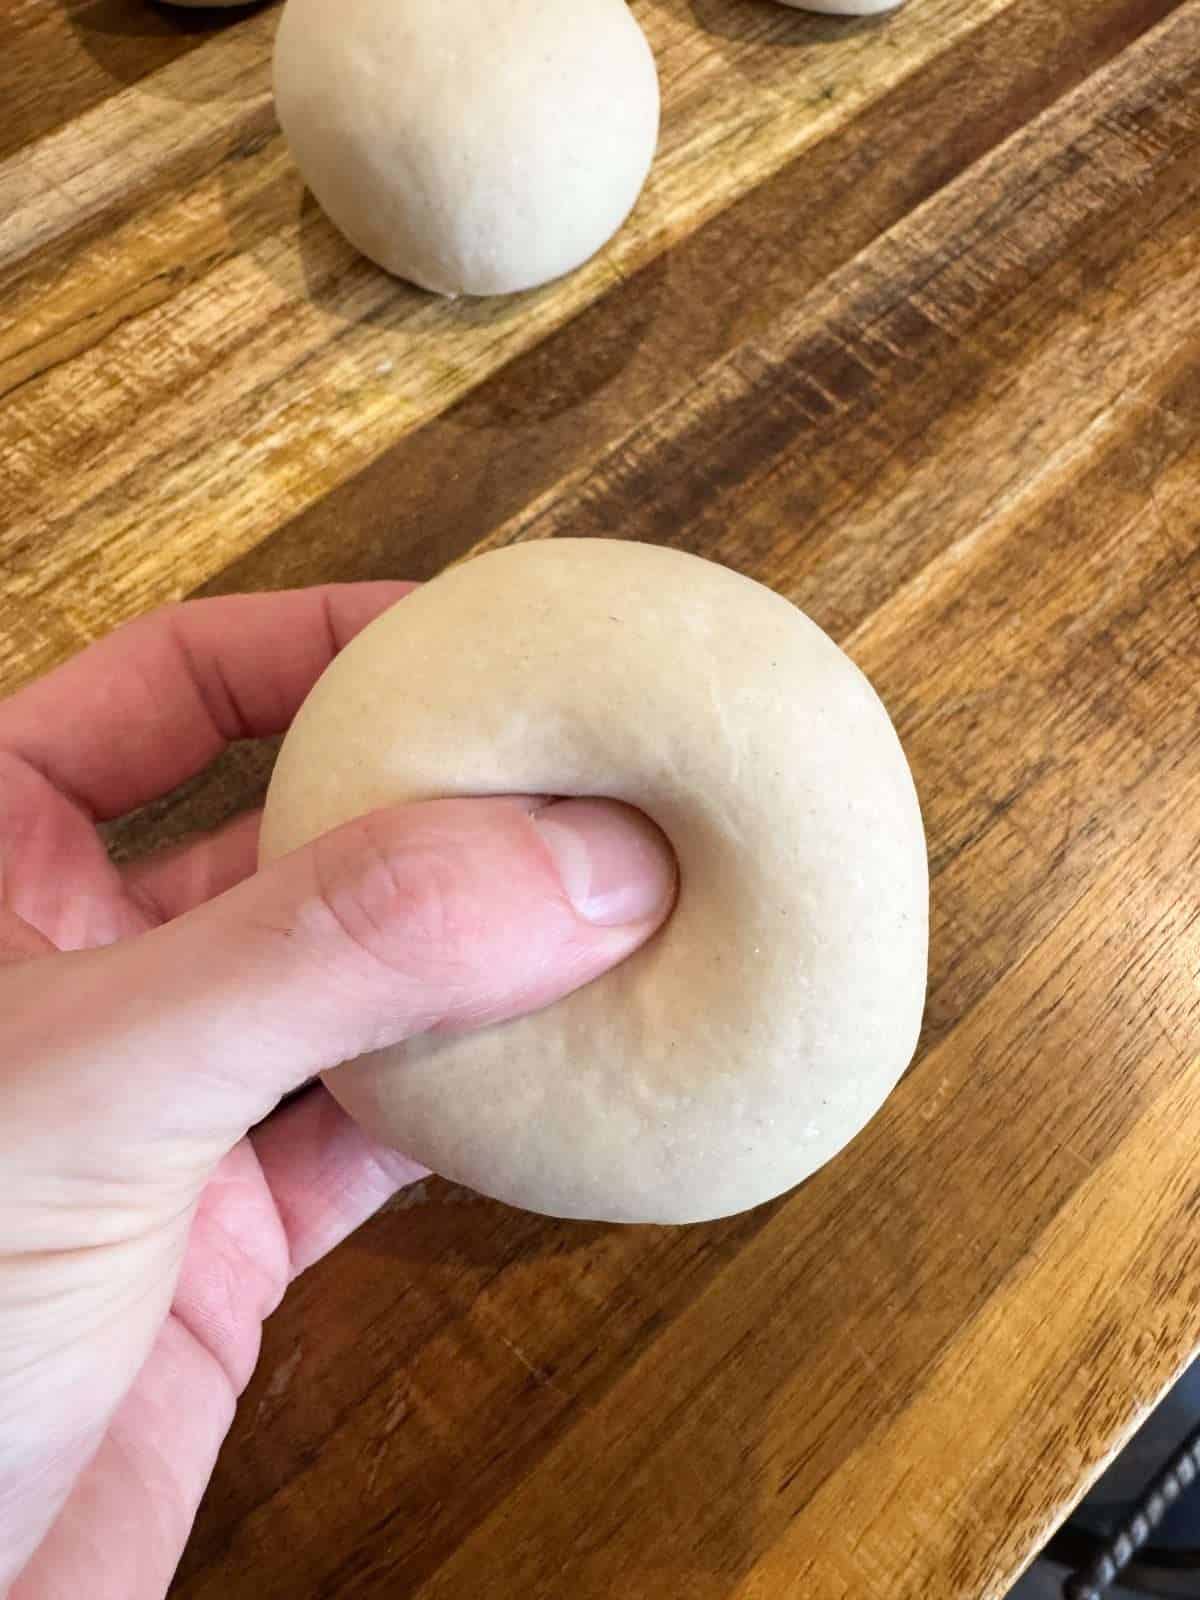
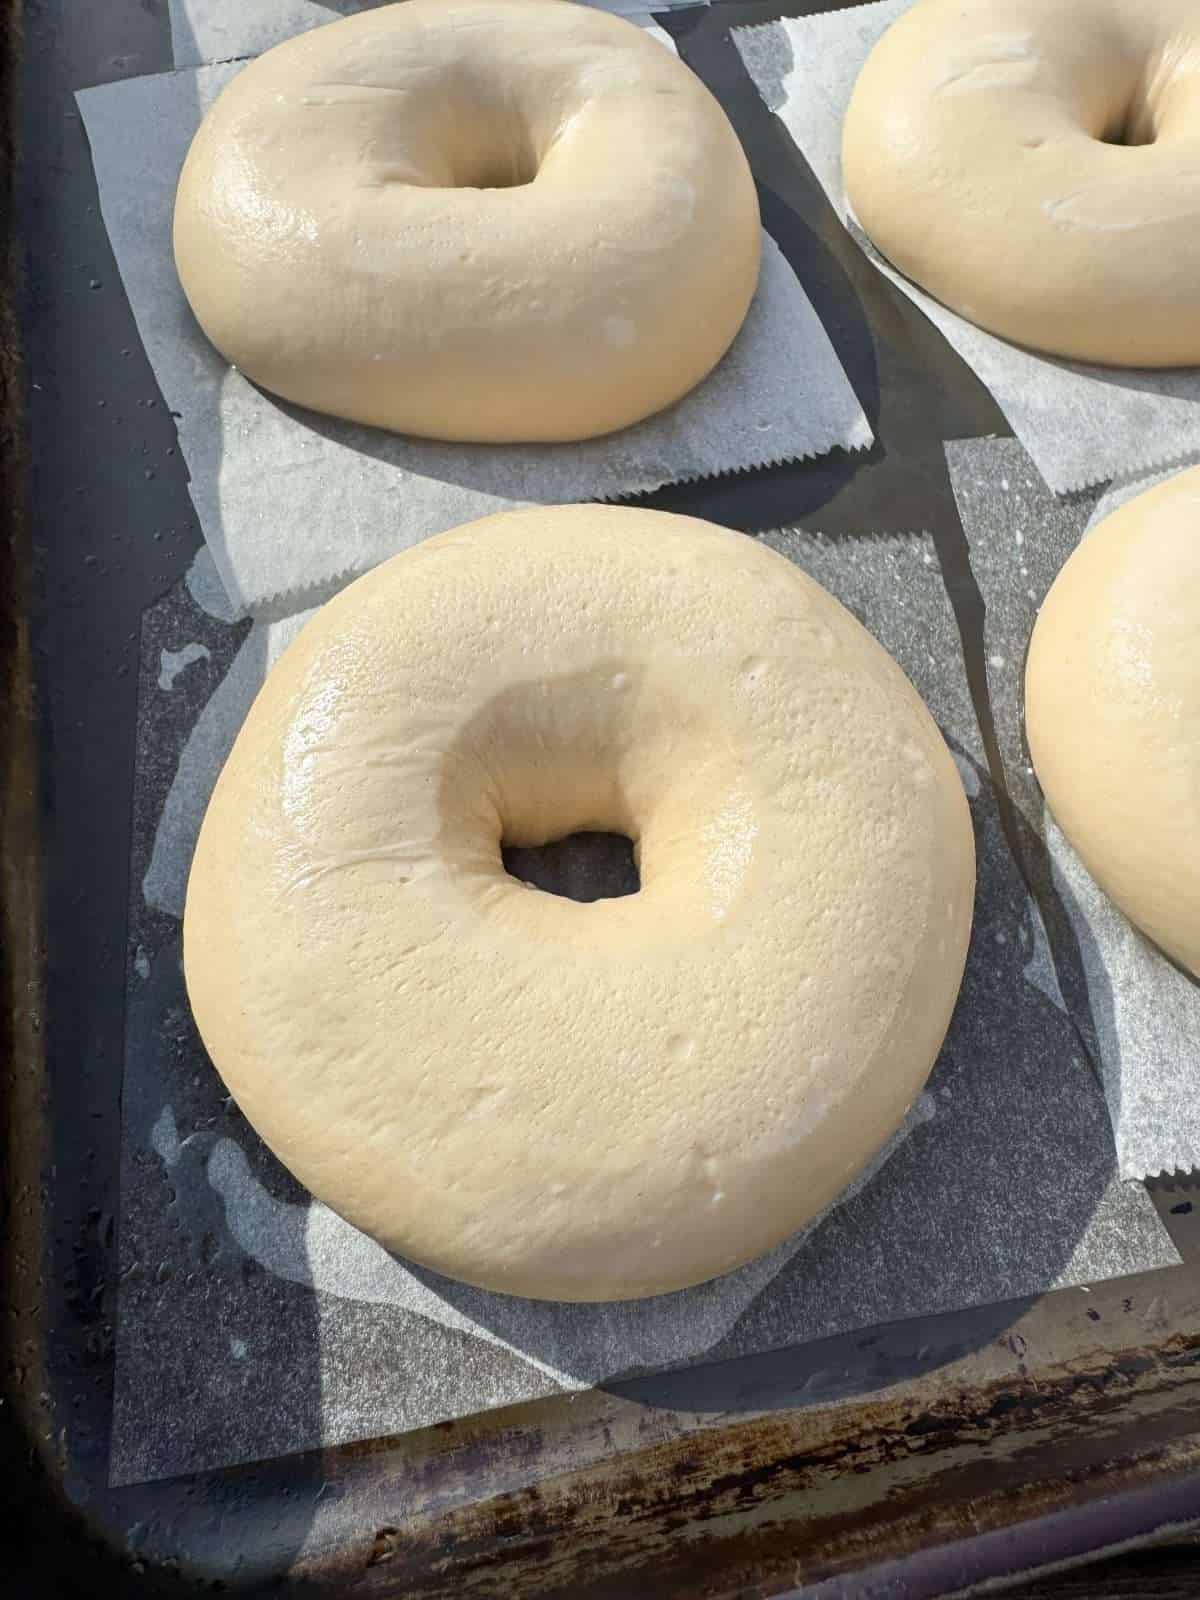
We shape our bagels in 2 stages. First, we divide the dough into 130 gram pieces, shape into balls then leave to bench rest for 5 minutes, covered in a damp tea towel. This relaxes the gluten, making it easier to shape the dough.
Then to shape the balls of dough into bagels, we use a thumb & index finger to pinch/poke a hole through the middle then we gently widen the hole so that it’s around an inch wide. Once shaped, we place each bagel onto its’ own square of greased parchment paper (this prevents the dough sticking).


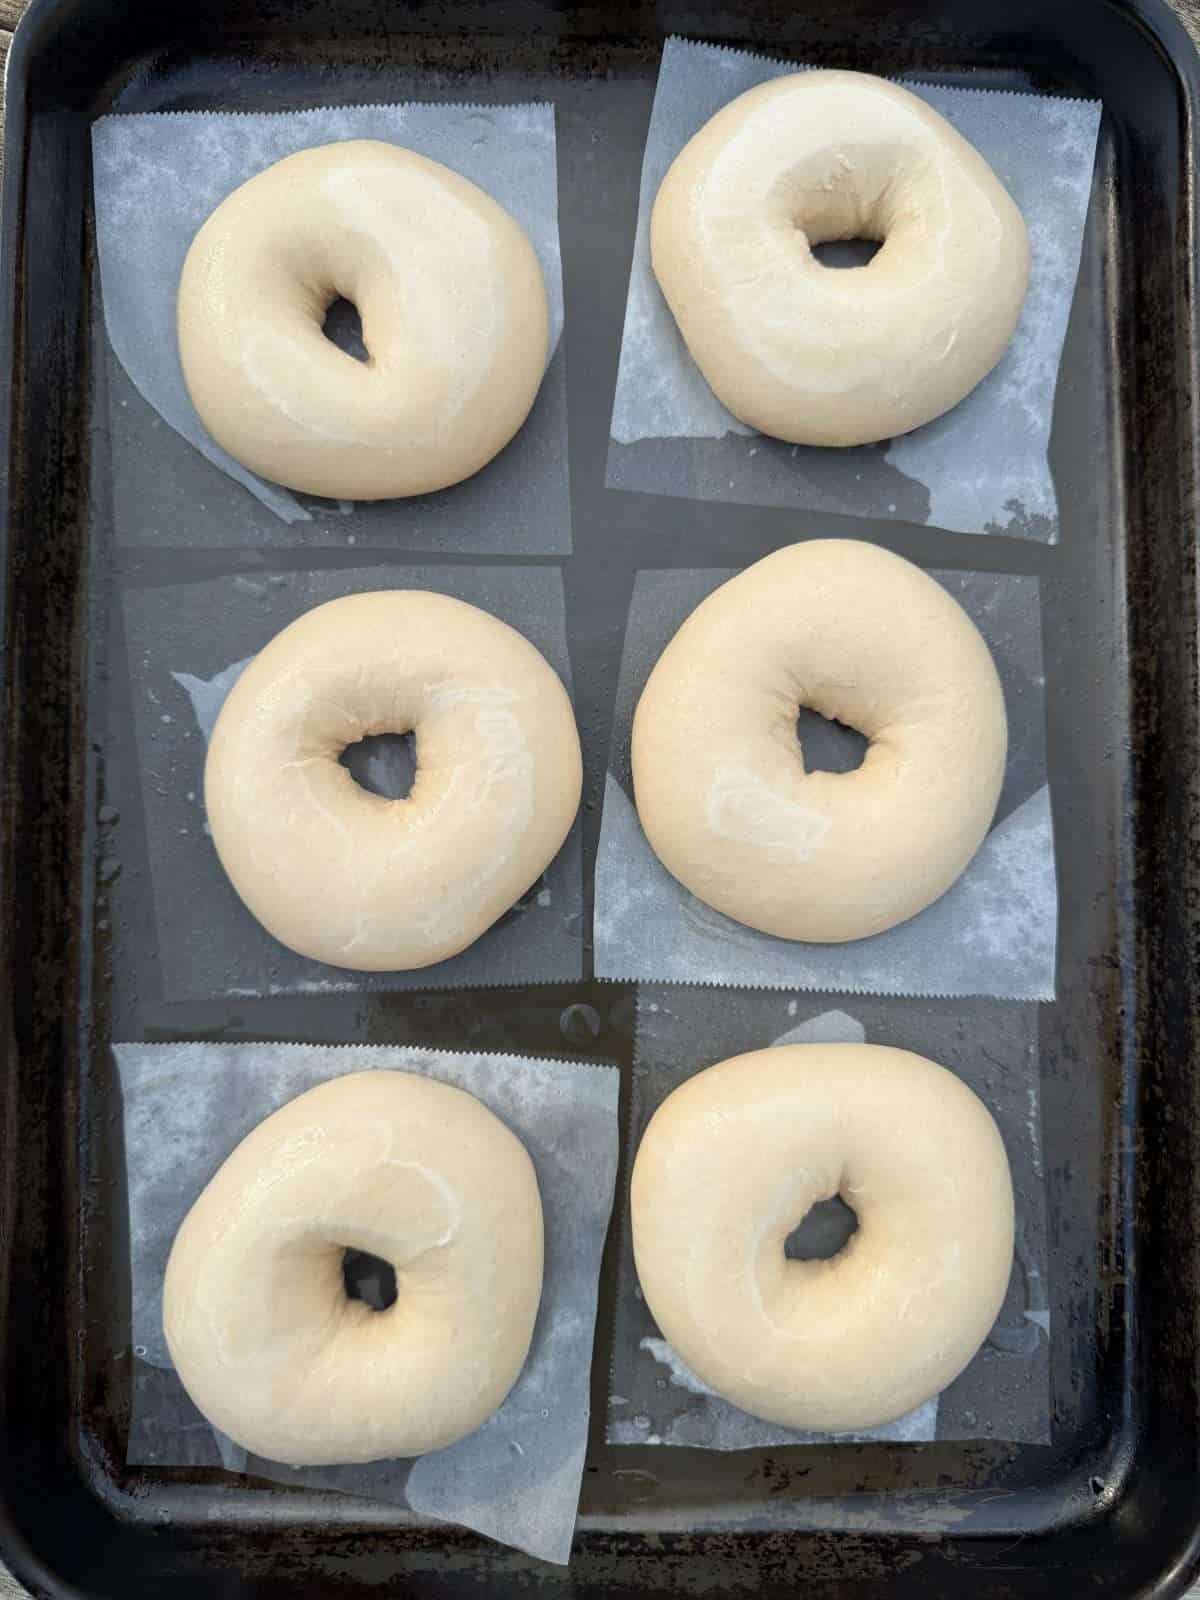
3. Cold Prove
Once shaped, we let our bagels sit at room temperature for 30 minutes then chill them in the fridge for 18-24 hours. Make sure to loosely cover the bagels with some oiled clingfilm, to prevent a skin forming.
You’ll be able to tell when your bagels are proved as they will have increased in volume & they’ll be lots of tiny bubbles in the dough. You could also perform the “float test” which is where we place a bagel into a bowl of room temperature water. If it floats, it’s ready to boil & bake.
If you’re kitchen is especially warm, it would be best to go with a 15 minute room temperature rest instead of a 30 minute one. On the other hand, if your kitchen is cold, it would be best to extend the room temperature rest by 15 minutes or so. The temperature of my kitchen tends to be around 25°c/78°f.
4. Boiling & Topping
The next day, we need to preheat an oven to 220°c/428°f. We also need to line a large baking tray with baking parchment & top with a light layer of semolina, which we’ll be cooking our bagels on.
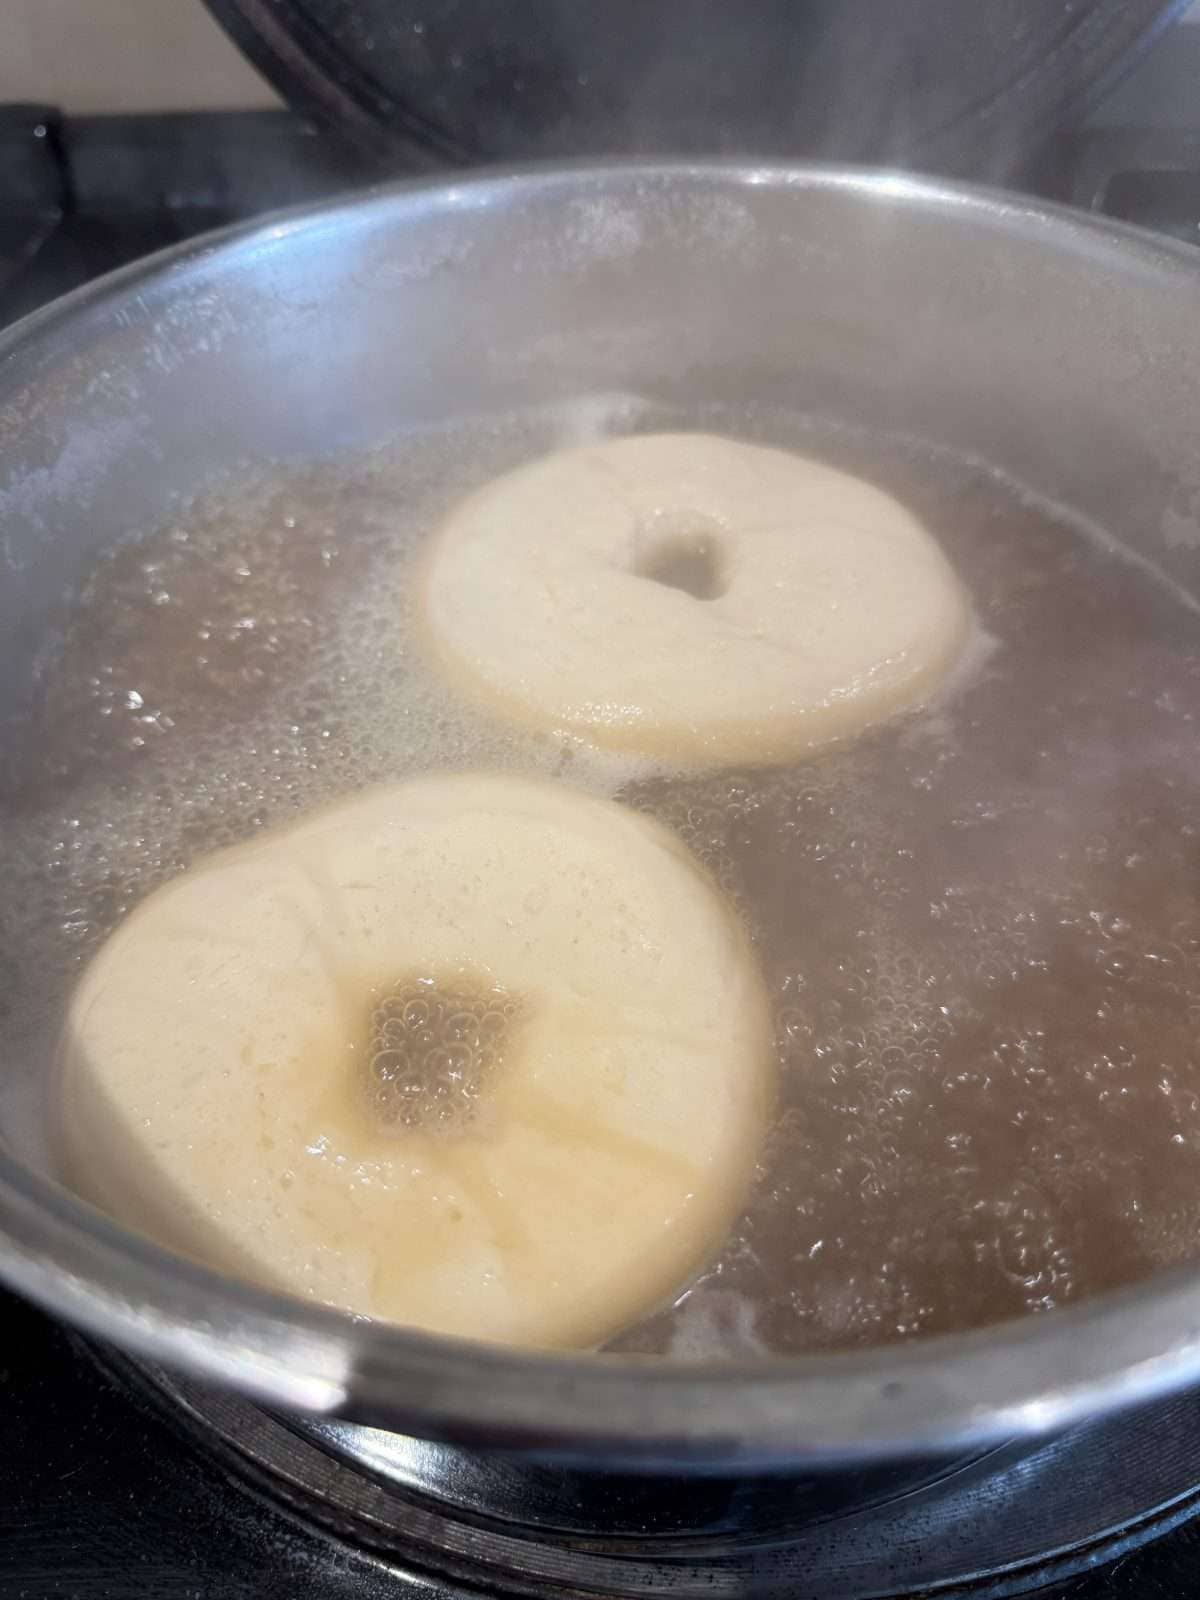
To prepare our boiling liquid we pour 2 litres of water into a large saucepan, add in 2 tbsp of malt extract & 1 teaspoon of bicarbonate of soda (baking soda) then set over a high heat & bring to the boil, stirring occasionally to melt the syrup. Once the water is boiling, we turn the heat down slightly so that it’s at a constant but gentle boil.
Next, we carefully add 2 or 3 bagels into the water (depending on the size of your pan) then boil for 1 minute on each side. Then we use a slotted spoon to lift each bagel out of the water & onto a wire rack set over a tray so that they can drain momentarily. The boiled bagels should now be topped with seeds whilst they’re still tacky then we place them onto the semolina dusted baking tray & repeat with the remaining un boiled bagels.
Bagel Boiling Workflow
Here’s my workflow for boiling & topping bagels before baking them! Here I boil a couple of bagels at a time, drain them on a wire rack then top them with seeds (or whatever topping you like!) whilst they’re still tacky. If you let the bagels dry out too much, the seeds won’t stick!
- Line a large tray with baking parchment then sprinkle with semolina. Set this aside for now.
- Next, get your boiling water on the stove & bring to the boil. Then in the meantime, set a wire cooling rack onto a baking tray & set to one side.
- Once your water is boiling, add in 2 or 3 bagels (depending on how big your pan is) then boil for 1 minute on each side.
- Use a slotted spoon to lift the bagels out of the water & onto the cooling rack.
- Whilst the bagels are draining, add 2 or 3 more bagels into the boiling water.
- Top the boiled bagels with seeds/bagel seasoning whilst the next batch is boiling then transfer to the semolina dusted baking tray.
- Repeat this process until all of your bagels are boiled then bake.
5. Baking
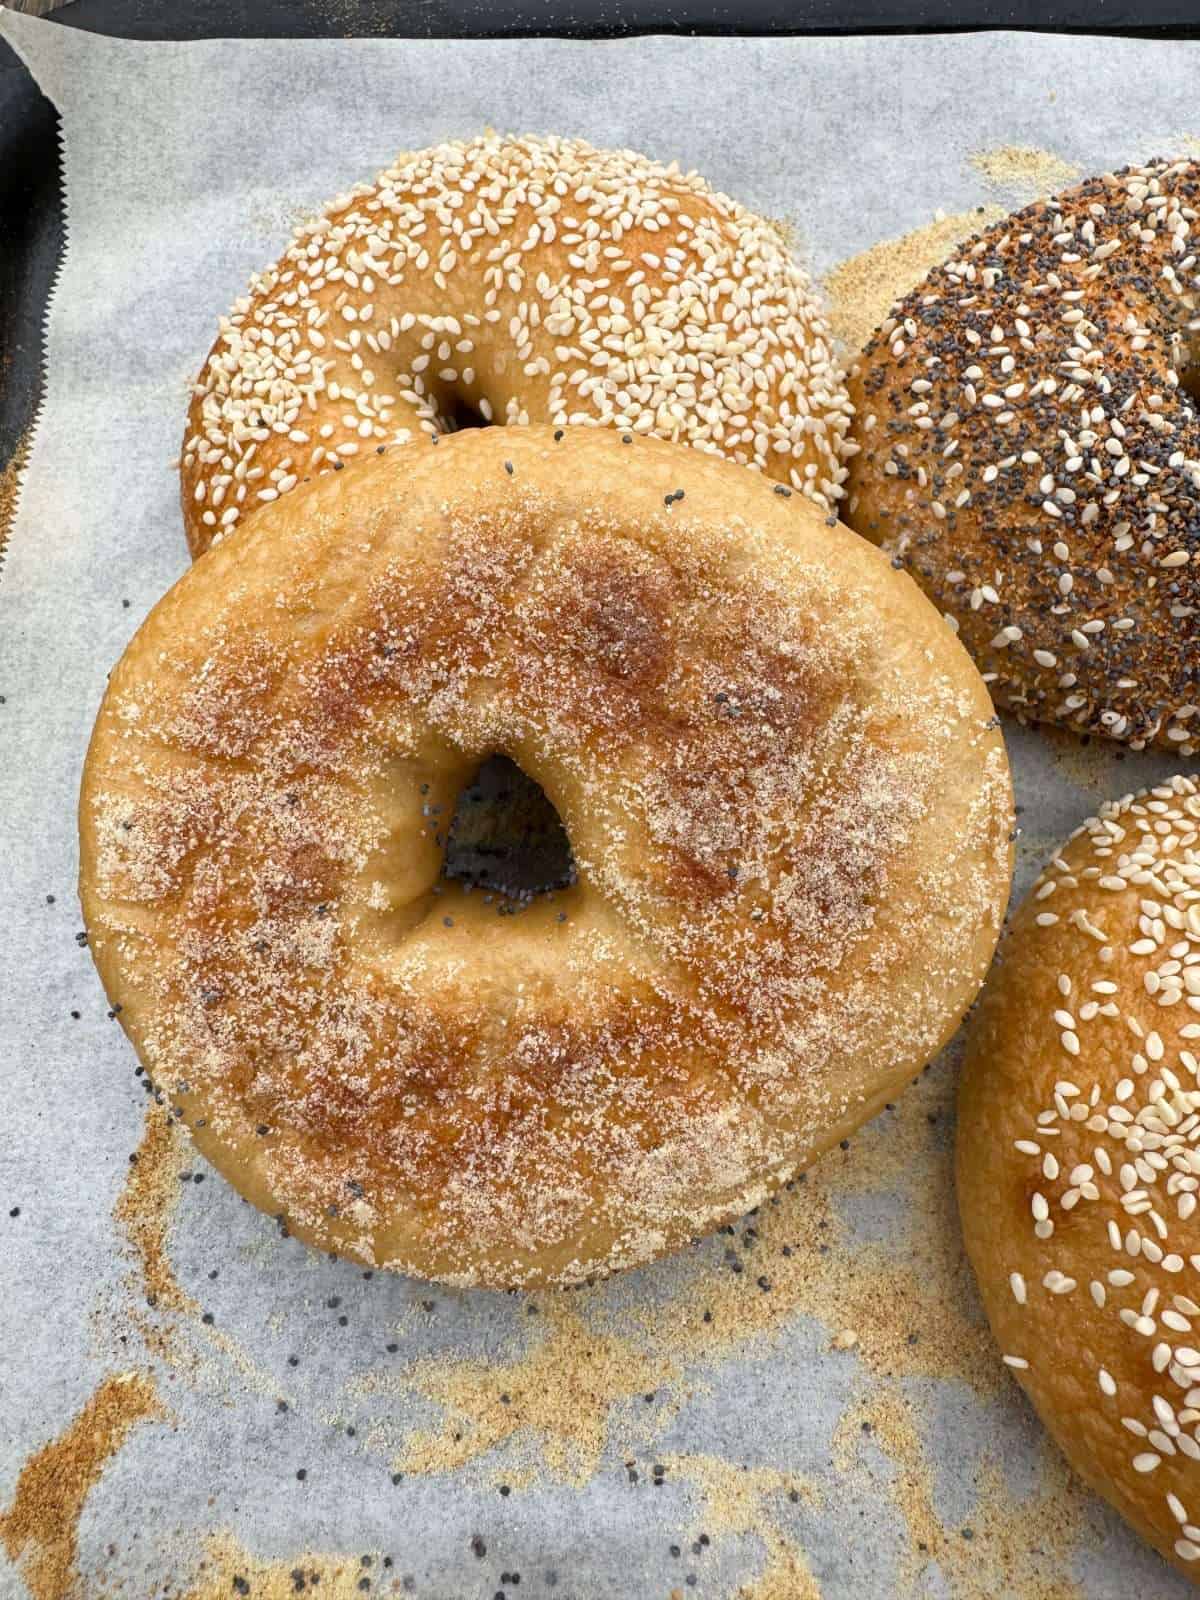
Once all of our bagels are boiled & topped, we bake them for 14-16 minutes until they are a deep golden brown then let them cool on the tray. Don’t worry if the crust seems too crisp when the bagels come out of the oven as they will soften as it cools.
Tips & Tricks
- For an authentic New York style bagel flavour, use malt extract syrup in the dough & the boiling water.
- Prove the dough overnight in the fridge to give your bagels a more developed flavour. Make sure to cover them with clingfilm to stop a skin forming.
- Homemade bagels are best served the same day as they were made so serve them fresh or toast them instead!
- Use a big saucepan to boil your bagels in. The water will increase in volume when we add the bicarbonate of soda in so it’s important to use a big enough pan so that it doesn’t over flow.
- Make sure that your water is at a constant boil before adding in the bagels. If the water isn’t hot enough the bagels could collapse & the crust won’t develop properly.
- Top your bagels almost straight after boiling (they should be tacky) so that the toppings stick properly.
Frequently Asked Questions
A strong white bread flour is best for New York style bagels, preferably one with a protein content of at least 14%. The high protein content is what gives the bagels their chewy texture, along with the boiling step.
New York style bagels are boiled before baking to give them a shiny crust that has a chewy texture. New York style bagels are baked in water, malt extract & bicarbonate of soda, which helps give them a deeper colour once baked. The malt extract also adds flavour.
A New York style bagel is defined by its’ chewy texture & shiny crust. New York style bagels are always boiled in a mix of water & malt extract syrup.
Bagel doughs tend to have a low hydration so need more kneading than other doughs in order to develop the gluten properly. Because of this, it’s a lot easier to use a stand mixer when making bagels but it is possible to knead the dough by hand. It will be a lot of work though!
Homemade bagels are best eaten on the same day as they were made but will keep for a day or two when stored in an airtight container. For an extra couple of days shelf life, bagels can be stored in the fridge. If your bagels start to go a bit stale, they’re really good toasted!
New York bagels are meant to be dense & properly chewy. It should take a bit of effort to eat! However you can make your bagels as chewy as you like. Chewy bagels are made with a low hydration dough & are boiled for longer. Softer, fluffier bagels are made with a dough that has a higher hydration & aren’t boiled for as long.
No you don’t have to boil bagels but if you want the best crust & authentic chewy texture, boiling is a necessary step.
To cook New York style bagels in an Aga, use the boiling plate to boil them then bake in the roasting oven on the third from bottom set of runners.
Equipment Used
Please note that these are affiliate links & I may make a small commission if you make a purchase using these links, at no extra cost to you. For more information, click here.
More Bread Recipes To Try!
- 100% Biga Potato Pizza Dough
- Tangzhong Dinner Rolls
- Potato Burger Buns
- 3 Day Poolish Pizza Dough
- Overnight Potato Focaccia
- Pizza Oven Pittas
If you have enjoyed this recipe for New York style bagels, it would mean a lot if you could leave a review & rating. And if you’d like to stay up to date with future recipes, follow us on Instagram & TikTok!
Overnight New York Style Bagels
Equipment
- Stand Mixer
- Digital Food Probe
- Dough Scraper
- Large Saucepan
- Baking Tray
Ingredients
Dough
- 500 g Strong White Bread Flour (See Notes)
- 285 g Water (@38°c/100°f)
- 2 g Dried Active Yeast
- 10 g Fine Sea Salt
- 20 g Malt Extract Syrup
To Boil
- 2 Litres Water
- 2 tbsp Malt Extract Syrup
- 1 tsp Bicarbonate Of Soda
Toppings
- Semolina
- 6 tsp Seeds/Bagel Seasoning (See Notes)
Instructions
Overnight Bagel Dough
- Add the water & dried active yeast to a jug, whisk to combine then leave for 5-10 minutes, to go frothy.The water needs to be at @38°c/100°f. You'll need a digital food probe to check this!
- In the meantime, add the flour, sea salt & malt extract to the bowl of a stand mixer.
- Once the yeast is activated, give it another whisk then pour into the flour. Mix on a medium-low speed until you get a smooth dough that passes the windowpane test. This will take 10-15 minutes.
- Once the dough is ready, cover the bowl with a damp tea towel then leave to rest for 10 minutes.
- Transfer the dough to an un floured work surface then divide into 6 equal pieces, each weighing around 130 grams. Shape into balls then cover with a damp tea towel & leave to bench rest for 5 minutes.
- In the meantime, cut out 6 squares of baking parchment, grease with oil then place onto a baking tray.
- Next, take a ball of dough & use your thumb & index finger to pinch/poke a hole in the middle. Gently widen the hole so that it's around an inch wide then place the bagel onto a square of baking parchment. Repeat with the remaining dough then loosely cover the tray with lightly oiled clingfilm.
- Let the bagels sit at room temperature for 30 minutes then chill in the fridge for 18-24 hours.
Boiling & Baking
- The next day, preheat an oven to 220°c/200°c fan (428°f/392°f).
- Next, line a large baking tray with baking parchment then sprinkle a light layer of semolina on top. Get another baking tray & set a wire rack on top.The semolina tray is for baking the bagels & the wire rack is for draining them after boiling.
- Next, add the water, malt extract & bicarbonate of soda into a large saucepan then set over a high heat & bring to the boil, stirring to melt the syrup.
- Once the water is boiling, turn the heat down slightly to medium-high.The water needs to be at a constant boil when we add the bagels in. If any foam forms on the top of the water, give it a stir to dissolve it.
- Carefully add 2 or 3 bagels into the boiling water (depending on the size of your pan) then boil for 1 minute on each side. Use a slotted spoon to lift the bagels out of the water & onto the wire rack. Leave to drain momentarily, top with your seeds of choice then set onto the semolina dusted baking tray.To add the bagels into the water, flip them off the baking parchment so that they go in top side down. This way, they'll be the right way up when we flip them over & take them out.
- Repeat the boiling & topping process with the remaining bagels then bake for 14-16 minutes, turning the tray after 10. Once cooked, the bagels will be a deep golden brown. Don't worry if the crust seems too crisp, it will soften as it cools!
- Let the bagels cool completely on the tray then serve.