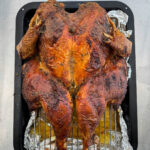
Roasted Spatchcock Turkey With Herb Butter
The best way to cook a perfectly roasted whole turkey with juicy meat & crisp, golden skin is to spatchcock it first! This allows the meat to cook more evenly & we’re cooking it in herb butter, for extra flavour.

In my opinion, spatchcocking then roasting is by far the best way to prep & cook a whole turkey, whether that’s at Christmas, Thanksgiving or Easter! The process is simple; you remove the turkey’s backbone, flatten the bird then roast at a high oven temperature for a lot less time than when you cook a regular whole turkey. The results speak for themself! You end up with crispy, golden skin and perfectly cooked white & dark meat that’s juicy, full of flavour & cooked evenly & at the same time. Wave goodbye to disappointing, dry turkey!
In this recipe, there’s an in depth guide on how to spatchcock a turkey properly, how long to cook it for (internal temperatures & timings) and how to properly carve the meat from the bones. We’ve also included some suggestions on what to use leftover turkey for & how to reheat it properly.
We’ll also going to be taking advantage of a dry brine which is applied the day before we roast our turkey, as well as a quick homemade herb butter that’s added under the turkey’s skin before roasting & brushed on top as it cooks. The dry brine is simply a mix of salt, herbs, garlic & zest that flavours the meat & prevents it from drying out and the herb butter is added for extra flavour & moisture.
If there’s a better way to cook a whole turkey, I’m yet to try it & I’m confident that this will take your Christmas dinner to the next level!
For more festive recipes, take a look at our collection of Christmas recipes! There’s lots to choose from here, from festive main courses, classic desserts & all the trimmings.
What You’ll Need
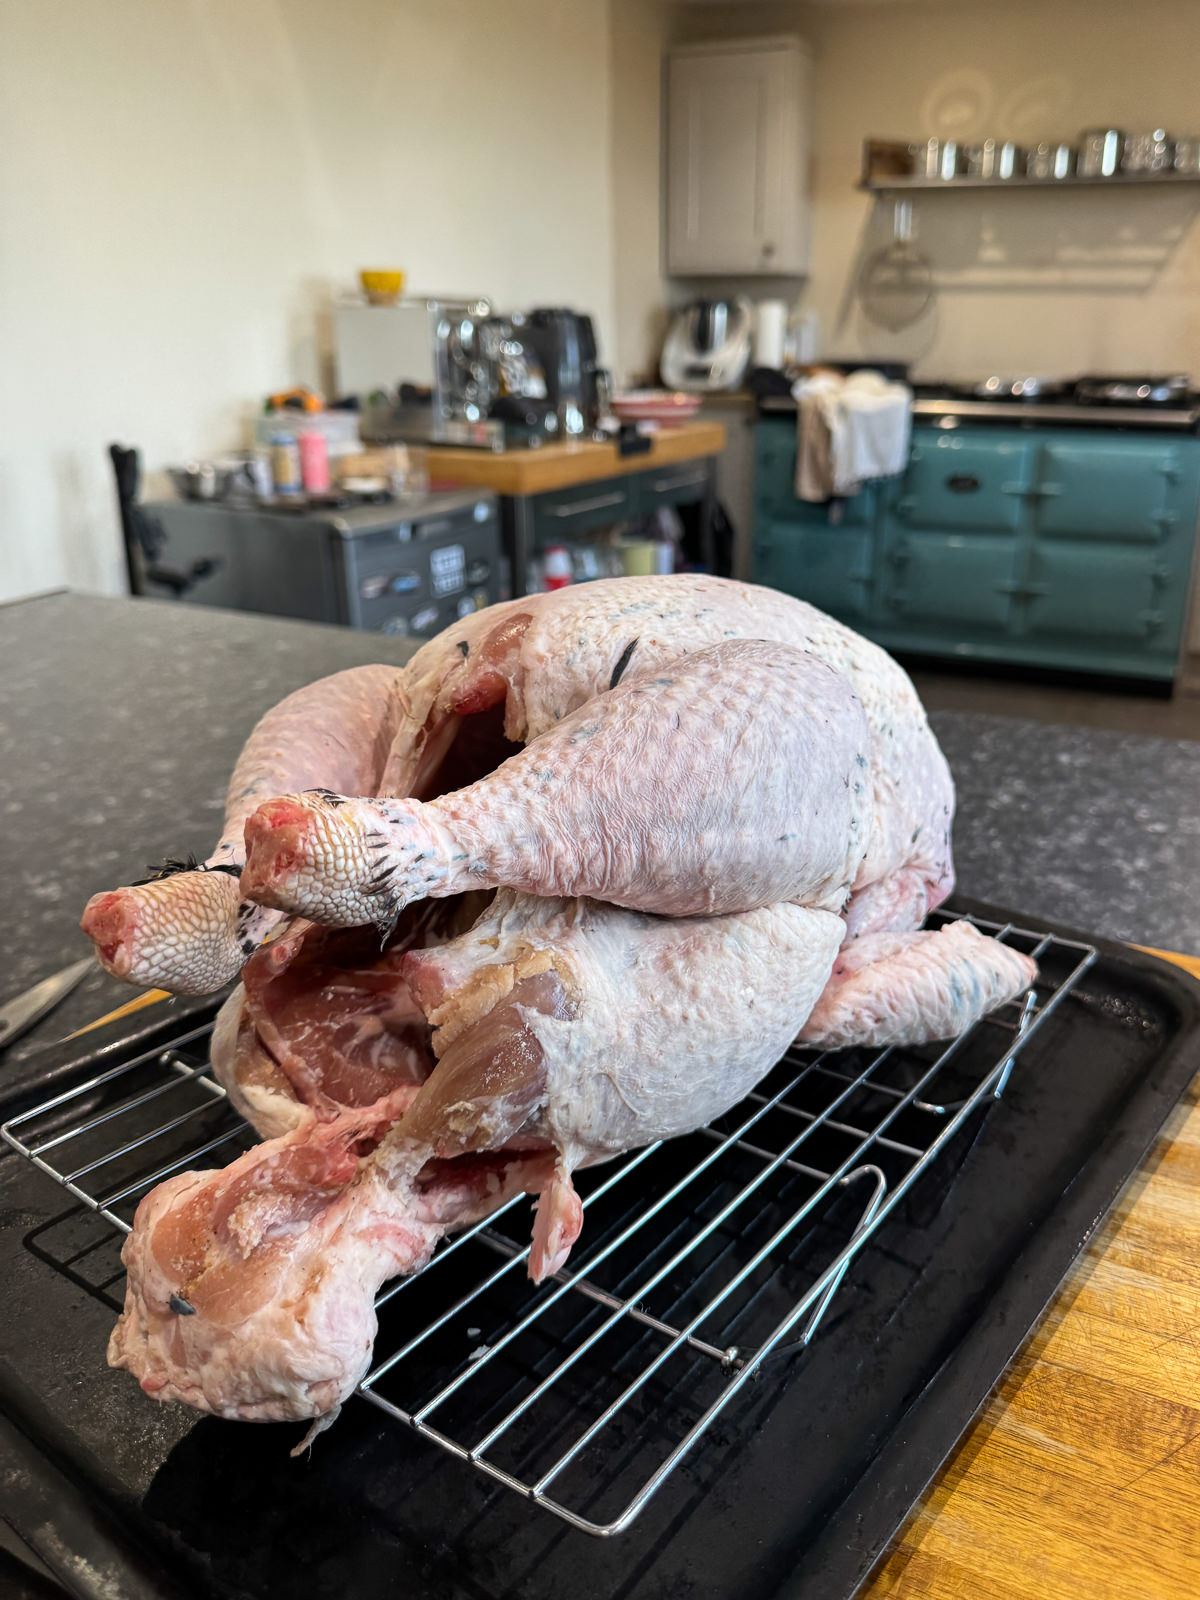
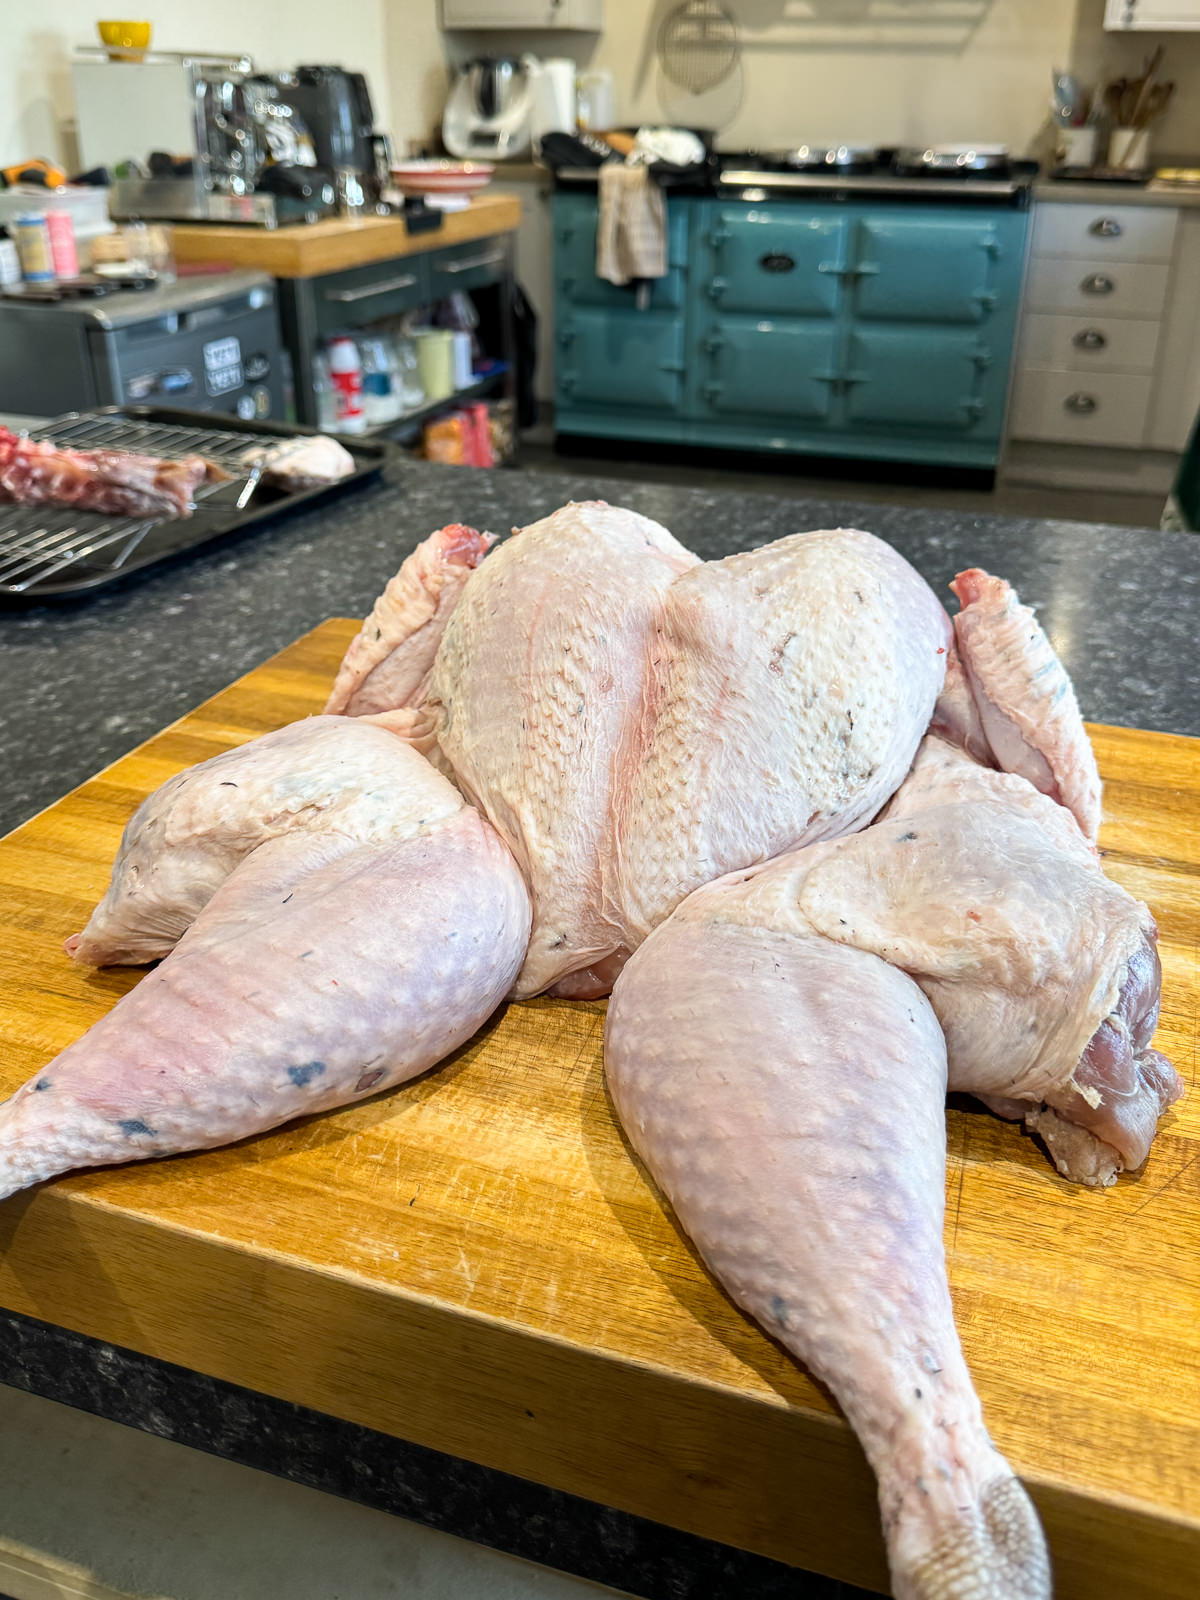
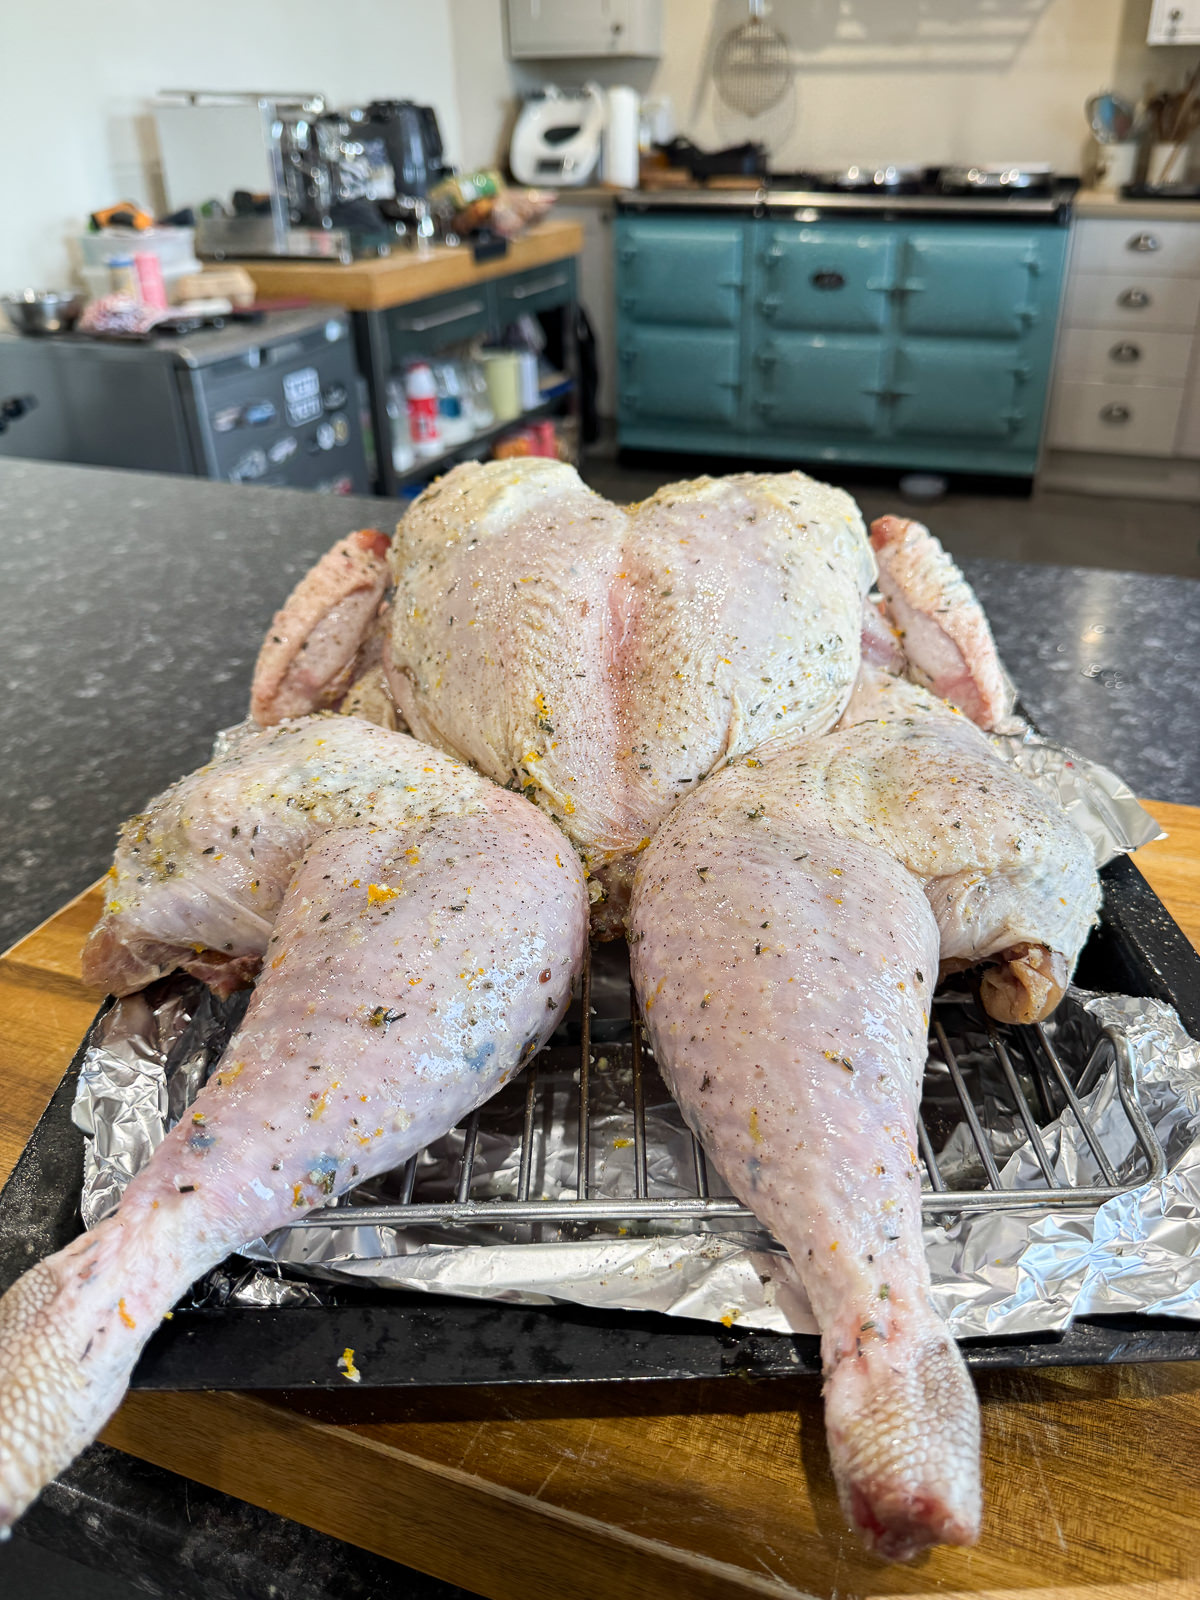
- A Whole Turkey – Ask your butcher for a 5½-6 kg whole turkey. Using a good quality turkey makes all the difference here! We’re going to be spatchcocking our turkey so that it cooks more evenly. This is really easy to do & is where we cut out the backbone then press the turkey flat before roasting.
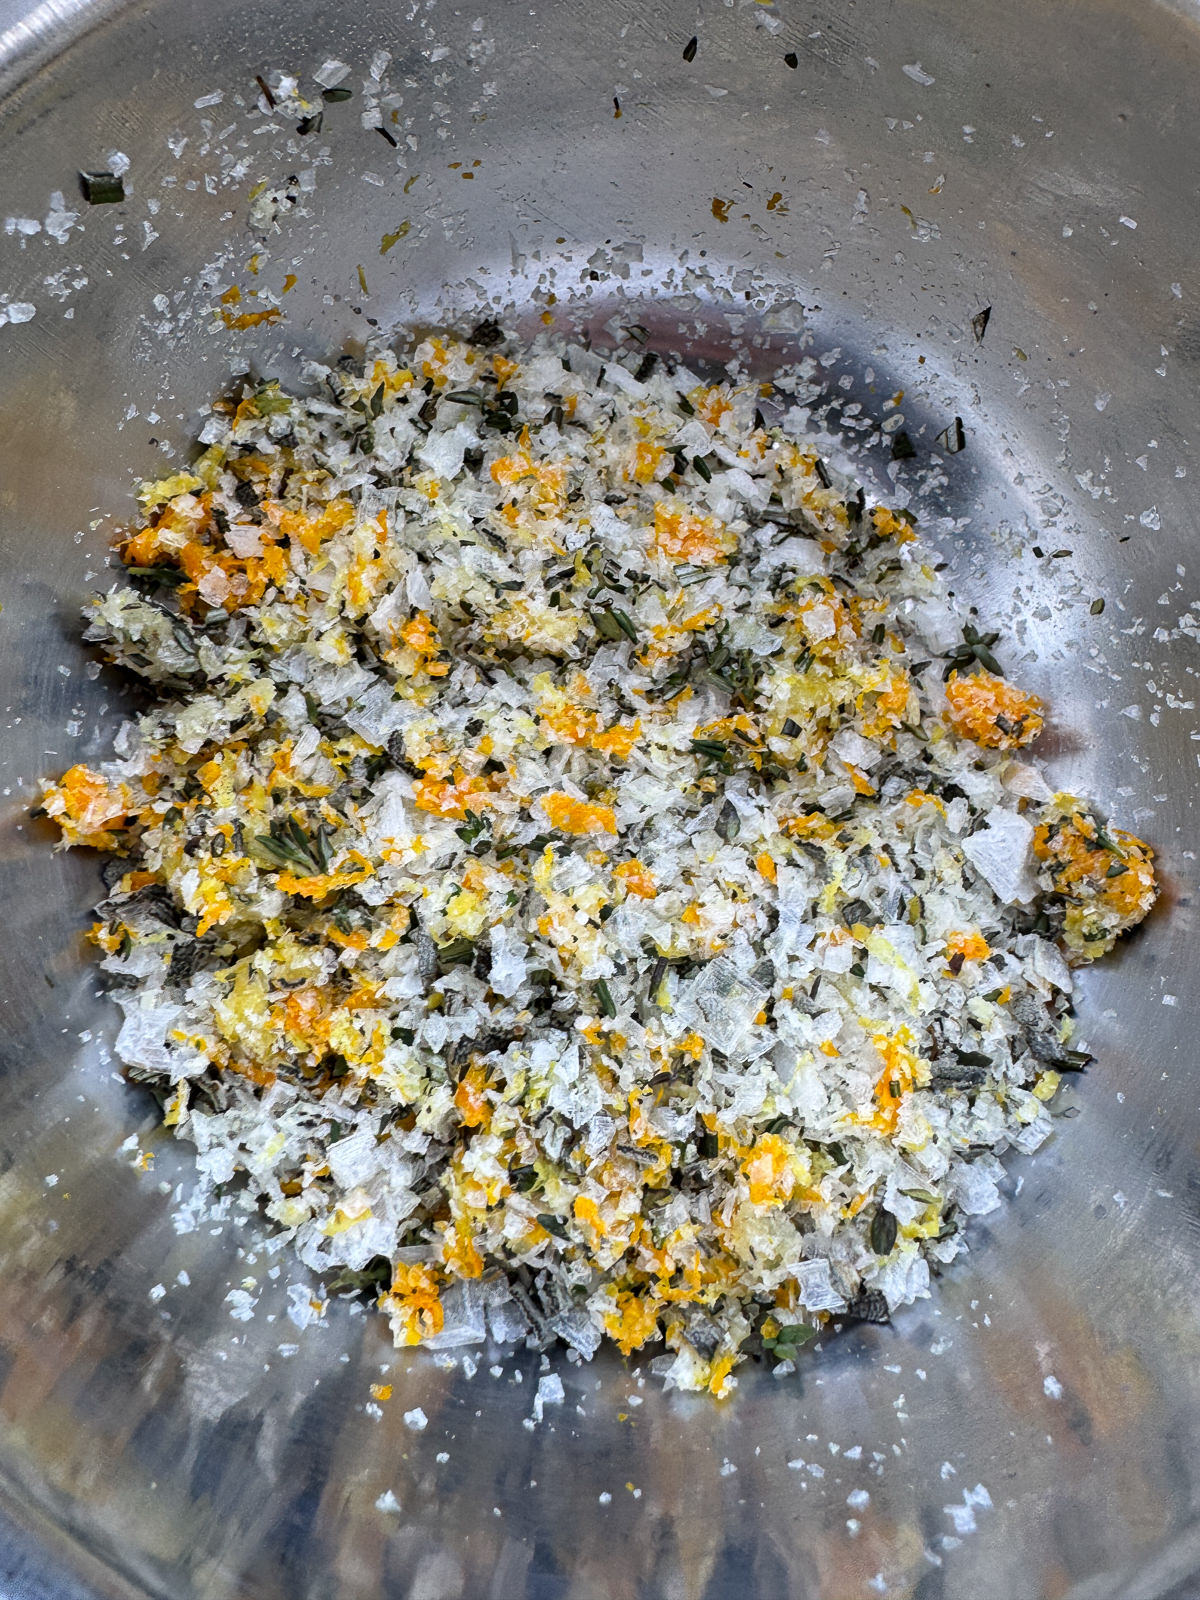
- Dry Brine – A dry brine is simply a mix of sea salt & whatever flavouring you like! For turkey, I like to use fresh garlic, lemon & orange zest and chopped sage, rosemary & thyme. This is sprinkled all over our turkey the day before we cook it.
- Herb Butter – We’re placing some homemade herb butter under the turkey’s skin before roasting for extra flavour & moisture. This is super easy to make; we simply blend softened butter with garlic, fresh herbs & lemon zest.
How To Spatchcock A Whole Turkey
A spatchcocked turkey is a whole turkey that has had its’ backbone removed then been flattened. By doing this, you’re essentially butterflying the turkey which means that every part of the bird can cook evenly without the meat drying out, unlike when you cook traditional whole turkey. Spatchcocking also means that we can roast the turkey at a higher temperature which gets the skin crispier & shortens the cook time.
The process of spatchcocking a whole turkey is pretty much the same as a chicken, just on a larger bird. Here’s how;
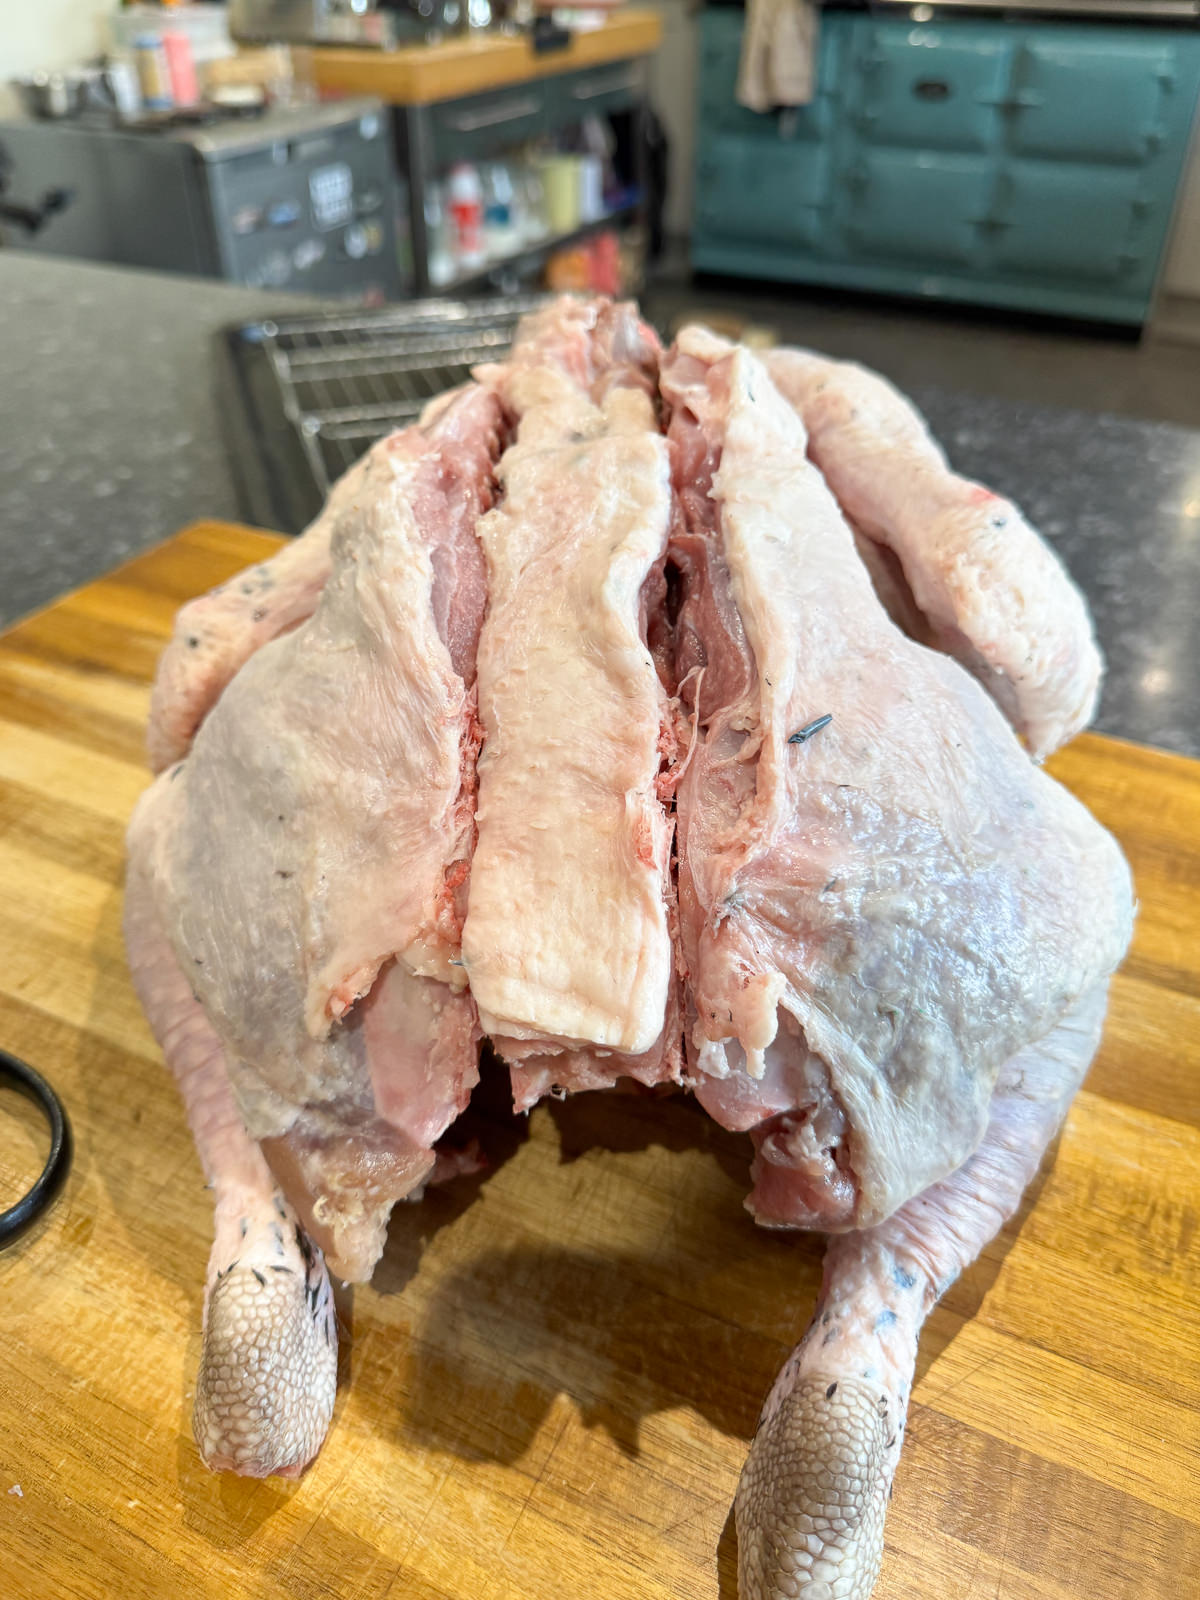
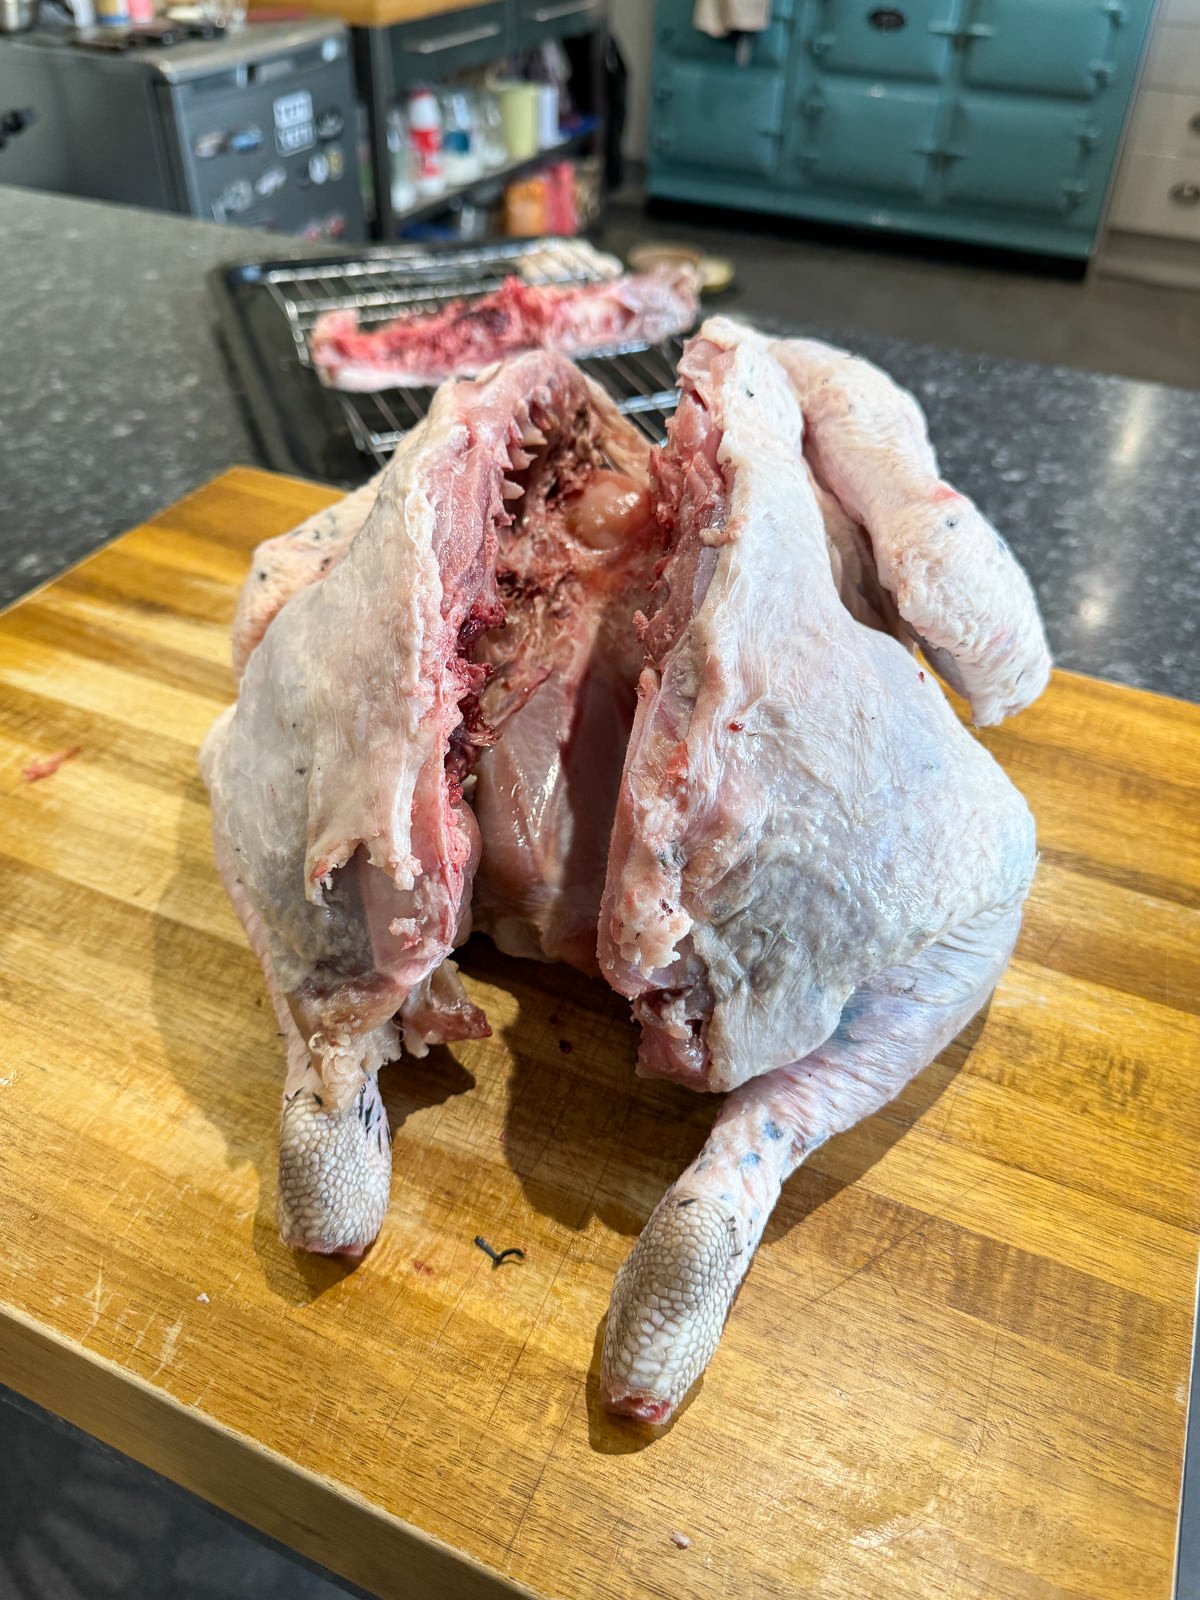
- Pat the turkey dry with kitchen paper then place it onto a chopping board so that it’s facing breast side down. If there’s any giblets or the neck inside the turkey, take them out & save for them for making homemade gravy!
- Next, use a pair of poultry shears to cut down each side of the backbone. To do this, start at the tail end then cut all the way up to the neck, cutting through the rib bones. Save the backbone for making gravy as well.
- If needed, trim any excess fat or overhanging skin from near the neck. You can remove the wishbone now as well, for easier carving. This is optional though & I don’t usually do it.
- Next, flip the turkey over so that it’s facing breast side up. Place your hands on the middle of the breasts then press down hard to make the turkey sit flat. You should hear a couple of cracks as you do this. The turkey is now spatchcocked!
1% Dry Brine
A 1% dry brine is a mix of salt & flavourings that’s made with 1% of the spatchcocked turkey’s weight in sea salt. This provides just the right amount of seasoning, whilst adding flavour to the turkey as well. Not only that but by dry brining our turkey, it will retain moisture as it cooks & won’t dry out!
For this turkey recipe, we’re flavouring our dry brine with ingredients that traditionally work with turkey. We’re talking garlic, lemon & orange zest and fresh sage, rosemary & thyme. To make the brine we finely chop the herbs then mix them into the salt, along with the zests.
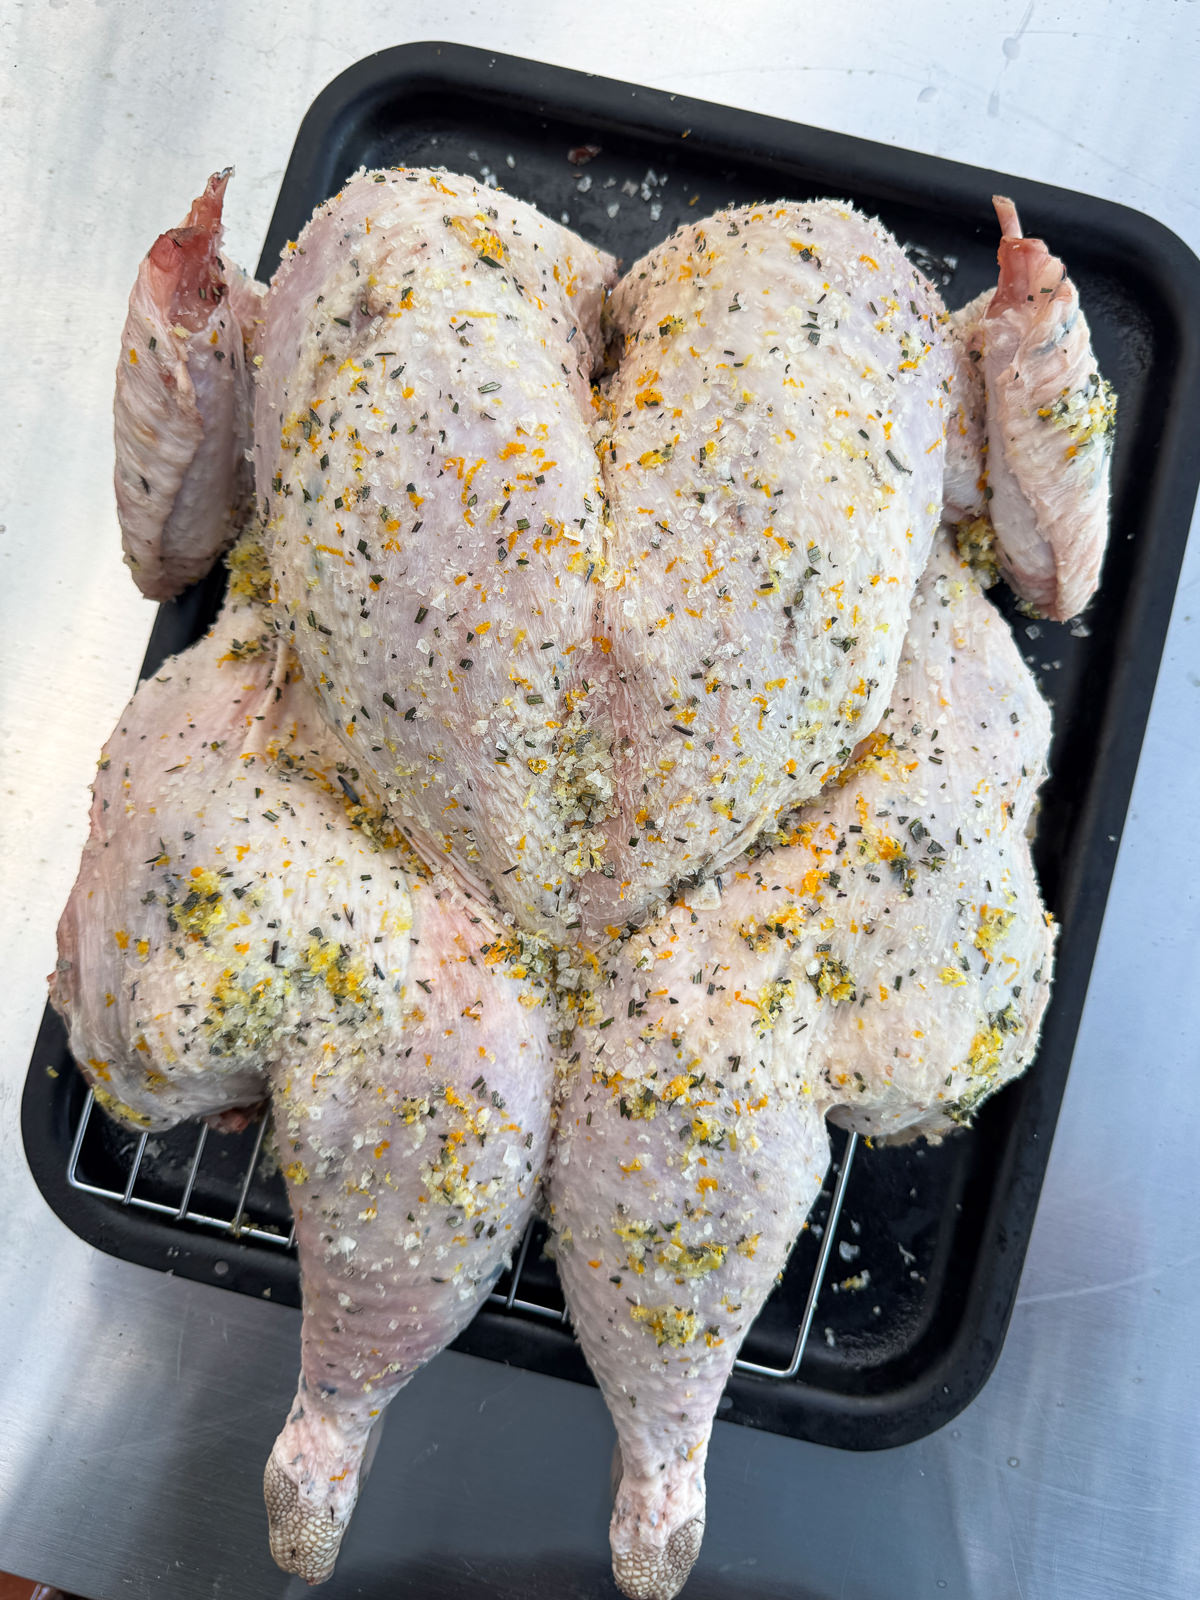
Then to dry brine our turkey (after we’ve spatchcocked it), we simply sprinkle the salt mix over both sides and under the skin. We place the turkey onto a rack set on a tray then chill it, uncovered in the fridge for 18-24 hours before cooking.
Example salt weight – If your spatchcocked turkey weighs 5.5kg (5500g), you’ll need 55g of sea salt. To work this out, you use a calculator to times the weight of the turkey by 0.01. The calculation that you’d do is 5500 x 0.01 = 55.
Garlic & Herb Butter
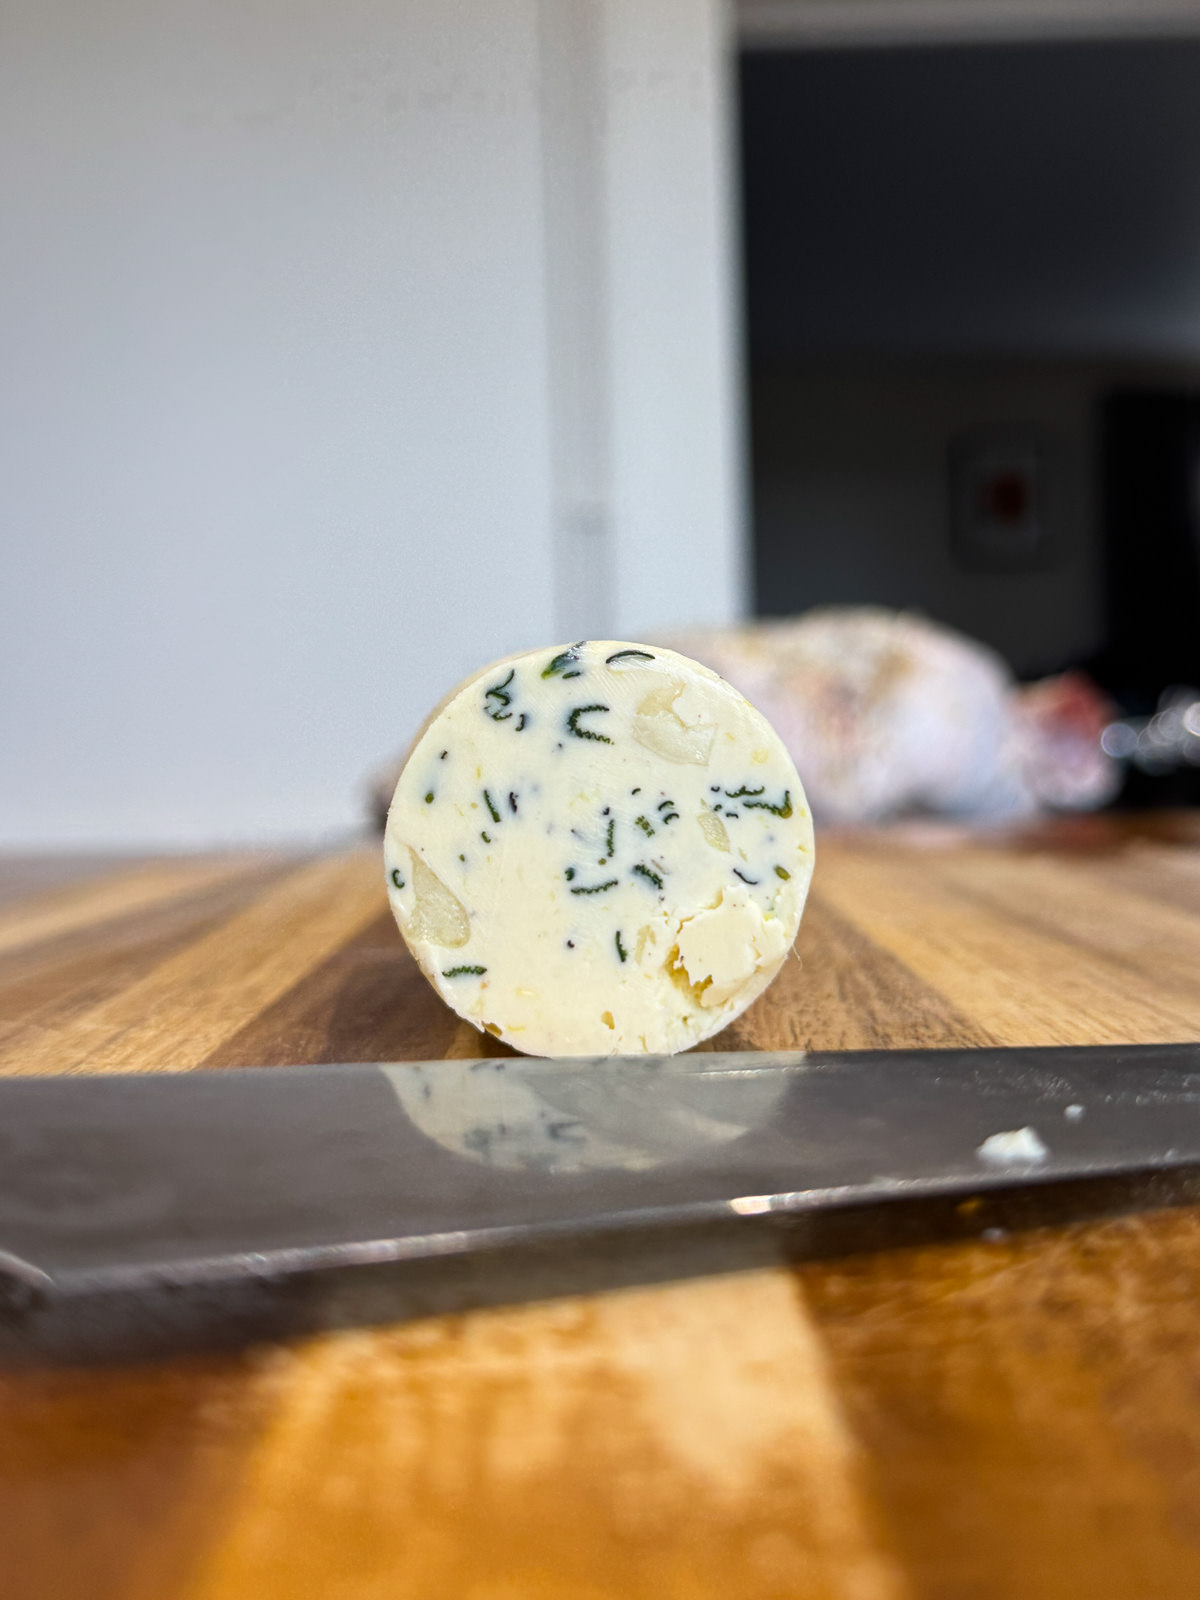
Placing butter under a turkey’s skin before roasting is a very popular preparation method so we’re taking advantage of it in this recipe! We’re not just using regular butter though, instead we’re going to be making a homemade garlic & herb butter. This compound butter is super easy to make, all we need to do is blend softened butter in a food processor with garlic, lemon zest & some fresh sage, rosemary & thyme.
Once our butter is smooth, we’re going to rolling it into a log (in clingfilm) then set it in the fridge. Then when we go to cook the turkey, we’re going to thinly slice half of the butter & place under the turkey’s skin. The rest of the herb butter is melted then brushed onto the turkey once it’s almost fully cooked, for extra flavour.
How To Roast A Spatchcock Turkey
A spatchcock turkey can be cooked at a higher temperature than a regular whole roasted turkey. This reduces the cook time considerably & ensures that the turkey’s skin gets properly crisp & browned. If you were to cook a whole turkey at a high temperature, the skin would burn before the meat was cooked through whereas with a spatchcock turkey, the skin & meat will be done at the same time.
So we’re going to be roasting our butterflied turkey at 220°c/428°f, which might seem like a quite a high oven temperature but it’s needed to crisp up the skin properly. Lean meats like turkey actually cook better at higher temperature as well. There’s not a lot of fat in a turkey so the meat would dry out if it was cooked for longer, at a lower temperature!
- Before Roasting
Before we roast our turkey, we need to pat the turkey’s skin dry with kitchen paper so that it crisps up properly in the oven. Don’t worry about wiping off any excess dry brine just make sure that the skin is dry! We’ll be cooking the turkey skin side up, sitting on a rack inside a roasting tin.
The bottom of the roasting tin should be lined with foil & a 2 cm layer of cold water should be poured in. The water will catch any fat that renders out of the turkey, preventing it from smoking in the oven. - Butter Under Skin
Next, we’re going to add our sliced herb butter under the turkey’s skin; under both the breast & leg skin. Then we’re going to let the turkey sit at room temperature for an hour, whilst we preheat our oven. This will make our turkey cook more evenly. - Roasting
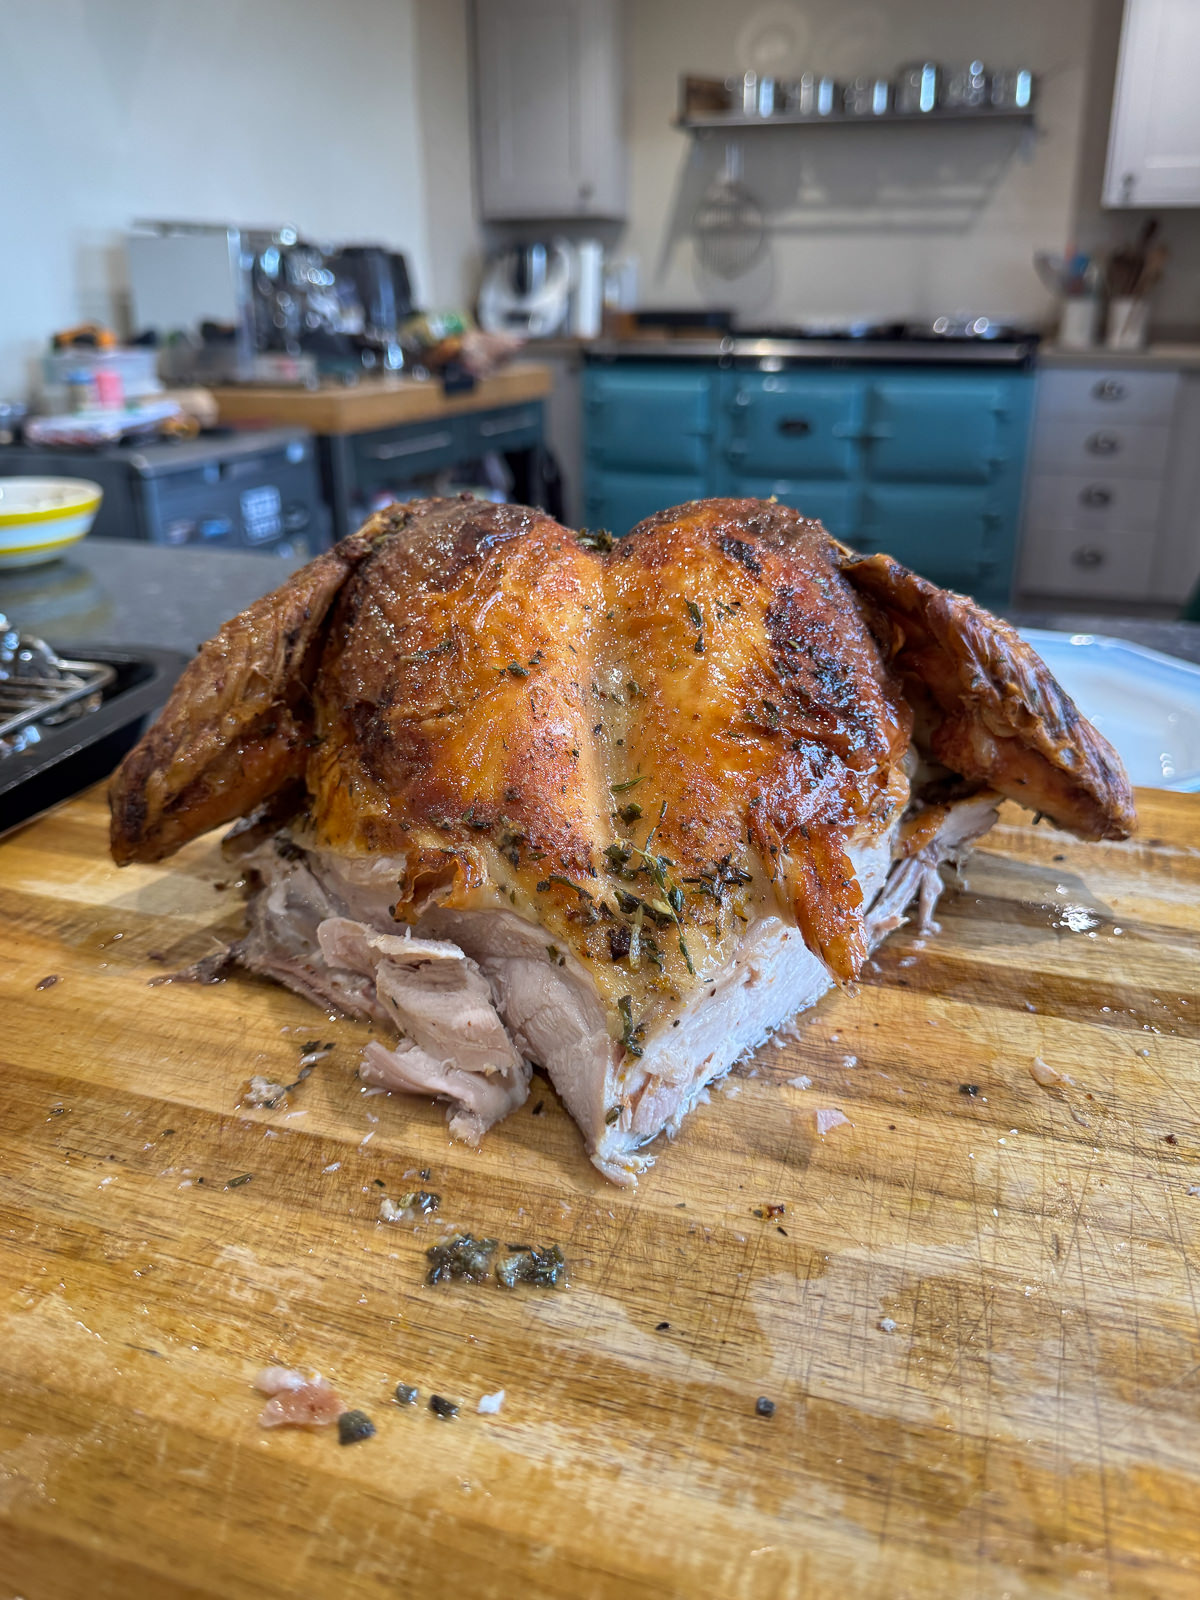
Just before roasting the turkey, we’re going to coat the skin with a small amount of vegetable oil then season with freshly cracked black pepper (no extra salt!). Then we place the turkey into the oven & roast until the thickest part of breast meat reaches an internal temperature of 68°c/155°f and the thighs have reached 74°c/165°f. This will take between 1½-2 hours. If needed, you’ll need to turn the turkey around every 45 minutes or so, so that the skin colours evenly. - Butter Baste
Remember the remaining herb butter from earlier? Well we’re going to be melting it then brushing it over the turkey towards the end of the cook, once the skin has browned & the meat is almost fully cooked. This adds flavour & moisture to the turkey! Brushing the butter on later in the cook prevents the herbs from burning. - Resting
Once the turkey is cooked, we’re going to loosely cover it with foil then let it rest for at least 20 minutes, or up to 1 hour. Make sure not to cover the turkey too tightly as this will make the skin less crispy!
Carving
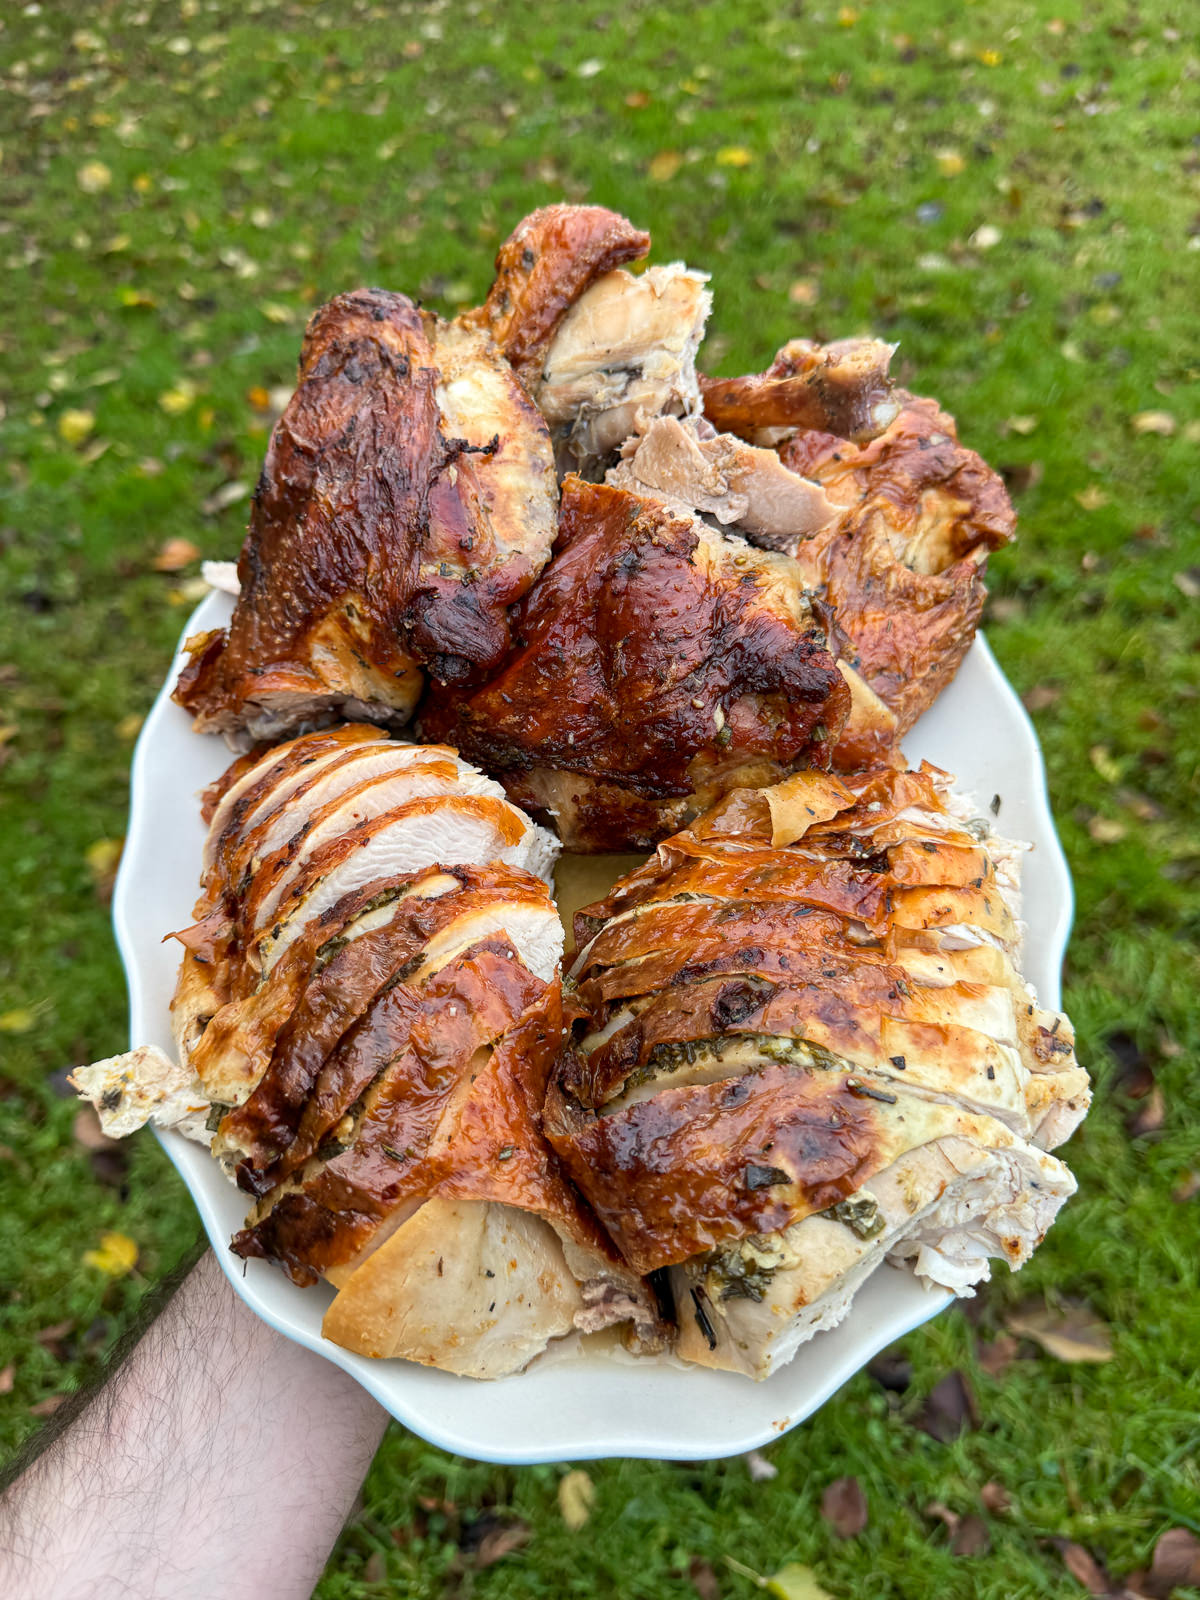
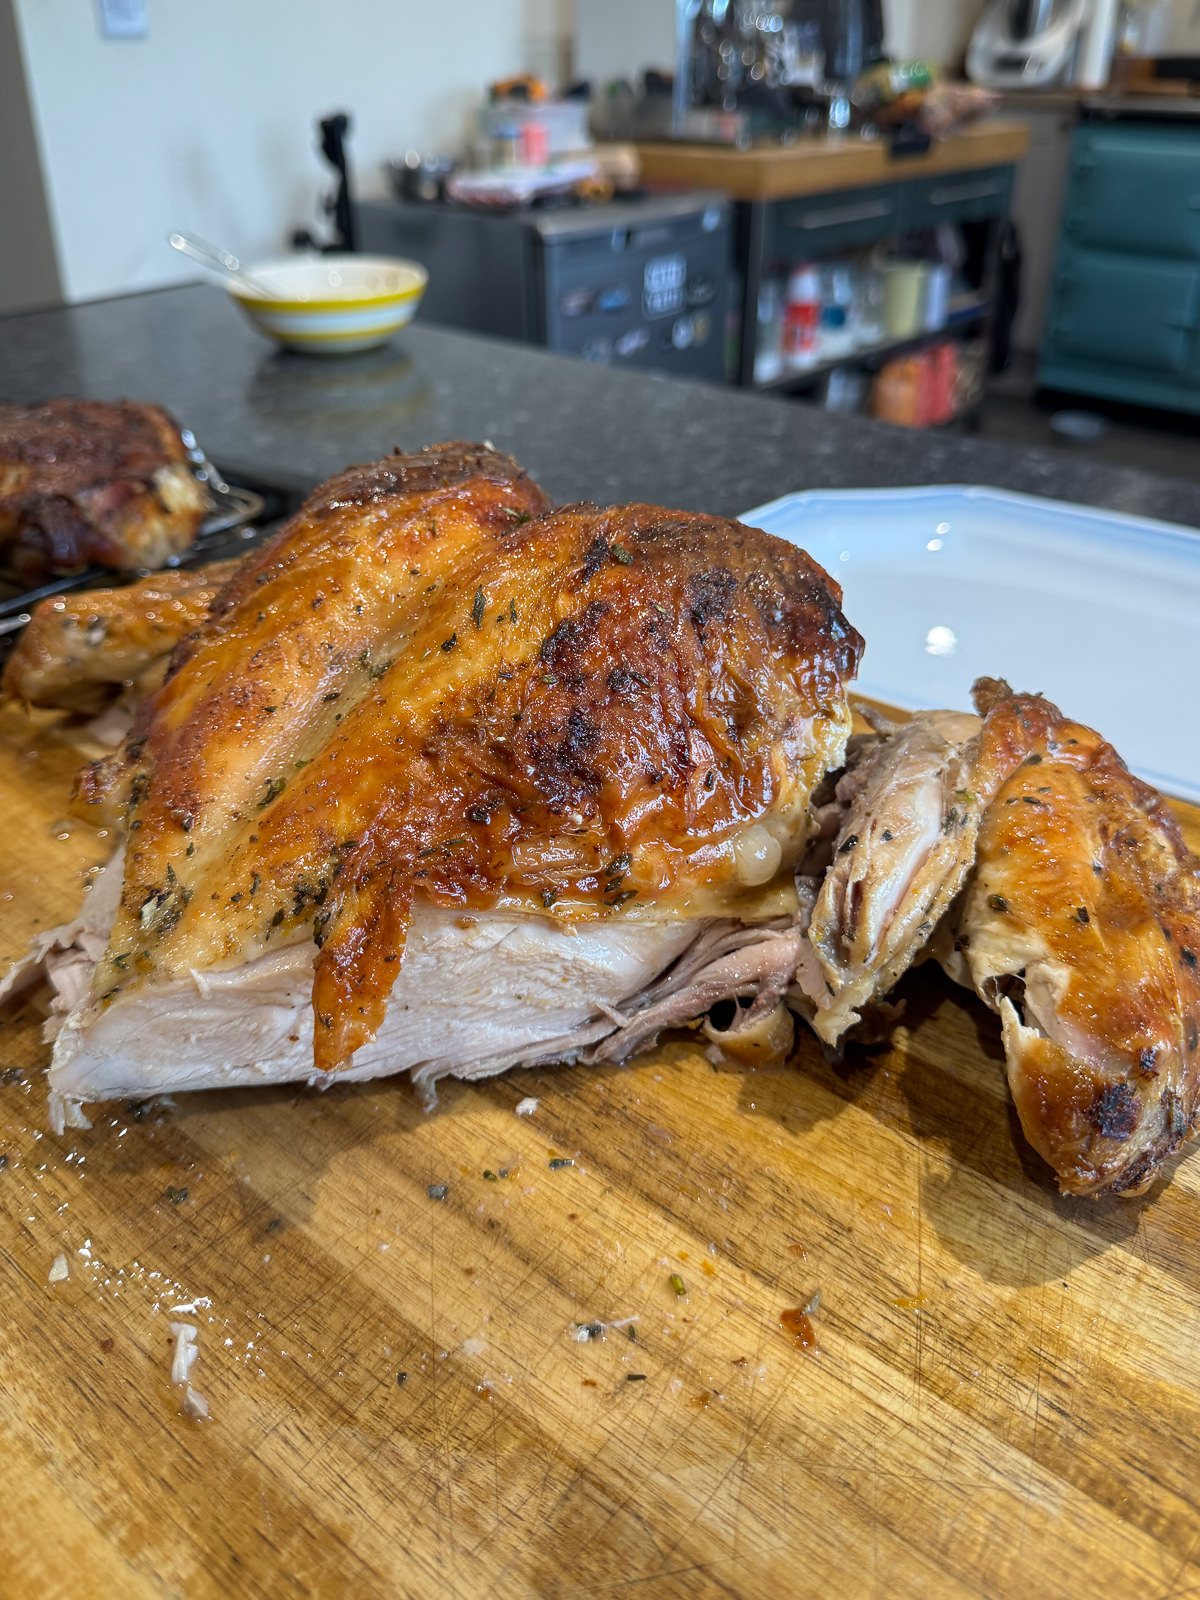
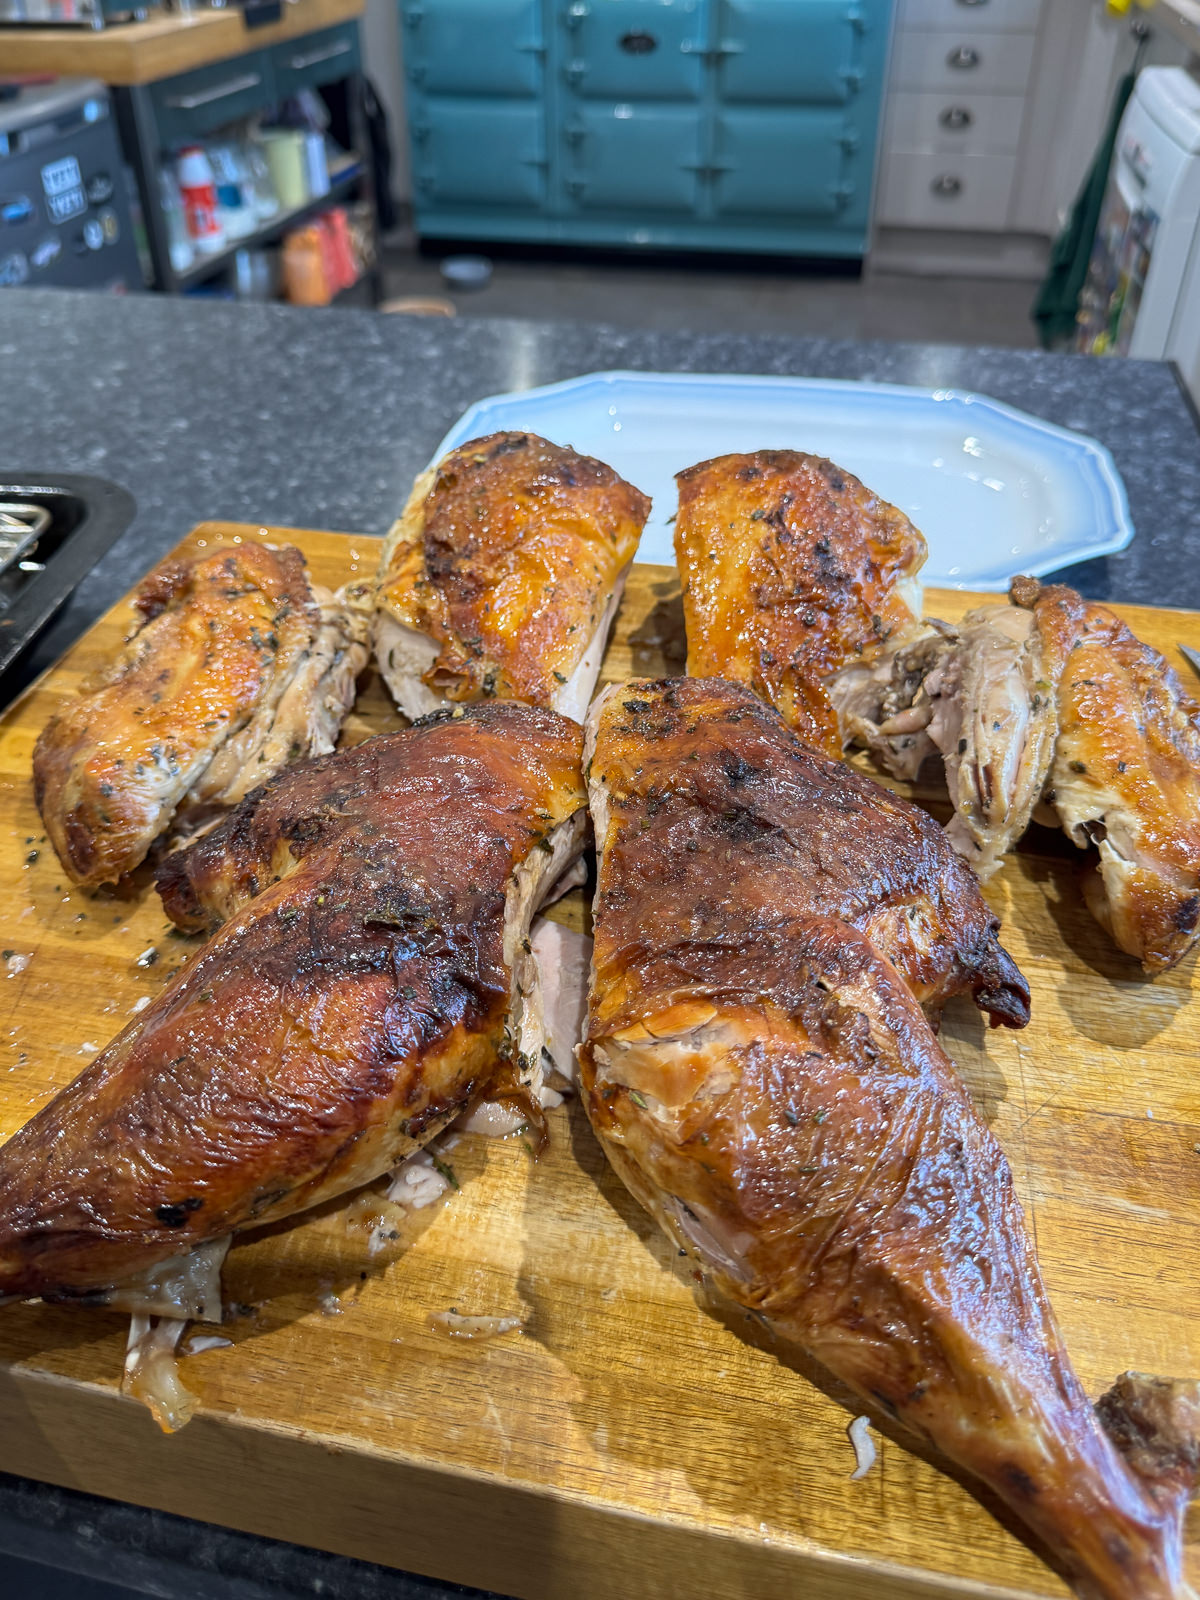
The last step is to carve the turkey. The carving process with a spatchcock turkey is basically the same as a regular one. You separate the legs from the body by cutting through the thigh joint, the wings are cut off the breasts through the wing joint & the breasts are cut away from each side of the breastbone, as 2 whole pieces. The breasts can be kept whole or sliced against the grain then the thighs can be separated from the drumsticks by cutting through the joint between them.

Tips & Tricks
- For the best flavour, buy your turkey from your local butcher.
- Dry brine your turkey the day before cooking, for extra flavour & juicier meat.
- Roast your spatchcock turkey at a high temperature to crisp the skin up properly!
- Baste your turkey with herb butter as it cooks for extra flavour & added moisture.
- Use a digital food probe to check if the turkey is cooked properly. This is key to avoiding under or overcooked turkey!
- Let your roasted turkey rest for at least 20 minutes, to let the juices redistribute through the meat.
- For the best homemade Christmas dinner, serve your turkey with a selection of our Christmas trimmings (side dishes!).
Serving Suggestions
If you’re reading this recipe, the chances are that you’re planning on making a classic roast dinner to serve at Christmas or Thanksgiving. Not only is this one of the most popular ways to serve a roasted turkey, it’s also one of the best! You’ll want all the trimmings here, including crispy roast potatoes, massive Yorkshire puddings, proper homemade gravy, roasted vegetables, cauliflower cheese, bread sauce, stuffing & of course, cranberry sauce. We’ve got recipes for all of these side dishes on this blog, which you’ll find in our Christmas trimmings collection & our collection of classic side dishes.
You don’t have to serve a spatchcock turkey as a roast dinner though! It’s also good with mashed potatoes, salad, pasta dishes, homemade cornbread, rice & loads more. Pretty much anything you like!
Ways To Use Leftover Turkey
Leftover roast turkey can be easily used to make another meal & can be served either hot or cold! I used leftovers from my turkey to make a really tasty turkey curry & a batch of coronation turkey which I used in sandwiches. In past Christmases I’ve used leftover turkey to make a slab pie, a Christmas dinner pie & a turkey Caesar salad. What I’m trying to say, is that leftover turkey is super versatile & can be used for loads of different dishes! You could even use it to make a turkey ramen, as a pizza topping or in a pasta sauce. Turkey mac & cheese would be good…
Reheating Leftover Turkey
If you’d just like to reheat your leftover turkey on its’ own, the best way to do this is to place pieces of turkey into an ovenproof dish with a generous splash of water (or gravy), cover with foil then bake at 160°c/320°f until piping hot. Then slice it up once hot. If your turkey is already sliced, add the slices into a dish with a generous amount of gravy then bake the same way as the other method (it won’t take as long though).
Frequently Asked Questions
A 5-6kg whole turkey will easily serve 8-10 people, with leftovers as well! It’s best to cook turkey to temperature, so you could use a smaller/larger turkey if needed as well.
Leftover roast turkey needs to be stored in the fridge & should be eaten within 3 days. You can also freeze leftover roast turkey & it will keep for several months, stored in an airtight container.
The best way to check if a spatchcocked turkey is cooked, is to check the internal temperature of the meat with a digital food probe. You’ll need to check the internal temperature in the thickest part of the breast & the thickest part of the thighs. Turkey breasts need to reach an internal temperature of 68°c/155°f & the thighs need to reach 74°c/165°f before the turkey can come out of the oven.
Sometimes when you buy a whole turkey, it will still have some feather stubs in the skin that were missed when the turkey was plucked. These are the tiny dark bits that you’ll see in the skin & to remove them, you simply pull them out with a pair of tweezers.
Turkey will dry out if it is over cooked, so it’s key to cook the meat to internal temperature not time, to avoid this. This is also why it’s best to spatchcock a whole turkey! The meat will cook more evenly & you’ll get even crispier skin because we’re able to roast the turkey at a higher temperature. Dry brining also helps the turkey stay moist, whilst also seasoning the meat.
To roast a spatchcock turkey in an Aga, slide your roasting tin onto the bottom set of runners in the roasting oven. Cook to the required temperatures, turning the turkey around every 45 minutes so that the skin colours evenly.
More Christmas Recipes!
- Sticky Toffee Glazed Ham
- Slow Roasted Prime Rib (Reverse Seared)
- Turkey Porchetta
- Christmas Gravy
- Marmalade Glazed Carrots
- Goose Fat Roast Potatoes
- Boozy Cranberry & Orange Sauce
If you have enjoyed this spatchcocked turkey recipe, it would mean a lot if you could leave a review & rating. And if you’d like to stay up to date with future recipes, follow us on Instagram & TikTok or subscribe to our newsletter!
Roasted Spatchcock Turkey With Herb Butter
Equipment
- Poultry Shears
- Mixing Bowl
- Microplane/Grater
- Large Roasting Tin
Ingredients
- 5½-6 kg Whole Turkey (See Notes)
Dry Brine
- 50 g Fine Sea Salt (Rough Measurement – See Notes)
- 4 Garlic Cloves (Grated)
- 1 Orange (Zested)
- 1 Lemon (Zested)
- 1 tsp Finely Chopped Sage
- 1 tsp Finely Chopped Rosemary
- 1 tsp Finely Chopped Thyme
Herb Butter
- 200 g Unsalted Butter (Softened)
- 1 tsp Finely Chopped Sage
- 1 tsp Finely Chopped Rosemary
- 1 tsp Finely Chopped Thyme
- 1 Lemon (Zested)
Roasting
- 1 tbsp Vegetable Oil
- Freshly Cracked Black Pepper
Instructions
Spatchcock Turkey
- Pat the turkey dry with kitchen paper then place it onto a chopping board so that it's facing breast side down.If there's any giblets or the neck inside the turkey, take them out & save for making gravy!
- Next, use a pair of poultry shears to cut down each side of the backbone. To do this, start at the tail end then cut all the way up to the neck, cutting through the rib bones. Save the backbone for making gravy!See the post above for a visual guide on doing this. If you haven't got poultry shears, you could use a heavy duty pair of scissors or a large knife/cleaver.
- If needed, trim any excess fat or overhanging skin from near the neck. You can remove the wishbone now as well, for easier carving. This is optional though.
- Next, flip the turkey over so that it's facing breast side up. Place your hands on the middle of the breasts then press down hard to make the turkey sit flat. You should hear a couple of cracks as you do this. The turkey is now spatchcocked!
Dry Brine
- Before making the dry brine, weigh the spatchcocked turkey then use a calculator to multiply the weight by 0.01. This is 1% of the turkey's weight & it's how much sea salt you'll need for the dry brine.For example, if your turkey weighs 5.5kg (5500g), you'll need 55 grams of sea salt. The calculation that you'd do is 5500 x 0.01 = 55.
- To make the dry brine, weigh the sea salt into a small mixing bowl then add in the grated garlic, lemon & orange zest and the chopped herbs. Give everything a mix, to combine.
- Next, sprinkle the dry brine mix all over the turkey, on both sides & underneath the skin. There should be a light, even layer of dry brine all over. To get under the turkey's skin, gently loosen the skin away from the meat with your hands, being careful not to tear the skin. You'll need to loosen the skin from the breasts at the neck end & the end near the legs. You should be able to loosen the skin above the legs as well!Loosen the skin gently with your hands but be careful not to tear the skin!
- Place the turkey onto a rack set on a large tray then leave to chill, uncovered in the fridge for 18-24 hours.
Herb Butter
- Place the butter, herbs & lemon zest into a food processor then blend until smooth & combined.
- Next, lay a double layer of clingfilm down onto a clean work surface then spoon the butter into the middle, so that it's running horizontally along the clingfilm.
- Use the clingfilm to roll the butter into a log shape, tie up the ends of the clingfilm then chill in the fridge until you're ready to cook the turkey.The butter needs to set completely, so make sure to give it at least a few hours in the fridge. I like to make it the day before using.
Roasting
- Once your turkey has dry brined, take it out of the fridge & pat the skin dry with kitchen paper. Don't worry about wiping off any excess brine but make sure that the skin is dry, as this ensures that it will crisp up properly in the oven.
- Place the turkey onto a rack set inside a roasting tin, facing skin side up. Before placing the turkey into the tin, line the bottom of the tin with foil then pour in a 2cm layer of water. This will stop the turkey fat from smoking as it renders in the oven.
- Next, cut the log of herb butter in half. Remove the clingfilm from half then thinly slice the butter. Place the other half of the butter back into the fridge, we'll be using this later on.
- Take the sliced butter & place it under the turkey's skin then let the turkey sit at room temperature for 1 hour. In the meantime, preheat an oven to 220°c/200°c fan (428°f/392°f).I like to put most of the butter under the skin of the breasts, towards the neck end. This is where the skin is thickest, so it won't tear. A small amount of butter can go under the leg skin as well. Make sure to place the butter in an even layer.
- Next, rub a tbsp of vegetable oil all over the turkey's skin then season with freshly cracked black pepper. Place the turkey into the preheated oven then roast until the thickest part of the breast meat reaches an internal temperature of 68°c/155°f and the thighs have reached 74°c/165°f. This will take between 1½-2 hours. If needed, turn the turkey around every 45 minutes or so, so that the skin colours evenly.As the turkey has been brined, there's no need to add on any extra salt.
- Whilst your turkey is in the oven, take the clingfilm off the remaining butter then melt, either in a pan on the stove or in a bowl in the microwave. Brush the turkey with melted butter every 15 minutes or so, once the skin is crisp & the meat is not far from being fully cooked (after around 1¼ hours).Brushing the butter onto the turkey towards the end of the cook stops the herbs from burning! It also adds flavour & moisture to the meat.
- Once your turkey is cooked, loosely cover it with foil then leave to rest for at least 20 minutes, or up to 1 hour.Don't cover the turkey too tightly with foil, as this will make the skin less crisp.
Carving
- Once your turkey has rested, remove the foil then transfer to a chopping board, ready to carve. Place the turkey on your board, so that the legs are closest to you.
- First, use a sharp knife to cut through the thigh joints where the legs meet the body. You should see a natural partition to follow between the legs & body & the legs will often pull away from the body as you start to cut through. Set each part of the turkey to one side as you carve.
- Next, cut through the wing joints, to release both from the breasts. You'll find the wing joints at the top end of each breast. You might need to gently bend the wings back to expose the joints.
- Now we've just got the breasts to carve. To do this, slice down one side of the breast bone, keeping as close to the bone as possible. Follow the natural curve of the breast bone with your knife to release the breast as a whole piece. If you gently pull the breast back as you go, it will be easier to see where to cut. Repeat this process with the other side.
- To serve you can keep the breasts whole or slice them against the grain (crosswise). To separate the legs from the thighs, cut through the joint between the thigh & the drumstick. There's a natural seem here that you can use as a guide. You can leave the thighs whole or cut out the bones then slice up the meat.The turkey carcass can be saved to make stock with.
Ben,
Your Roasted Spatchcock Turkey With Herb Butter is outstanding! I’ve prepared many turkeys over the years (smoked, roasted, grilled, fried, etc.). I followed your recipe exactly. It was flavorful and juicy with a crispy, delicious skin. Perfect!
I look forward to checking out your other creations.
Thanks for sharing this recipe!
Thank you for making it & for the feedback! Really glad you liked it