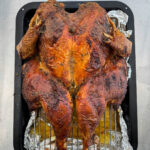
Roasted Spatchcock Turkey With Herb Butter
The best way to cook a perfectly roasted whole turkey with juicy meat & crisp, golden skin is to spatchcock it first! This allows the meat to cook more evenly & we're cooking it in herb butter, for extra flavour.
Servings: 8 People
Equipment
- Poultry Shears
- Mixing Bowl
- Microplane/Grater
- Large Roasting Tin
Ingredients
- 5½-6 kg Whole Turkey (See Notes)
Dry Brine
- 50 g Fine Sea Salt (Rough Measurement - See Notes)
- 4 Garlic Cloves (Grated)
- 1 Orange (Zested)
- 1 Lemon (Zested)
- 1 tsp Finely Chopped Sage
- 1 tsp Finely Chopped Rosemary
- 1 tsp Finely Chopped Thyme
Herb Butter
- 200 g Unsalted Butter (Softened)
- 1 tsp Finely Chopped Sage
- 1 tsp Finely Chopped Rosemary
- 1 tsp Finely Chopped Thyme
- 1 Lemon (Zested)
Roasting
- 1 tbsp Vegetable Oil
- Freshly Cracked Black Pepper
Instructions
Spatchcock Turkey
- Pat the turkey dry with kitchen paper then place it onto a chopping board so that it's facing breast side down.If there's any giblets or the neck inside the turkey, take them out & save for making gravy!
- Next, use a pair of poultry shears to cut down each side of the backbone. To do this, start at the tail end then cut all the way up to the neck, cutting through the rib bones. Save the backbone for making gravy!See the post above for a visual guide on doing this. If you haven't got poultry shears, you could use a heavy duty pair of scissors or a large knife/cleaver.
- If needed, trim any excess fat or overhanging skin from near the neck. You can remove the wishbone now as well, for easier carving. This is optional though.
- Next, flip the turkey over so that it's facing breast side up. Place your hands on the middle of the breasts then press down hard to make the turkey sit flat. You should hear a couple of cracks as you do this. The turkey is now spatchcocked!
Dry Brine
- Before making the dry brine, weigh the spatchcocked turkey then use a calculator to multiply the weight by 0.01. This is 1% of the turkey's weight & it's how much sea salt you'll need for the dry brine.For example, if your turkey weighs 5.5kg (5500g), you'll need 55 grams of sea salt. The calculation that you'd do is 5500 x 0.01 = 55.
- To make the dry brine, weigh the sea salt into a small mixing bowl then add in the grated garlic, lemon & orange zest and the chopped herbs. Give everything a mix, to combine.
- Next, sprinkle the dry brine mix all over the turkey, on both sides & underneath the skin. There should be a light, even layer of dry brine all over. To get under the turkey's skin, gently loosen the skin away from the meat with your hands, being careful not to tear the skin. You'll need to loosen the skin from the breasts at the neck end & the end near the legs. You should be able to loosen the skin above the legs as well!Loosen the skin gently with your hands but be careful not to tear the skin!
- Place the turkey onto a rack set on a large tray then leave to chill, uncovered in the fridge for 18-24 hours.
Herb Butter
- Place the butter, herbs & lemon zest into a food processor then blend until smooth & combined.
- Next, lay a double layer of clingfilm down onto a clean work surface then spoon the butter into the middle, so that it's running horizontally along the clingfilm.
- Use the clingfilm to roll the butter into a log shape, tie up the ends of the clingfilm then chill in the fridge until you're ready to cook the turkey.The butter needs to set completely, so make sure to give it at least a few hours in the fridge. I like to make it the day before using.
Roasting
- Once your turkey has dry brined, take it out of the fridge & pat the skin dry with kitchen paper. Don't worry about wiping off any excess brine but make sure that the skin is dry, as this ensures that it will crisp up properly in the oven.
- Place the turkey onto a rack set inside a roasting tin, facing skin side up. Before placing the turkey into the tin, line the bottom of the tin with foil then pour in a 2cm layer of water. This will stop the turkey fat from smoking as it renders in the oven.
- Next, cut the log of herb butter in half. Remove the clingfilm from half then thinly slice the butter. Place the other half of the butter back into the fridge, we'll be using this later on.
- Take the sliced butter & place it under the turkey's skin then let the turkey sit at room temperature for 1 hour. In the meantime, preheat an oven to 220°c/200°c fan (428°f/392°f).I like to put most of the butter under the skin of the breasts, towards the neck end. This is where the skin is thickest, so it won't tear. A small amount of butter can go under the leg skin as well. Make sure to place the butter in an even layer.
- Next, rub a tbsp of vegetable oil all over the turkey's skin then season with freshly cracked black pepper. Place the turkey into the preheated oven then roast until the thickest part of the breast meat reaches an internal temperature of 68°c/155°f and the thighs have reached 74°c/165°f. This will take between 1½-2 hours. If needed, turn the turkey around every 45 minutes or so, so that the skin colours evenly.As the turkey has been brined, there's no need to add on any extra salt.
- Whilst your turkey is in the oven, take the clingfilm off the remaining butter then melt, either in a pan on the stove or in a bowl in the microwave. Brush the turkey with melted butter every 15 minutes or so, once the skin is crisp & the meat is not far from being fully cooked (after around 1¼ hours).Brushing the butter onto the turkey towards the end of the cook stops the herbs from burning! It also adds flavour & moisture to the meat.
- Once your turkey is cooked, loosely cover it with foil then leave to rest for at least 20 minutes, or up to 1 hour.Don't cover the turkey too tightly with foil, as this will make the skin less crisp.
Carving
- Once your turkey has rested, remove the foil then transfer to a chopping board, ready to carve. Place the turkey on your board, so that the legs are closest to you.
- First, use a sharp knife to cut through the thigh joints where the legs meet the body. You should see a natural partition to follow between the legs & body & the legs will often pull away from the body as you start to cut through. Set each part of the turkey to one side as you carve.
- Next, cut through the wing joints, to release both from the breasts. You'll find the wing joints at the top end of each breast. You might need to gently bend the wings back to expose the joints.
- Now we've just got the breasts to carve. To do this, slice down one side of the breast bone, keeping as close to the bone as possible. Follow the natural curve of the breast bone with your knife to release the breast as a whole piece. If you gently pull the breast back as you go, it will be easier to see where to cut. Repeat this process with the other side.
- To serve you can keep the breasts whole or slice them against the grain (crosswise). To separate the legs from the thighs, cut through the joint between the thigh & the drumstick. There's a natural seem here that you can use as a guide. You can leave the thighs whole or cut out the bones then slice up the meat.The turkey carcass can be saved to make stock with.
Notes
1. Cooking In An Aga - To roast a spatchcock turkey in an Aga, slide your roasting tin onto the bottom set of runners in the roasting oven. Cook to the required temperatures, turning the turkey around every 45 minutes so that the skin colours evenly.
2. Turkey - For this recipe you'll need a whole turkey that weighs between 5½-6 kg. This will easily serve 8 people, with some meat leftover! If your turkey has any feather stubs in still (the little dark bits in the skin), you can remove them with a pair of tweezers.
3. Salt - I've given a rough weight of salt in the dry brine ingredients because you'll need to calculate how much salt to use, based on the weigh of your spatchcocked turkey. This is explained in the method section!
4. Dry Brine - I wouldn't recommend skipping the dry brine, as it will make your turkey juicier & more flavourful! You'll need to calculate 1% of the turkey's weight (once spatchcocked) to find how much sea salt you'll need to for the brine. Make sure to let the turkey brine for at least 18 hours or up to 24. A few hours longer won't hurt though!
5. Herb Butter - Adding herb butter under the turkey's skin keeps the meat moist as it cooks & adds flavour! We're making a quick herb butter but you could use just regular butter instead.
6. Internal Temperature - Turkey has a tendency to dry out if it's cooked too much, which is why we take it out of the oven just before it is fully cooked. The internal temperature will rise as the turkey rests & it will be perfectly cooked & still juicy when you carve it. The breasts need to reach an internal temperature of 68°c/155°f before we take the turkey out of the oven & the legs/thighs need to reach 74°c/165°f. The dark meat needs to be cooked to a higher temperature than the white meat!
7. Leftovers - Leftover roast turkey will keep in the fridge for up to 3 days & can be eaten hot or cold. You can also use leftover turkey to make curries, salads & sandwiches!
The best way to reheat leftover turkey is to add pieces into a dish with a generous splash of water/gravy, cover with foil then bake at 160°c/320°f until piping hot. Then slice it up once hot. If your turkey is already sliced, add the slices into a dish with a generous amount of gravy then bake the same as the other method (it won't take as long though).
❤️ Stay connected with Salt Butter Smoke
The Prep List is my free weekly newsletter with seasonal recipes, kitchen notes and behind-the-scenes from my kitchen. Add Salt Butter Smoke as a Google Preferred Source to see more of my recipes in Search.