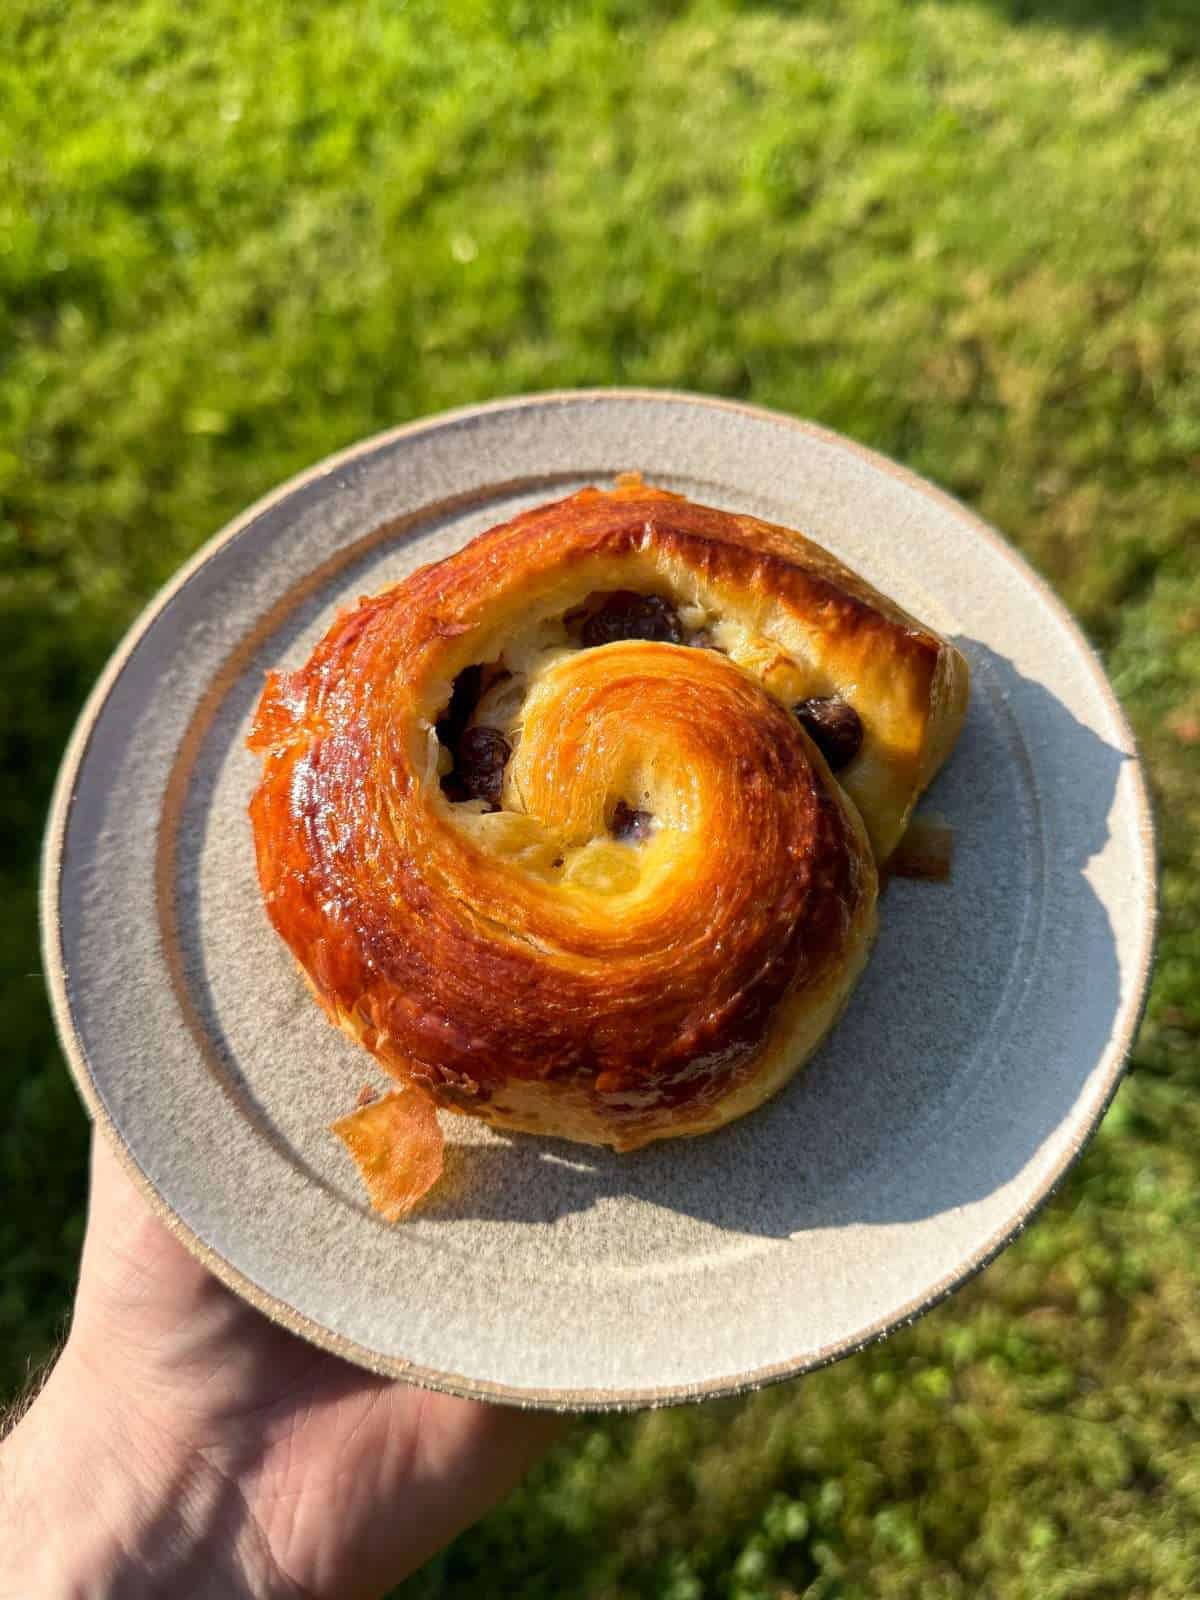
Pain Aux Raisin Danish Pastries
Bakery style pain aux raisins made with homemade Danish pastry! Here, flaky pastry is filled with a rich vanilla pastry cream & plump, juicy raisins.
This post contains affiliate links.

These bakery style pain aux raisins are absolutely incredible! There’s flaky homemade Danish pastry, a rich vanilla pastry cream & loads of juicy raisins, all rolled together, baked until a deep golden brown then glazed with apricot jam. They’re the perfect weekend breakfast but are just as good when eaten whenever. Trust me I know, I’ve made a lot of these recently. It’s a hard job I know!
For more pastry, cake, cookie, brownie & bread recipes, take a look at our ever growing collection of baking recipes! Plus, take a look at my “If I Had A Bakery” substack newsletter for more exclusive baking recipes…
Pain Aux Raisin Components
- Danish Pastry
You’ll need a batch of my Danish pastry dough for these pain aux raisins. You’ll need to start the dough the day before making these danishes. But other than that, it’s super straight forward to prepare. - Vanilla Pastry Cream
This is a type of thick, vanilla custard that’s made like a regular custard but is thickened with extra cornflour. This needs to chill for at least 2 hours in the fridge before it can be used so that it’s completely cold & set. However, I like to make it the day before so that it’s good to go! - Soaked Raisins
I used a 50/50 mix of regular & golden raisins but feel free to use one or the other. To make them extra plump & juicy we soak them in hot water for an hour before using. - Glaze
We’re using apricot jam to glaze these Danish pastries. To give the jam a brushable consistency, we mix it with a splash of warm water.
How To Make Pain Aux Raisin Danishes
Making pain aux raisins is all about the prep! Once each component is ready, it’s just a case of assembling, proving, baking & glazing them. Easy stuff right!?
- Roll Out Pastry
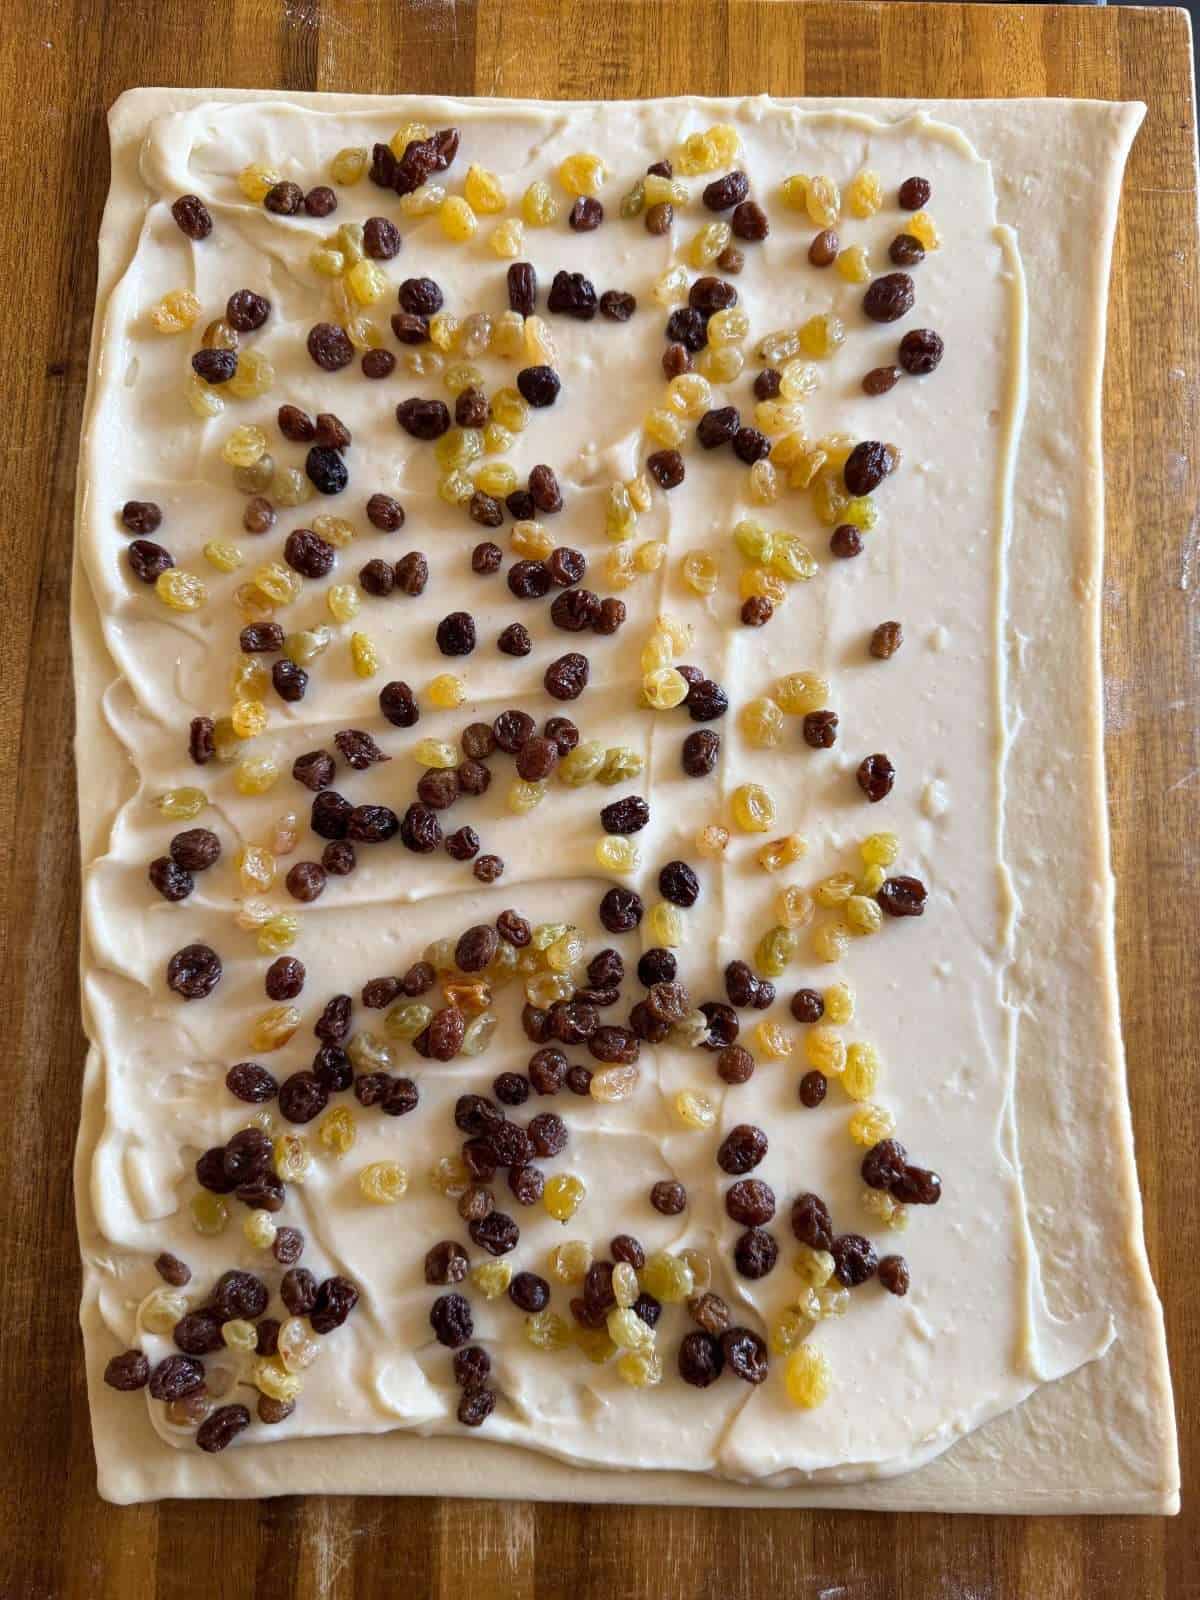
First, we need to roll our Danish pastry out on a lightly floured surface, into a rectangle that measures 30×40 cm & is roughly 5mm thick. If necessary, we can trim the edges slightly to neaten up. - Add Fillings
Next, we spoon the pastry cream on top of the pastry then use a palette knife to spread it out into an even layer, leaving a 1 inch border on the longest side closest to you. We brush this border with a light layer of egg wash (egg & milk). - Roll Up
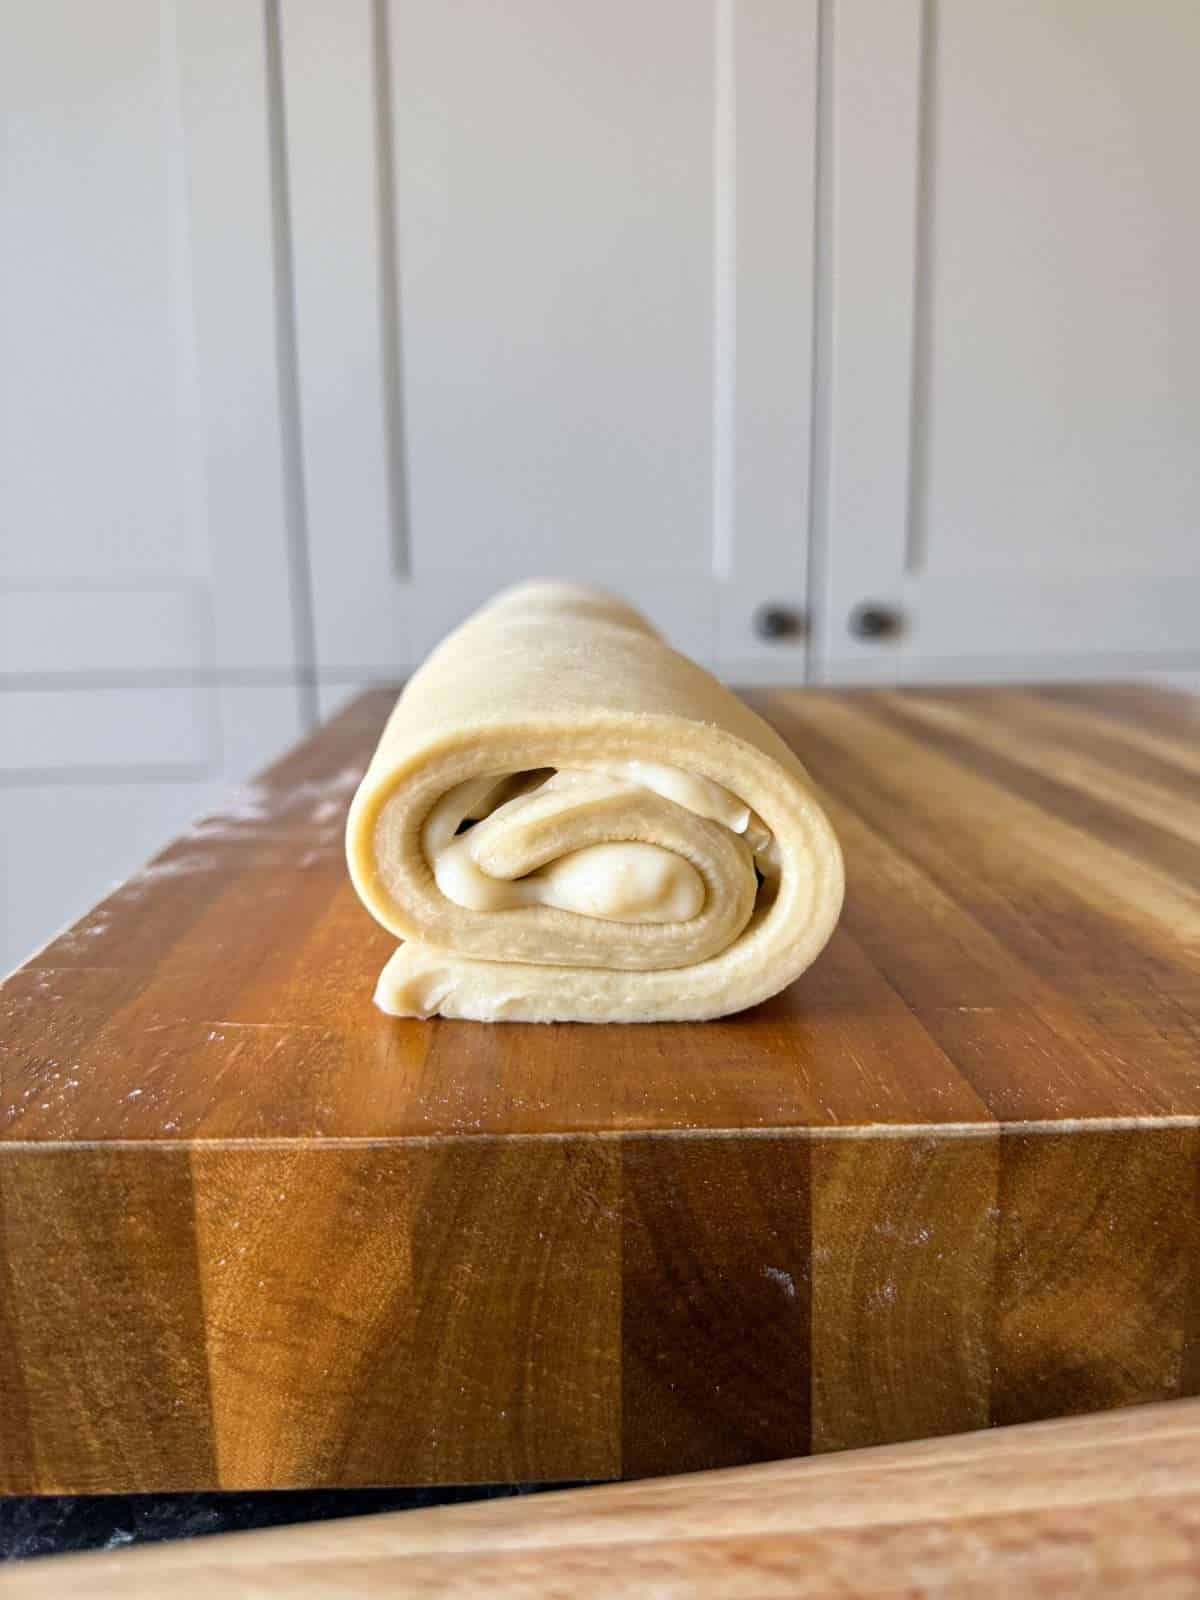
We sprinkle the soaked raisins evenly over the pastry cream then roll the pastry up into a tight sausage, starting at the longer edge that’s furthest away from us (the one without the border). Once rolled up, we need to make sure that the pastry is sitting with the seam on the bottom. - Cut Into Pieces
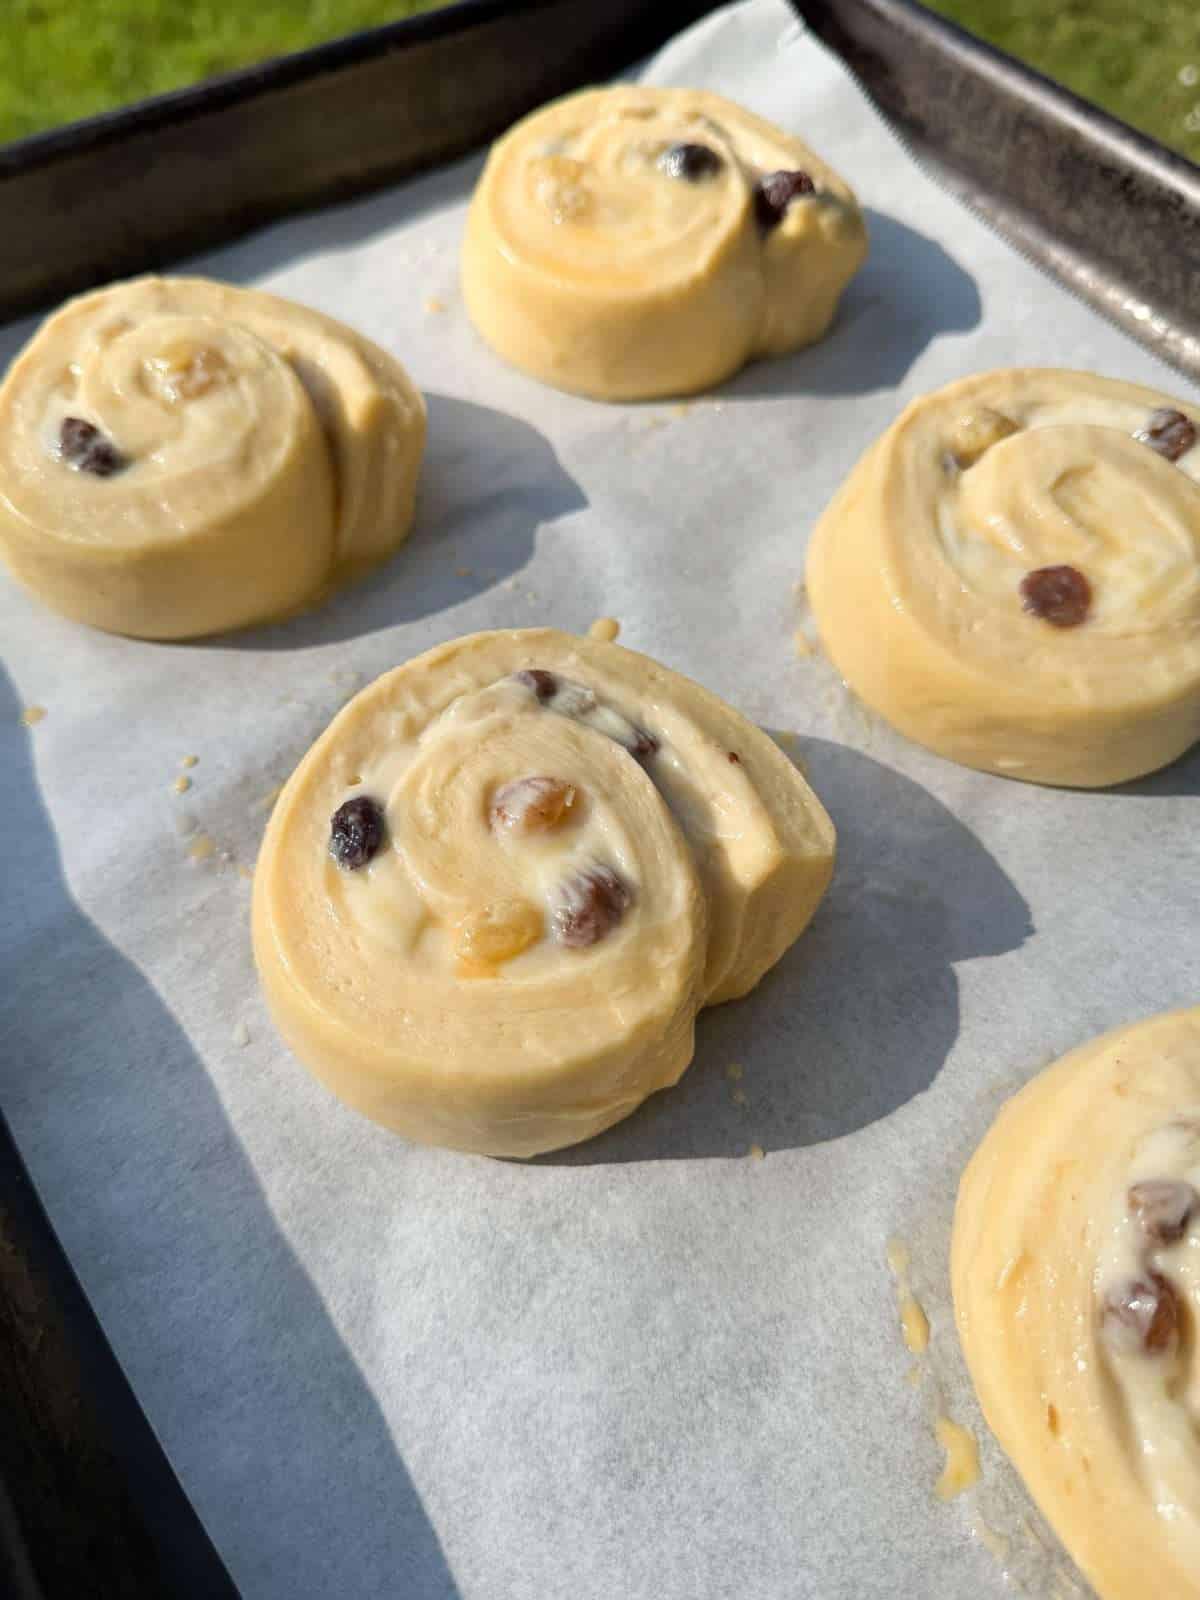
Next, we use a sharp knife to cut the pastry into 4cm wide pieces then we place them onto lined baking trays, leaving plenty of space between each piece. I find that you’ll get the neatest pieces if use a gentle sawing motion to cut the pastry. - Prove
Now we loosely cover the trays with clingfilm (or an upside down roasting tin) then leave to prove at room temperature for 2-3 hours, until the pastries are light & airy and they wobble when you gently shake the tray. It’s key not to under prove the pastries as this can make the butter leak out as they bake. - Bake
Once proved, we brush the tops & sides of each pastry with egg wash then bake at 220°c/428°f for 16-18 minutes until they’re well risen & a deep golden brown all over. For the best flavour, it’s best to bake them quite dark. - Glaze
As soon as the danishes come out of the oven, we brush them with warm apricot jam then leave to cool before serving.
Tips & Tricks
- For the best flavour & texture, make your own Danish pastry! My full step by step guide can be found here.
- Soak the raisins in hot water for at least an hour then drain well before using. This makes the raisins extra plump & juicy!
- Use a vanilla pod or a good quality vanilla paste in the pastry cream, for the best flavour. Make sure to chill the pastry cream for at least 2 hours before using, so that it’s completely cold & set.
- Before rolling the pastry up, leave a slight border on one side without any filling on then brush with a light layer of egg wash. When you roll the pastry up, the egg wash will seal the edge & means that the danishes won’t unroll in the oven.
- Make sure not to under prove the danishes; they take longer than you think! Danish pastries will take at least 2 hours to rise at room temperature. Don’t let get too warm though as this will the butter melt.
Frequently Asked Questions
Because pain aux raisins contain custard, it’s best to store them in the fridge in an airtight container, where they’ll keep for up to 3 days. Although pain aux raisins are best eaten fresh!
The best way to reheat a pain aux raisin is to place the pastry onto a baking tray then bake in a 180°c/356°f oven for 5-6 minutes, until warmed through.
Pain aux raisins are filled with a creamy vanilla pastry cream (like a custard) & plenty of raisins. We soak the raisins in hot water before using, to make them extra plump & juicy.
Pain aux raisins can be made with either croissant dough or danish pastry. The pastries made with croissant dough will be crisper & not as sweet and the pastries made with Danish pastry will be sweeter & slightly chewier.
To bake pain aux raisins in an Aga, bake them in the roasting oven, on the bottom set of runners for 14-16 minutes (turning them around after 12 minutes). Use the simmering plate to cook the pastry cream.
Equipment Used
Please note that these are affiliate links & I may make a small commission if you make a purchase using these links, at no extra cost to you. For more information, click here.
More Baking Recipes To Try!
- Brown Butter & Vanilla Glazed Cookies
- Overnight New York Style Bagels
- Brown Butter & Miso Pecan Pie Bars
- Kettle Chip Chocolate Chip Cookies
- Chocolate Loaf Cake With Dark Chocolate Ganache
- Rapeseed Oil Lemon Drizzle Loaf Cake
If you have enjoyed this recipe for pain aux raisin danishes, it would mean a lot if you could leave a review & rating. And if you’d like to stay up to date with future recipes, follow us on Instagram & TikTok!

Pain Aux Raisin Danish Pastries
Equipment
- Saucepan
- Mixing Bowl
- Sieve
- Rolling Pin
- Baking Trays
Ingredients
Pastry Cream
- 250 g Whole Milk
- 50 g Caster Sugar
- ½ A Vanilla Pod (Or 1 tsp Vanilla Paste)
- A Pinch Of Sea Salt
- 40 g Egg Yolks
- 20 g Cornflour
- 15 g Unsalted Butter
Assembly
- 1 kg Danish Pastry Dough (See Notes)
- 130 g Raisins (See Notes)
- 1 Egg
- 1 tsp Whole Milk
Glaze
- 100 g Apricot Jam
- 2 tsp Hot Water
Instructions
Pastry Cream
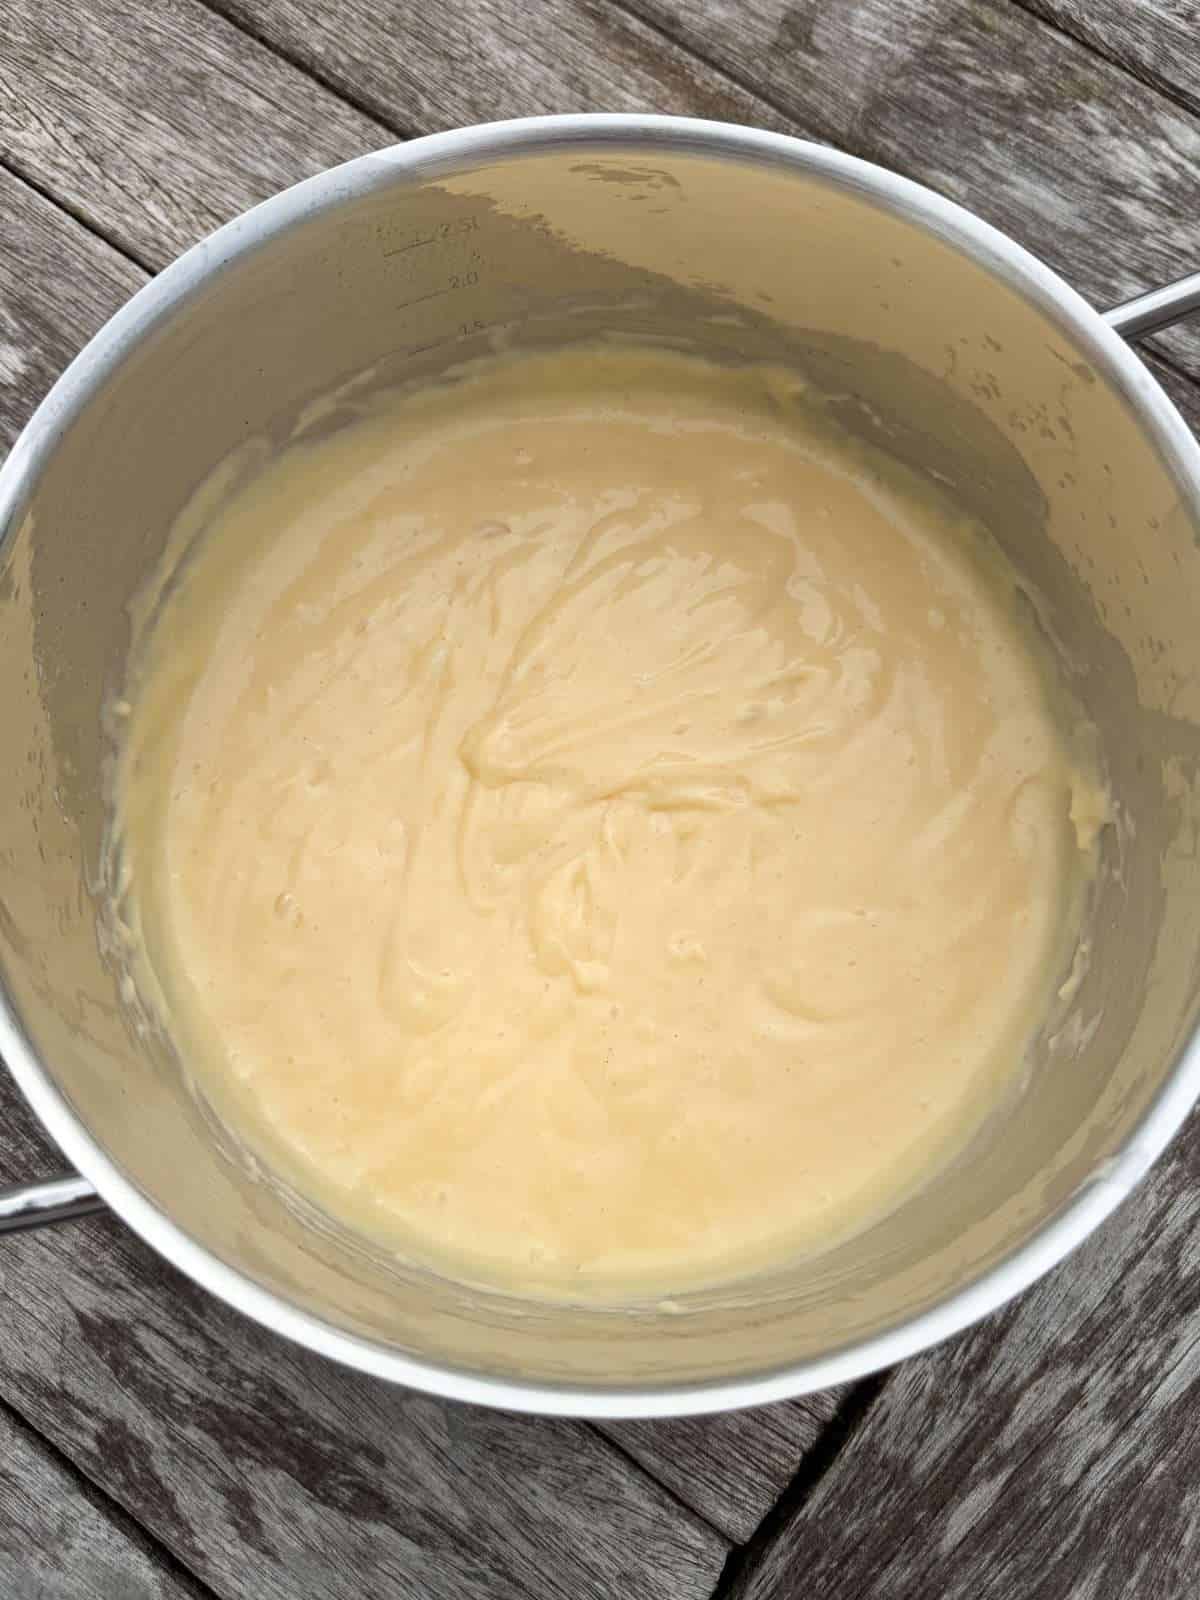
- Add the milk, vanilla, salt & half of the caster sugar into a large saucepan then set over a low heat. Warm gently, stirring occasionally until steaming hot.If you're using a vanilla pod, scrape the seeds out then add both the pod & seeds to the milk.
- Whilst your milk is warming up, place the yolks, cornflour & remaining sugar into a mixing bowl & whisk by hand until pale, smooth & combined. This will take a minute or so.
- Once the milk is steaming hot, pour half of it into the yolks, whisking as you do so. Pour the now tempered yolks into the pan of milk.
- Increase the heat to medium then cook, whisking constantly until the custard is thick & starting to bubble. This will take around 3-4 minutes. If you take the temperature of the custard with a food probe, it should be around 85°c/185°f once cooked.To check if the custard is ready, stop whisking every 20-30 seconds once it has thickened. If a few bubbles appear & pop, the custard is ready. Be careful not to overcook it though!
- Once the custard is cooked, take the pan off the heat, whisk in the butter then pass through a sieve, into a bowl. Place a piece of baking parchment onto the custard's surface, leave to cool slightly then refrigerate until completely cold. This will take at least 2 hours.I like to make the pastry cream the night before so that it's ready to go the next day!
Assembly
- Before making the danishes, place the raisins into a bowl, cover with hot water then leave to soak for at least an hour. Drain the fruit well (through a sieve) before using. You'll also need to make an egg wash by whisking the egg & milk together in a small bowl.
- Roll the danish pastry out on a lightly floured work surface into a rectangle that measures 30x40cm & is roughly 5mm thick. If necessary, trim the edges slightly so that they are straight. Position the pastry so that it's sitting horizontally (landscape), with a longer side closest to you.For these pastries, you'll need a batch of my danish pastry dough. The dough should be chilled for at least 2 hours before making this recipe.
- Next, take the pastry cream out of the fridge & whisk by hand, until smooth & at a spreadable consistency. Spoon the pastry cream on top of the pastry then use a palette knife to spread it out into an even layer, leaving a 1 inch border on the longest side closest to you. Brush this border with a light layer of egg wash.
- Sprinkle the soaked raisins evenly over the pastry cream then roll the pastry up into a tight sausage, starting at the longer edge that's furthest away from you (the one without the border). Once rolled up, make sure that the pastry is sitting with the seam on the bottom.
- Lightly trim each end slightly then use a sharp knife to cut the pastry into 4cm wide pieces. Place the danishes onto lined baking trays as you cut them, leaving plenty of room between each one. Place the pastries onto the tray so that the cut edge is facing up, showing the filling.You should get 10 danishes. I find that cutting gently in a sawing motion helps get the cleanest slices.
- Next, cover the trays loosely with clingfilm (or an upside down roasting tin) & leave to prove at room temperature until the pastries are light & airy and wobble when you gently shake the tray. This will take between 2-3 hours.
Baking
- In the meantime, preheat an oven to 220°c/200°c fan (428°f/392°f).
- Once the danishes are ready to cook, brush the tops & sides with a light coating of egg wash then bake for 16-18 minutes, until they're well risen & a deep golden brown.Depending on the size of your oven, you may need to bake the pastries 1 tray at a time. I'd recommend turning the tray around after 12-14 minutes, so that they colour evenly.
- Whilst the danishes are baking, add the apricot jam & water into a bowl then stir to combine. Gently brush the top of the pastries with a good layer of jam as soon as they come out of the oven.If needed, warm the jam in a microwave to make it a more brush-able consistency.