Beef Wellington
Here’s how to make the ultimate beef wellington! There’s a perfectly cooked fillet, duxelles, bresaola & crêpes, all wrapped in flaky pastry.
This post contains affiliate links.
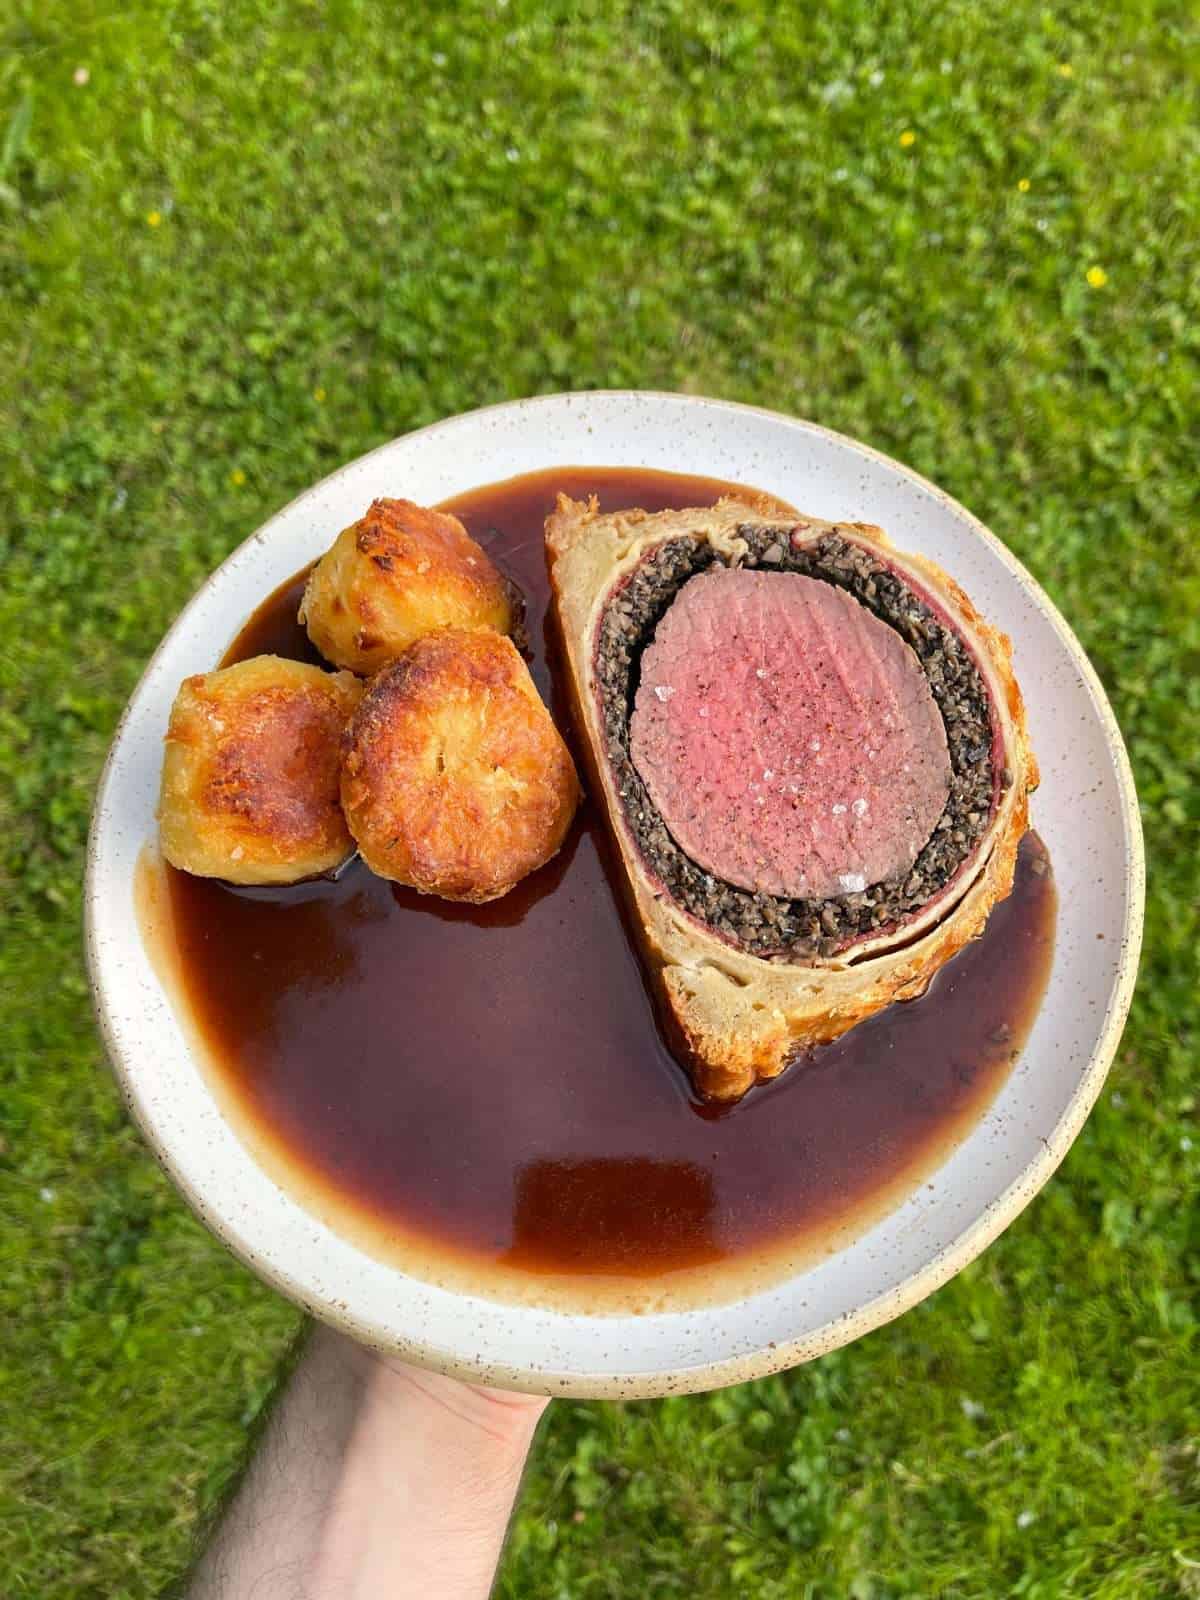
The ultimate, homemade beef wellington!
This is one of those dishes that is reserved for a special occasion. Mainly because of how much work is involved but also because it’s pretty expensive to make. It’s definitely worth it though, this classic beef dish is incredibly delicious!
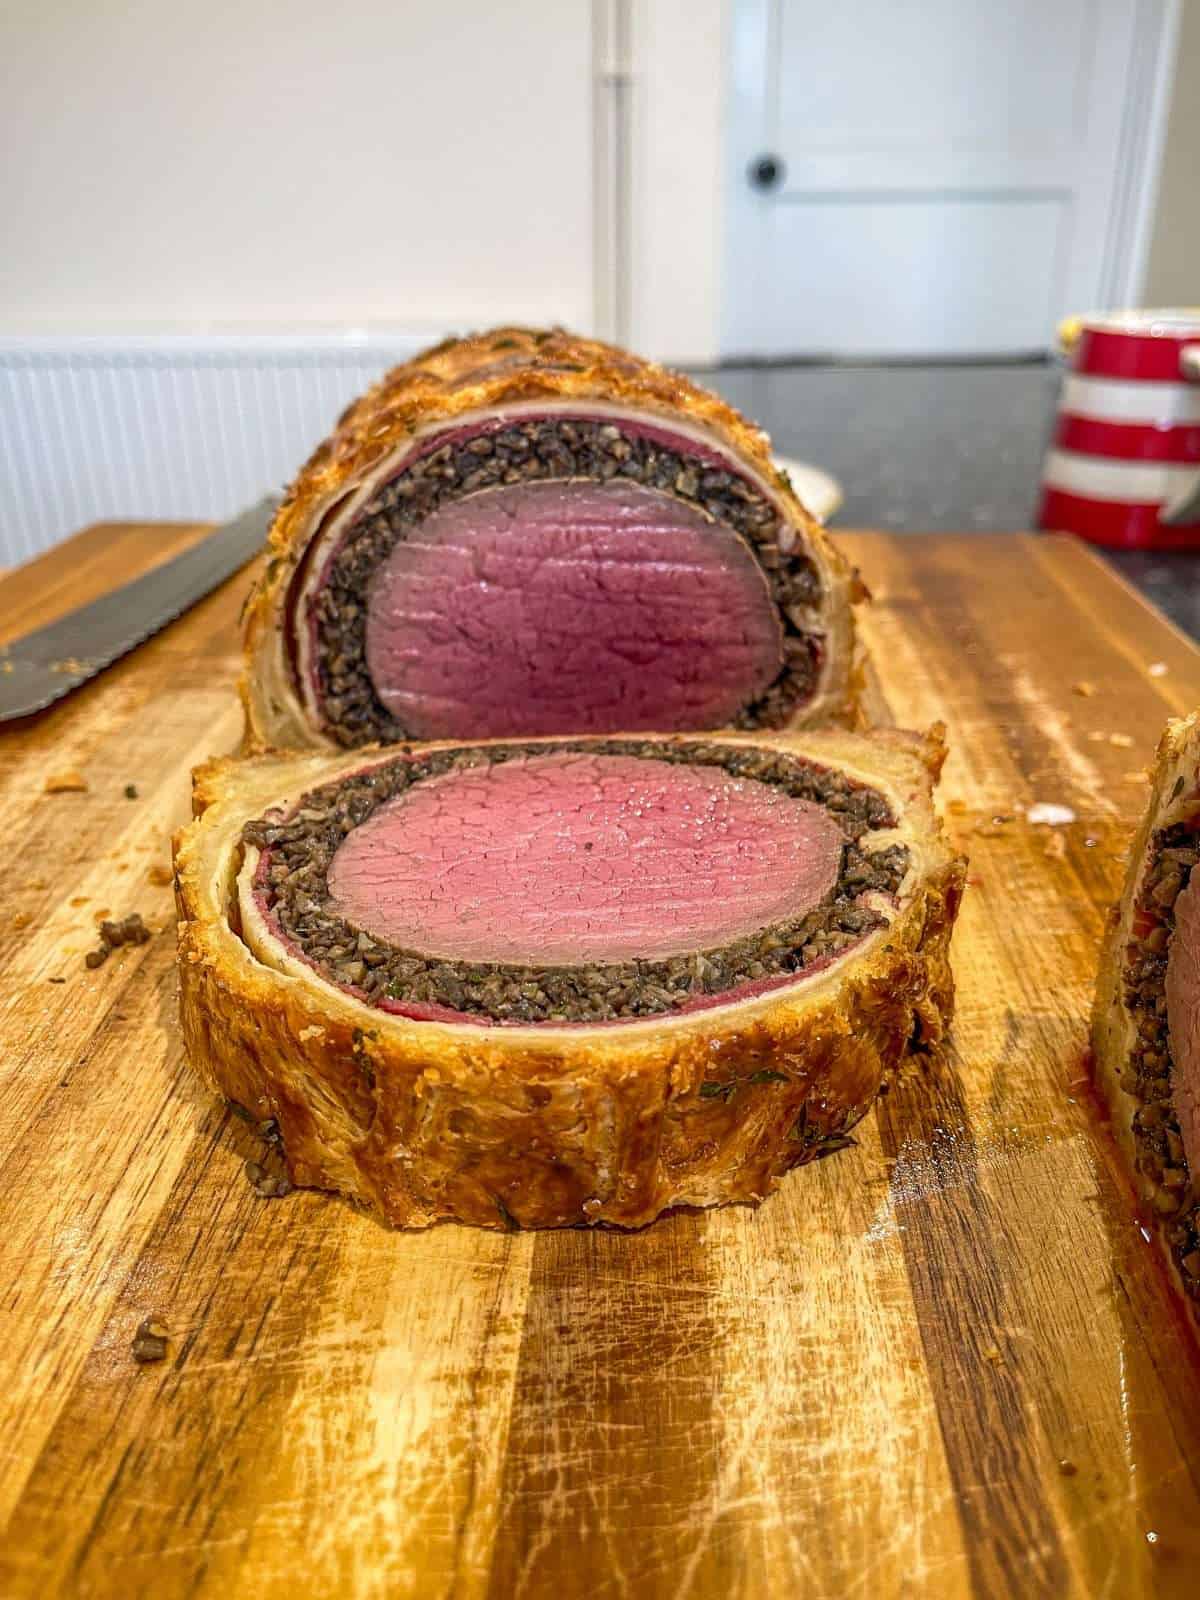
Inside the super flaky pastry, there’s a piece of perfectly cooked, medium rare fillet of beef, rich & flavourful mushroom duxelles, delicate bresaola & homemade crêpes. 5 simple components that come together to make something special!
Beef wellington might seem tricky to make but don’t let this put you off, it’s not as hard as it seems, especially when you use our easy to follow recipe. Serve this with a generous amount of homemade gravy & plenty of roast potatoes & you’re onto a real winner that’s sure to impress!
Components Of A Beef Wellington
There’s quite a few variations of the classic beef wellington, although there are a few non negotiables (fillet of beef, mushroom duxelles & flaky pastry). Here’s what we’re using in ours…
Fillet Of Beef
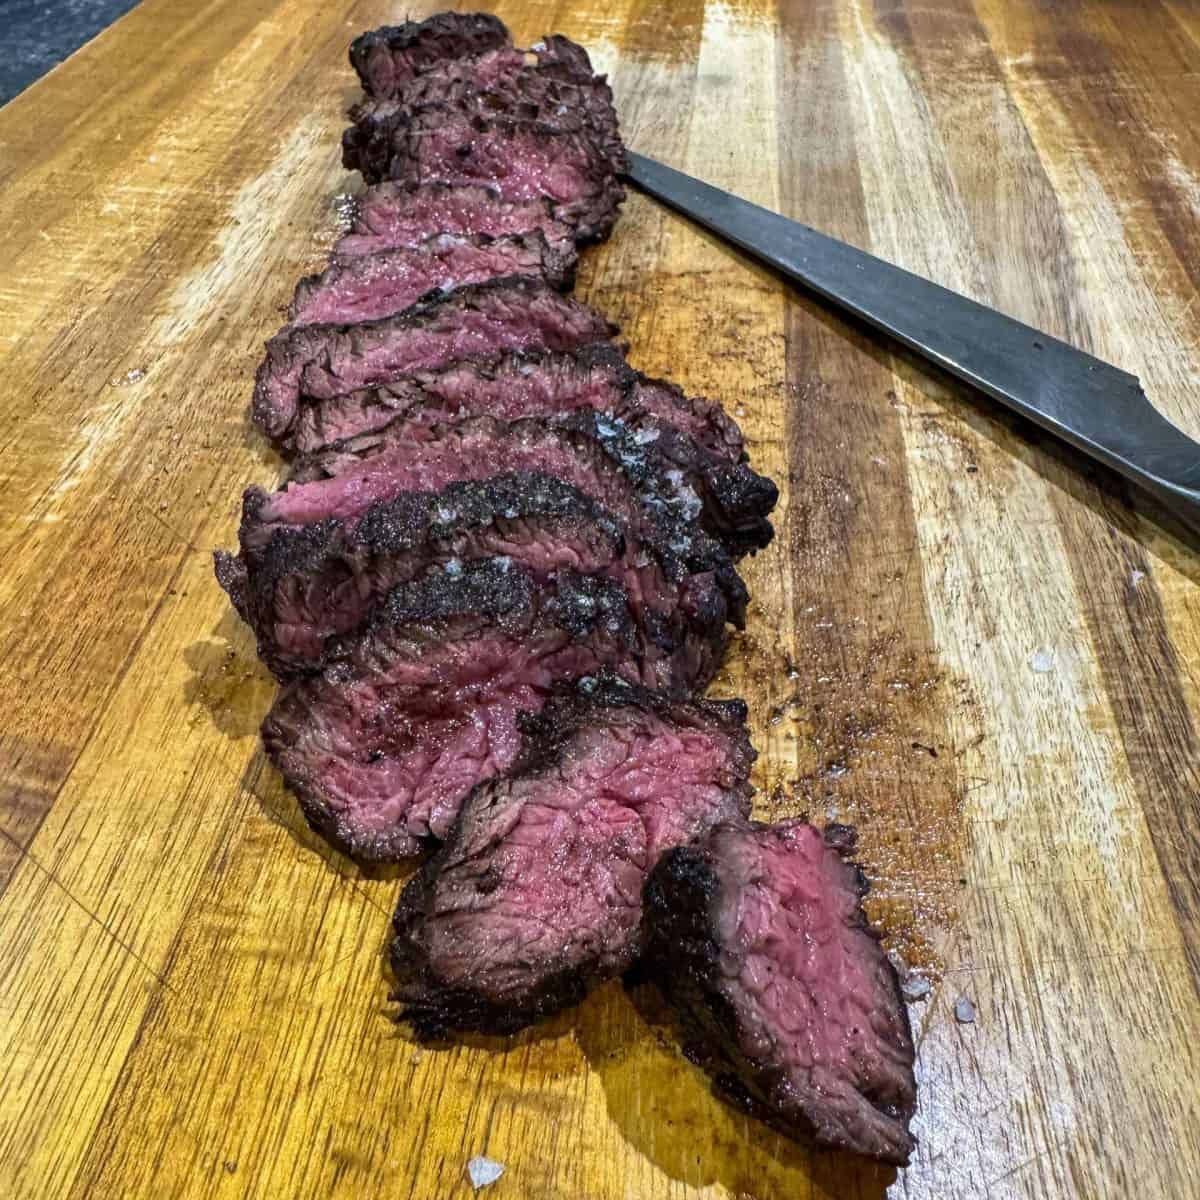
The main attraction! We’re using a 1 kg piece of centre cut fillet, which will serve at least 6 people. A dry aged piece of fillet provides the best flavour! We’re going to be cooking our beef medium rare, which in my opinion, is the best way to serve it.
Mushroom Duxelles
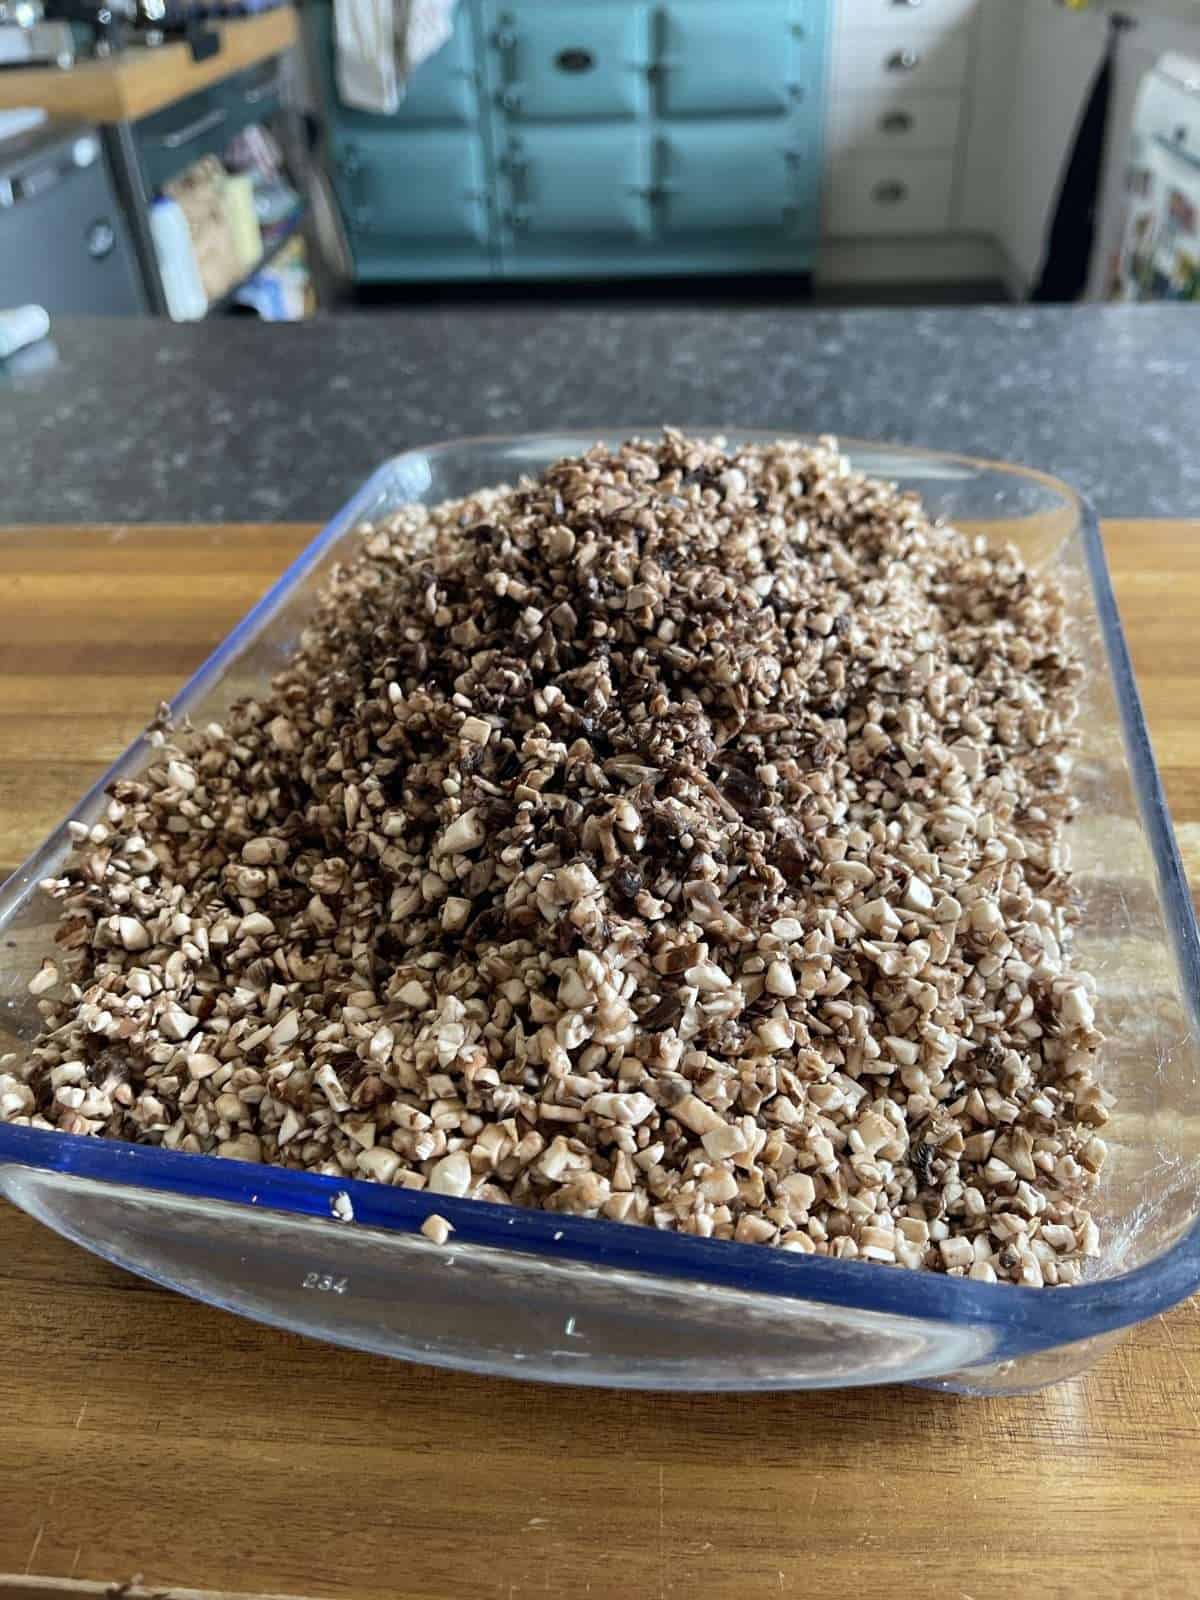
Next up is our duxelles. This is a classic French mushroom filling that has a paste like texture & is made with finely chopped mushrooms, shallots, garlic, fresh thyme & a splash of sherry. The key here is cooking the mushrooms until all of the moisture has been evaporated. For the best flavour, I like to use a mix of mushrooms (I used portobello, chestnut & cup mushrooms).
Bresaola
This is a type of cured meat, made with beef. I’ve used bresaola in my wellingtons ever since reading The Pie Room cookbook by Calum Franklin. Bresaola has a meatier yet more delicate flavour than prosciutto (this lets the flavour of the beef fillet shine through!).
Crêpes
Crêpes are a classic component & work great for providing a moisture barrier between the meat & the pastry (no soggy pastry here!). We’re using a half batch of my classic French Crêpes recipe here (without the sugar), as we only need four crêpes for a wellington of this size.
Rough Puff Pastry
Lastly, we have the pastry. We have 2 options here. We can either use shop bought puff pastry or we can make our own rough puff pastry. Either way the wellington will turn out great! If you did want to make your own pastry, I’d recommend making a batch & a half of our seriously flaky rough puff pastry.
How To Assemble A Beef Wellington
The Filling
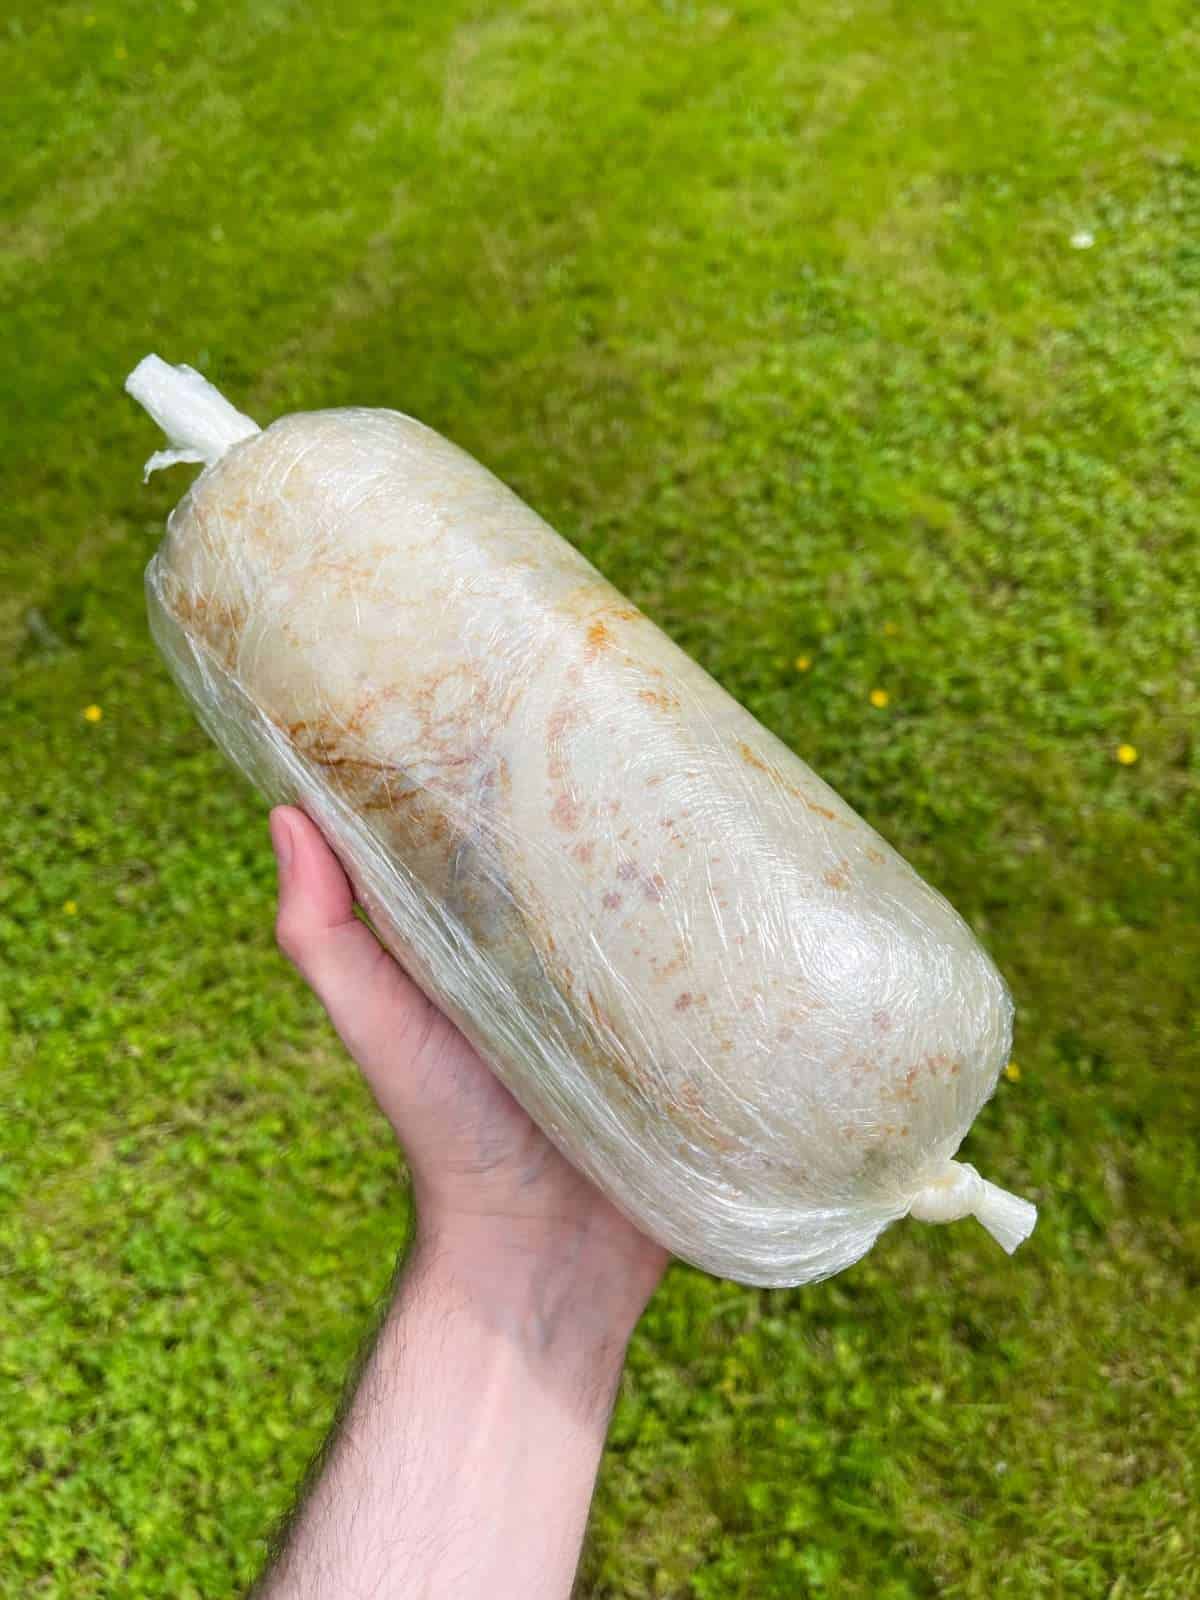
- Lay a double layer of clingfilm onto your work surface. Make sure that there is enough clingfilm so that you’ll be able to tie each end off.
- Arrange four crêpes in the middle of the clingfilm. They should sit 2 crêpes wide & 2 tall and should overlap slightly, so that there aren’t any gaps.
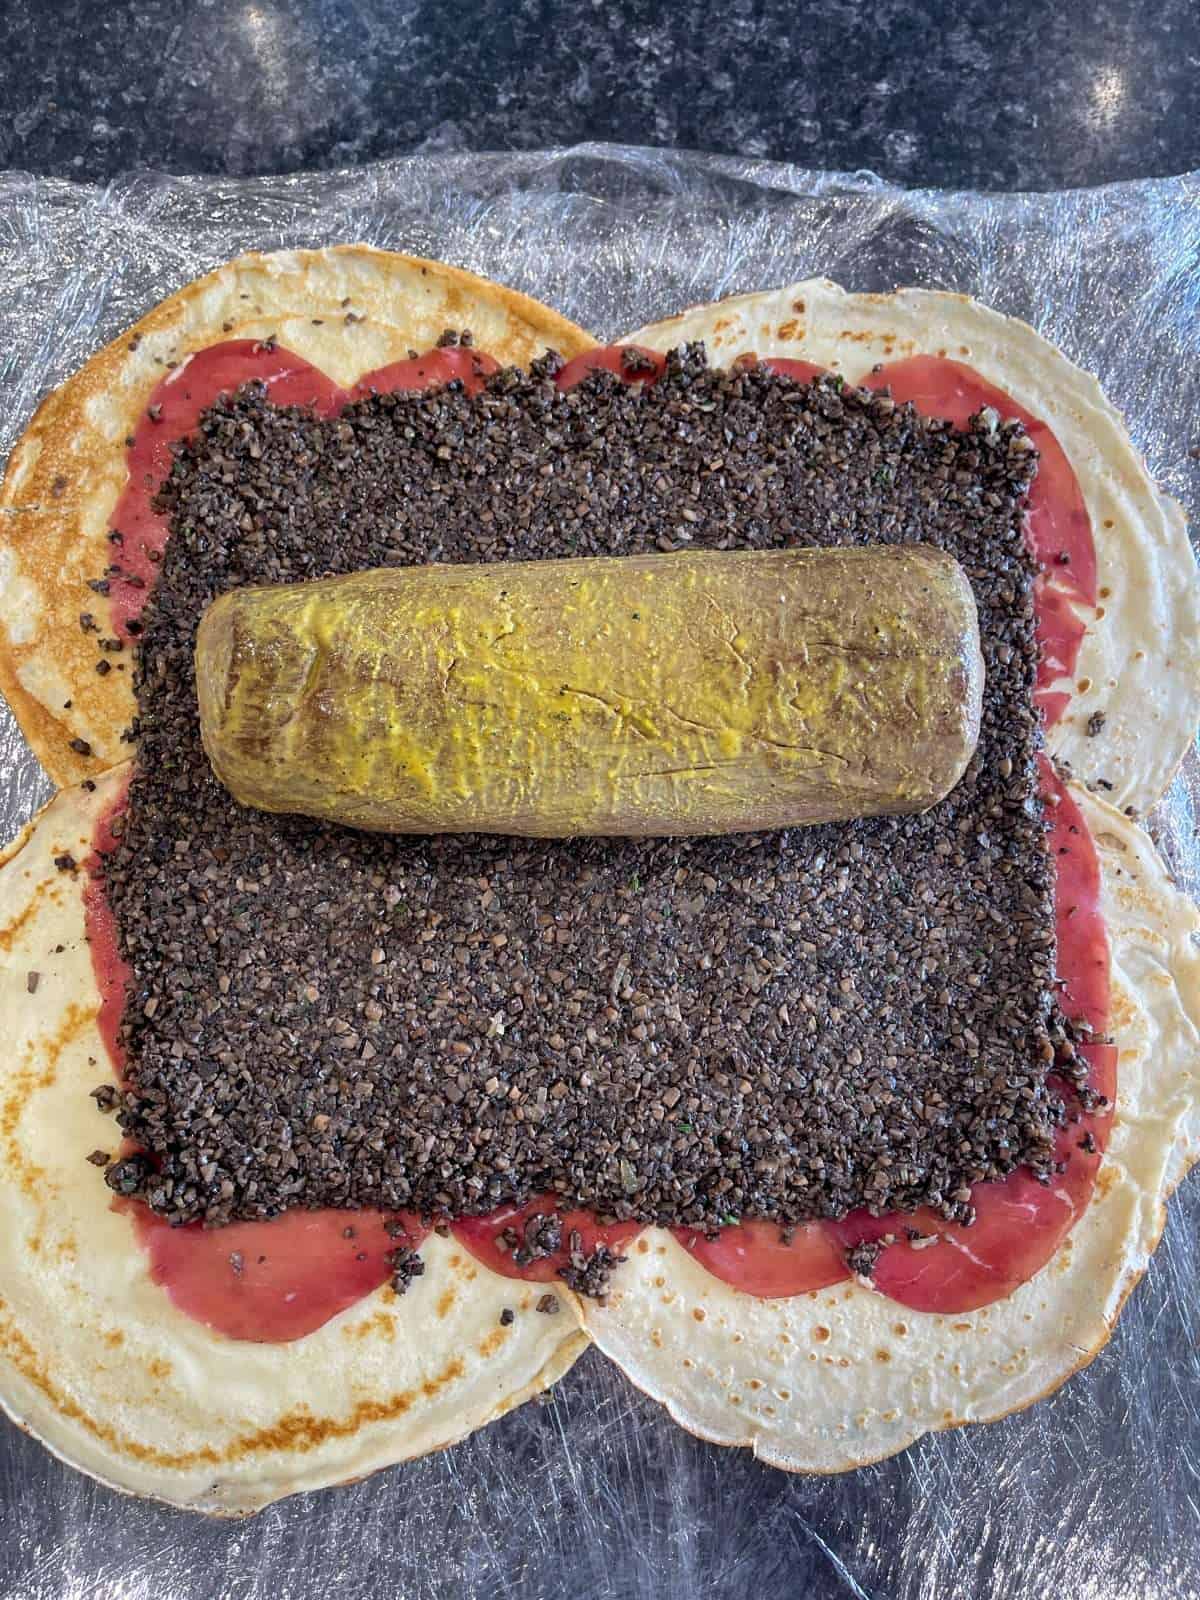
- Top the crêpes with a single layer of thinly sliced bresaola, overlapping these slightly as well. The meat should almost completely cover the crêpes. You may need to cut a few slices of bresaola in half so that they fit.
- Spoon mushroom duxelles on top of the bresaola, spreading it out with a palette knife into an even layer that almost completely covers the meat.
- Remove the clingfilm from the fillet then lay it horizontally across the middle of the mushrooms, near the top edge.
- Using the clingfilm, carefully roll the crêpes/mushrooms around the beef. Make sure to tuck the edges of the crêpes underneath, to seal before rolling into a tight sausage & tying off each end. Chill this in the fridge overnight.
The Wellington
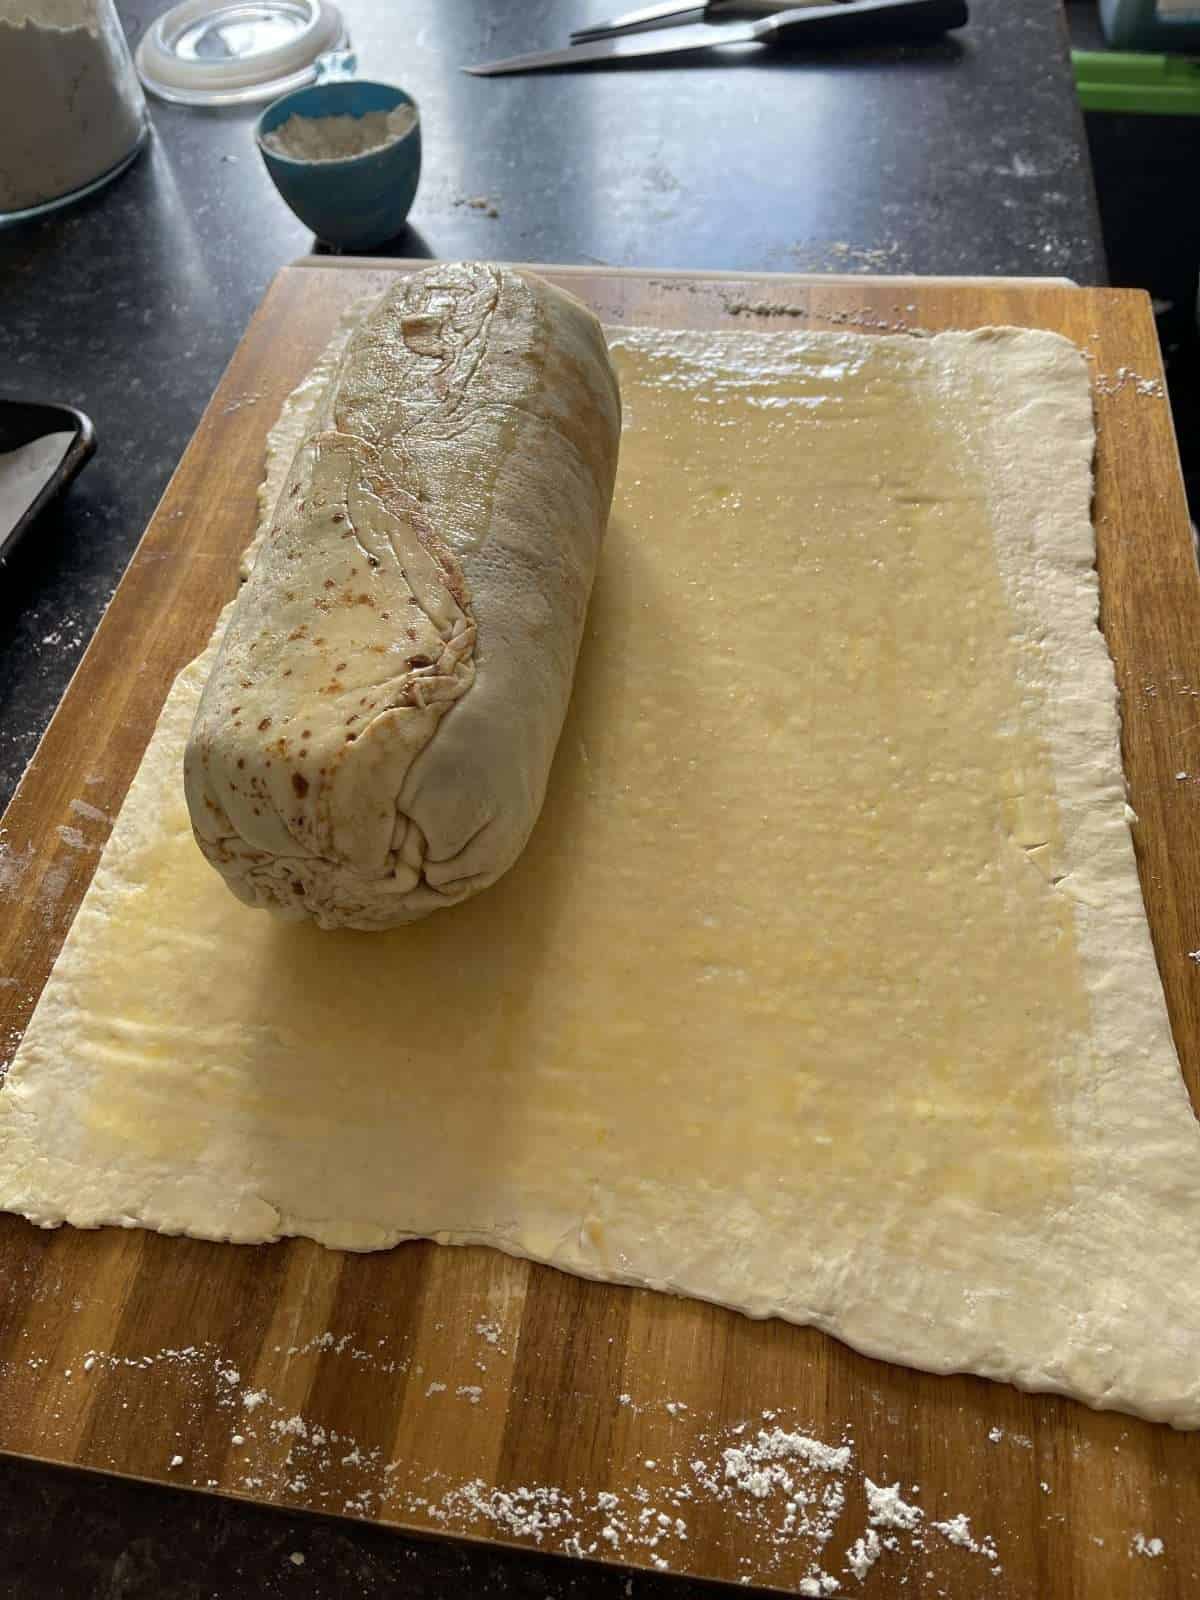
- The next day, roll pastry out into a 40cm x 50cm rectangle (it should be 5mm thick). Brush the pastry lightly with egg wash then carefully remove the clingfilm from the filling then place horizontally in the middle of the pastry, near the top edge.
- Starting with the edge furthest away from you, tightly wrap the pastry around the filling. If necessary, trim some of the excess pastry from the bottom edge then roll the wellington over, to seal. The pastry should only overlap by a couple of centimetres.
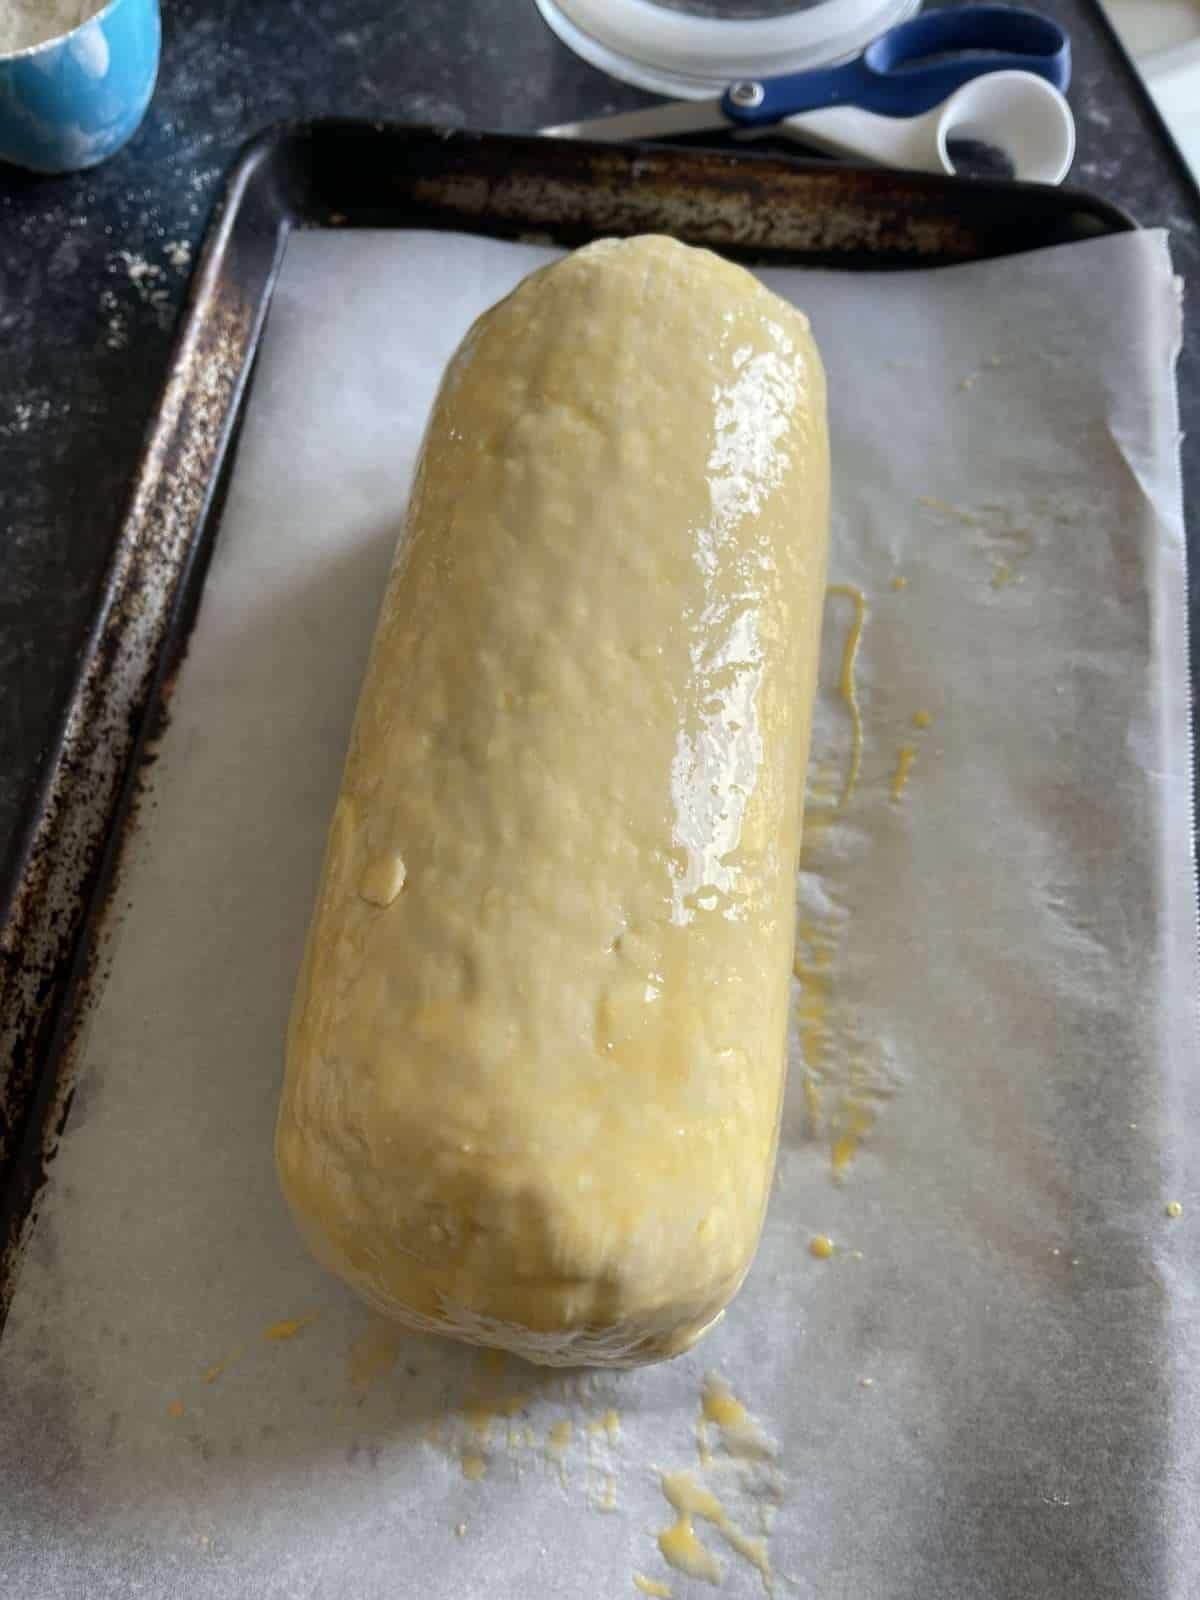
- Gently flatten the excess pastry from each end with your hands then trim most of it off, leaving a few centimetres. Tuck the pastry underneath the wellington then place it seam side down, on a lined baking tray. Brush the wellington all over with a light layer of egg wash.
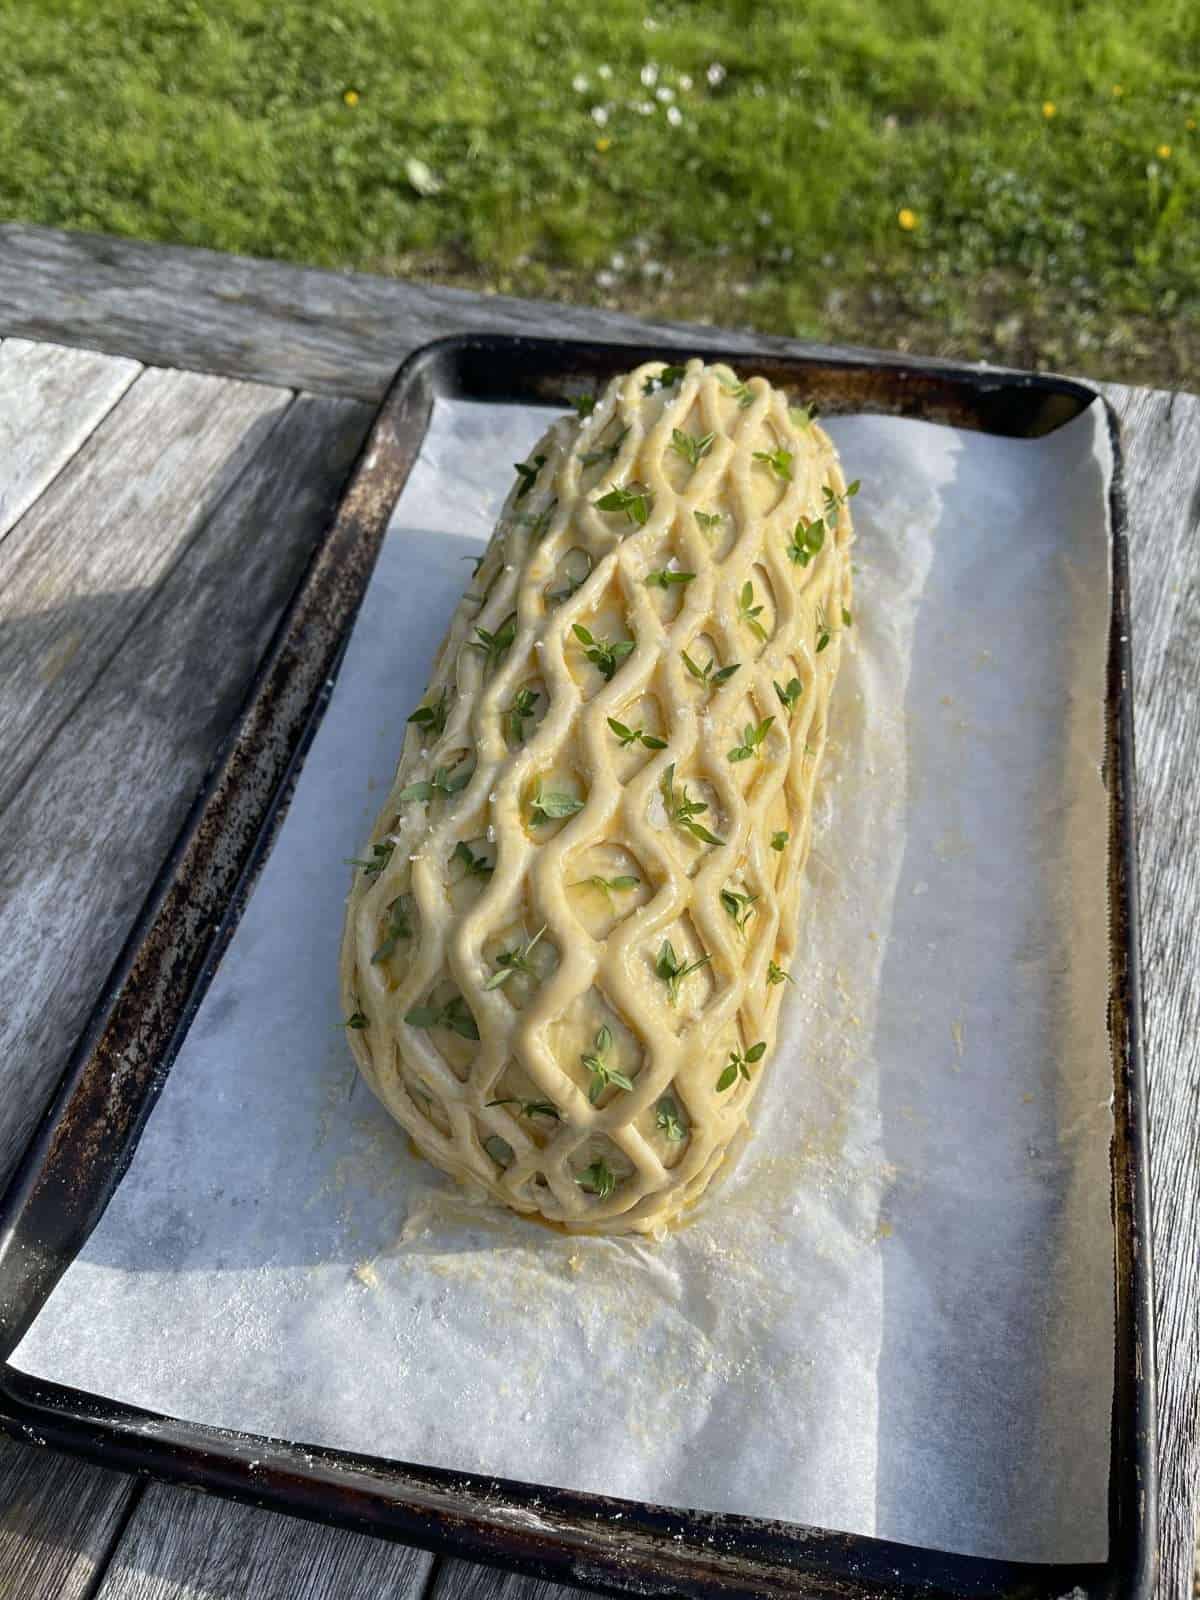
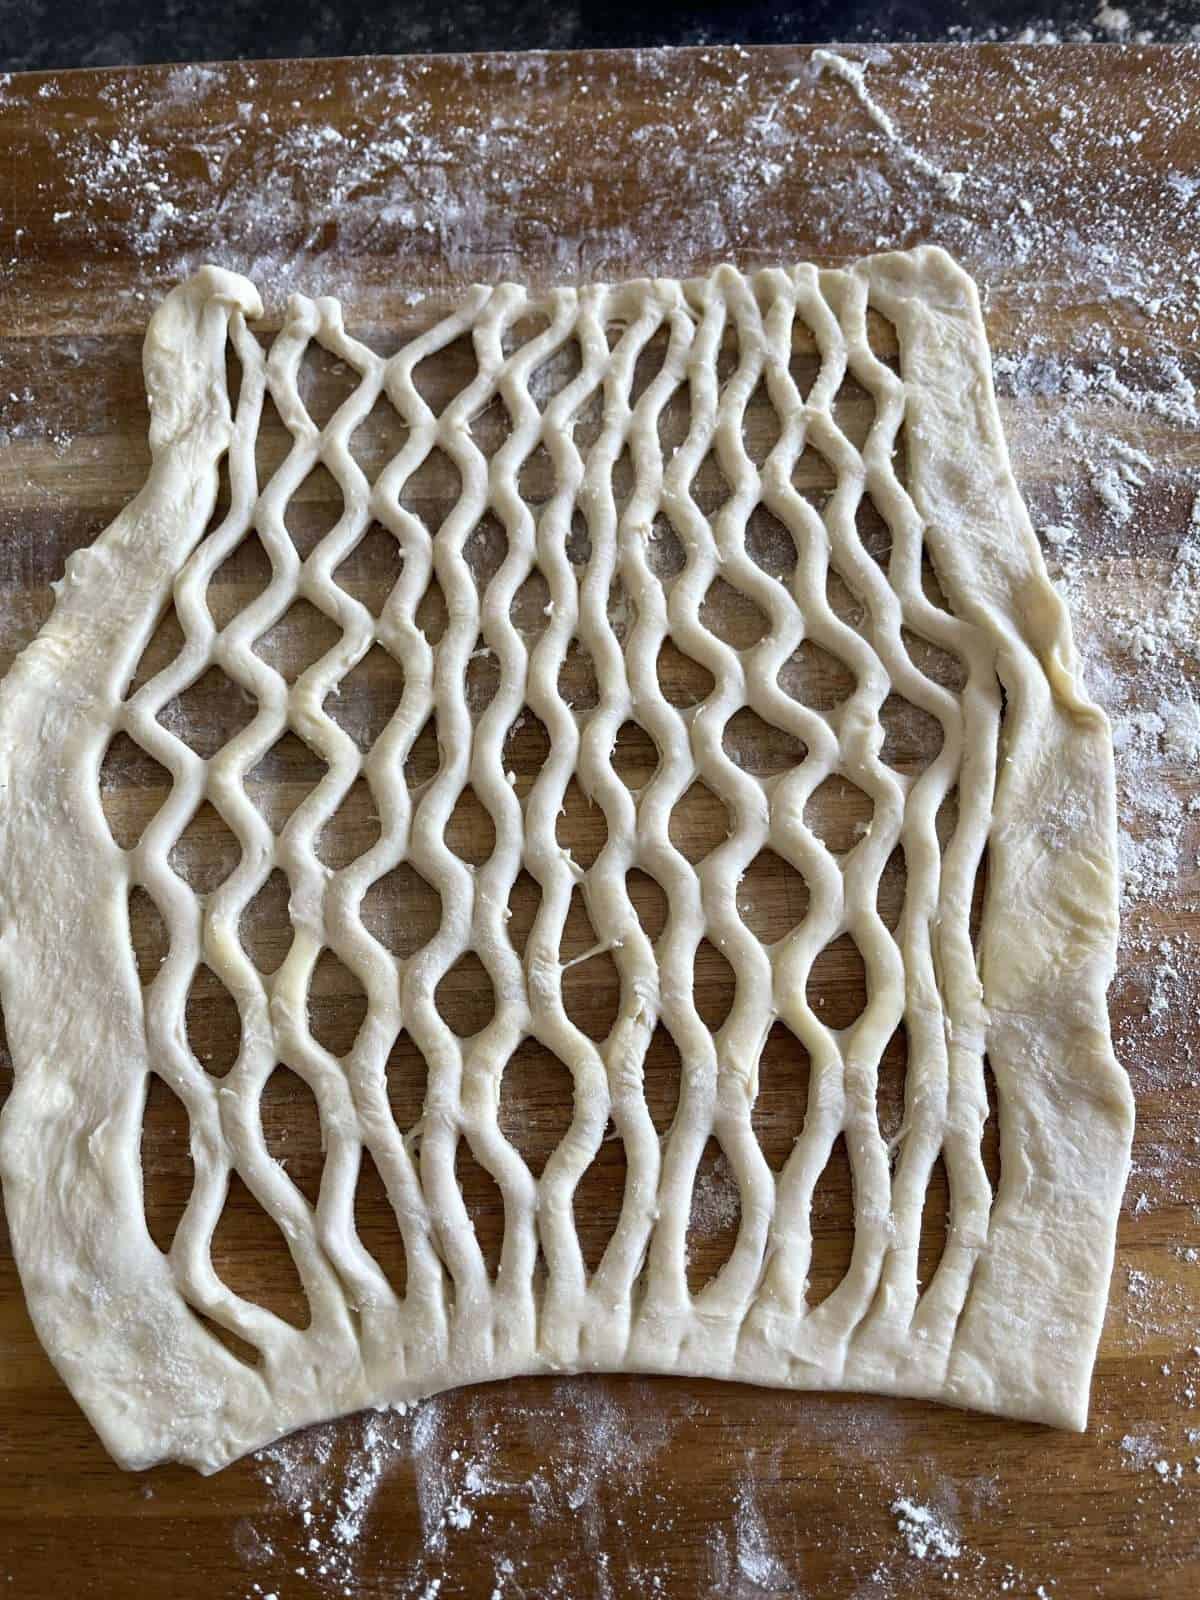
The Lattice
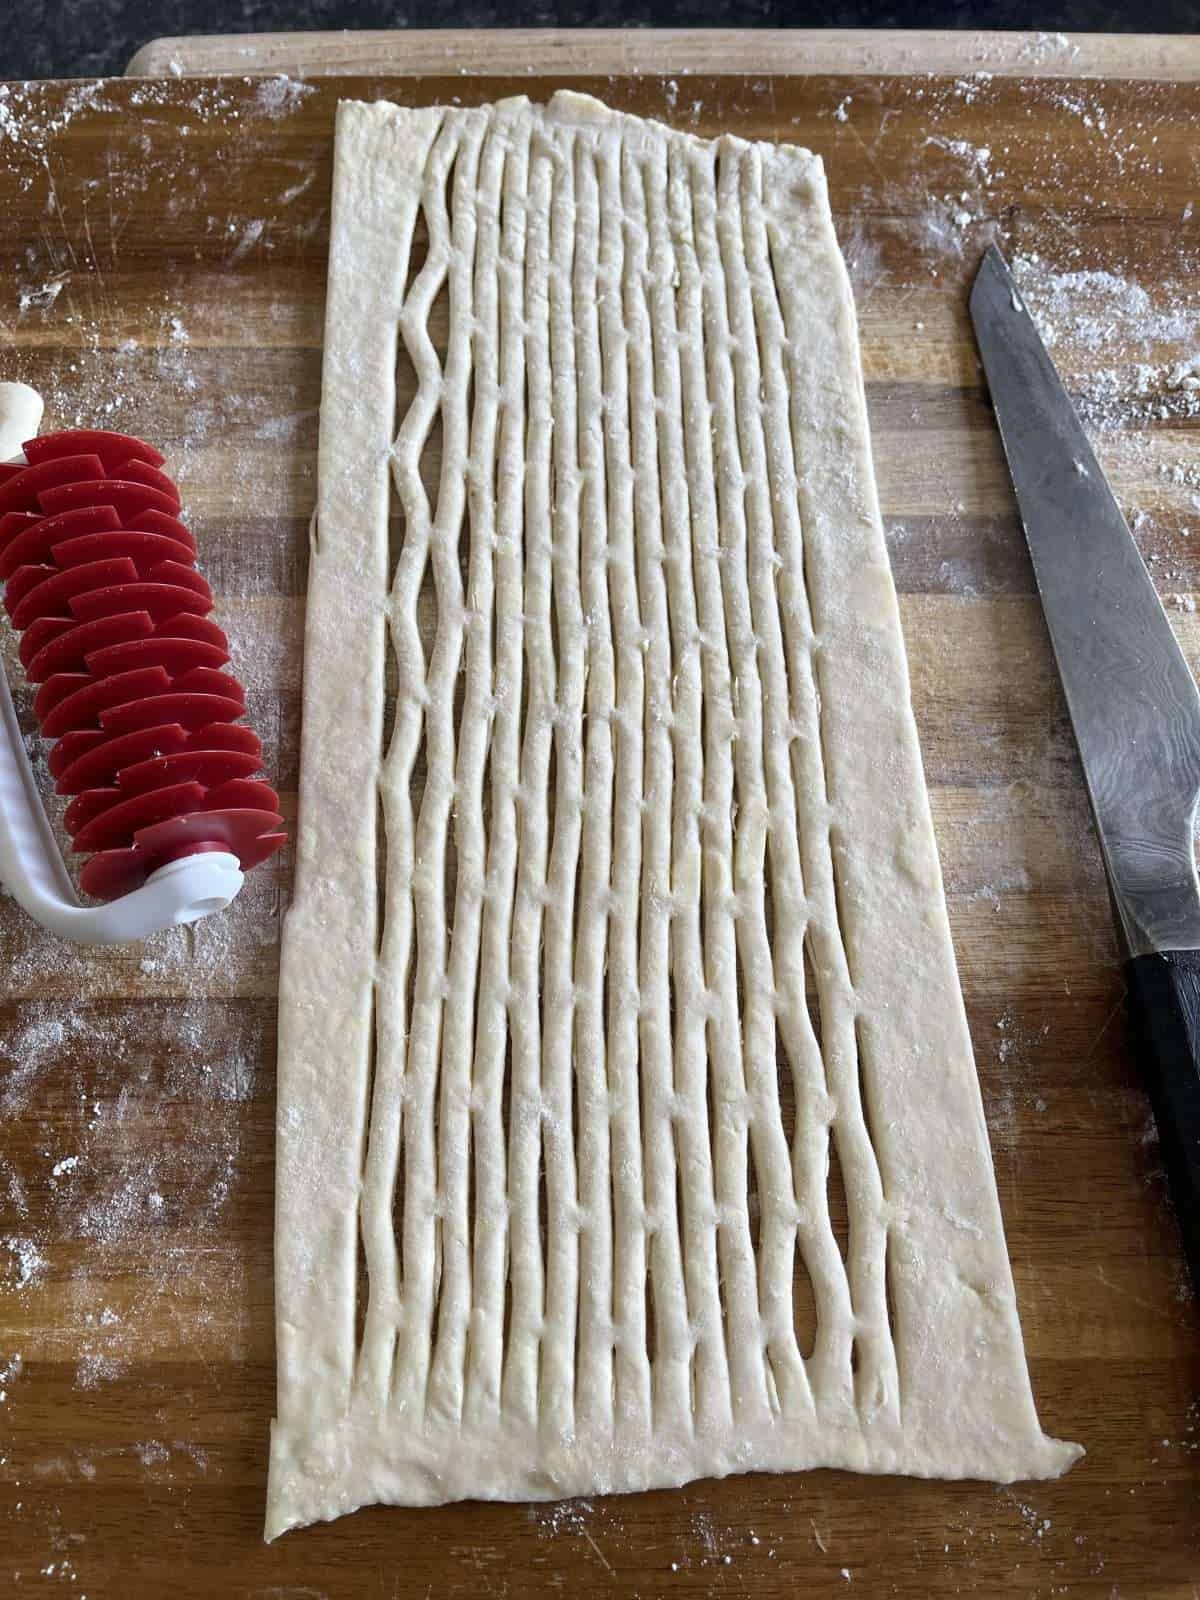
Now you don’t have to finish your wellington with a pastry lattice but it sure looks good & isn’t as difficult to do as it seems. The key here is to use well chilled pastry & a lattice roller. Make sure to double check that the roller cut through the pastry properly before placing on the wellington. If you haven’t got a lattice roller, I would recommend lightly scoring the top of the wellington with the back of a knife instead.
Here’s how to make a pastry lattice…
- Roll 300 grams of pastry out into a 5mm thick rectangle. This should be slightly longer than your wellington & roughly 15 cm wide. Chill this in the fridge whilst you roll the filling in pastry.
- Once you’ve assembled & egg washed the wellington, take the pastry out of the fridge & run a lattice roller down its’ length.
- Use a sharp knife to cut through any pastry that wasn’t cut with the roller.
- Carefully stretch the lattice with your hands then lay over the top of the wellington.
- Gently stretch the lattice so that it completely covers the wellington then tuck the edges underneath, trimming any excess pastry off if necessary.
- Brush egg wash over the lattice then place a fresh thyme leaf in each gap. Season with sea salt then bake.
How To Make Beef Wellington – 3 Day Schedule
There’s quite a lot of work involved in making a homemade beef wellington. Luckily we’re spreading the workload over 3 days! Here’s the schedule I follow when making a wellington at home.
Day 1
There’s not much to do on the first day. All we’re doing here is trimming any sinew from the beef fillet then rolling it in clingfilm, to give it a uniform shape & thickness. The beef then gets placed into the fridge & left overnight.
Day 2
Most of our prep is done on the second day. If you’re making your own rough puff pastry, you’ll need to make it today as well.
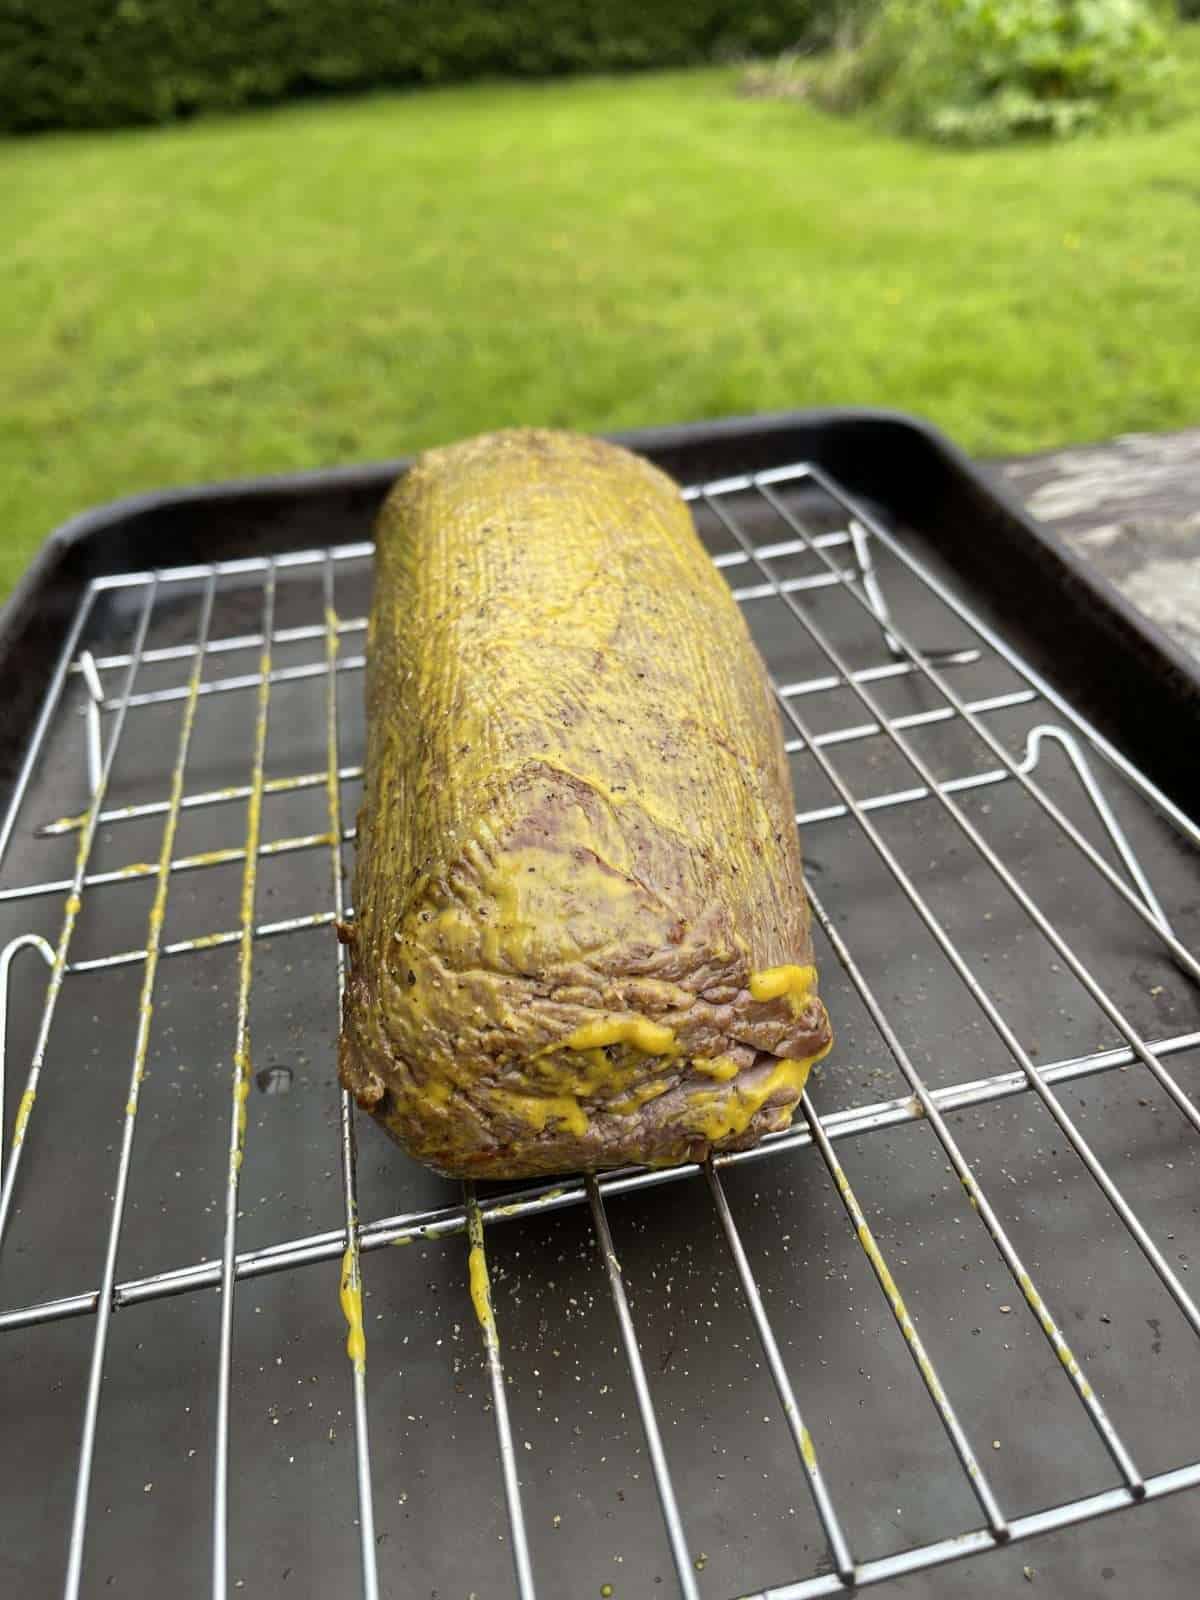
- Searing The Beef
First, we need to sear our beef in a super hot pan, until browned well. We then brush the outside with English mustard, leave it to cool then roll it in clingfilm again. This gets chilled in the fridge whilst we prep the rest of the components. - Mushroom Duxelles
Next, we make our mushroom duxelles. To do this, we cook finely diced shallots & grated garlic in butter, until soft (use the beef searing pan!) then transfer to a bowl.
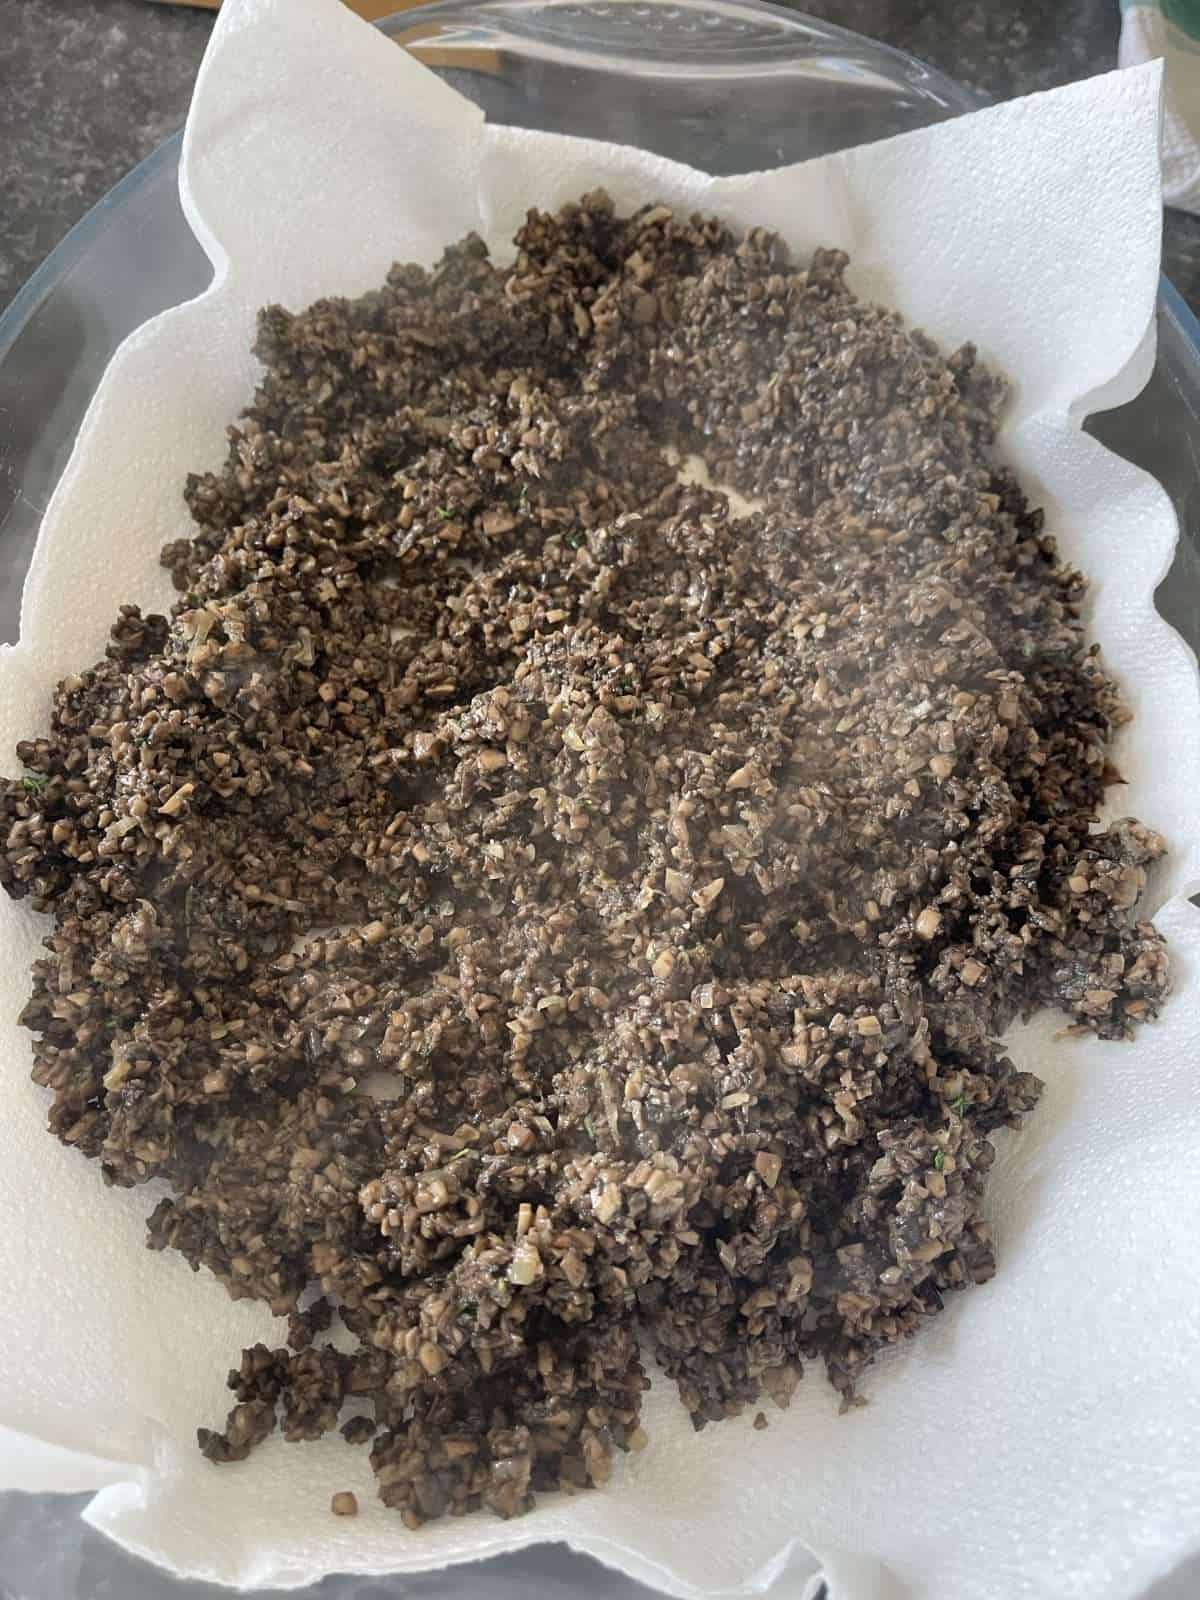
Now we set the pan over a high heat, add in a splash of veg oil, followed by finely chopped mushrooms & a good pinch of salt. This gets cooked until all of the moisture has evaporated then we deglaze the pan with sherry & stir in the cooked shallots & some finely chopped thyme leaves. We season the mushrooms with pepper then leave the duxelles to cool completely, in a kitchen paper lined dish. - Crêpes
Whilst our mushrooms are cooling down, we make the crêpes. We’re making these the classic way, with a batter made with flour, melted butter, egg, milk & pinch of salt. We cook them in a large frying pan, for 30 seconds on each side then let them cool completely. - Assembling The Filling
Once all of our components are cooled down, we can assemble the filling. There’s a full step by step guide above on how to do this!

Day 3
This is the final day & is when we will serve our wellington. Make sure to give yourself plenty of time to prep, cook & rest the beef. If you’re planning to serve at 5 pm (for example), I’d aim to get the beef wellington in the oven at around half past 3 in the afternoon.
- Roll Filling In Pastry
First, we roll out our pastry into a 40cm x 50 cm rectangle then use this to wrap around the beef filling. There’s a full guide on how to do this above! - Lattice
Once the filling has been wrapped, we brush the pastry all over with egg wash then top with a homemade pastry lattice (more on this in the section above). We give the lattice a light coating with egg wash then chill the wellington in the fridge, for 30 minutes. - Baking
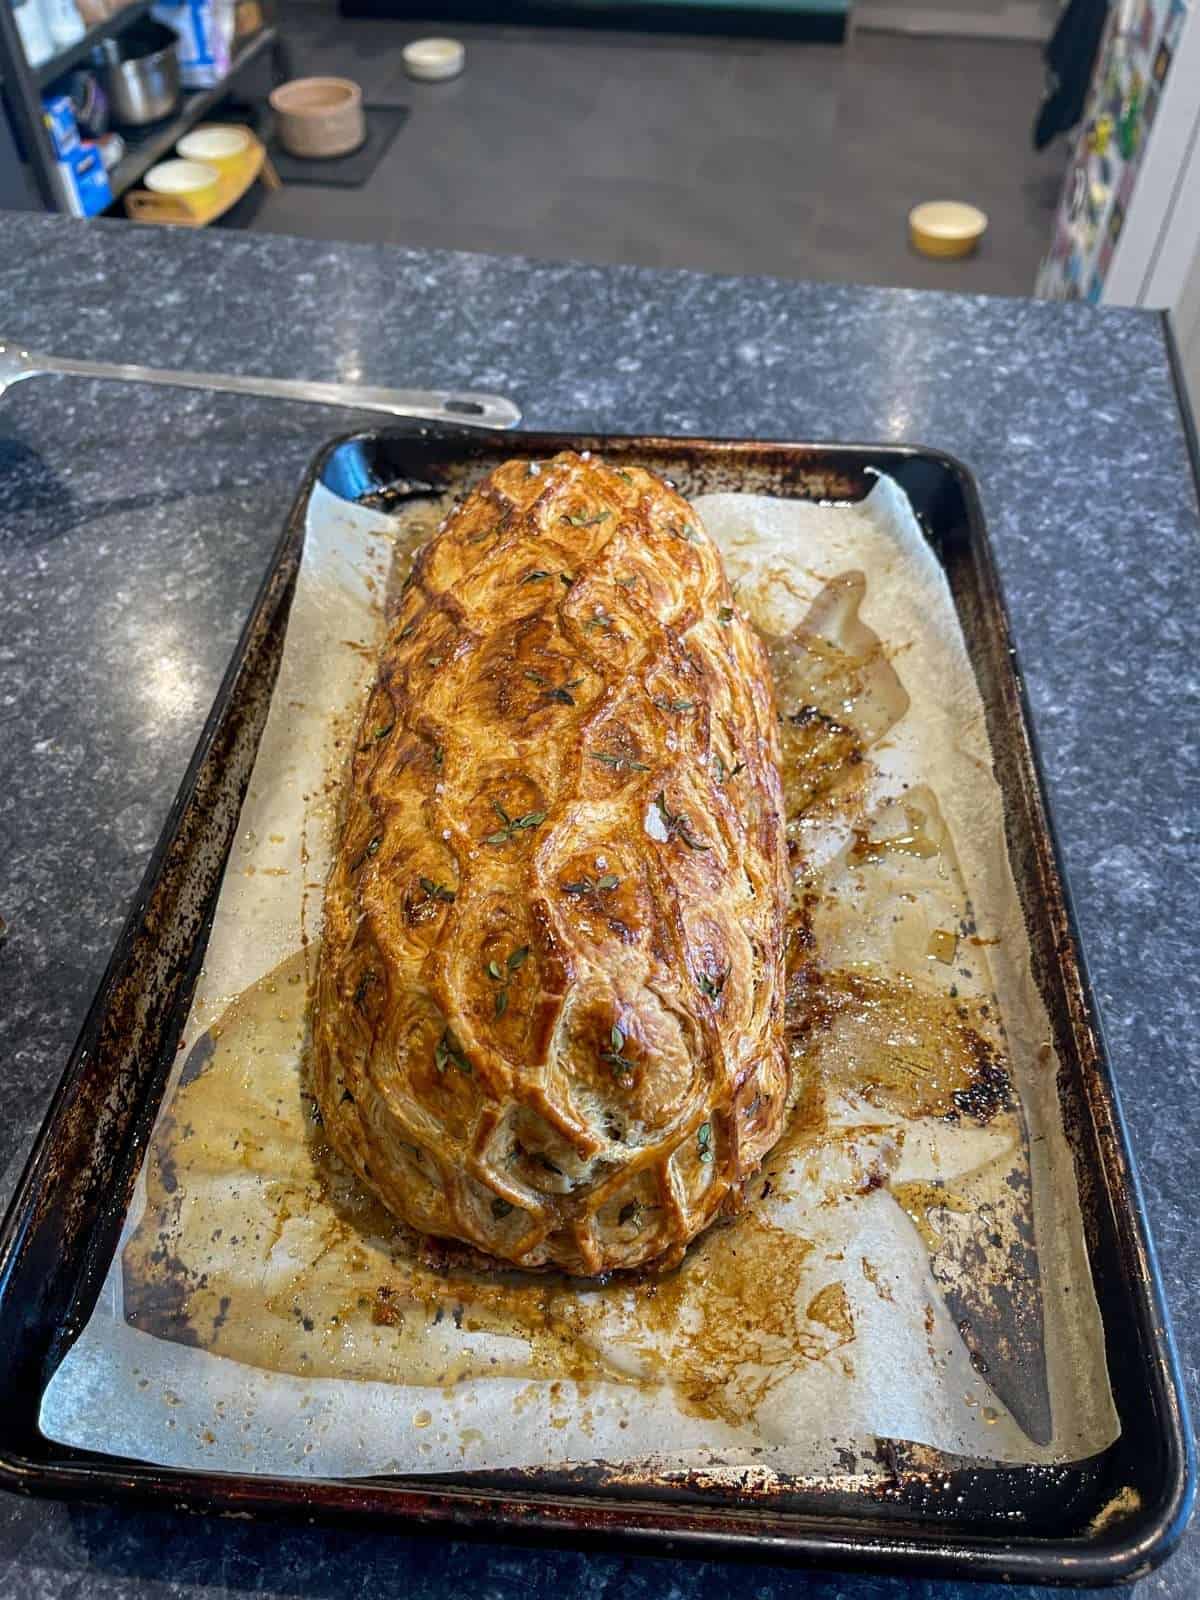
Next, we add a thyme leaf into each gap in the lattice then sprinkle with sea salt. Then we bake the wellington at 210°c/410°f until the internal temperature in the middle of the beef reaches 42°c-46°c (110°f-115°f). This gives us a perfect medium rare once rested. The wellington will take roughly 40-50 minutes to cook. - Resting
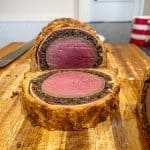
Once cooked, we let the beef rest for at least 30 minutes then we cut it into thick slices & serve immediately.
What To Serve With Beef Wellington
Feel free to serve your beef wellington with whatever you like! I tend to serve mine with some roast potatoes, some sautéed greens & a really good homemade gravy. Bernaise sauce, fondant potatoes or dauphinoise potatoes would be some other good choices.
Beef Wellington Tips & Tricks
- Don’t Rush – There’s quite a few different components to make for a beef wellington so it’s best to give yourself plenty of time to prep, cook & rest it.
- Use A Centre Cut Fillet – Ask your butcher for a centre cut beef fillet. This has a uniform thickness, which means that it will cook more evenly.
- Roll In Clingfilm – For uniform beef that is cooked evenly throughout, it’s best to roll it in clingfilm at each stage of the assembly process (before & after searing and once assembled).
- Make Your Own Pastry – Homemade puff pastry is best for beef wellington (in my opinion) & is easier to make & more robust than homemade puff pastry.
- Use A Food Probe – The best way to determine whether you’re beef is cooked, is to use a food probe to measure the internal temperature. I’d recommend a Thermapen.
- Cook At A High Temp – Pastry cooks best at a higher oven temperature & won’t turn soggy when cooked like this. Don’t worry about overcooking the beef, it has plenty of insulation.
- Rest Well – Make sure to rest your wellington for at least 30 minutes before serving. This lets the beef come up to temperature & reabsorb its’ juices.
- Slice With A Sharp Knife – Using a sharp serrated knife is key to getting the cleanest cuts.
Frequently Asked Questions
A fillet of beef is used to make a wellington. More specifically, a centre cut beef fillet, as it has a uniform shape/thickness so will cook more evenly. For this recipe, we’re using a 1kg piece of beef which will serve at least 6 people.
Bresaola is a type of cured beef, made from meat from the cow’s hindquarter. Flavoured with herbs & spices, plus port/red wine, this cured meat has a meatier, more delicate flavour compared to prosciutto which is more typically used in a beef wellington.
For the best ever beef wellington, I’d recommend making your own rough puff pastry. Alternatively, shop bought puff pastry will work as well. For this recipe, you’ll need 600 grams of pastry for the wellington & an extra 300 grams to make the lattice.
To accurately determine when your beef wellington is cooked, you’ll need to use a digital food probe. The internal temperature in the centre of the beef should be between 42°c-46°c (110°f-115°f) for medium rare. The temperature will rise slightly as the wellington rests, giving us perfectly cooked beef. Feel free to cook the beef more or less if you’d prefer.
The key to avoiding soggy pastry is to remove as much moisture as possible from the mushroom duxelles & to rest the cooked wellington for at least 30 minutes. We’re also using crêpes in our wellington’s filling, which acts as another moisture barrier between the meat and pastry.
Ideally, beef wellington should rest for at least 30 minutes before it is sliced & served. This gives the meat enough time to finish cooking (the temperature will rise slightly as it rests) & to reabsorb the juices.
For the best results, I’d recommend cooking & serving the beef wellington on the same day. If you did want to make it in advance, the assembled wellington can be stored in the fridge for a day or so before being baked.
How To Cook Beef Wellington In An Aga
With all of my recipes, I include cooking instructions for conventional ovens, fan ovens & also Agas. Here’s how to cook this recipe in an Aga…
To sear the beef, use the boiling plate. Cook the shallots (for the duxelles) on the simmering plate then move to the boiling plate to cook the mushrooms. Cook the crêpes using the boiling plate as well. Bake the wellington in the roasting oven, on a grid shelf placed on the floor. If the pastry needs more colour towards the end of the cook, move the tray up to the bottom set of runners.
Equipment Used
Please note that these are affiliate links & I may make a small commission if you make a purchase using these links, at no extra cost to you. For more information, click here.
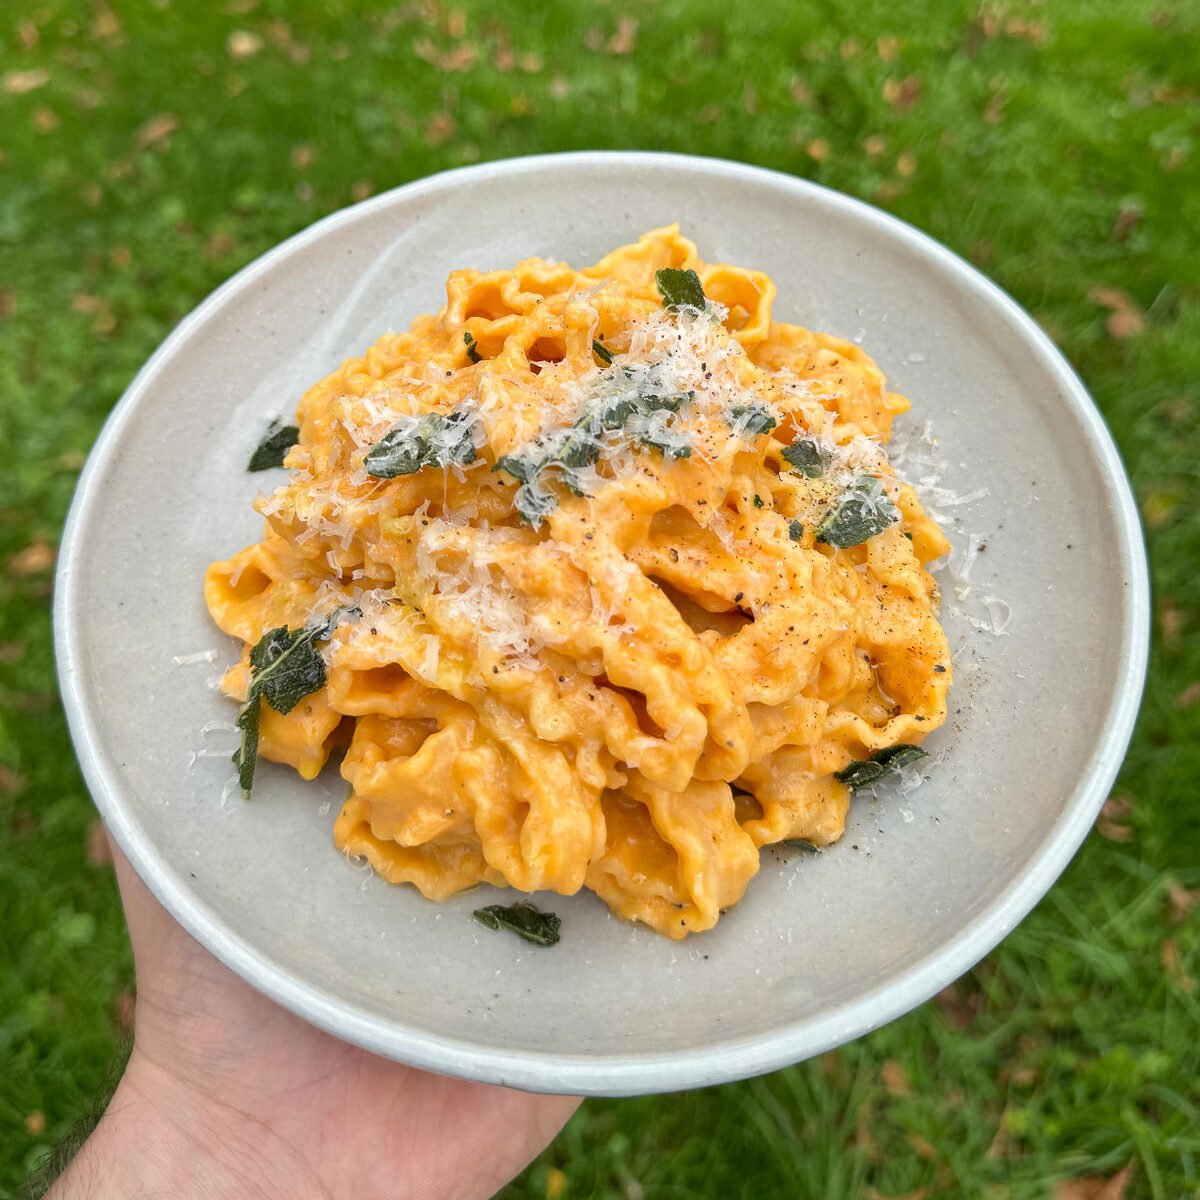
What’s For Dessert?
Want to finish your meal with a next level, homemade dessert? Here’s what we’d recommend…
- Apricot & Almond Frangipane Tart
- Coffee Stracciatella Ice Cream
- Amaretto Tiramisu
- Brown Butter & Miso Treacle Tart
Watch How To Make This Recipe
If you have enjoyed this beef wellington recipe, it would mean a lot if you could leave a review & rating. And if you’d like to stay up to date with future recipes, follow us on Instagram & TikTok!
Beef Wellington
Equipment
- Lattice Cutter
- Digital Food Probe
- Large Baking Tray
- Large Pan
- Microplane/Grater
- 10" Frying Pan
- Wire Cooling Rack
- Palette Knife
- Rolling Pin
Ingredients
Beef
- 1 kg Centre Cut Beef Fillet (See Notes)
- 2 tbsp Vegetable Oil
- 2 tsp English Mustard
Mushroom Duxelles
- 3 Shallots Peeled
- 2 Garlic Cloves Peeled
- 1 kg Mushrooms (See Notes)
- 20 g Unsalted Butter
- 1 tbsp Vegetable Oil
- 100 ml Sherry
- 1 tsp Finely Chopped Thyme Leaves
Crêpes
- 15 g Unsalted Butter
- 65 g Plain Flour
- 140 g Whole Milk
- 1 Large Egg
To Assemble
- 100 g Bresaola (Roughly 12 Large Slices)
- 900 g Rough Puff Pastry (See Notes)
- Thyme Leaves
Egg Wash
- 3 Egg Yolks
- 3 tsp Cold Water
- A Pinch Of Table Salt
Instructions
Prepping The Beef
- First, use a sharp knife to trim off any sinew from the outside of the beef fillet.
- Next, lay a double layer of clingfilm down on your workbench then place the beef on top. Tightly roll up the beef in the clingfilm, then tie off each end. Chill in the fridge overnight.The clingfilm should be slightly longer than the beef, so that we can tie off each end.
- The next day, set a large pan over a high heat, add in 2 tbsp of vegetable oil then leave to get smoking hot.
- In the meantime, unwrap the beef, pat dry with kitchen paper then season the outside generously with table salt.
- Once the oil is hot, add in the beef then sear well on all sides, making sure to flip the beef every 5-10 seconds. We're not cooking the beef at this point, only searing the outside. Make sure to get the oil smoking hot, for the best sear. Once the beef is seared, set the pan to one side, we'll be using this to cook the duxelles in.
- Transfer the beef to a wire cooling rack, set over a tray then brush all over with the English mustard. Season with freshly cracked black pepper, leave to cool then wrap in another double layer of clingfilm & chill in the fridge.
Mushroom Duxelles
- Finely dice the shallots & grate the garlic then place into a bowl & set aside.
- Next, chop up the mushrooms by hand, as fine as possible, placing them into another bowl as you chop them.You could also use a food processor to chop up the mushrooms, in batches. But for the best texture, it's worth taking the time to do them by hand.
- Set the pan that you seared the beef in over a low heat then add in the butter. Leave to melt then add in the shallots & garlic. Cook for 5-10 minutes, until soft then transfer to a bowl.
- Increase the heat up to high, add in the tbsp of veg oil then leave for a minute or two, to get hot.
- Add the mushrooms to the pan, along with a good pinch of salt then cook, stirring regularly until all of the moisture from the mushrooms has evaporated. This will take around 10 minutes.
- Deglaze the pan with the sherry, letting it reduce completely then stir in the cooked shallots & the chopped thyme leaves. Season with freshly cracked black pepper then transfer to dish lined with kitchen paper & leave to cool completely.
Crêpes
- Melt the butter (in a microwave or a pan) then add into a mixing bowl along with the flour, milk & egg. Season with a pinch of a salt then whisk to combine. Pass the batter into another bowl, through a sieve.
- Place a 10" frying pan/skillet over a medium heat then once hot, grease with a small amount of butter or oil.
- Add a small ladle full (roughly 4 tbsp/60 ml) of batter into the pan then tilt so that the batter completely covers the bottom, in a thin, even layer.
- Cook the crêpe for 30-40 seconds, until the bottom is lightly browned & the top looks dry then flip over with a spatula & cook for another 30 seconds.
- Transfer the cooked crêpe to a plate then repeat the cooking process with the remaining batter. Once all of the batter is cooked, let the crêpes cool completely.We need to make 4 large crêpes but they're should be enough batter to make a couple extra.
Assembling The Filling
- Lay a double layer of clingfilm down on your work surface & smooth out with a tea towel. Make sure to give yourself enough room to tie off each end. I'd recommend 3 sheets of clingfilm wide.
- Next, place 4 crêpes in the middle of the clingfilm, arranging them 2×2 & overlapping them slightly (there shouldn't be any gaps!).
- Top the crêpes with a single layer of bresaola slices, overlapping these slightly as well. The meat should almost completely cover the crêpes. You may need to cut a few slices of bresaola in half so that they fit.
- Spoon the duxelles on top of the bresaola then use a palette knife to spread them into an even layer that completely covers the meat.
- Unwrap the beef then place horizontally, near the top edge of the duxelles (the side furthest away from you).
- Using the clingfilm, carefully roll the crêpes/mushrooms around the beef. Make sure to tuck the edges of the crêpes underneath, to seal before rolling into a tight sausage & tying off each end. Chill this in the fridge overnight.
Assembling The Wellington
- Take a third (300 grams) of the pastry & roll out on a lightly floured surface, into a 5mm thick rectangle then place onto a tray & chill in the fridge. We'll be using this pastry for the lattice, so it should be slightly longer than the wellington & around 15 cm wide.
- Make the egg wash by whisking together the yolks, water & salt then set aside.
- Next, roll the remaining pastry out into a 40cm x 50cm rectangle, that is also 5mm thick.
- Trim the edges, to neaten up if necessary, dust off any flour then brush the entire top of the pastry with a light layer of egg wash.
- Carefully remove the clingfilm from the filling then place horizontally in the middle of the pastry, near the top edge.
- Starting with the edge furthest away from you, tightly wrap the pastry around the filling. If necessary, trim some of the excess pastry from the bottom edge then roll the wellington over, to seal. The pastry should only overlap by a couple of centimetres.
- Gently flatten the excess pastry from each end with your hands then trim most of it off, leaving a few centimetres. Tuck the pastry underneath each end then place the wellington seam side down, on a lined baking tray. Brush the wellington all over with a light layer of egg wash.
- Next, take the chilled piece of pastry out of the fridge & place onto your work surface. Run a lattice roller down the length of the pastry (down the middle) then use a sharp knife to open up any of the cuts that weren't made properly.
- Carefully stretch out the lattice with your hands then confidently lay over the top of wellington. Gently stretch the lattice so that it completely covers the wellington then tuck the edges underneath, trimming any excess pastry off if necessary.
- Brush the wellington all over, with another light layer of egg wash then chill in the fridge for 30 minutes. In the meantime, preheat an oven to 210°c/190°c fan (410°f/374°f).
Cooking
- Brush the wellington all over with a final (light) layer of egg wash, place a fresh thyme leaf inside each of the gaps made by the lattice then sprinkle with sea salt.
- Bake the wellington until the centre of the beef reaches an internal temperature of 42°c-46°c (110°f-115°f). This will take around 40-50 minutes but check after 30. This is for medium rare beef, so feel free to cook it more if you'd prefer. I'd recommend turning the tray after 30 minutes, so that the pastry browns evenly.
- Once cooked, let the wellington rest for 30 minutes then transfer to a chopping board. Use a sharp knife to cut into thick slices then serve, seasoning each slice with sea salt & freshly cracked black pepper.
I’ve always thought Beef Wellington was impossible to make, but your breakdown gives me confidence to finally try. I posted something similar on my site, though not nearly as detailed as this.