2 Day Pizza Dough
This homemade pizza dough is cold proved over 2 days, for extra flavour. It makes crusts with light, airy crusts and crisp bases.
This post contains affiliate links.

This homemade pizza dough is cold proved over 2 days in the fridge for extra flavour, better oven spring and for proper blistering! Despite the longer fermentation time, most of the prep for this dough is hands off, plus it’s super easy to handle and makes the best pizzas ever…
This is one of those recipes that’s taken many tests to get just right! After experimenting with different levels of hydration, the amount of yeast used & length of the cold ferment, I’ve finally got this pizza dough to a place that I’m super happy with. It’s easy to stretch (it won’t tear!), has a fantastic oven spring, the crust is light & airy and you get the perfect amount of char & blistering when you bake it in a pizza oven!
For more bread & dough recipes, take a look at our ever growing collection of bread recipes! Here you’ll find more pizza doughs, flatbreads, sourdough, burger buns, bagels & lots more. I’d recommend trying my 3 day poolish pizza dough!
What You’ll Need
- 00 Flour – Using a good quality 00 flour works best! I use Caputo. For this style of pizza dough, it’s key that we use an 00 flour with a protein content of at least 12.5% & a W rating between 260 – 300.
- Yeast – This pizza dough recipe has been developed using dried active yeast, so that’s what I’d recommend that you use!
- Salt – A good quality, fine sea salt works best for pizza dough. I use Maldon salt.
- Water – Regular tap water is fine for this recipe. Make sure to accurately measure the water’s temperature with a food probe.
How To Make 2 Day Pizza Dough
This pizza dough is cold proved over 2 days, for extra flavour! The process is simple; mix the dough, bulk ferment at room temperature for a few hours, ball up, prove in the fridge for 2 days then leave at room temperature for a few hours before using for pizza!
- Autolyse
First, we mix 00 flour & water together until just combined then leave to sit at room temperature for an hour. This is called an “autolyse” & is used to hydrate the flour, which helps with gluten development. - Mix Dough
Next, we add dried active yeast to the dough (dissolved in a small amount of water) then mix on a medium-low speed (in a stand mixer) until incorporated. Then we add in sea salt & continue mixing until the dough is smooth & is coming away from the sides of the bowl. This will take 5-10 minutes of mixing. - Bulk Ferment
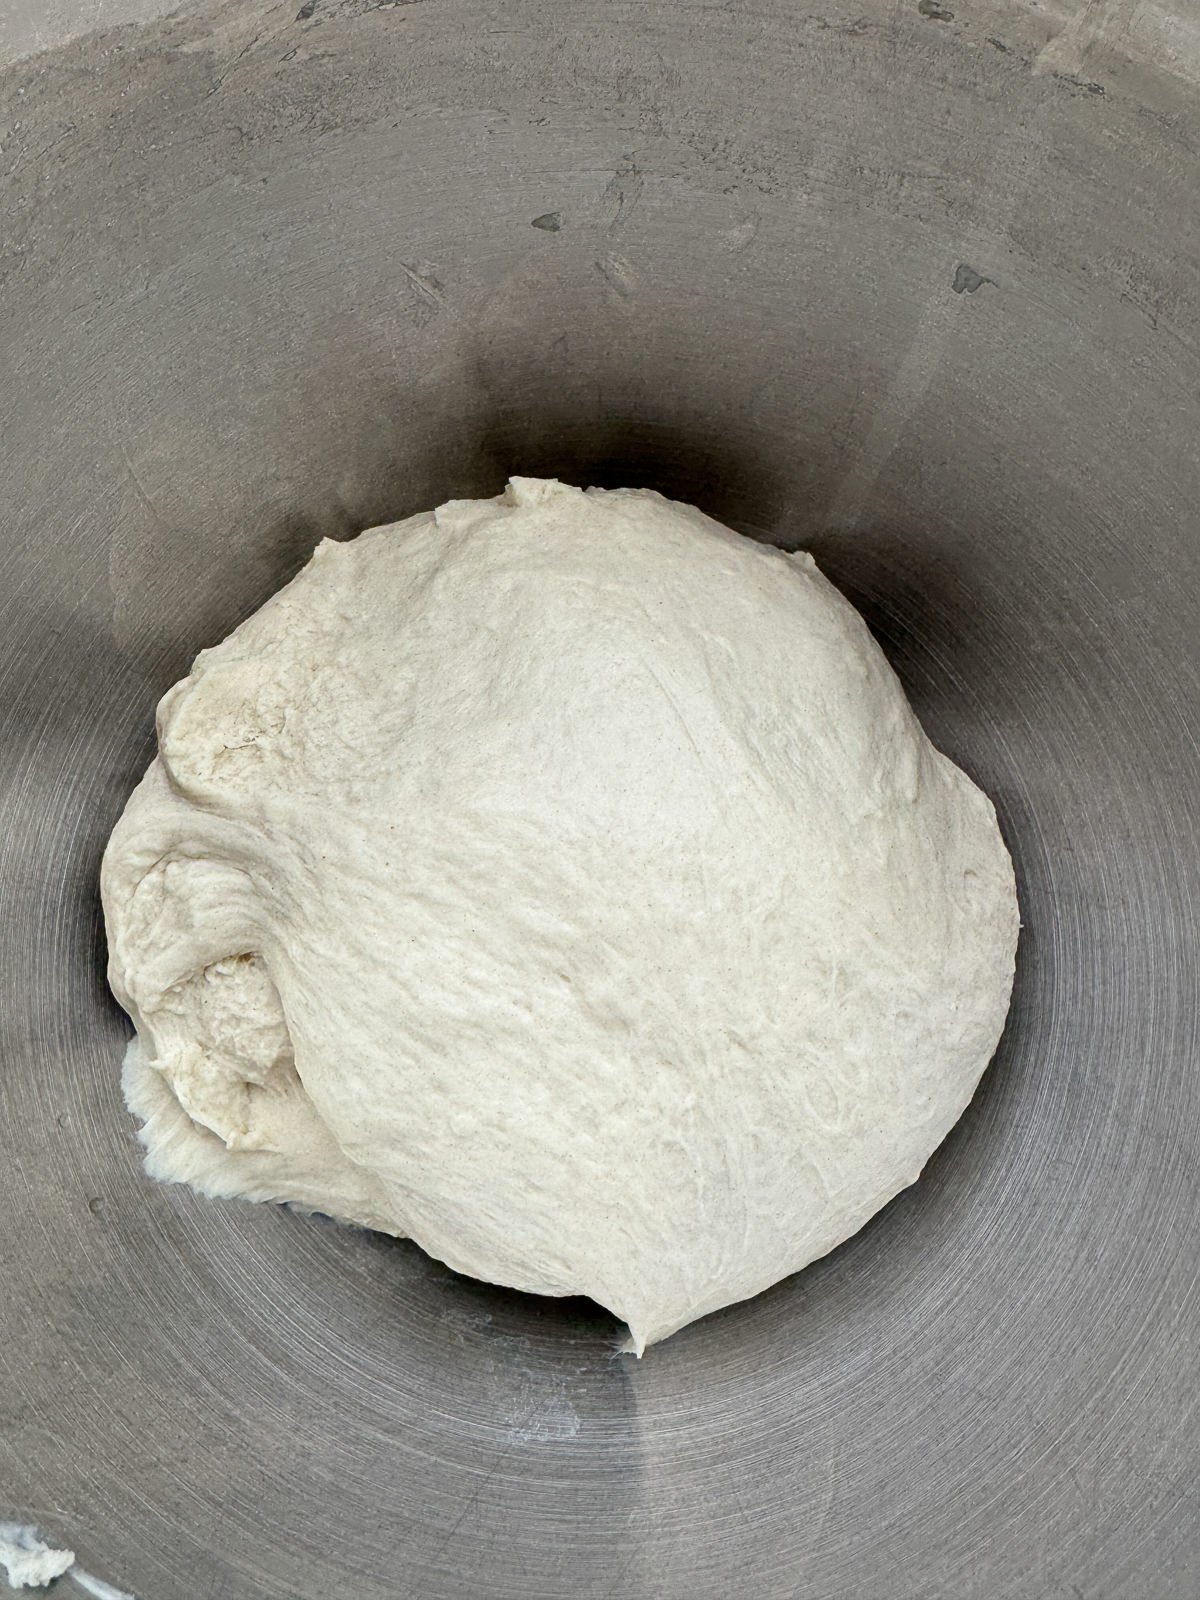
Once the dough is mixed, we transfer it to a lightly oiled glass bowl then leave to bulk ferment at room temperature (around 25°c/78°f) until the dough has increased in size by around 50% & there’s lots of tiny bubbles around the sides of the dough. This will take 2½-3 hours. We use a glass bowl, so that we can see signs of fermentation (tiny bubbles).
During the first hour of the bulk ferment, we’re going to perform a 2 sets of coil folds, spaced 30 minutes apart. This helps develop gluten in the dough! - Ball Dough
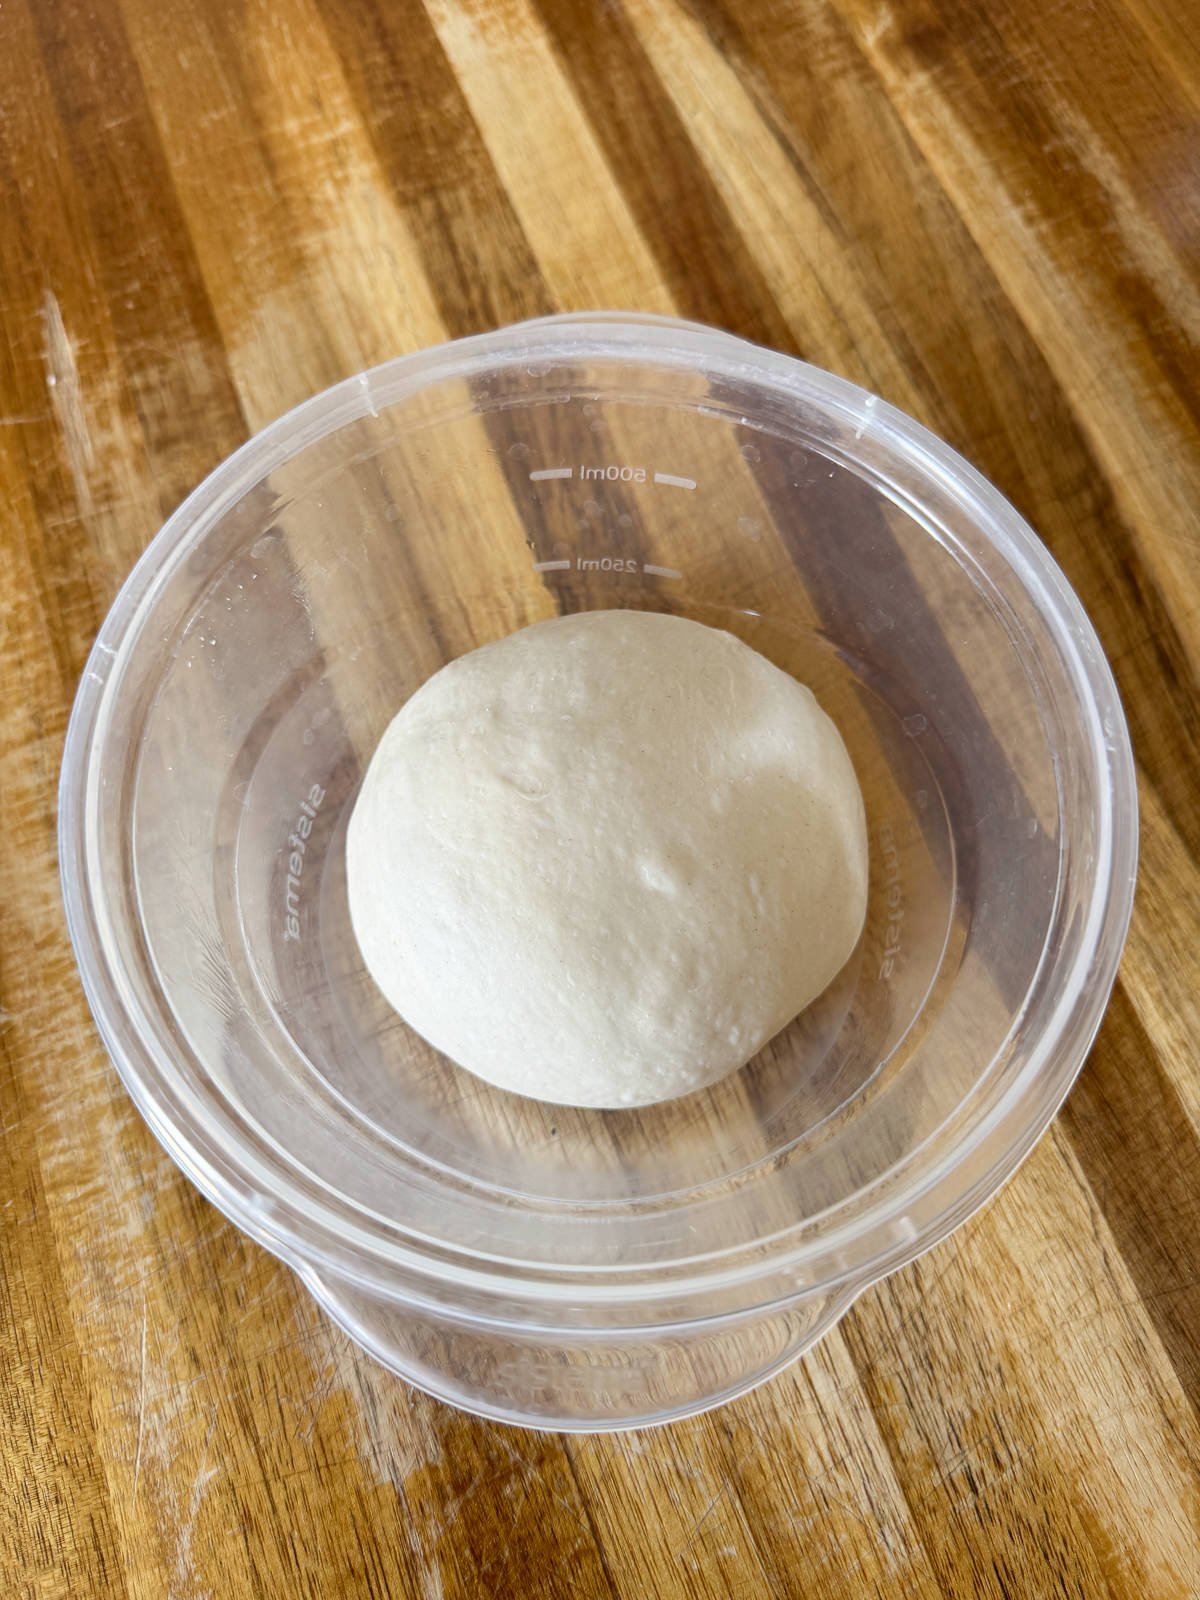
Next, we tip the dough out onto a clean work surface (you won’t need any extra flour) then use a bench scraper to divide the dough into 4 x 275 gram pieces. We then shape the dough into balls, place into lightly oiled containers then cover. - 48 Hour Cold Prove
Now the balls of dough need to cold prove in the fridge for 36-48 hours. You could prove the dough for up to 72 hours but 36-48 hours is the sweet spot. - Room Temperature Rise
Before using your pizza dough, it needs to be left to sit at room temperature for 3-4 hours, until the dough has risen in size slightly & no longer feels cold to the touch. - Use For Pizza
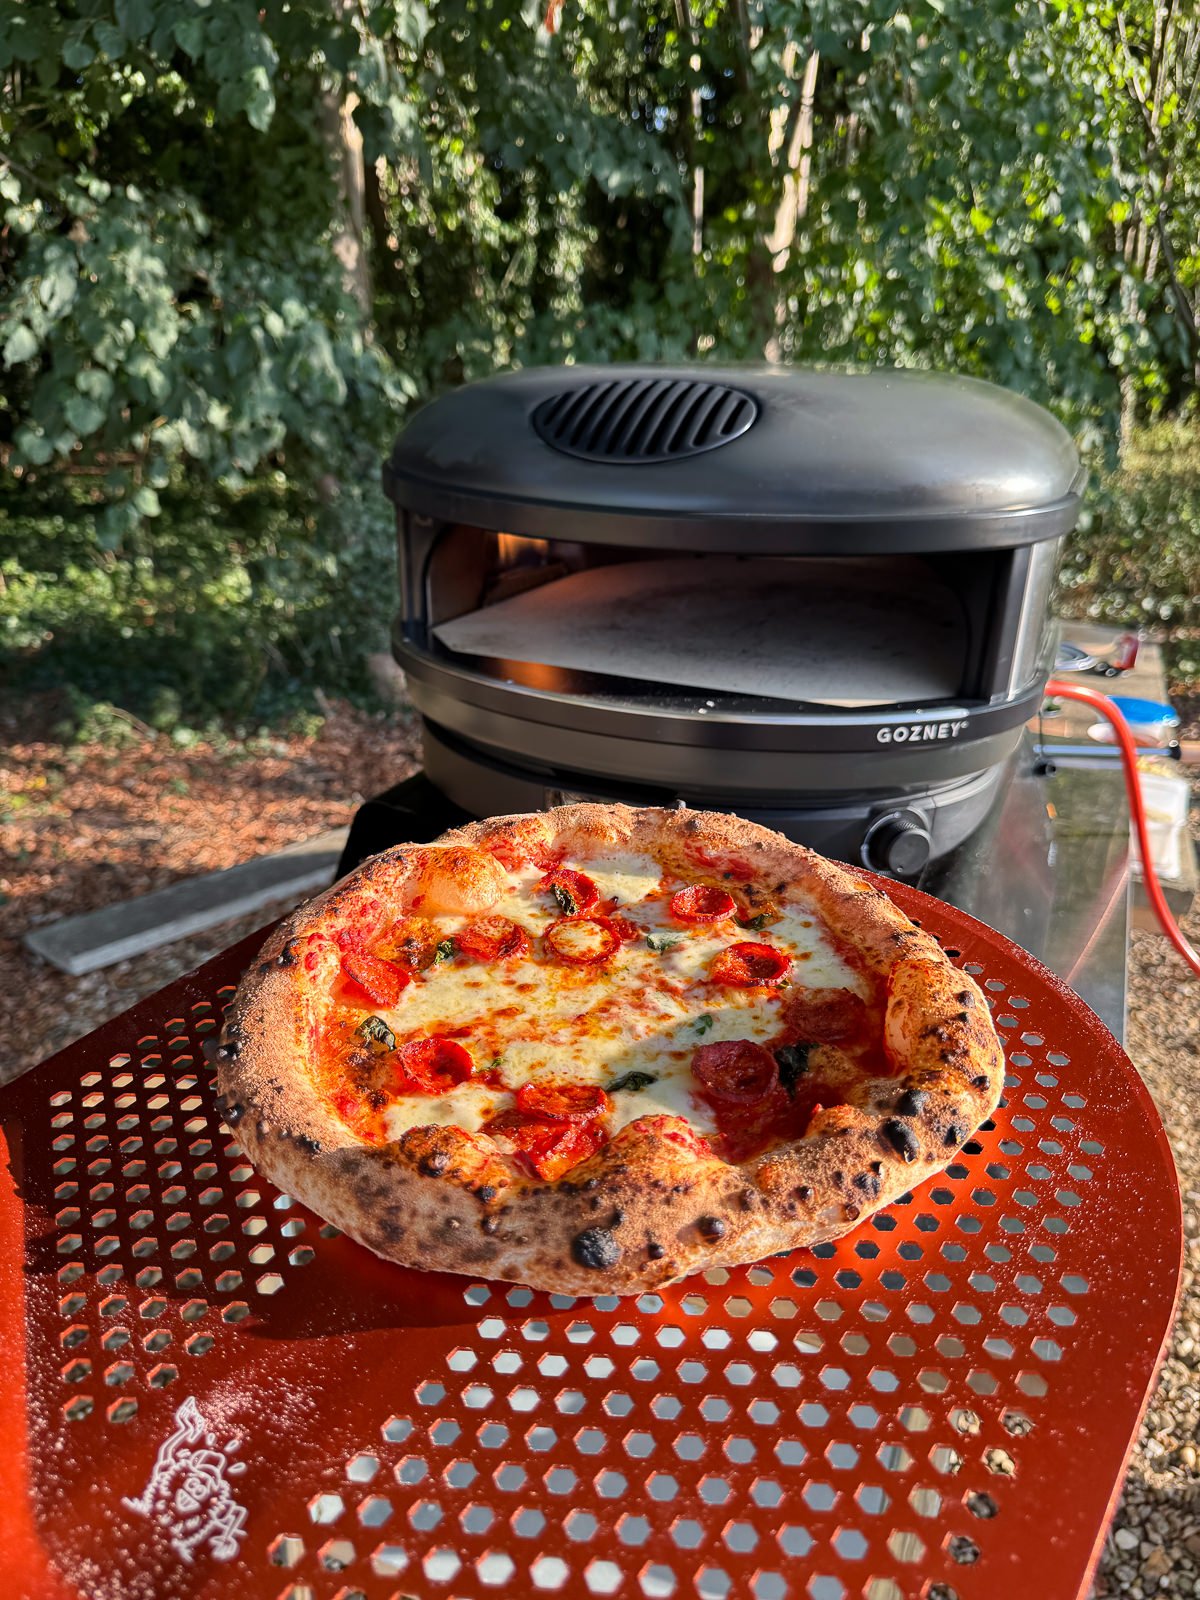
The pizza dough is now ready to use to make pizzas! For the best results, I’d recommend using a pizza oven to cook them.
Coil Folds
Coil folds are a way to strengthen dough & develop gluten during the bulk ferment. Although doing them for this pizza dough is optional, I find that it’s a quick & easy way to ensure that your dough has achieved proper gluten development. Here’s how to perform a set of coil folds:
- With wet hands (this stops the dough from sticking), gently loosen the dough from the sides of the bowl
- Using both hands, gently lift the dough up from the middle until one side is released from the container/bowl.
- Fold the released side back under the dough.
- Turn the bowl 180° and repeat the folding process.
- Now turn the bowl 90° & repeat.
- Finally, turn the bowl another 180° and repeat one last time.

The Best Way To Cook Pizza
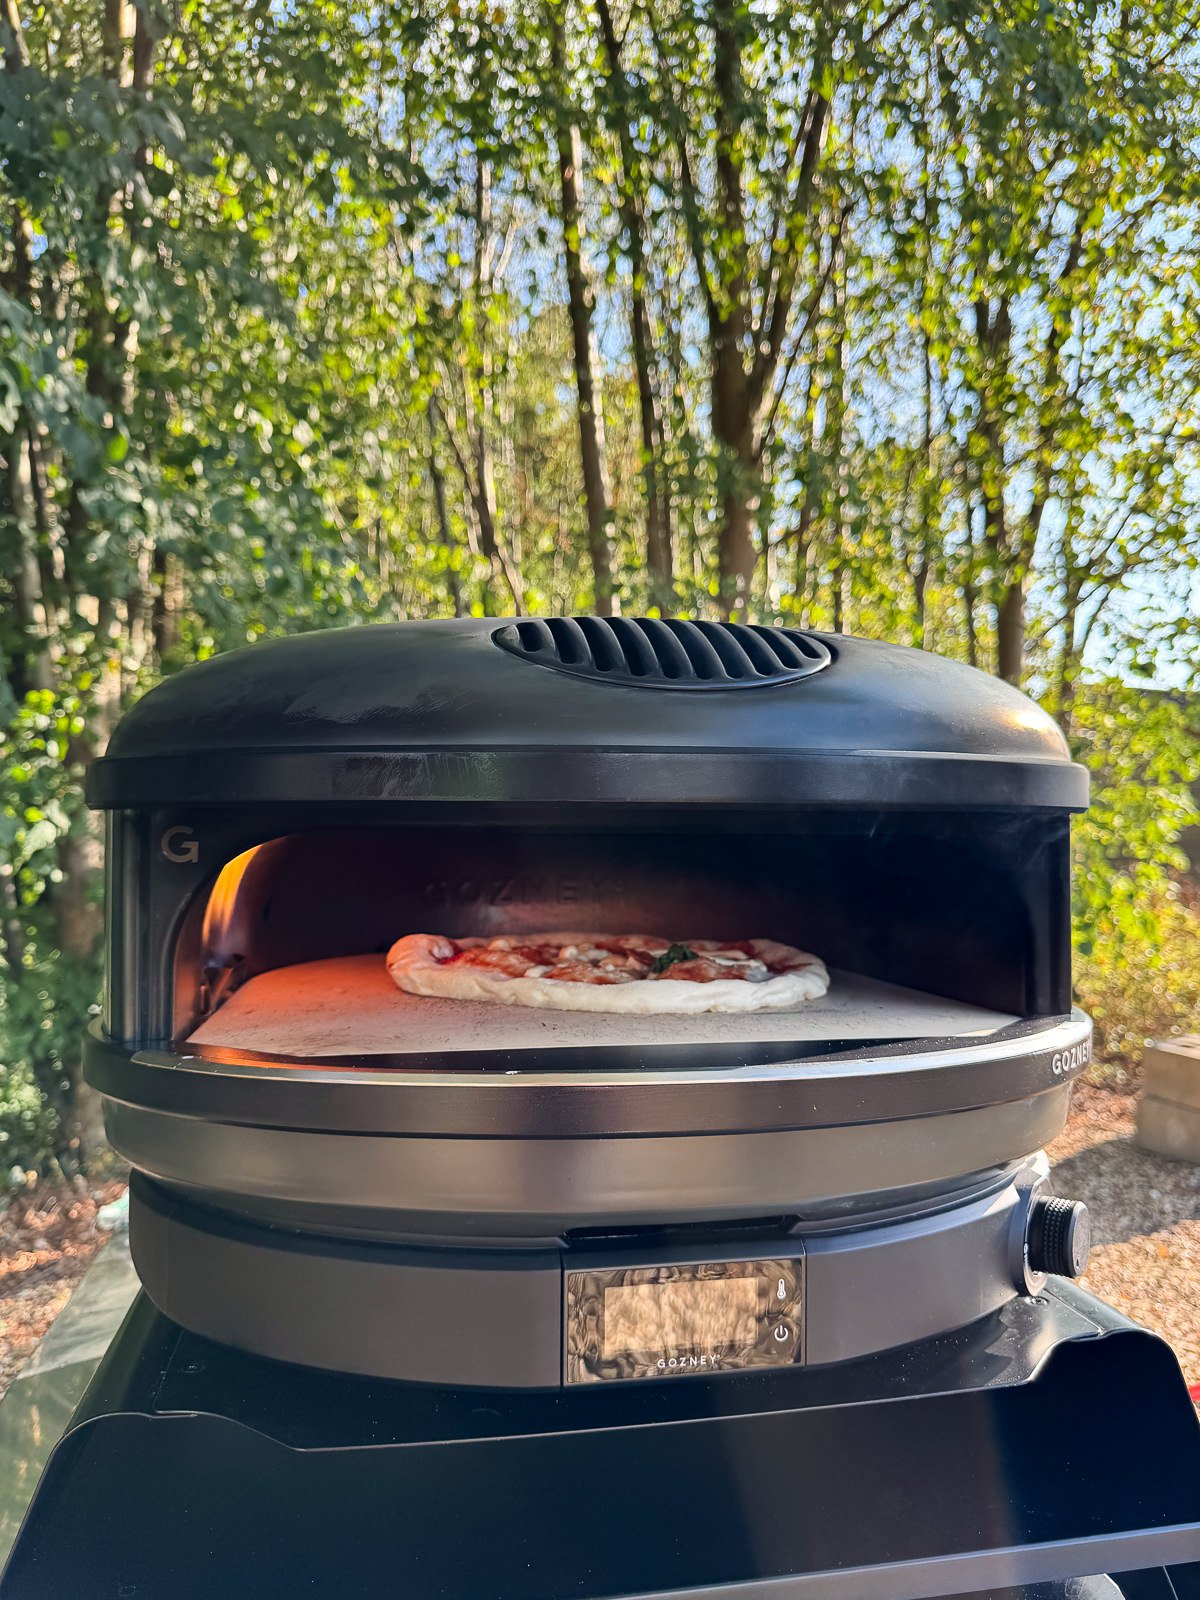
To get the best results with this pizza dough, you’ll want to cook it in a pizza oven, ideally at a temperature between 400°c – 450°c (750°f/840°f)! These aren’t temperatures that you’ll be able to reach in a regular home oven, so I’d recommend using a pizza oven (you can pick these up relatively cheaply online). I use a Gozney Arc xl.
The reason that you need to cook pizzas at such a high temperature is so that the crust gets the optimum amount of oven spring, with a crisp texture yet fluffy crumb. The high heat also ensures that the toppings are properly cooked & the cheese is melted & browned. If you’re using a Gozney pizza oven like me, I give the stone a good 30 minutes to saturate with heat. I tend to cook this dough with the dial set at medium-low to begin with then turn it up at the very end, to brown the toppings.
Tips & Tricks
- Use a good quality 00 flour with a high protein content & W rating. This is key to making pizza doughs with longer, cold fermentations.
- Cold prove the dough for 2 days in the fridge, to give your pizza crusts a more developed flavour & better oven spring.
- Measure the yeast out accurately. As we’re using such a small amount of yeast, you’ll need a set of micro scales to weigh it out.
- For the best results, use a pizza oven to cook your pizzas! I use a Gozney Arc xl.
- Stretch the dough out by hand to make a pizza base, using fine semolina underneath to stop it sticking to your work surface. Make sure to shake off any excess flour before cooking your pizza, so that the base doesn’t burn! I use Caputo Semolina Rimacinata for my pizzas.
Frequently Asked Questions
A good quality 00 flour works best for pizza dough, I use Caputo flour. For pizza doughs with longer cold fermentation time, it’s important to use a flour with a protein content of at least 12.5% & a W rating between 260-300 (the higher the W rating, the stronger the flour).
To weigh out 0.7 grams of yeast, you’ll need to us a set of micro scales. These are available online.
This pizza dough will keep for up to 3 days in the fridge, once it has been balled up but I find that it’s best to give it as close to 48 hours in the fridge as possible. Any longer than 3 days in the fridge & you’ll risk over proving the dough.
This pizza dough needs to be taken out of the fridge & left at room temperature for 3-5 hours before using, depending on how warm your kitchen is. You’ll know when the pizza dough is ready to use when it has risen in volume & no longer feels cold. If you use pizza dough whilst it’s still cold, it won’t stretch properly & could tear.
Yes, this pizza dough can be cooked in a regular oven (at its’ highest temperature) but for the best results, you’ll need to use a pizza oven. The high temperature of these ovens gives the dough the best oven spring, flavour & texture.
Equipment Used
Please note that these are affiliate links & I may make a small commission if you make a purchase using these links, at no extra cost to you. For more information, click here.
- Gozney Arc XL
- Stand Mixer
- Micro Scales
- Thermapen Food Probe
- Caputo 00 Flour
- Caputo Semolina (For Stretching Dough)
- Individual Dough Containers
More Pizza Oven Recipes To Try!
- 3 Day Poolish Pizza Dough
- 100% Biga Potato Pizza Dough
- Pizza Oven Garlic Bread With Burrata
- Baked Camembert Dough Ball Wreath
- Potato Sandwich Bread
- Tangzhong Dinner Rolls
Watch How To Make This Pizza Dough
If you have enjoyed this 2 day pizza dough recipe, it would mean a lot if you could leave a review & rating. And if you’d like to stay up to date with future recipes, follow us on Instagram & TikTok!

2 Day Pizza Dough
Equipment
- Stand Mixer
- Digital Food Probe
- Dough Scraper
- 5 Round Storage Tubs With Lids
- Pizza Oven
Ingredients
- 675 g 00 Flour (See Notes)
- 410 g Water (25°c/78°f)
- 0.7 g Dried Active Yeast
- 20 g Fine Sea Salt
Instructions
Pizza Dough
- Add the flour & 380g of the water into the bowl of a stand mixer then mix (with the dough hook) on a low speed, until just combined. Leave to autolyse at room temperature for 1 hour.
- Next, add the yeast & the remaining 30 grams of water into a bowl/jug, whisk to combine then add into the dough. Mix on a medium-low speed until incorporated then gradually add in the sea salt whilst still mixing.Dissolving the yeast in water helps it incorporate into the dough more evenly.
- Continue mixing on a medium-low speed until the dough is smooth & is coming away from the sides of the bowl. This will take 5-10 minutes.
- Transfer the dough to a lightly oiled, glass bowl then leave to prove at room temperature (ideally this will be around 25°c/78°f) for 2½-3 hours, until it has risen by roughly 50%. During the first hour, perform a set of coil folds every 30 minutes then leave to ferment untouched for the remaining 1½-2 hours.I like to place the dough into a glass bowl for its' bulk ferment. This way, you can see how the dough is fermenting. You'll be able to see lots of tiny bubbles in the side of the dough once it has fermented! There's a step by step guide to coil folding dough in the post above.
- Once the dough has proved, transfer it to a clean work surface then use a bench scraper to divide into 4 equal pieces. Each piece should weigh around 275 grams.
- Lightly oil 4 round storage containers then place a ball of dough into each. Then place the dough in the fridge & leave to ferment for 36-48 hours. You can leave the dough in the fridge for up to 72 hours but for the best flavour, I like to go as close to 48 hours as possible.
Making Pizza
- Take the dough out of the fridge & leave to sit at room temperature for 2-3 hours before using. You'll know when the dough is ready to use because it will have risen in size slightly & will no longer feel cold.
- Whilst your dough is coming up to temperature, preheat your pizza oven to 400°c – 450°c (750°f/840°f), allowing plenty of time for the stone to saturate with heat.
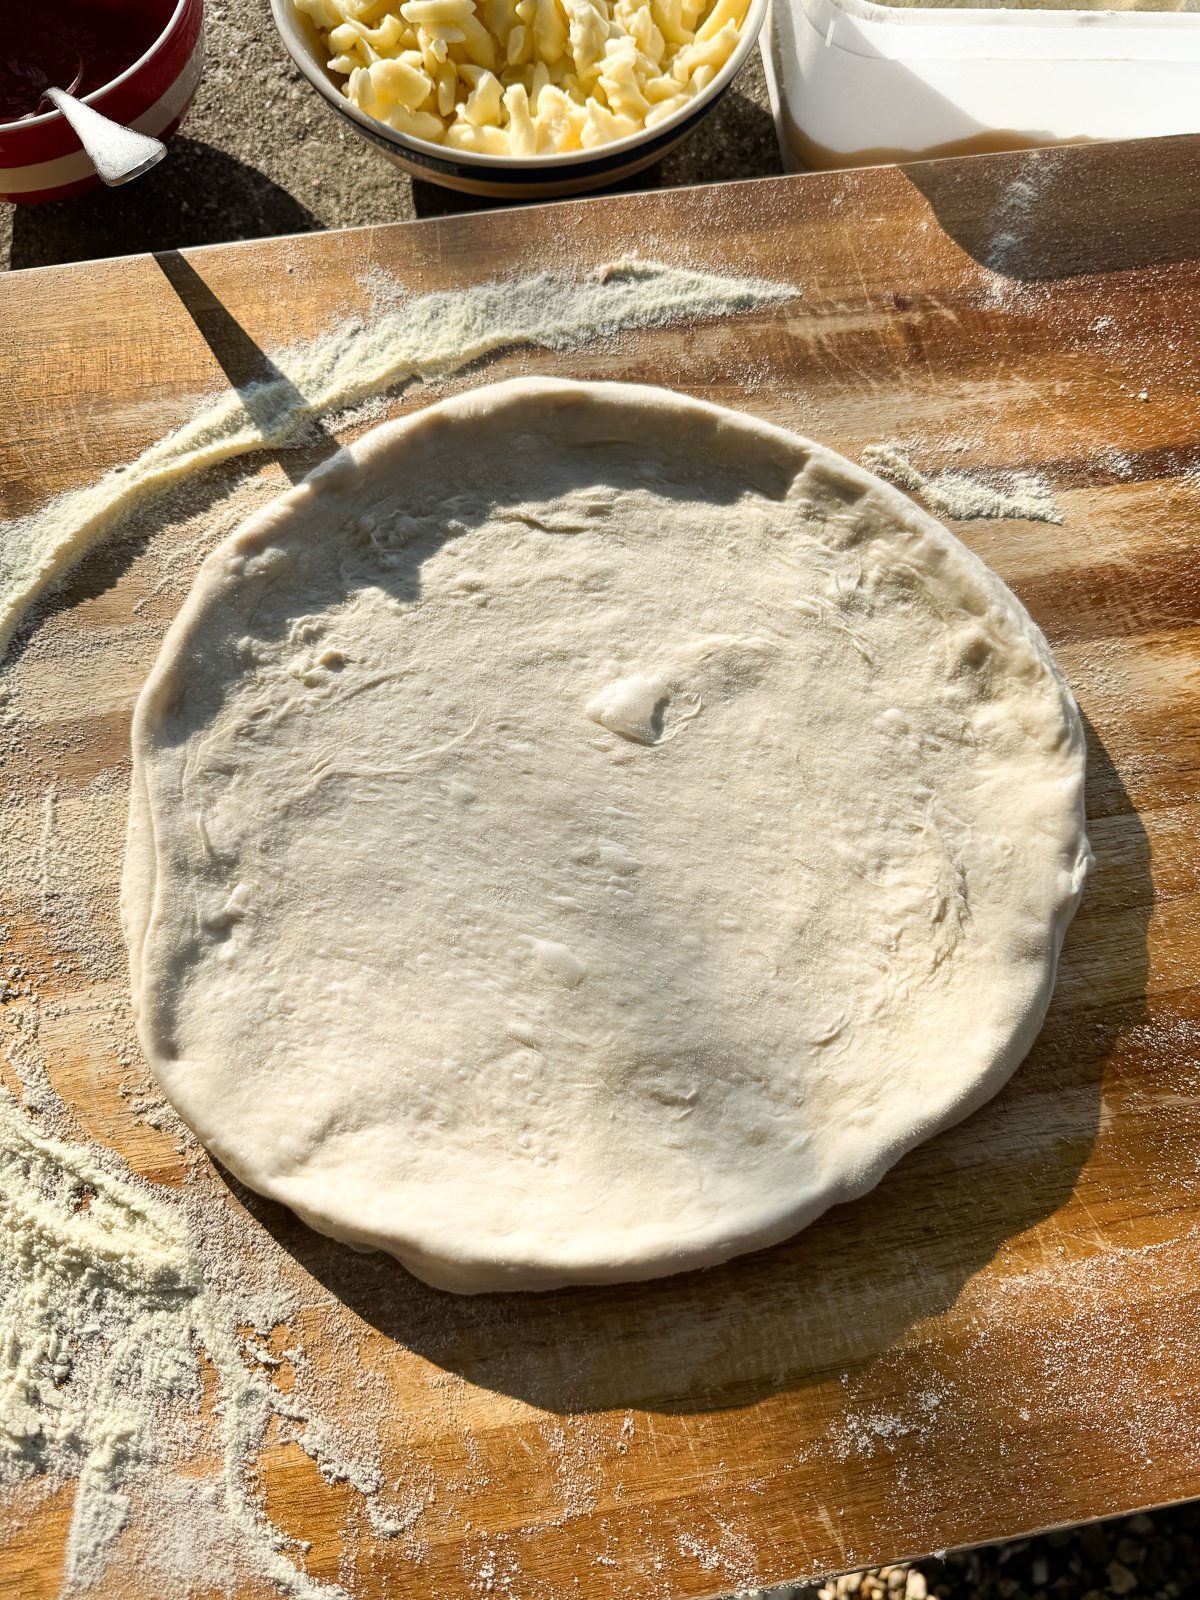
- To make a pizza, first tip the dough out onto a semolina dusted work surface then flip over so that the dough is facing the same was as it was in the container.Fine semolina is best! I use Caputo Semola Rimacinata.
- Using your fingertips, press the dough into a disc. Starting from the centre & working to the edge, making sure to leaving a 1-2 cm border (this will be the crust).
- To open up the dough, I like to use a method know as "The Steering Wheel" stretch. Here's how…Using both hands, pick the dough up from one edge & hold it in front of you like a steering wheel. Now rotate the dough in your hands, pinching to form a crust as you do so. As the dough rotates, gravity will stretch it into a large circle.With this method you have full control on the thickness of the crust. If you'd prefer a thinner crust, pinch the dough nearer the edge. For a thicker crust, pinch more towards the centre.
- Top the dough with a light layer of toppings then cook in your preheated pizza oven for 1-1½ minutes turning regularly with a peel to stop it burning.