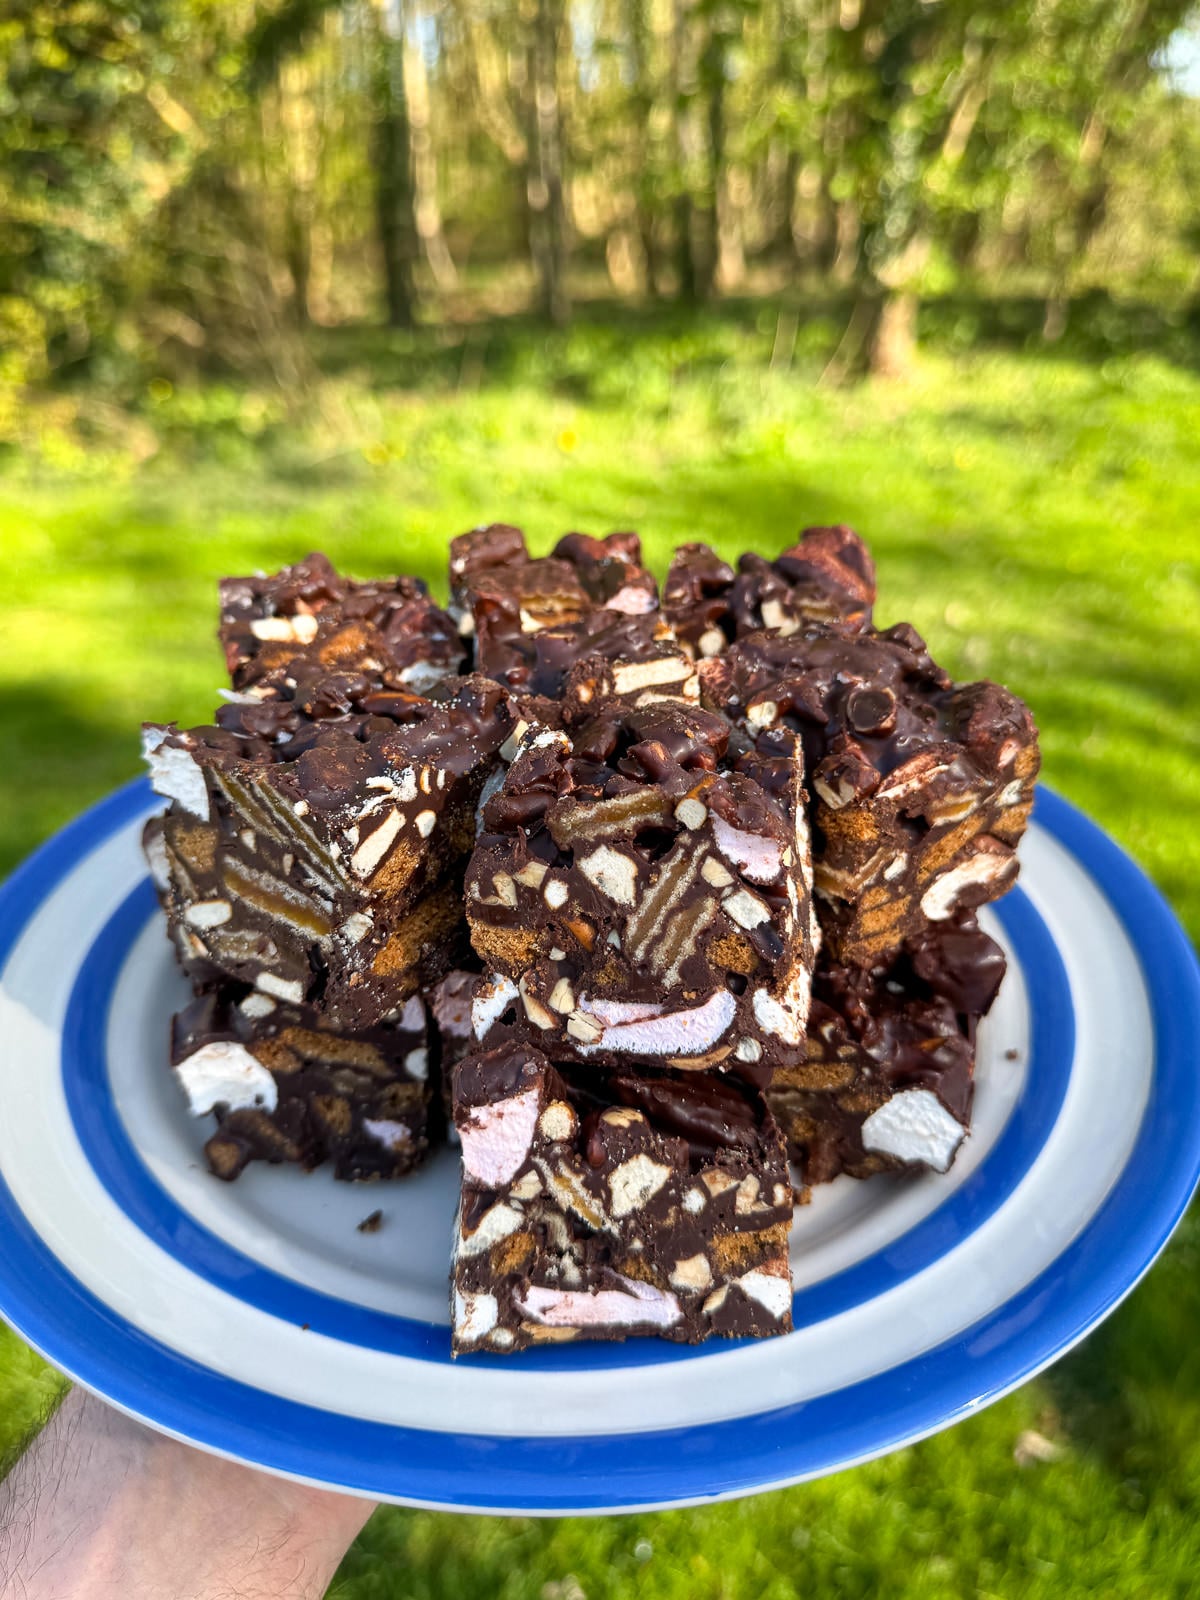
Stroopwafel Biscoff Rocky Road
Easy no-bake Stroopwafel Biscoff rocky road loaded with marshmallows, hazelnuts & salted pretzels. Super crunchy with a rich salted caramel flavour!

This easy, no-bake Stroopwafel Biscoff rocky road is a twist on the classic treat, combining caramel waffles with rich dark chocolate, caramelised biscuits, salty pretzels & fluffy marshmallows. The mix of Stroopwafels, Biscoff biscuits & pretzels adds plenty of crunch & a hit of salted caramel! Whilst toasted hazelnuts bring even more texture and flavour.
This simple recipe comes together in a matter of minutes and is perfect for sharing. Once made, rocky road will keep in the fridge for several weeks and is a guaranteed crowd pleaser. And if some of the mix ins aren’t to your taste, you can swap them out for something else. It’s completely customisable.
For more baking recipes, check out every growing baking recipe collection! There’s plenty to choose from here, from chocolate chip cookies & brownies, to homemade breads, pastry & loads more. And for more rocky road, try our kettle chip rocky road!
What Is Rocky Road?
Rocky road is a type of no bake fridge cake, that originates from Australia but is popular all over the world. To make rocky road, melted chocolate is mixed with marshmallows as well as other mix ins then set as a traybake before being cut into chunks.
Rocky road is all about the texture! You get the rich chocolate, gooey marshmallows and crunchy biscuits. Often nuts, dried fruit, honeycomb and even potato chips are added, for extra texture.
Why You’ll Love This Recipe
- It’s Easy To Make
Rocky road is super easy to make! Essentially, it’s melted chocolate mixed with biscuits, marshmallows & your favourite mix ins. - Fully Customisable
The great thing about homemade rocky road is that you can customise it however you like. You can use your favourite types of biscuits, chocolate, marshmallows, nuts & more. - Long Shelf Life
Rocky road will keep for up to 2 weeks in the fridge so is the perfect make ahead snack. - Perfect Balance Of Flavour & Texture
All of the components work perfectly together! The salt from the pretzels complement the flavour of the chocolate, the marshmallows add a squidgy texture & the biscuits & nuts add crunch. - Great For Sharing
This batch of rocky road makes enough to share! It’s a great edible gift.
Ingredients For Stroopwafel Biscoff Rocky Road
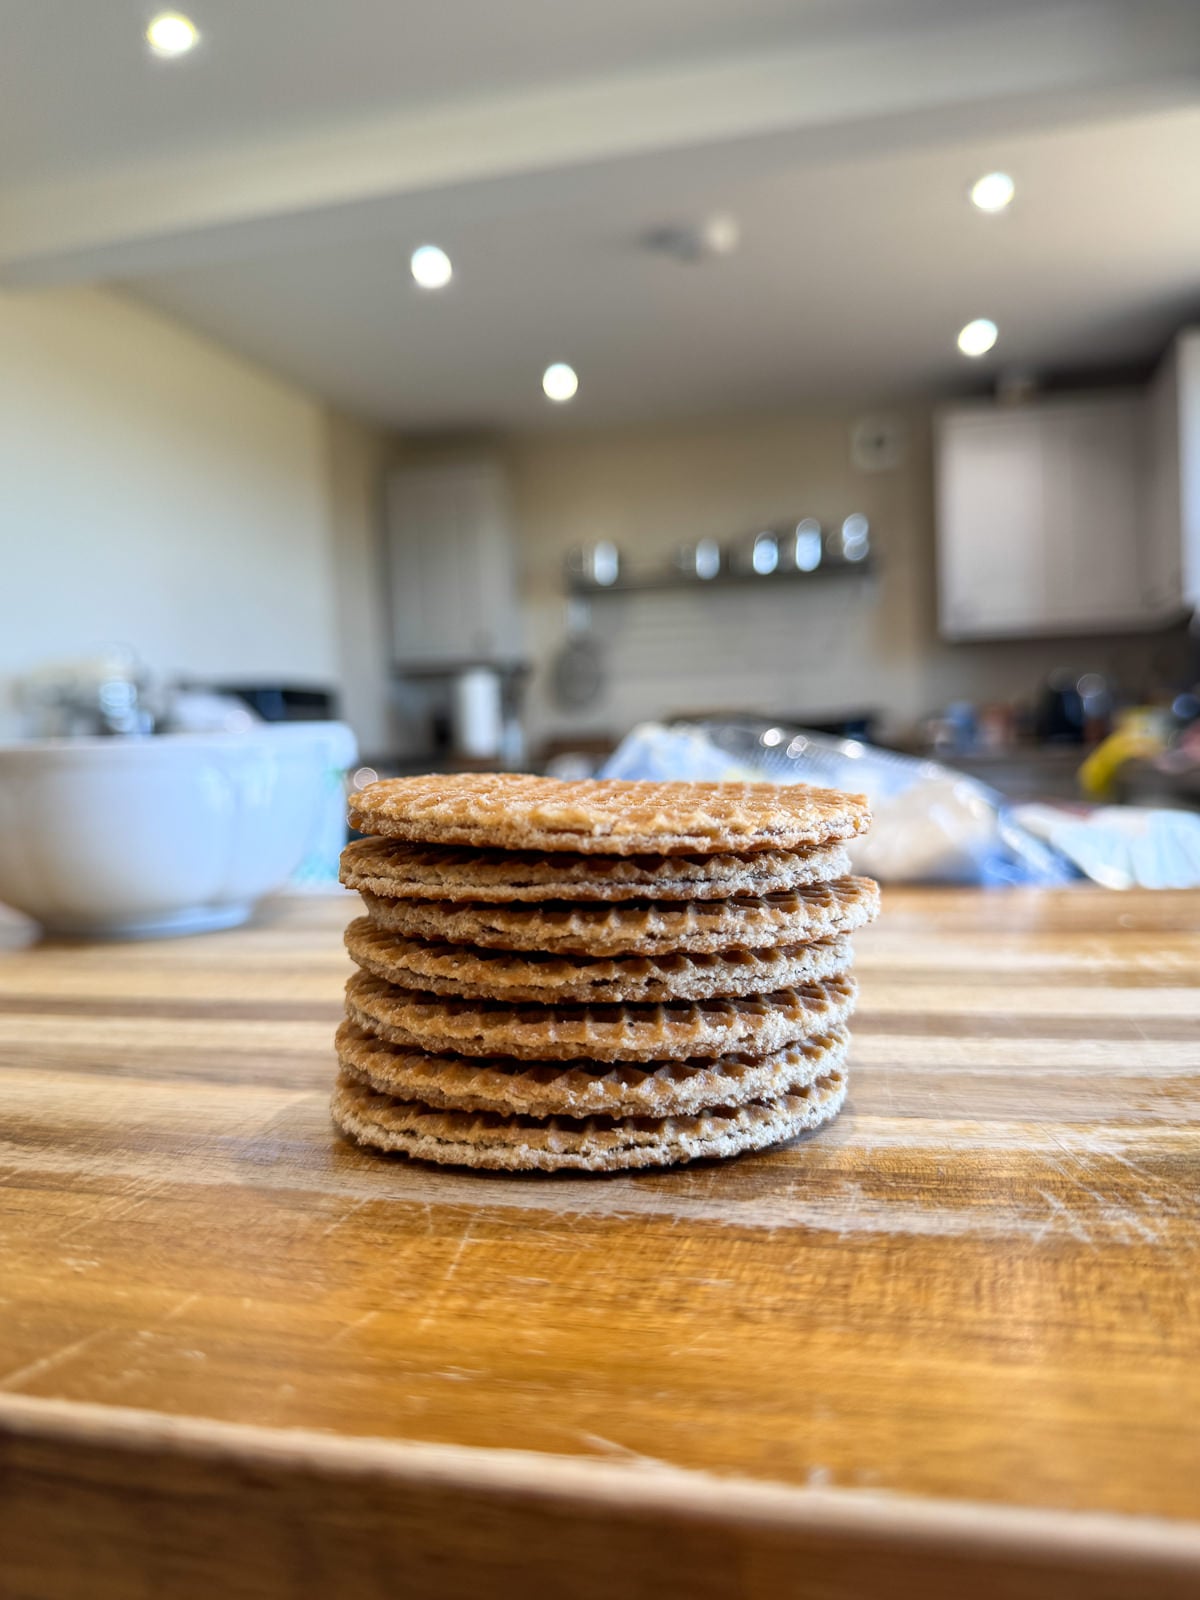
- Stroopwafels – A Dutch cookie made by sandwiching a chewy caramel between 2 crisp waffles. Stroopwafels are lightly spiced with cinnamon and their flavour works really well with chocolate! You can buy them from some supermarkets or online.
- Biscoff Biscuits – Lotus Biscoff biscuits have a buttery, caramelised flavour and are also lightly spiced with cinnamon so work perfectly with the stroopwafels. Feel free to use a different type of biscuit if you’d prefer though. Digestives or shortbread would work well.
- Marshmallows – I like to use large marshmallows for rocky road, as they can be chopped into larger pieces. Mini marshmallows will work as well though.
- Mix Ins – This batch of rocky road also contains salted pretzels & toasted hazelnuts for some added crunch & extra flavour. Salted potato chips or a different type of nut can also be used.
- Chocolate – Using a good quality chocolate makes all the difference when making rocky road & bars of chocolate will melt better than chocolate chips. I used a 54% dark chocolate but a darker chocolate, a milk chocolate or white chocolate will work as well.
- Butter – Adding butter to the melted chocolate helps it set slightly softer, making it easier to cut and eat the rocky road.
- Golden Syrup – Like with the butter, golden syrup is added to prevent the chocolate from setting too hard. It also adds sweetness and a buttery caramel flavour.
- Sea Salt – A sprinkle of sea salt on top of the rocky road enhances the flavours from the chocolate.
How To Make Stroopwafel Biscoff Rocky Road
The great thing about rocky road is that it’s just so easy to make! There’s very little prep involved & it’s pretty much just a case of mixing melted chocolate with your chosen mix ins then letting it set in the fridge.
1. Toasted Hazelnuts
You’ll get the best flavour by toasting the nuts before using them, so you’ll need to do this first so that they have time to cool. To do this, place hazelnuts onto a baking tray then bake at 180°c/356°f for 8-10 minutes, until a deep golden brown. Or toast them in a frying pan set over a medium heat.
Once toasted, set the nuts to one side & let them cool whilst you melt the chocolate and prepare the other mix ins. If your hazelnuts have a skin on the outside, make sure to peel this off before chopping the nuts, as it tends to taste quite bitter.
2. Melted Chocolate Base
The chocolate base for this rocky road is made by melting chopped dark chocolate with butter & golden syrup. You can do this over a pan of barely simmering water or in a microwave, in 30 second bursts.
It’s important not to over heat the chocolate as you’ll risk it seizing. So make sure to cook until the chocolate is just melted. Once the chocolate has been melted, you’ll need to let it cool for at least 5 minutes, to avoid melting the marshmallows.
3. Prepare The Mix Ins
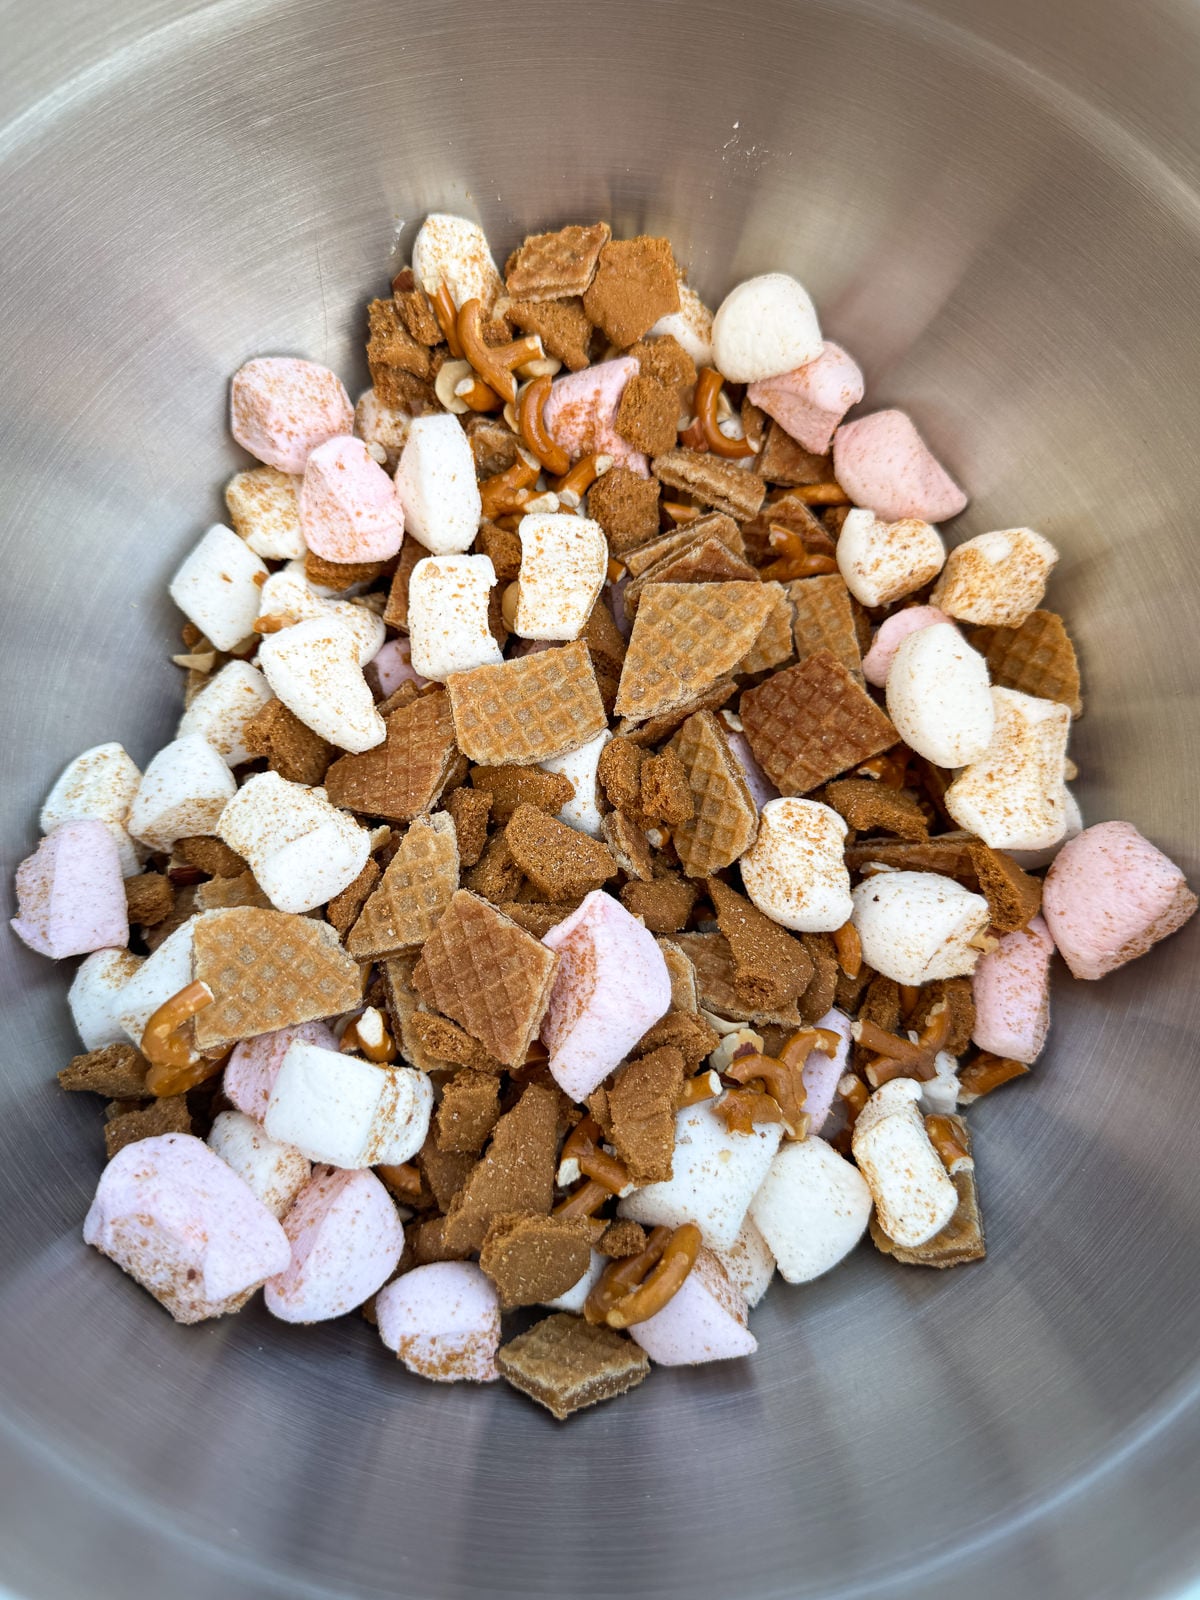
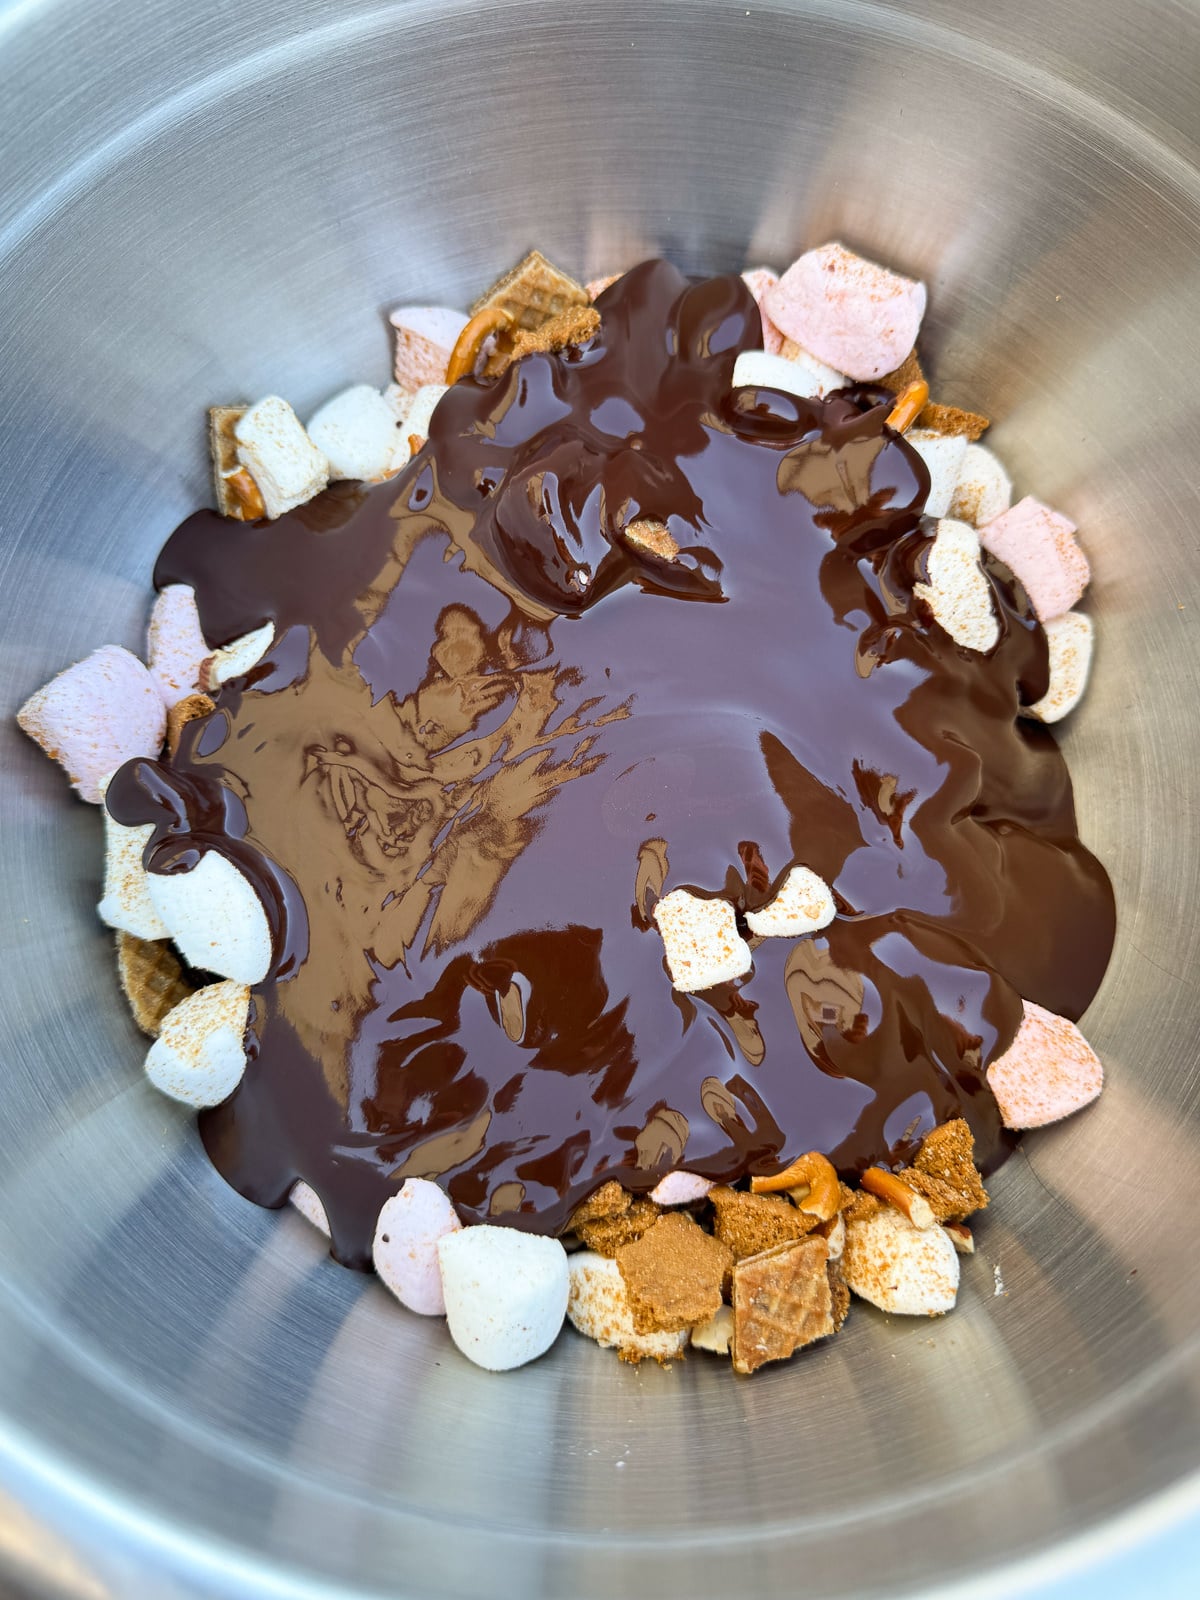
Whilst the chocolate is cooling, prepare the mix ins then add them all into a large mixing bowl & mix to combine. This ensures that everything will be evenly distributed throughout the rocky road.
Preparing the mix ins includes chopping the nuts & marshmallows and crushing the biscuits & pretzels. I like to keep everything fairly chunky, for maximum texture!
4. Mix Together Then Set
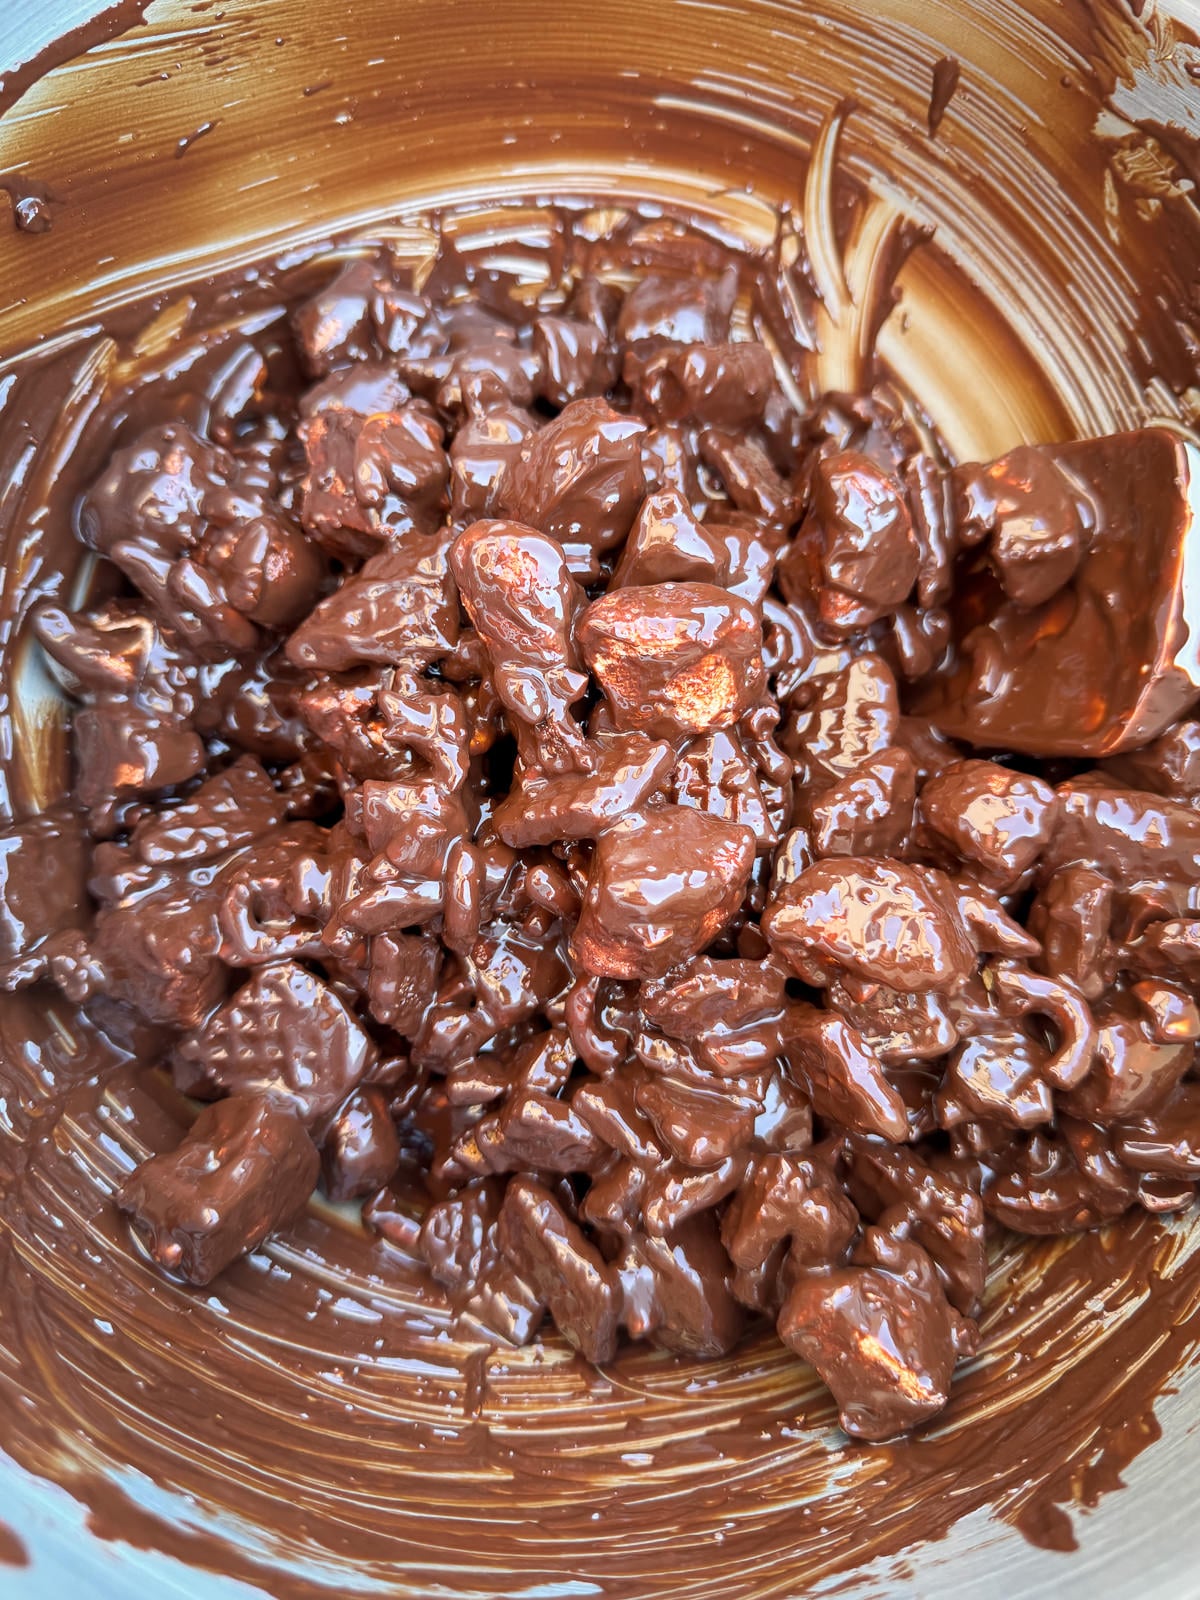
Next, pour the melted chocolate over the mix ins then stir until the mix is well combined. Everything should be covered in chocolate!
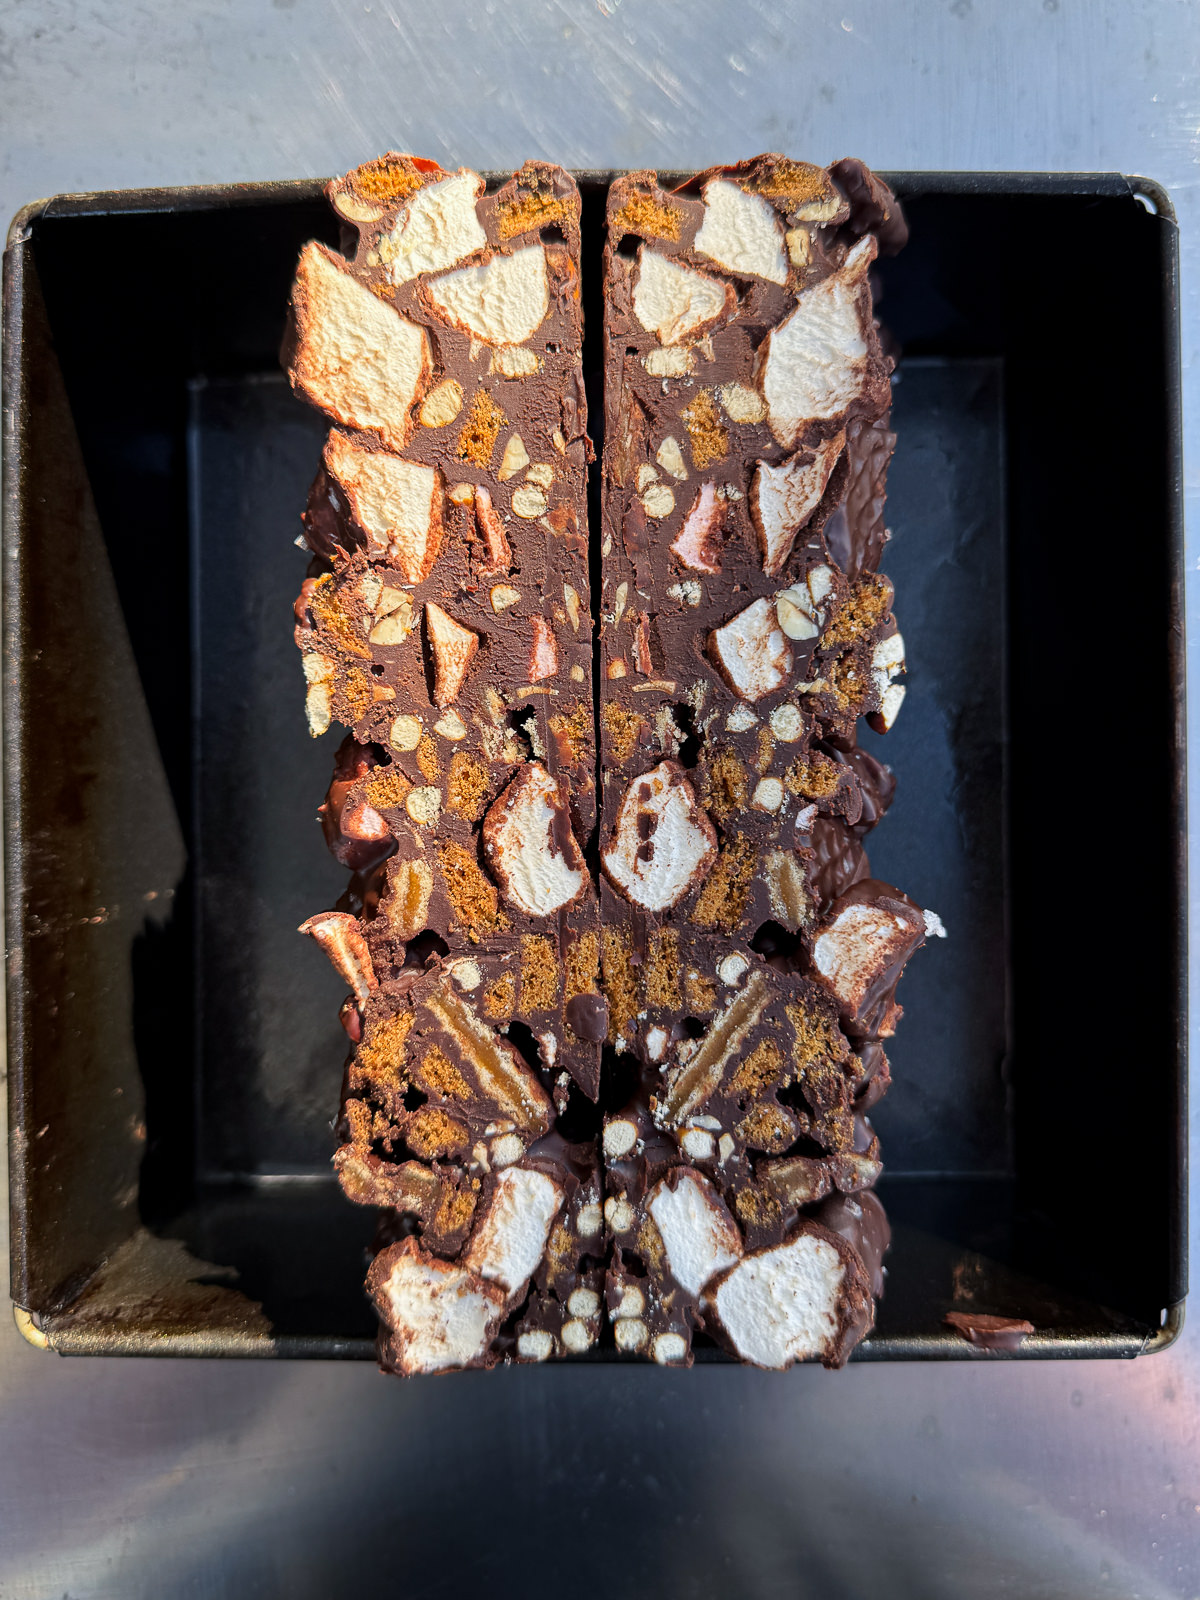
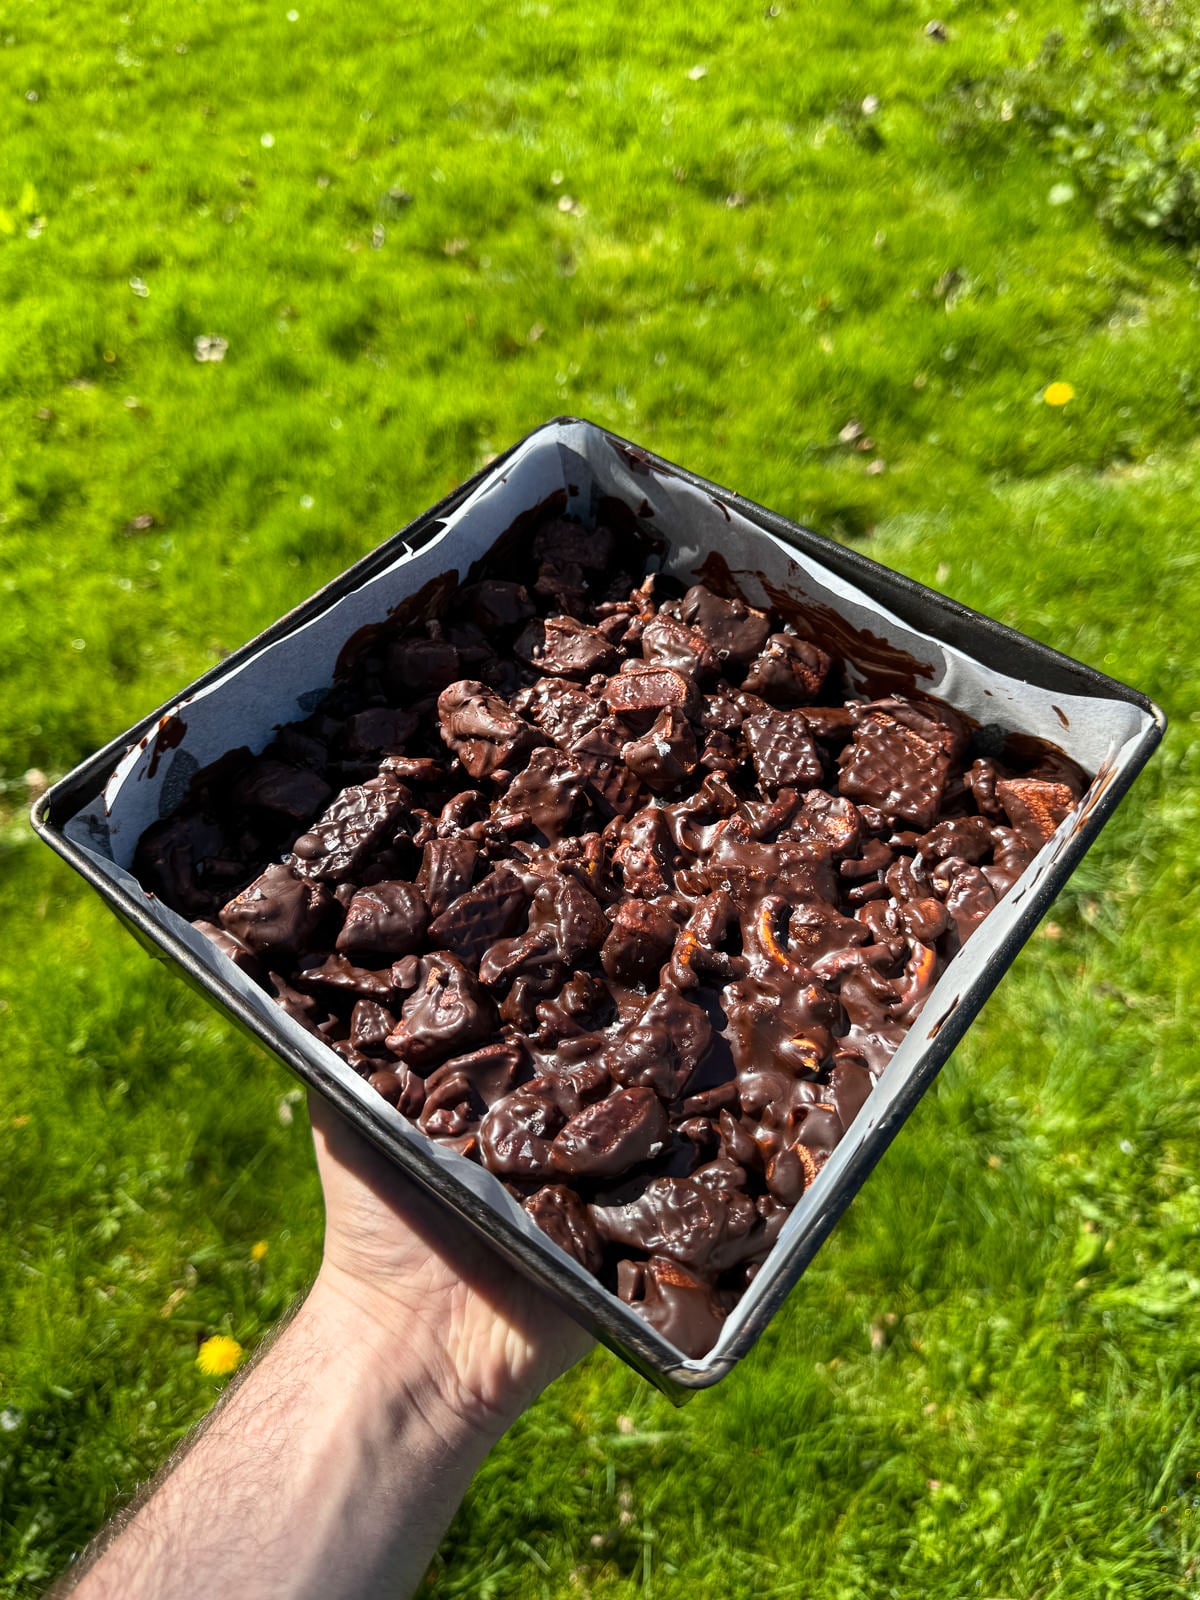
The rocky road mix can then be transferred into a lined 8″ square baking tin and pressed gently into an even layer. I like to sprinkle some sea salt on top for extra flavour before placing the tin of rocky road in the fridge & letting it set for at least 3 hours (or until firm).
5. Cut Into Pieces
Once set, take the rocky road out of the tin, remove the baking parchment then cut into pieces. It’s best to use a large, flat edged knife (like a chef’s knife) to cut the rocky road. I cut mine into 16 pieces but feel free to cut yours into however many you like!
Rocky Road Tips, Tricks & Troubleshooting
Tips & Tricks
Use these tips & tricks to make rocky road that sets properly, with the best texture & flavour.
- Use Good Quality Chocolate – This will give your rocky road the best flavour.
- Leave To Set – Make sure to let your rocky road chill in the fridge for at least 3 hours, to give it enough time to set.
- Plenty Of Mix Ins – Rocky road is meant to be chunky, so don’t be shy with the mix ins!
- Store In The Fridge – Rocky road will melt if it gets too warm so make sure to store it in the fridge.
- Add Butter & Golden Syrup – To prevent the chocolate from setting too hard, add butter & golden syrup to the melted chocolate.
Troubleshooting
Here are some common problems that can happen when making rocky road and how to avoid them.
- Rocky Road Didn’t Set
If your rocky road hasn’t set, it needs to chilled in the fridge for longer. Make sure to give it at least 3 hours in the fridge before cutting. - The Chocolate Set Too Hard
Using just chocolate will make your rocky road set to hard. To avoid this, melt butter & golden syrup with the chocolate. - My Chocolate Has Seized
Chocolate will seize & turn grainy if it gets over heated or if water is added. To prevent seized chocolate, melt it over a low heat, make sure your bowl is dry & add a small amount of fat (butter) to the chocolate. If you’re melting your chocolate over a pan of water, make sure not to fill it up too much. - Why Have The Marshmallows Melted?
Your marshmallows & any other soft mix ins will melt if the melted chocolate is too warm. To prevent this, make sure to let the melted chocolate cool for at least 5 minutes before using. - Rocky Road Falling Apart
You didn’t use enough chocolate or added in too many mix ins. There should be enough melted chocolate to completely cover the biscuits, marshmallows, etc. This can also happen if you didn’t let your rocky road set for long enough or if you didn’t press the mix into the tin.
Frequently Asked Questions
Rocky road will take at least 3 hours to set in the fridge. It’s key to let rocky road set completely before cutting otherwise it will be too soft. You’ll know when your rocky road is set when it feels firm to the touch.
Rocky road is actually designed to be prepared ahead of time so is perfect for making in advance. Once made, rocky road will take a few hours to set but will keep for up to 2 weeks in the fridge!
Rocky road should be stored in the fridge to prevent it from melting. Storing rocky road in an airtight container keeps it fresh.
If you can’t get hold of stroopwafels, for rocky road you can swap them out for another caramel wafer biscuit. Caramel chocolate digestives or Tunnock’s caramel wafers would be good substitutes for stroopwafels.
Using a good quality chocolate makes all the difference when making rocky road as it will give it the best flavour & finish. It’s best to use bars of chocolate as they will melt more easily than chocolate chips. I used a 54% dark chocolate for this rocky road but a darker chocolate, milk chocolate or white chocolate will work as well.
More Easy Baking Recipes To Try!
- Chocolate Fudge Layer Cake
- Pecan Pie Date Bark
- Chocolate Cherry Swiss Roll
- Brown Butter & Vanilla Glazed Cookies
- Brown Butter & Miso Pecan Pie Bars
If you have enjoyed this stroopwafel rocky road recipe, it would mean a lot if you could leave a review & rating. And if you’d like to stay up to date with future recipes, follow us on Instagram & TikTok or subscribe to our newsletter!

Stroopwafel Biscoff Rocky Road
Equipment
- 8" Square Baking Tin
- Heatproof Mixing Bowl
- Large Mixing Bowl
Ingredients
Chocolate Base
- 400 g Dark Chocolate (See Notes)
- 150 g Unsalted Butter
- 75 g Golden Syrup
Mix Ins
- 50 g Hazelnuts
- 200 g Stroopwafels
- 150 g Marshmallows
- 125 g Biscoff Biscuits
- 50 g Salted Pretzels
- Sea Salt (To Finish)
Instructions
- Grease & line an 8" square with baking paper then set to one side.
Toasted Hazelnuts
- Toast the hazelnuts (from the mix ins) first so they have time to cool. To do this, preheat an oven to 180°c/160°f fan (356°f/320°f).
- Next, place the hazelnuts onto a baking tray then toast in the preheated oven for 8-10 minutes until a deep golden brown. Set aside then leave to cool. By the time you've melted the chocolate, the nuts should be cool enough to handle. The nuts can also be toasted in a frying pan, over a medium heat.
Chocolate Base
- Roughly chop the chocolate & butter then add into a heatproof bowl along with the golden syrup.
- Set the bowl over a pan of barely simmering water then cook, stirring regularly until just melted. Alternatively, heat the chocolate in a microwave, in 30 second bursts.Don't use a metal bowl if you're using a microwave!
- Once melted, set the chocolate to one side & allow to cool slightly whilst you prepare the mix ins.
Mix Ins
- Roughy chop the stroopwafels, cut the marshmallows into 2 cm pieces and lightly crush the biscuits & pretzels by hand. Add all of these into a large mixing bowl.I like to chop the stroopwafels into a mix of small & chunkier pieces. Same with the biscuits & pretzels. Using scissors makes cutting the marshmallows easier but a knife will work as well.
- Roughly chop the toasted hazelnuts then add into the mixing bowl. Give the bowl a toss to mix everything together.If you hazelnuts have skin on, peel this off before chopping.
- Next, pour the cooled melted chocolate over the mix ins then use a spatula to stir together. Everything should be coated in the chocolate!
- Transfer the rocky road mix into the lined tin then gently press into an even layer.
- Sprinkle a pinch of sea salt over the top of the rocky road then leave to set in the fridge for at least 3 hours.
- Once set, take the rocky road out of the tin then cut into squares, using a sharp knife.