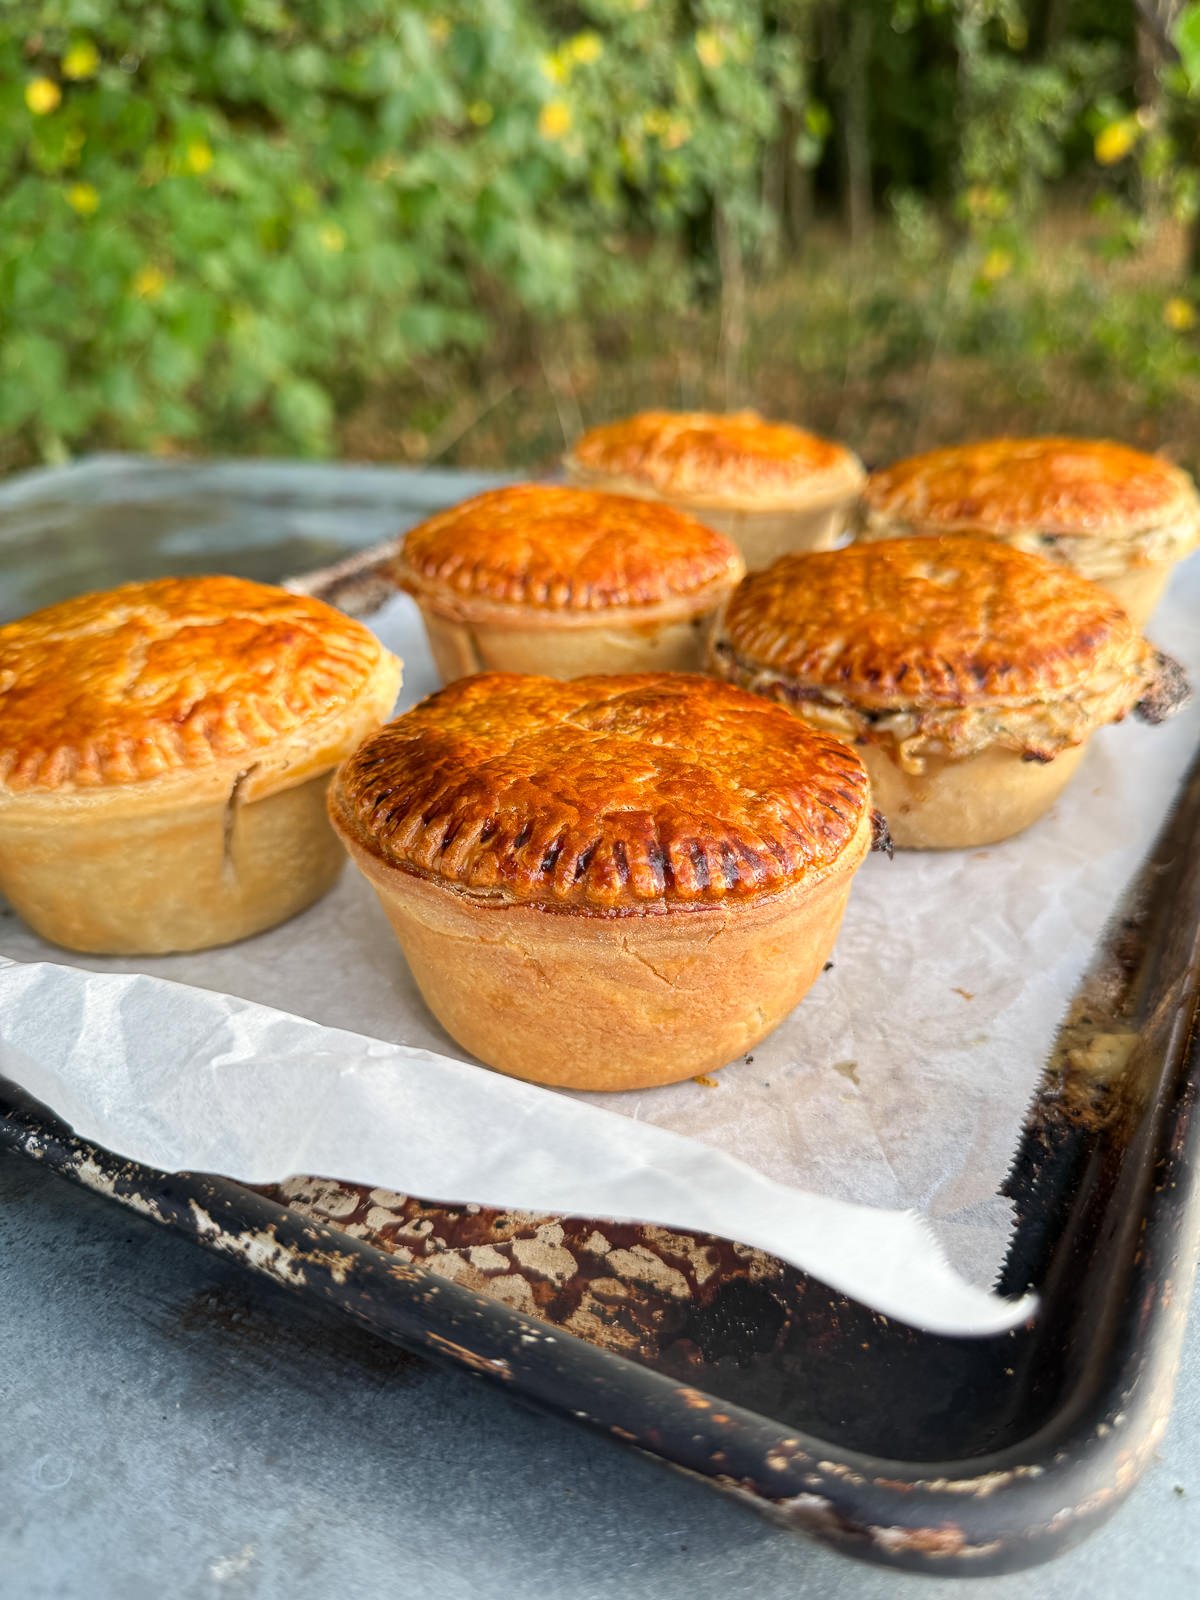
Roast Chicken, Bacon & Mushroom Pies
Individual roast chicken pies, filled with a roasted garlic sauce, smoked bacon, mushrooms & plenty of fresh herbs. The ultimate comfort food!
This post contains affiliate links.
You really can’t beat a good chicken pie, especially when the weather starts to turn cold! The combination of a crisp pie crust and a creamy chicken filling is super comforting, especially when served with gravy…
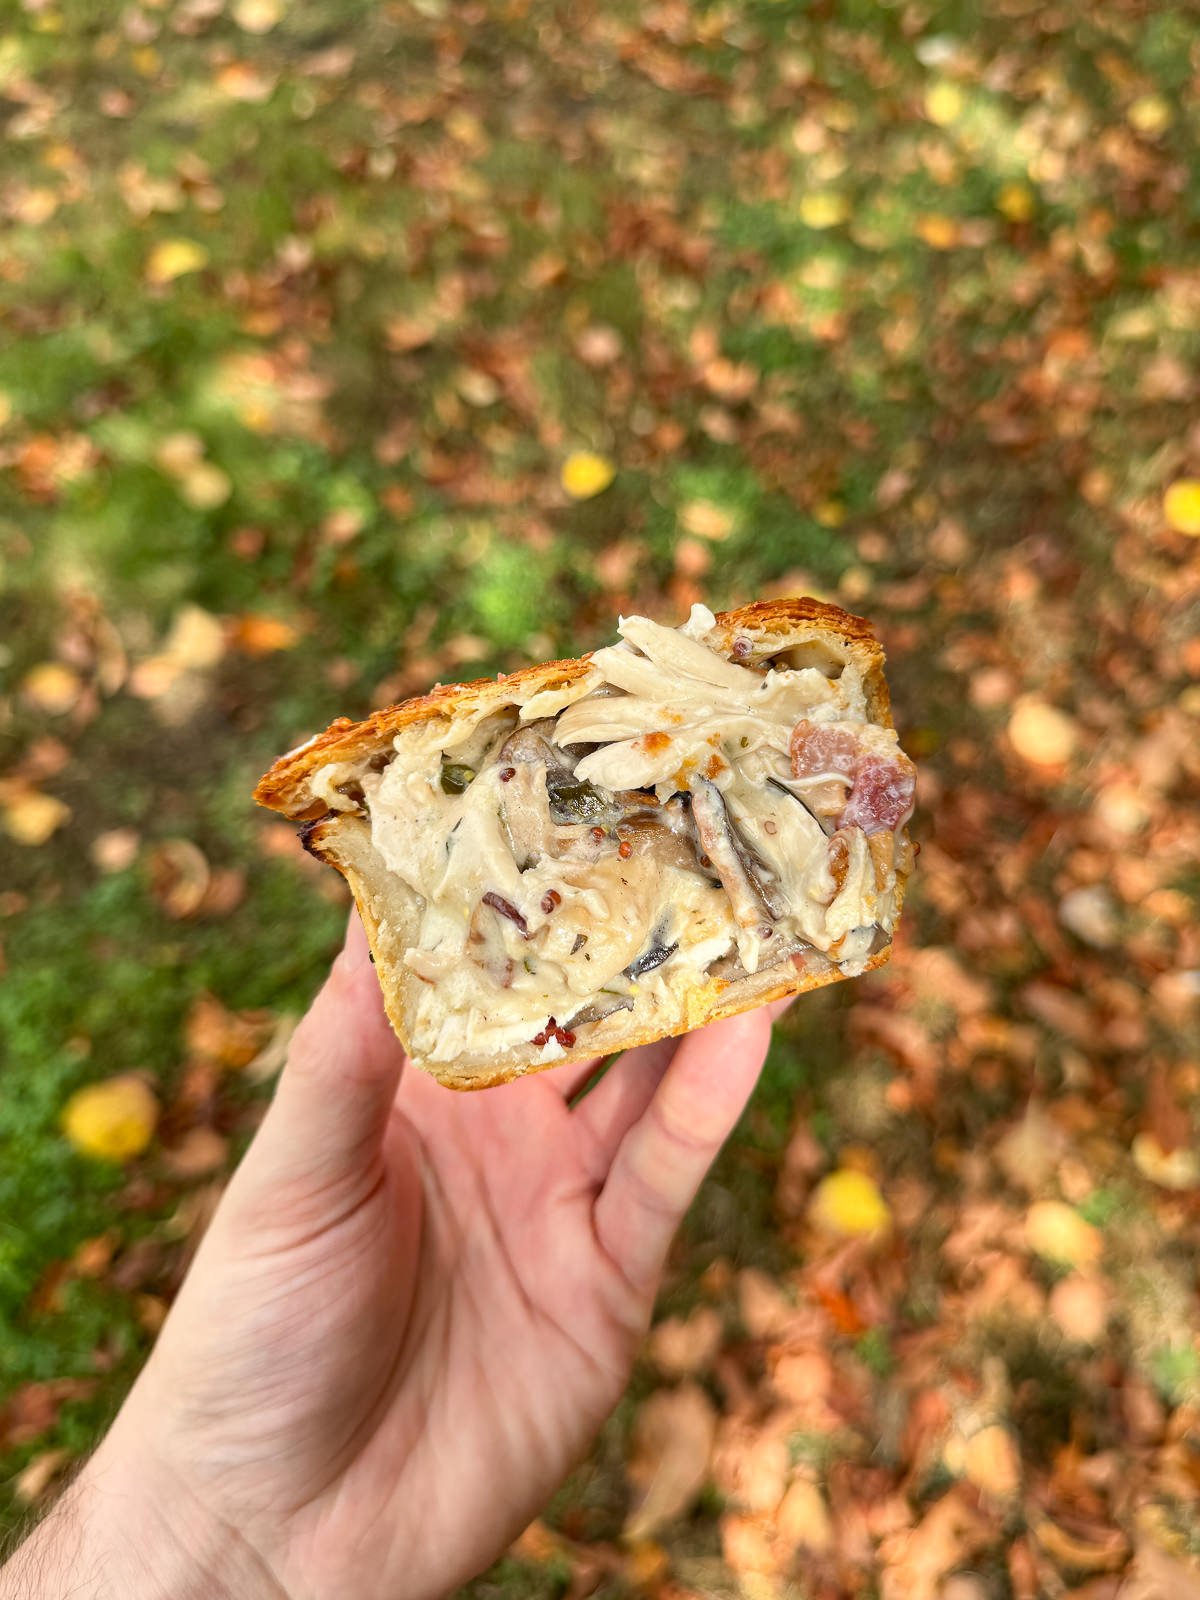
This batch of pies is made with a whole roast chicken, a creamy roasted garlic, smoked bacon & mushroom sauce, a hot water crust pastry base and a puff pastry lid. Chicken pot pie style! Using a whole chicken makes enough filling to make 12 pies, so we’re using half now and saving the rest for another day as it freezes really well. I’ve also given the option to make individual pies or a large sharing style one.
For more dinner inspiration check our our ever growing collection of main course recipes! There’s lots to choose from here, from homemade pies, curries, barbecued meat, pasta dishes & lots more. Or for something to serve with these pies, take a look at our side dish recipes. I’d go with some triple cooked chips or mashed potatoes!
Components Of These Chicken Pies
Like all good pies, these chicken ones only have a few components; a creamy garlic, mushroom & bacon sauce, chunks of roast chicken, a crisp pie crust & a flaky puff pastry lid!
Roast Chicken
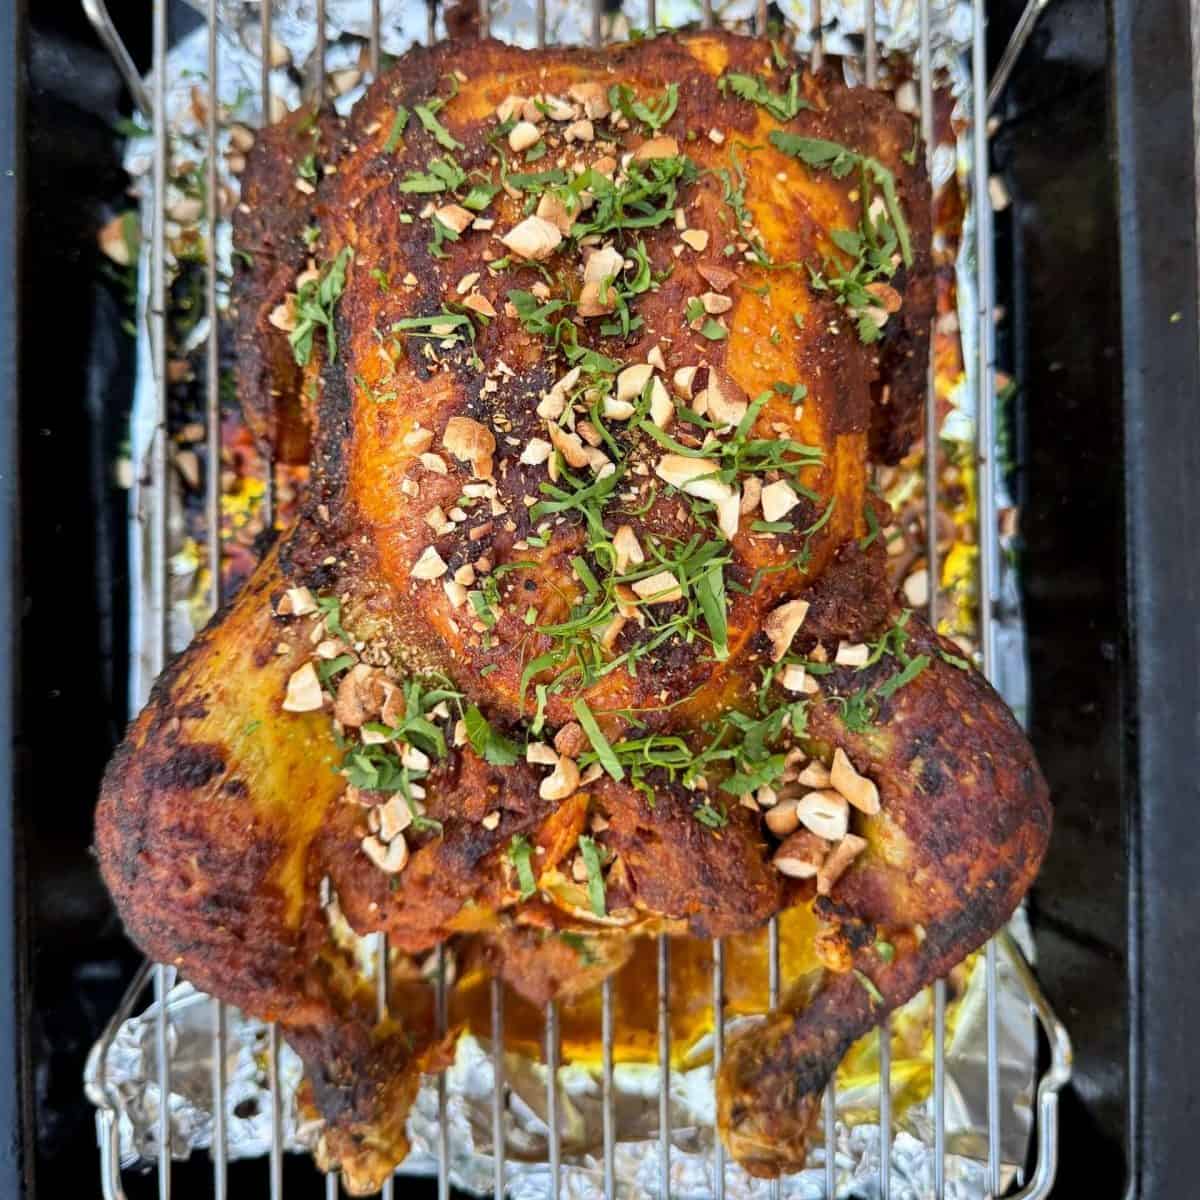
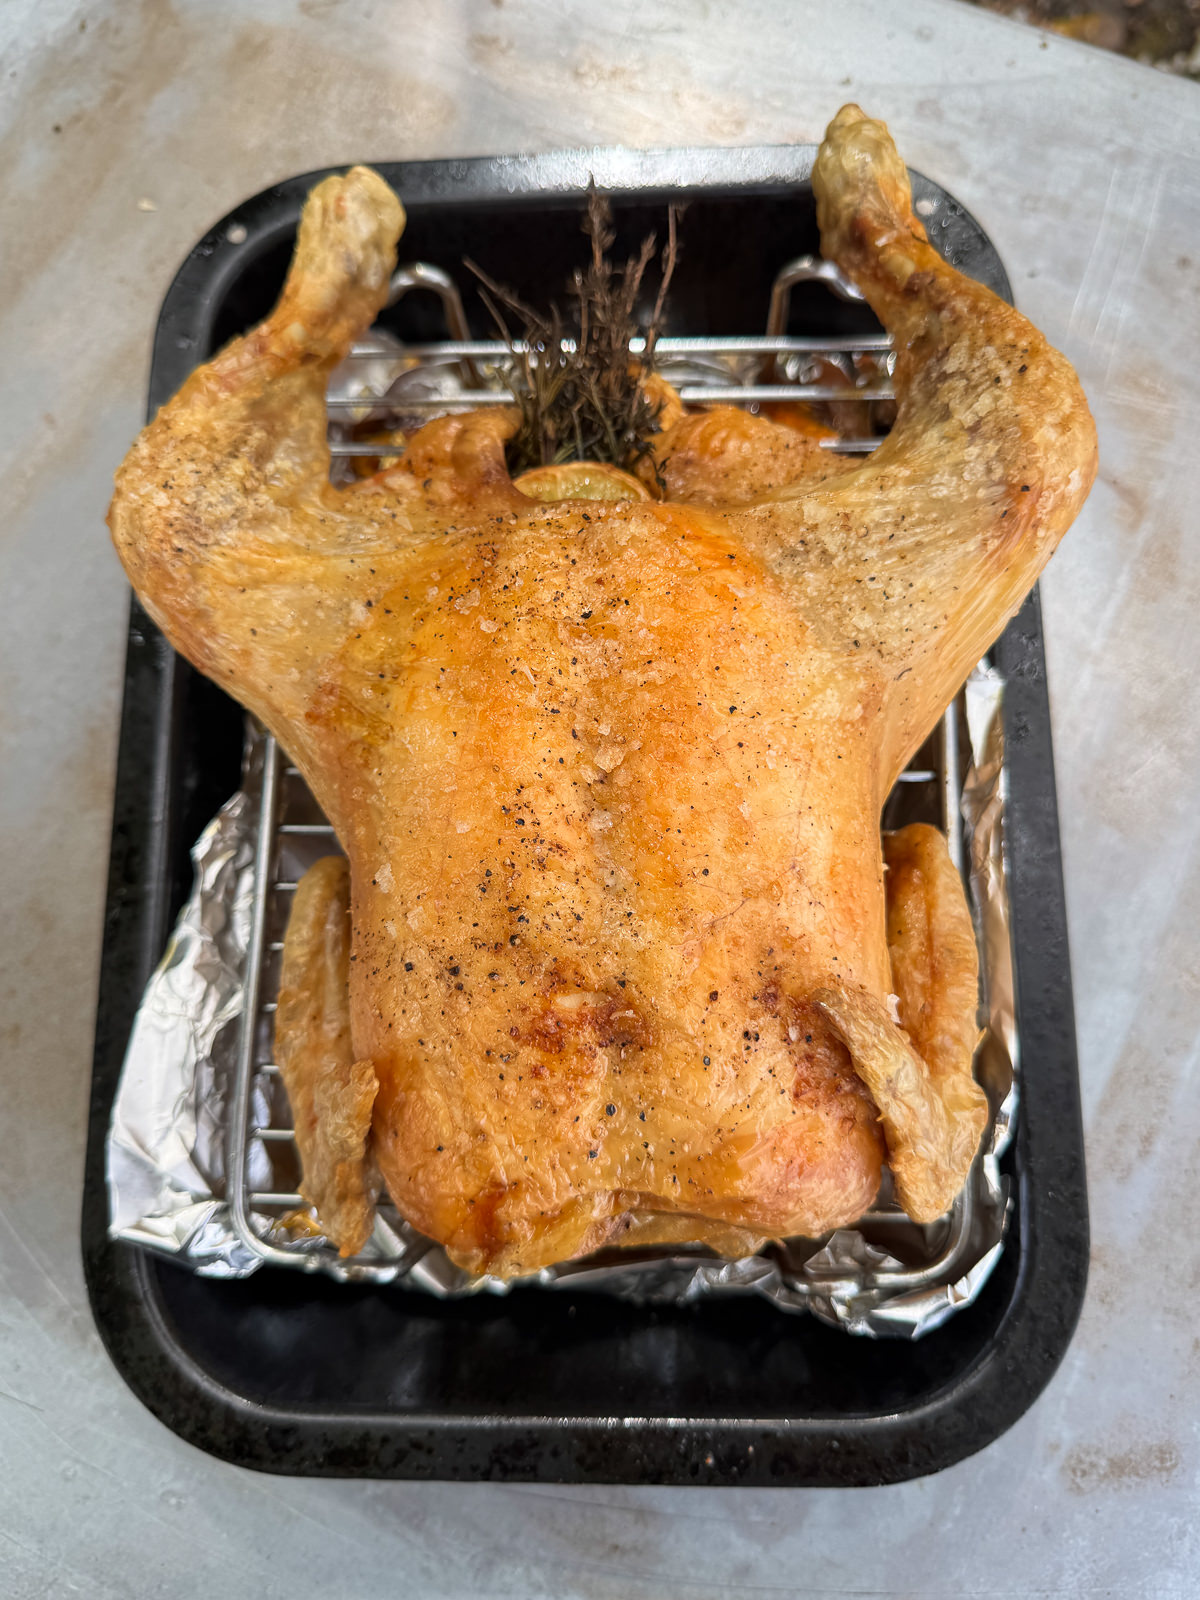
The filling for these pies uses a whole roast chicken! To cook our chicken, we’re going to stuff the cavity with lemon & fresh herbs, coat the skin with oil, salt & pepper then roast at 180°c/356°f until perfectly cooked. The chicken rests whilst we make the filling & we’re going to be roasting a couple of bulbs of garlic underneath the chicken, which we’ll be using in the sauce.
Once rested, the chicken is pulled off the bones then shredded & added into the sauce. The leftover carcass can be used to make stocks, broths or soup.
Roasted Garlic Sauce
The sauce for our pie filling is essentially a roasted garlic bechamel but instead of milk we’re using chicken stock & creme fraiche. To make this, we make a roux with butter & plain flour then gradually add in warm chicken stock until we get a thick sauce, which is then finished with the creme fraiche.
Then to flavour, we’re going to be blending the roasted garlic (squeezed out of the skins) into the sauce before stirring in a generous amount of wholegrain mustard. The key thing here, is to cook the sauce until it’s thick, otherwise the filling can leak out of the pies as they bake.
Mix Ins
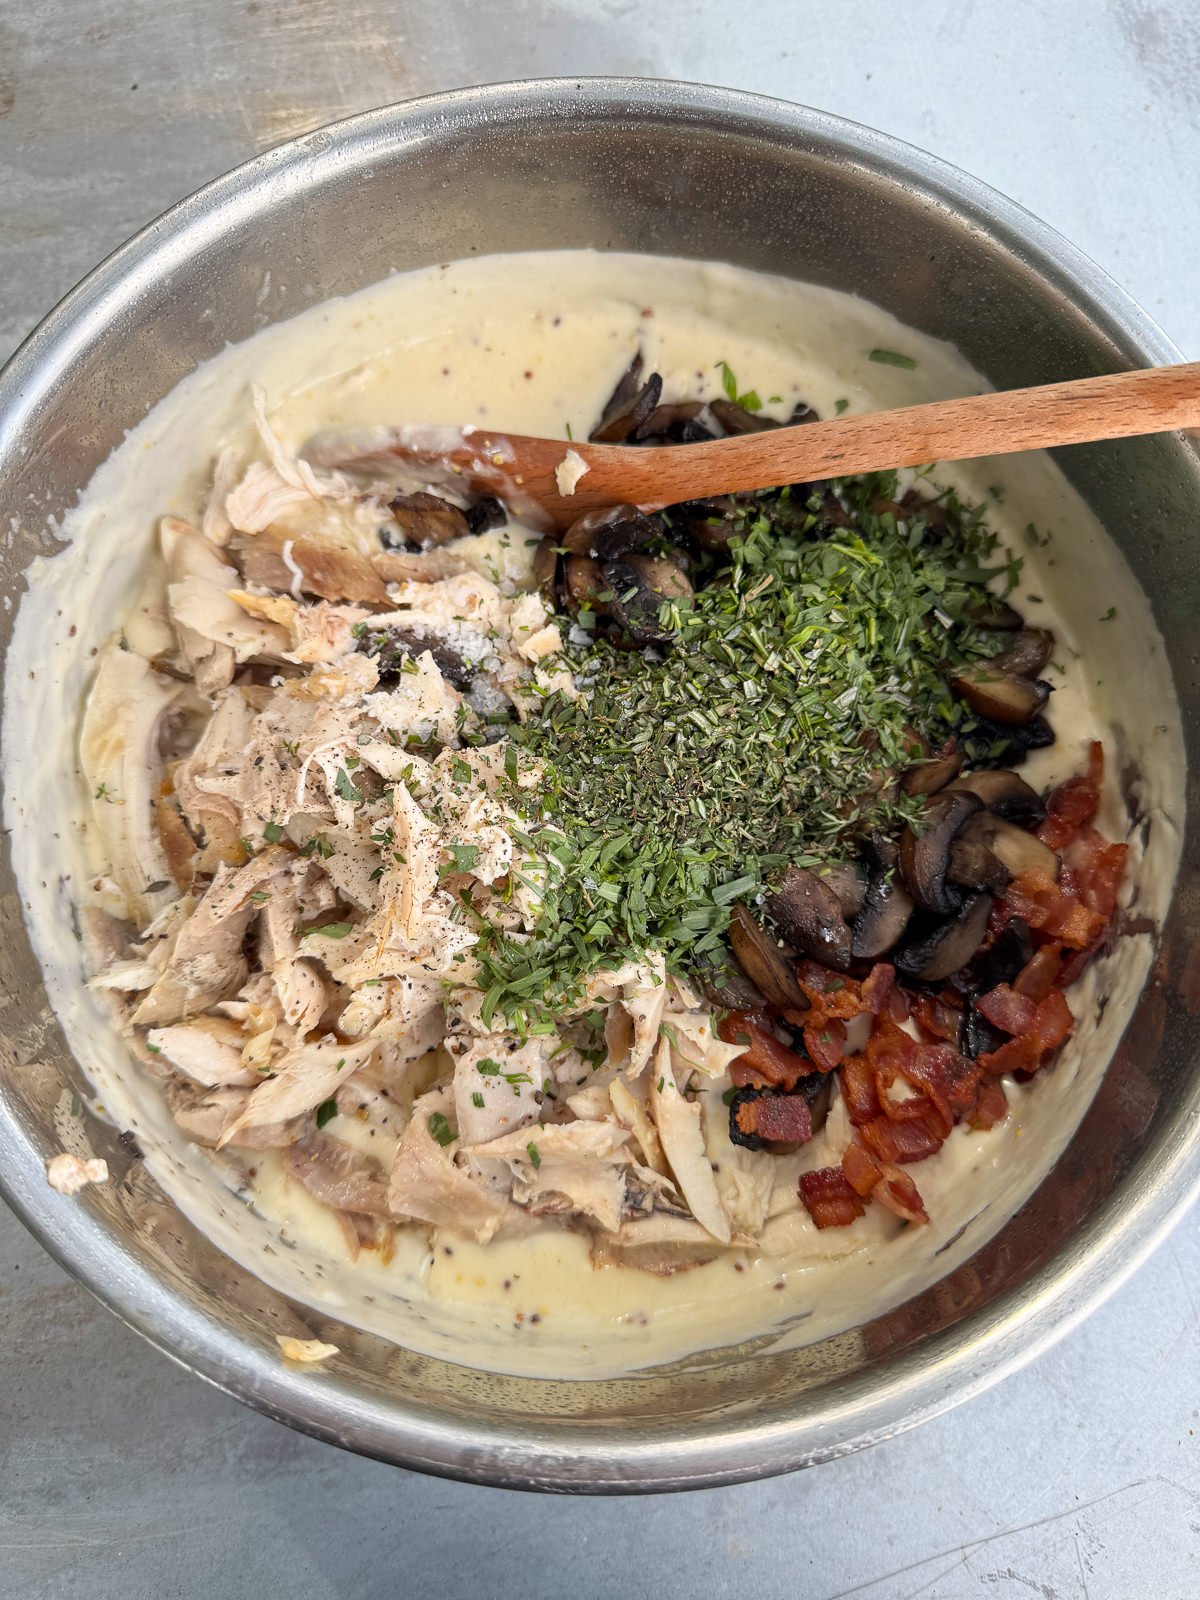
As well as the roasted chicken & the garlic sauce, this pie filling also contains smoked bacon, mushrooms & plenty of fresh herbs. We’re talking tarragon, rosemary & thyme! The bacon is fried first then we cook the mushrooms in the bacon fat. Then we make the sauce in the same pan (with the bacon & mushrooms taken out).
Pastry (Hot Water Crust & Puff Pastry)
This pie recipe uses 2 different type of pastry. A homemade hot water crust pastry for the base & a shop bought sheet of puff pastry for the lid.
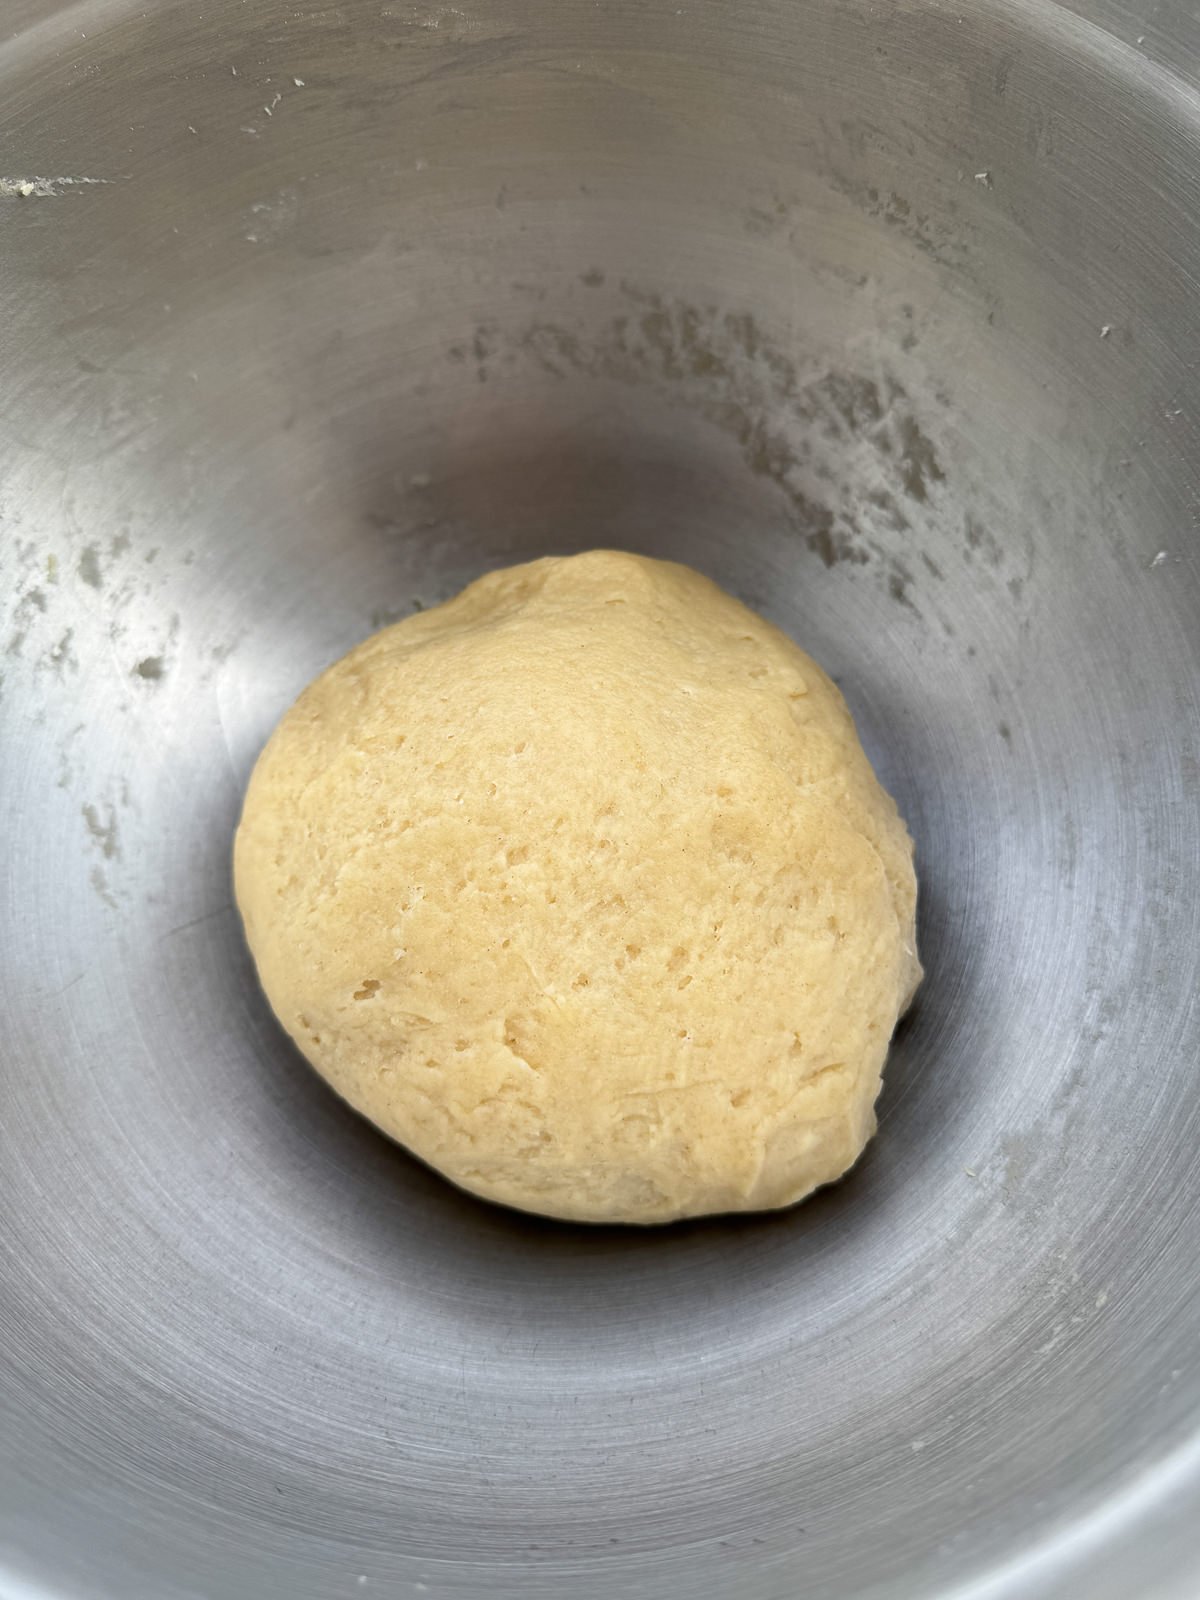
If you’ve never made hot water crust pastry before, it’s actually really easy to make! You add butter, lard & water into a pan then melt over a medium heat before bringing to the boil. You pour the hot fat mixture into a bowl containing flour & a pinch of salt, mix to combine then add in an egg and knead gently to make a smooth dough. Then you rest the dough for 20 minutes then use to line the pie tins. The hot water crust should still be slightly warm when you use it.
Just a tip! The hot water crust dough will still be warm when you knead it. I like to knead it by hand & wear a pair of food safe gloves . Feel free to use a wooden spoon instead if you’d prefer.
How To Assemble Individual Chicken Pies
When I make individual pies, I like to use a deep 6 hole Yorkshire pudding tin (linked below) but feel free to use individual pie tins if you’d prefer. You could make a large pie instead, the assembly method is the same.
- Grease your pie tins with butter then set to one side.
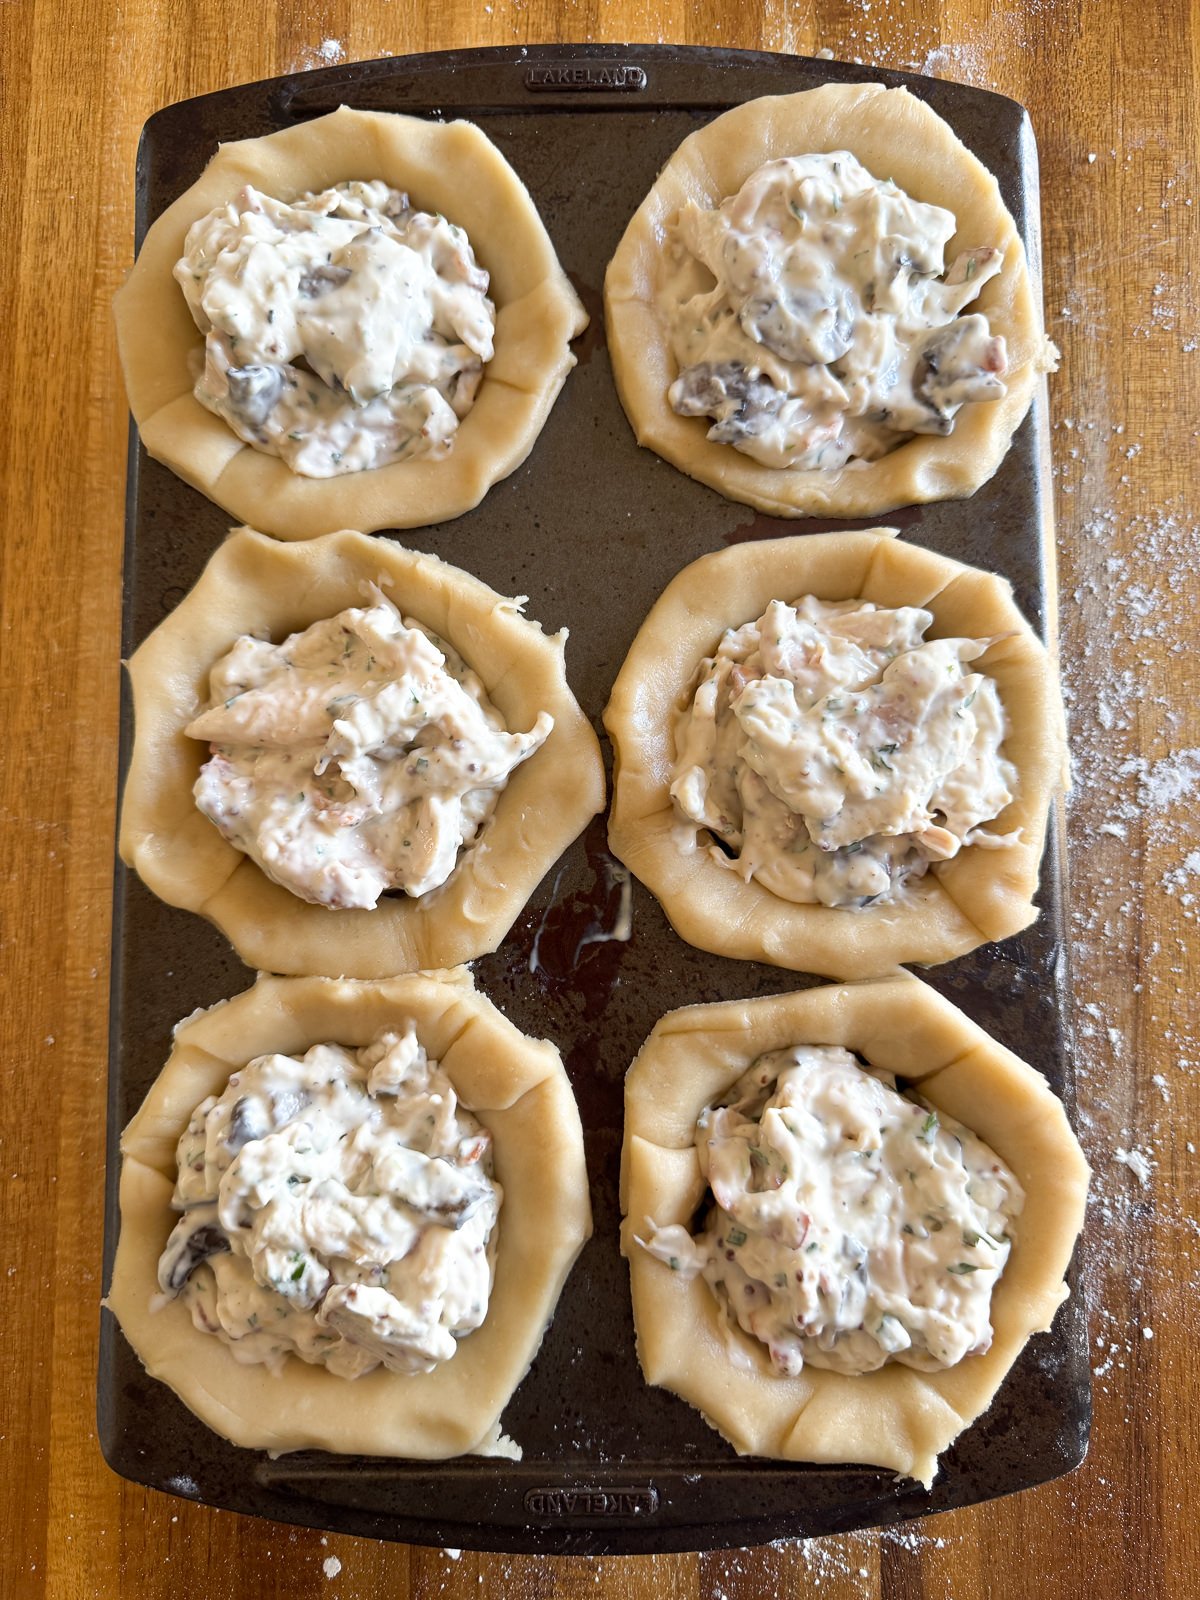
- Divide the hot water crust pastry into equal portions then roll each into 4mm thick circles.
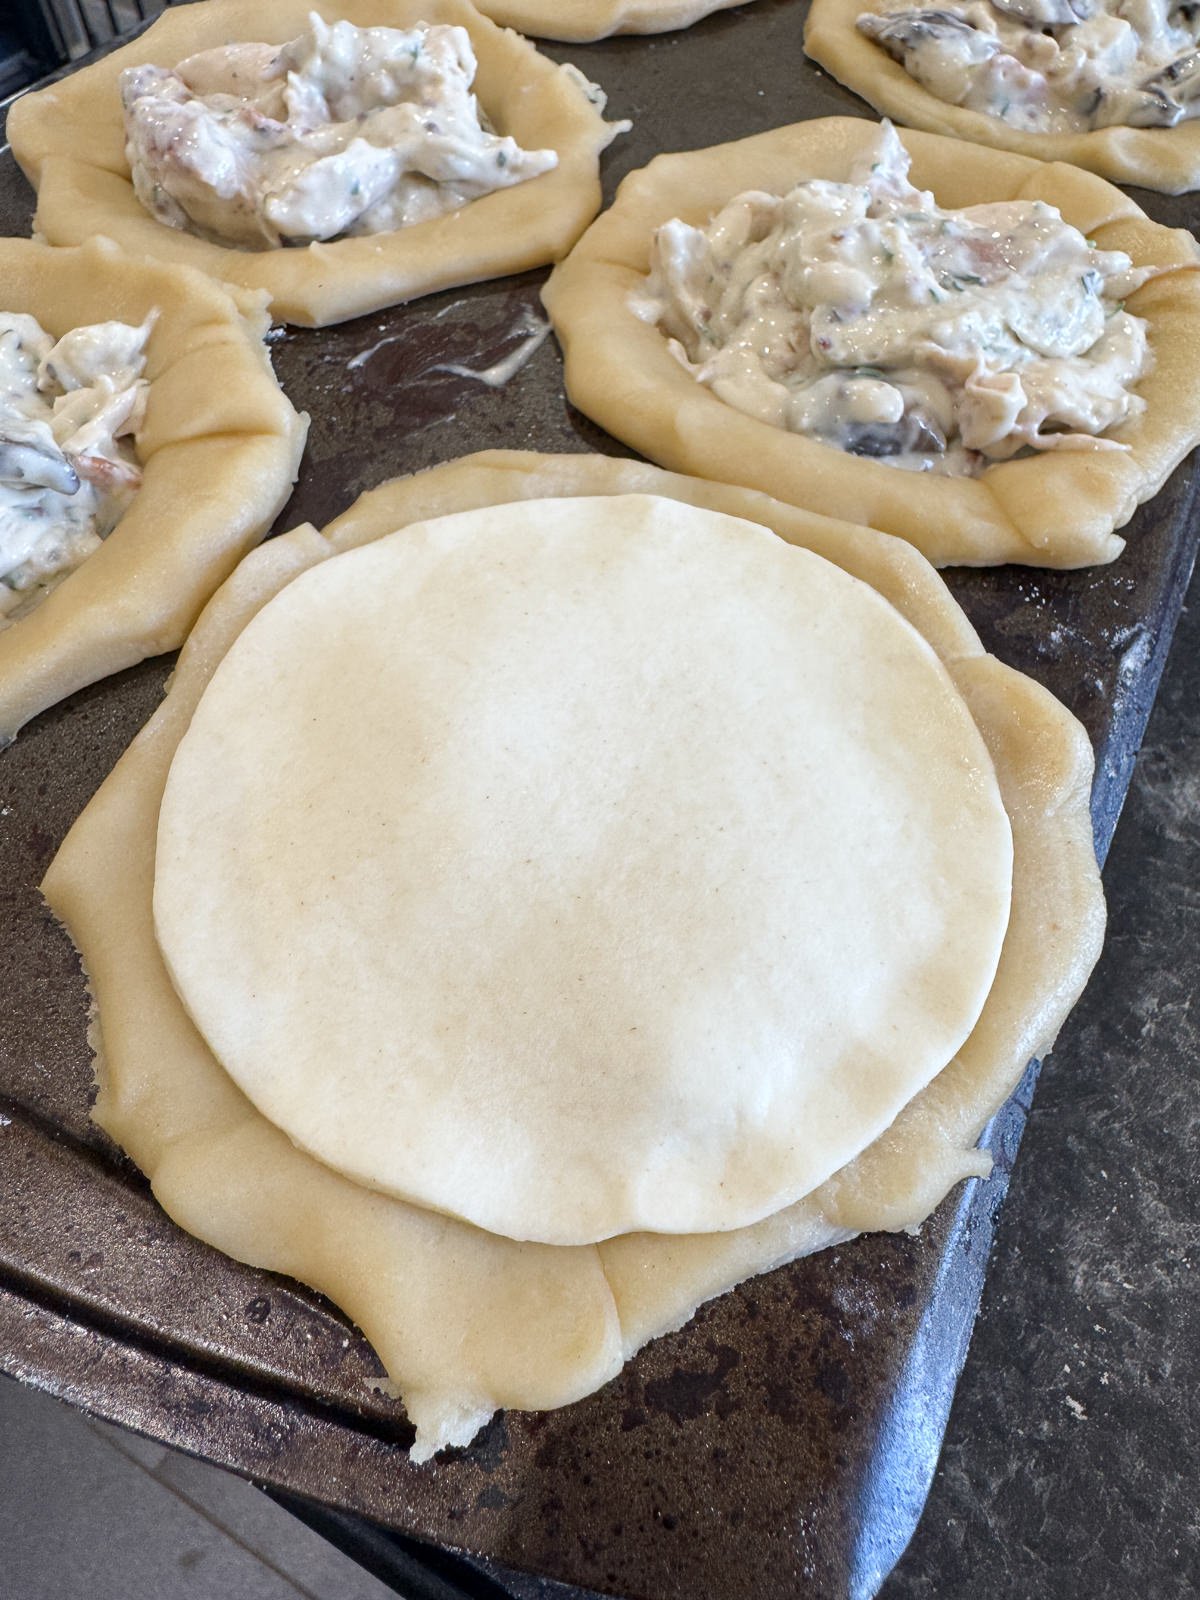
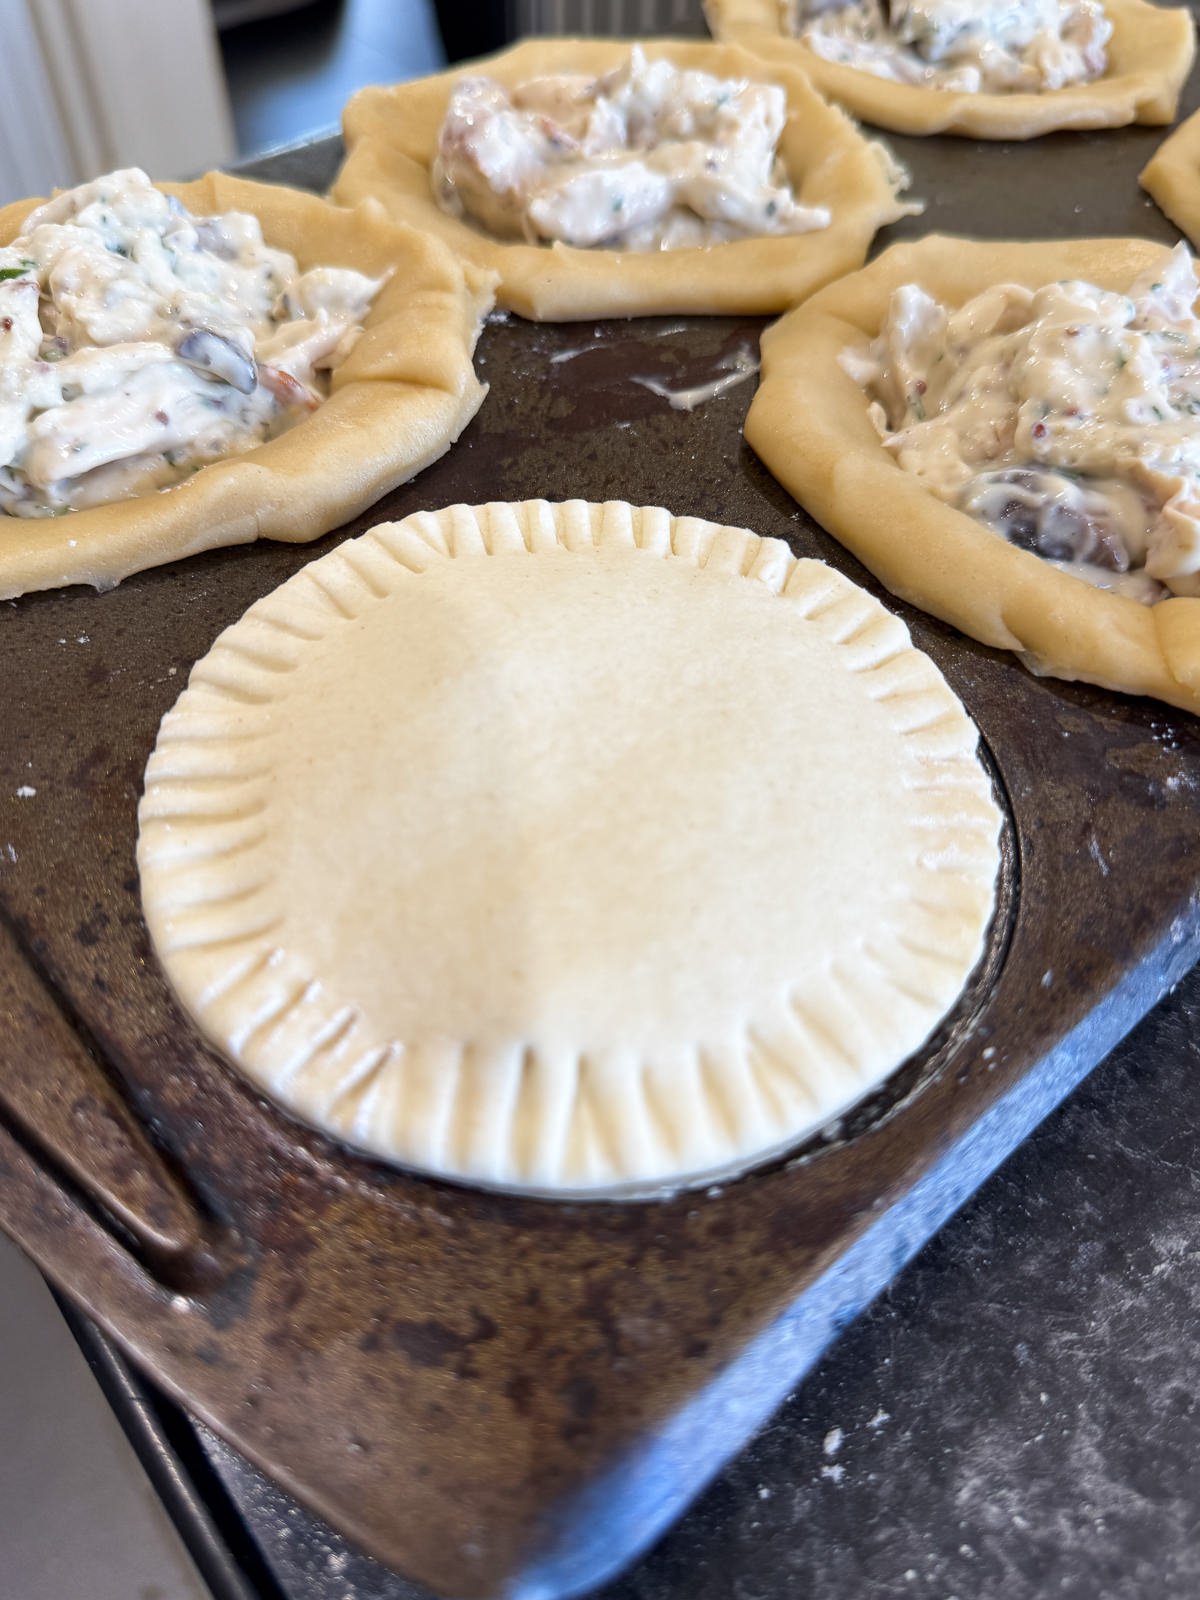
- Line the inside of each tin with a disc of pastry then fill each pie with a generous amount of filling. Make sure to leave a small amount of pastry (around 1cm) overhanging the edge of each tin/muffin tin hole. The top of the filling should sit just above the top of the pie tin.
- Cut circles out of puff pastry that are large enough to completely cover the top of each pie. You can do this with a circular cutter or by cutting round a plate/bowl.
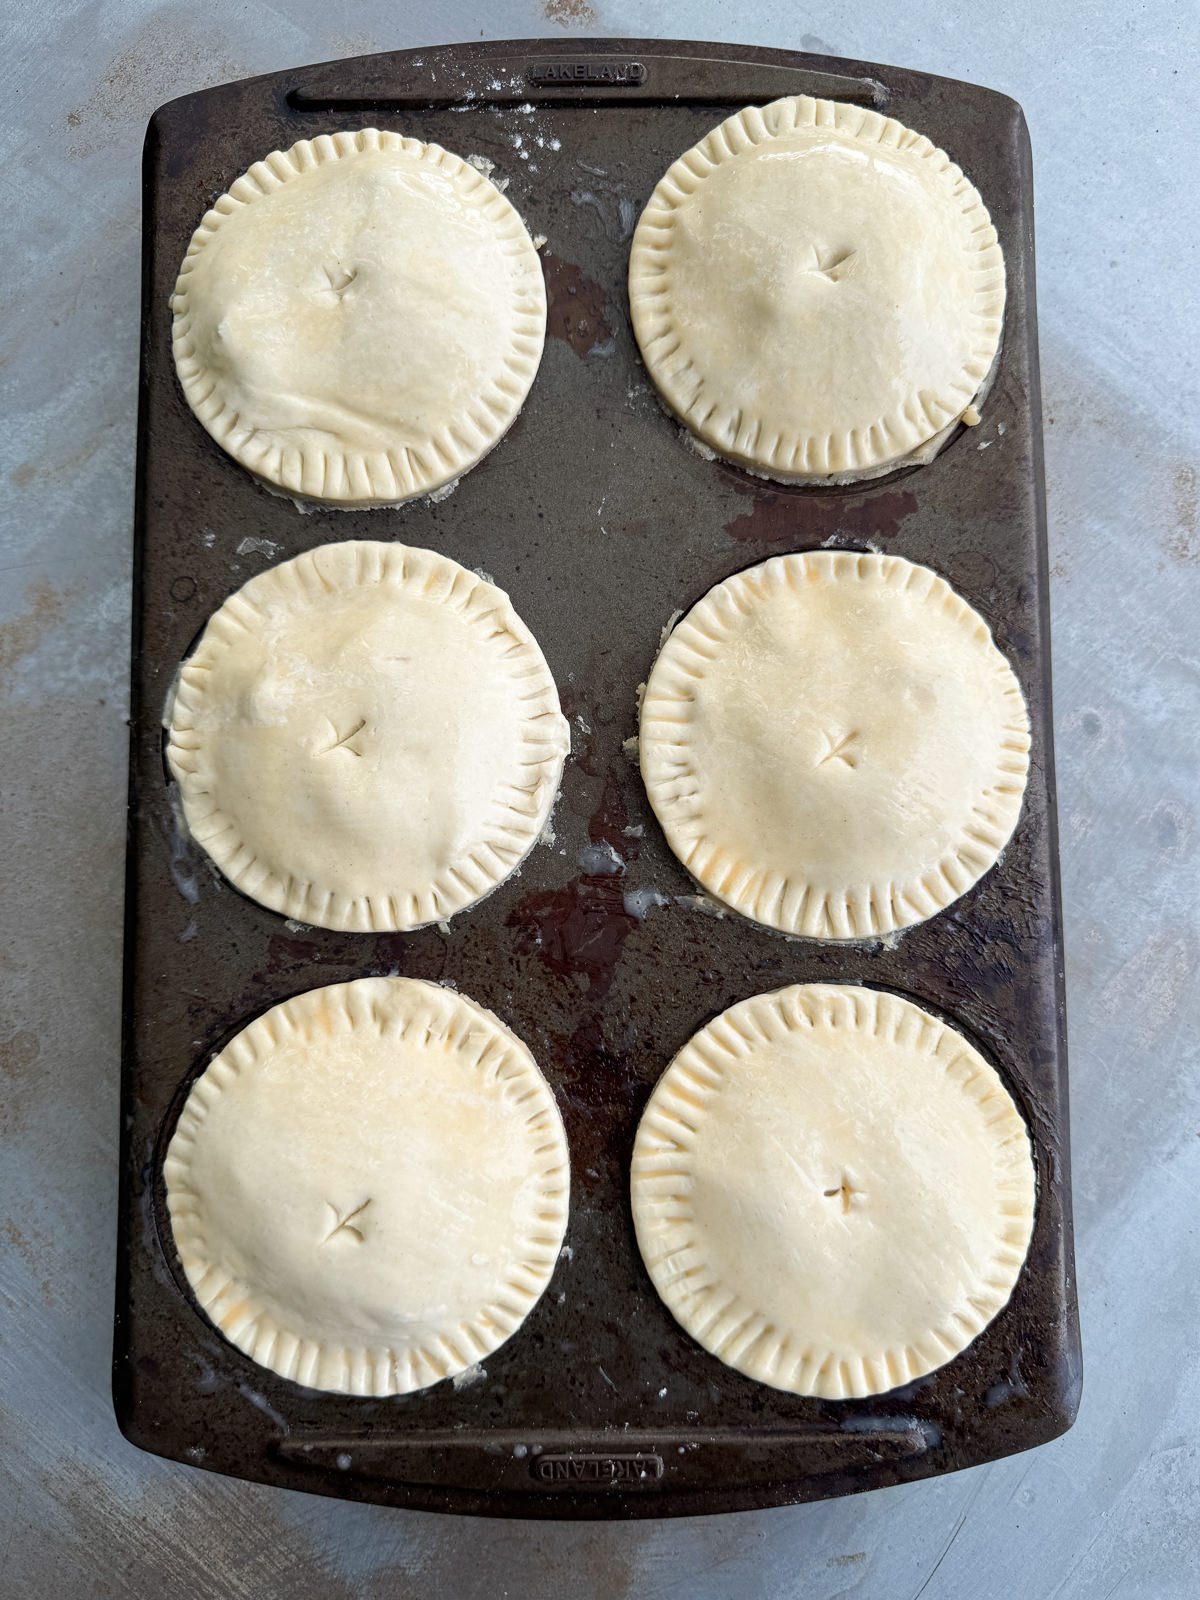
- Brush a small amount of cold water around the edge of each pie then top each with a disc of puff pastry, pressing down lightly on the edges to seal & to thin the pastries out slightly.
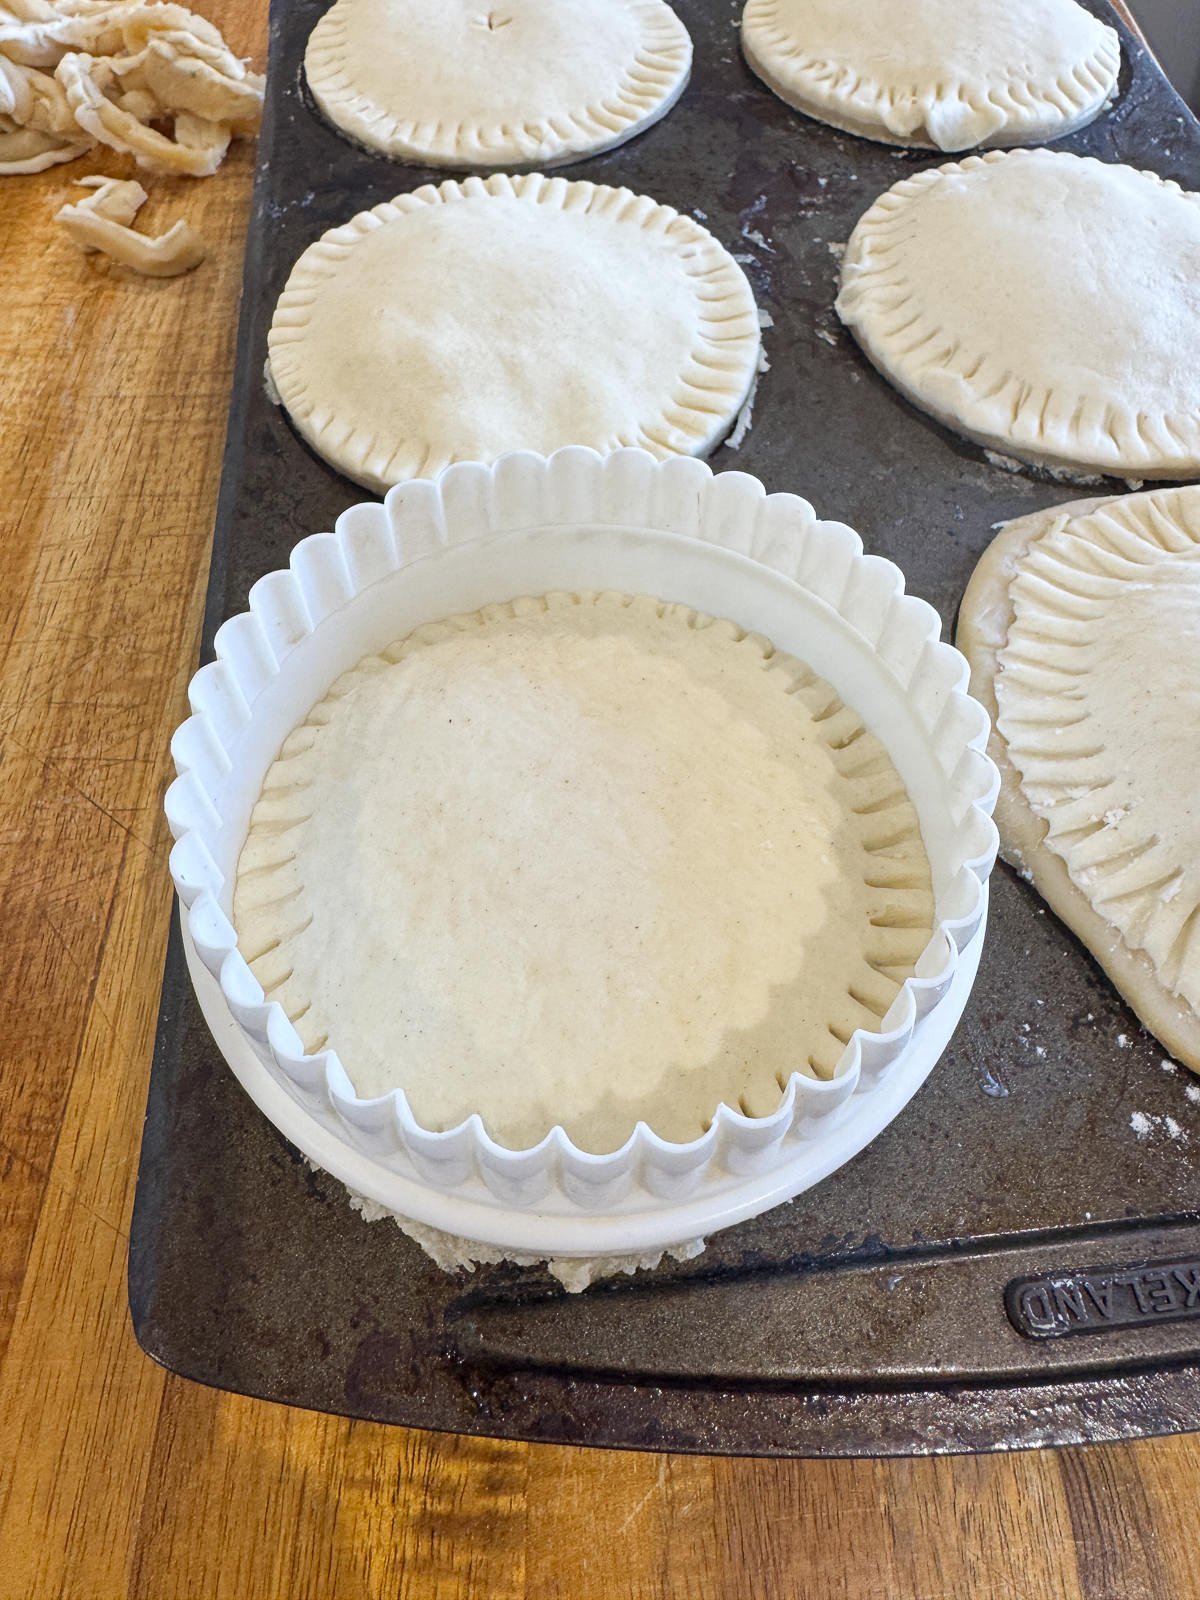
- Crimp around the edge of each pie with a fork then use a large round cutter to trim the pastry level with the edge of the tins/dishes. If you dip your fork in flour before crimping, it won’t stick to the pastry!
- Cut a small steam hole in the top of each pie then chill in the fridge for at least an hour.
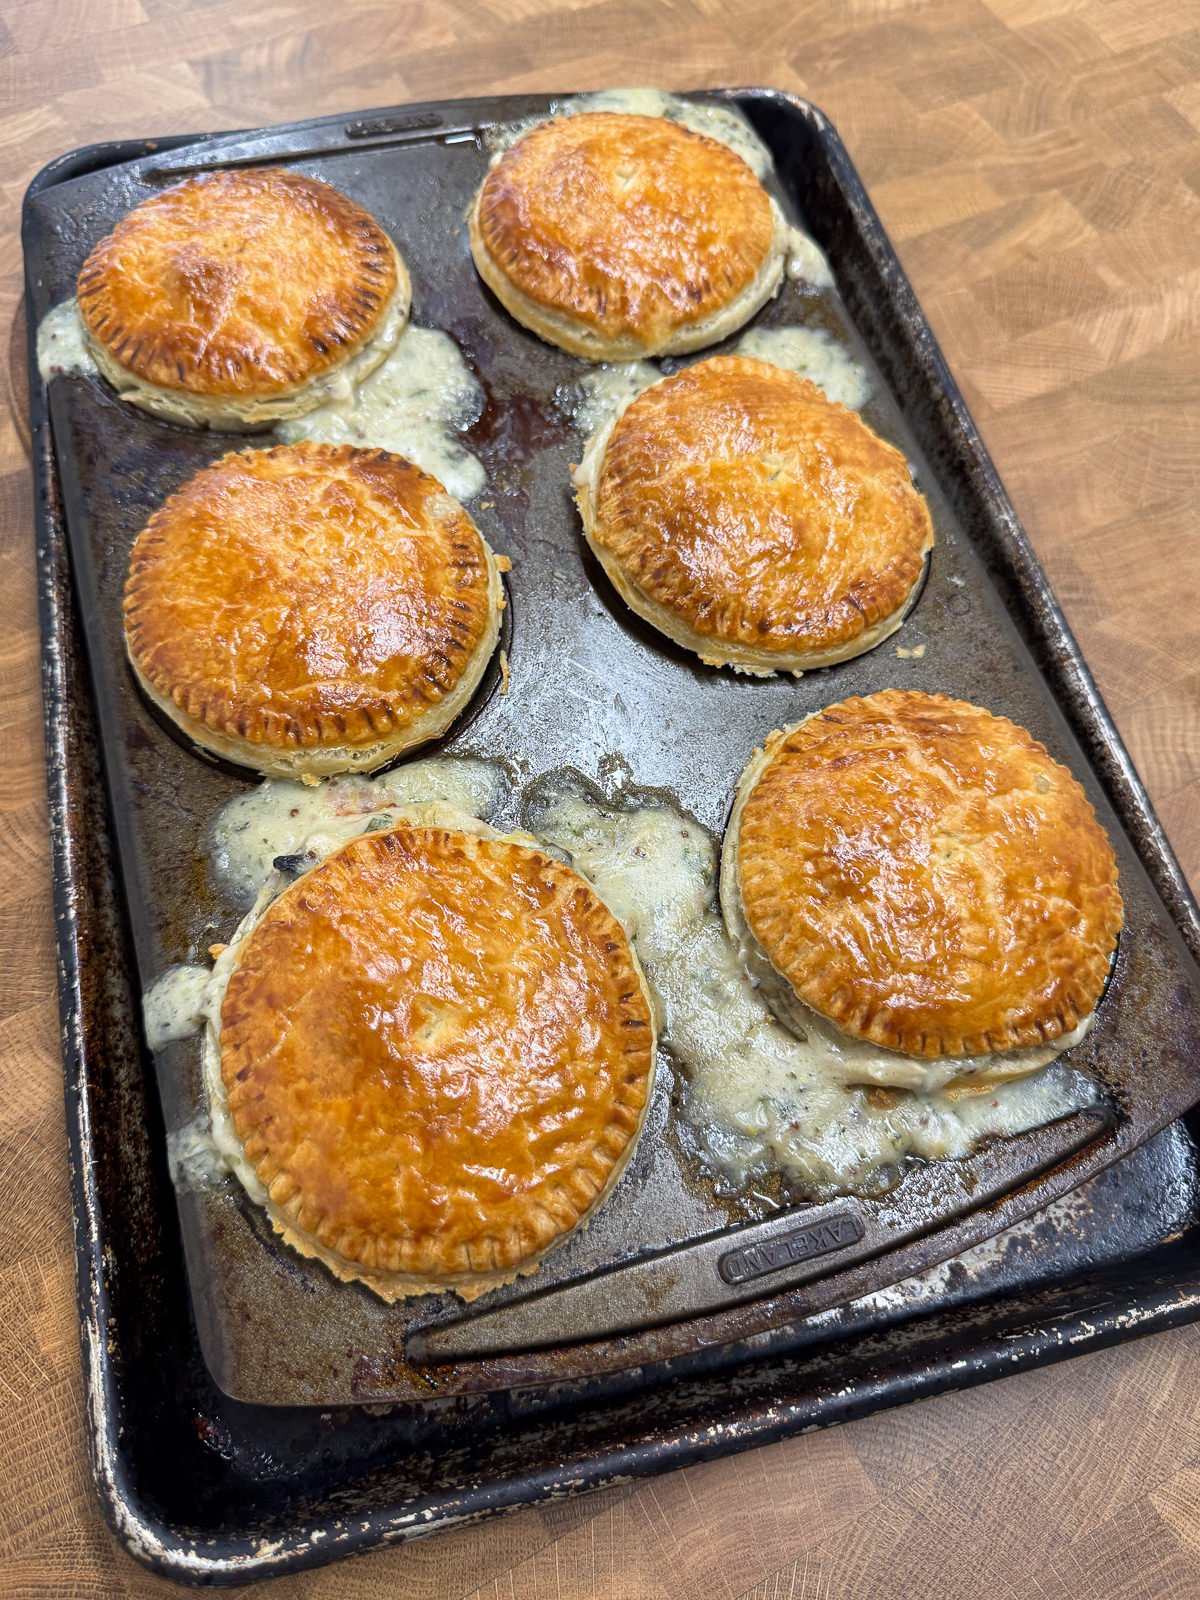
- Before baking, brush two light layers of egg wash over the pies, leaving 20 minutes between each layer. Return the pies to the fridge between each layer.
Tips & Tricks For Baking Chicken Pies
I’ve baked quite a few pies since starting this blog & I’ve picked up a few tips & tricks along the way! The first tip is to preheat a large baking tray for at least 15 minutes then bake the pies on top (in the tins). This helps crisp up the bottom of the pies, preventing any undercooked, soggy bottoms!
The second tip, is to chill the pies for at least an hour before baking them. Combined with the preheated tray, this gives the pastry a crisper, flakier texture. I like to give the tops of the pies a light coating of egg wash 20 minutes before baking then another coating just before they go in the oven. This gives the pies a deeper, golden finish.
The third & final tip, is to let the pies sit in the tins for at least 20 minutes (at least 30 minutes for larger pies) before taking them out. This just allows the pie crust to set & firm up slightly, avoiding any leakages when you lift them out of the tin.
Serving Suggestions
My favourite way to serve chicken pies, is with gravy & some sort of potato side dish! We’ve got recipes for triple cooked chips, duck fat oven chips, crushed new potatoes & dauphinoise. And if you’d like to make your own gravy, take a look at our red wine gravy recipe.
That being said, you can serve your pies with pretty much whatever you like! They’d be good with some roasted veg, a carrot & swede mash or for a lighter option, a simple green salad would work well.
Frequently Asked Questions
Once cooked, chicken pies should be stored in the fridge & eaten within 2 days. You can serve leftover pies either hot or cold! The chicken pie filling can be made up to 2 days in advance & needs to be stored in the fridge.
The best way to reheat roast chicken pies, is to bake them at 180°c/356°f until the filling is piping hot. You might need to cover the pies with foil if the pastry starts to brown too much.
A leftover roasted chicken carcass can be used to make stock (broth) or to make a really good chicken soup.
Once chicken pies are cooked, the pastry will be a deep golden brown & the filling will be piping hot. If you take the temperature of the filling with a food probe, it should be at least 75°c/167°f.
Cooking On An Aga
With all of my recipes, I include cooking instructions for conventional ovens, fan ovens & also Agas. Here’s how to cook this recipe in an Aga…
To roast the chicken, follow my aga roast chicken recipe! Use the boiling plate to fry the bacon & mushrooms then move over to the simmering plate to make the sauce. Bake the pies in the roasting oven, on a baking tray placed on the floor.
Equipment Used
Please note that these are affiliate links & I may make a small commission if you make a purchase using these links, at no extra cost to you. For more information, click here.
More Dinner Recipes To Try!
- Butter Chicken
- Hot Maple Fried Chicken
- Tikka Masala Roast Chicken
- Leftover Roast Chicken Ramen
- Goose Fat Jacket Potatoes
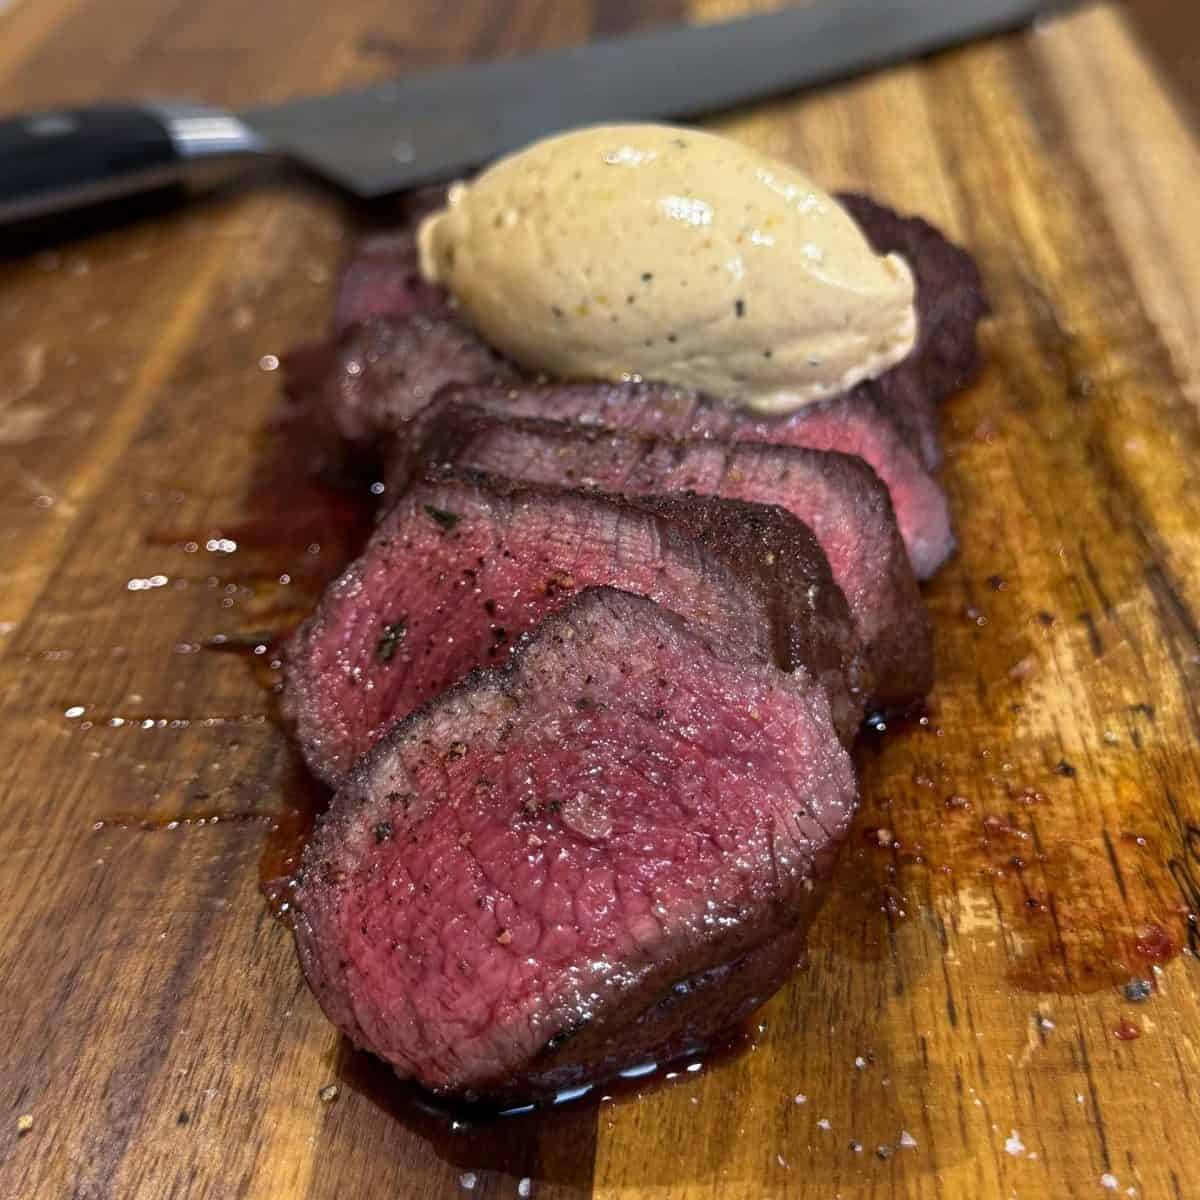
- Black Garlic Hanger Steaks
If you have enjoyed this chicken pie recipe, it would mean a lot if you could leave a review & rating. And if you’d like to stay up to date with future recipes, follow us on Instagram & TikTok!

Roast Chicken, Bacon & Mushroom Pies
Equipment
- Pie Dishes (See Notes)
- Roasting Tin (With Rack)
- Digital Food Probe
- Large Saucepan
- Mixing Bowl
- Rolling Pin
- Baking Tray
Ingredients
Roast Chicken
- 1½ kg Whole Chicken
- 2 Bulbs Of Garlic (Left Whole)
- 1 Lemon (Sliced)
- 10 Sprigs Fresh Rosemary
- 10 Sprigs Fresh Thyme
- 2 tbsp Vegetable Oil
Pie Filling
- 1 tbsp Vegetable Oil
- 250 g Smoked Streaky Bacon (Cut Into 1cm Lardons)
- 250 g Chestnut Mushrooms (Sliced)
- 100 g Unsalted Butter
- 100 g Plain Flour
- 800 ml Chicken Stock (Warm – See Notes)
- 300 g Creme Fraiche
- 2 tsp Wholegrain Mustard
- 20 g Bunch Of Tarragon (Leaves Picked Off)
- 1 tsp Finely Chopped Rosemary
- 1 tsp Finely Chopped Thyme
Hot Water Crust Pastry
- 450 Plain Flour
- ½ tsp Table Salt
- 1 Large Eggs Beaten
- 75 g Unsalted Butter
- 75 g Lard
- 190 g Water
To Assemble
- 320 g Puff Pastry See Notes
- 1 Egg
- 1 tsp Whole Milk
Instructions
Roast Chicken
- Preheat an oven to 180°c/160°c fan (356°f/320°f).
- Place the chicken onto a rack set inside a roasting tin. Place the bulbs of garlic in the tray, underneath the chicken.
- Next, stuff the chicken's cavity with the lemon slices & herbs then coat the skin with the vegetable oil. Season well with salt & pepper then roast in the preheated oven until the internal temperature reaches 73°c/163°f. This will take between 1-1½ hours.Chicken is fully cooked once it reaches 75°c/167°f. The internal temperature will reach this as the meat rests.
- Once cooked, let the chicken rest whilst you make the filling. We'll be using the roasted garlic bulbs for the sauce.
Pie Filling
- Set a large saucepan over a medium-high heat then add in the veg oil & leave to heat up for a minute or so.
- Once the oil is hot, add the bacon lardons into the pan & fry until crisp, stirring frequently. Then once cooked, use a slotted spoon to transfer the bacon to a bowl, leaving the fat in the pan.
- Next, add the sliced mushrooms into the bacon fat & cook until golden, again stirring frequently. Once cooked, transfer the mushrooms to the bowl with the bacon then set to one side.
- Lower the heat to medium-low then add in the butter & cook until melted, stirring regularly. Once melted, stir in the flour then cook out for 1 minute, stirring constantly.
- Next, pour in a third of the warm stock then whisk until smooth. Cook out until thick, whisking/stirring regularly. This will only take 2-3 minutes.
- Once thick, pour half of the remaining stock into the sauce then continue cooking until it has thickened up again, whisking regularly.
- Add in the remaining stock then reduce the heat to low. Continue cooking, stirring/whisking regularly until the sauce has thickened back up for a final time. This step will take around 5 minutes. The sauce should be the consistency of a thick bechamel/cheese sauce (think mac & cheese!).
- Once the sauce is cooked, take the pan off the heat & whisk in the creme fraiche.
- Squeeze the roasted garlic out of the skins then add into the sauce before giving it a quick blitz with a stick blender to make smooth. Then stir in the mustard.
- Next, use your hands to pull the chicken off the bones & into chunks. I like to keep the chunks fairly large.Food safe gloves come in handy here! Make sure to get as much meat off the bones as possible. The carcass can be used to make stock or soup.
- Add the chicken into the sauce along with the bacon, mushrooms & chopped herbs then season with sea salt & freshly cracked black pepper and gently mix to combine. Give the sauce a taste to check the seasoning then add in more salt & pepper as needed.
- Transfer the pie filling to a shallow dish, leave to cool slightly then chill until completely cold. Cover the surface with a piece of clingfilm before refrigerating, to prevent a skin forming on top.The filling can be kept in the fridge for 2-3 days before being used.
Hot Water Crust Pastry
- Add the flour & salt into a large mixing bowl then whisk to combine. Set this to one side. Add the egg into a separate small mixing bowl then beat lightly.
- Next, add the butter, lard & water into a saucepan then set over a medium heat. Cook, stirring regularly until the fats have melted then bring to the boil.
- As soon as the water & fats are boiling, pour them into the flour, stirring constantly with a wooden spoon as you do.
- Once the fats have been mixed in, add in the beaten egg then continue mixing for a couple of minutes, until a smooth dough forms then cover the bowl & leave to rest for 20 minutes.The pastry will still be warm when you knead it. A pair of food safe gloves comes in handy here! The pastry should still be slightly warm when we roll it out.
Assembly
- A quick note: This recipe makes enough pastry for 6 individual pies or 1 large one, which you'll need half the filling for. I like to freeze the other half for another day. Feel free to make double the amount of pastry if you'd prefer & use all of the filling!
- Grease your pie dishes with butter then set aside.
- Transfer the hot water crust pastry to a lightly floured surface then divide into 6 portions.
- Take a portion of pastry & roll out into a 4mm thick circle. Line a pie dish with the pastry then repeat with the remaining portions.Make sure to leave a cm or two of pastry overhanging each pie dish.
- Divide half of the chilled pie filling between each pie. The filling should sit slightly above the top of the tins/dishes.The rest of the filling can be saved for another batch of pies. Either in the fridge for up to 2 days or in the freezer for several months.
- Next, cut circles out of the puff pastry that are large enough to completely cover the top of each pie. You can do this with a circular cutter or by cutting round a plate/bowl.
- Brush a small amount of cold water around the edge of each pie then top each with the discs of puff pastry, pressing down lightly on the edges to seal & to thin the pastries out slightly.
- Crimp around the edge of each pie with a fork then use a small knife (or a round cutter) to trim the pastry level with the edge of the tins/dishes.If you dip your fork in flour before crimping, it won't stick to the pastry!
- Cut a small steam hole in the top of each pie then chill in the fridge for at least an hour.
Baking
- Preheat an oven to 210°c/190°c fan (410°f/374°f). Place a baking tray in the oven at the same time.
- In the meantime, make an egg wash by whisking the egg & milk together then brush a light layer over the top of each pie. Return them to the fridge, to chill whilst your oven heats up (for 20 minutes or so).
- Brush another light layer of egg wash onto each pie then place the pie tins onto the hot baking tray in the oven & bake for 35-40 minutes, until the pastry is a deep, golden brown and the filling is piping hot.A digital food probe inserted into the filling should read at least 75°c/167°f. If the pies start to brown too much, cover them loosely with foil.
- One baked, let the pies sit for 20 minutes then carefully lift them out of the tins. Serve immediately or leave to cool then store in the fridge.
Notes
To cook, bake the pie for 20 minutes at 220°c/428°f then turn the oven down to 170°c/338°f and cook for another 45 minutes – 1 hour until the pastry is crisp & golden and the filling is piping hot. Make sure to let a large pie sit in the tin for at least 40 minutes before taking out, to avoid breaking the crust (don’t ask me how I know this!).