Peanut Butter & Medjool Date Chocolate Chip Cookies
These peanut butter & medjool date chocolate chip cookies have a crisp & chewy texture and are made with brown butter & good quality chocolate, for maximum flavour!

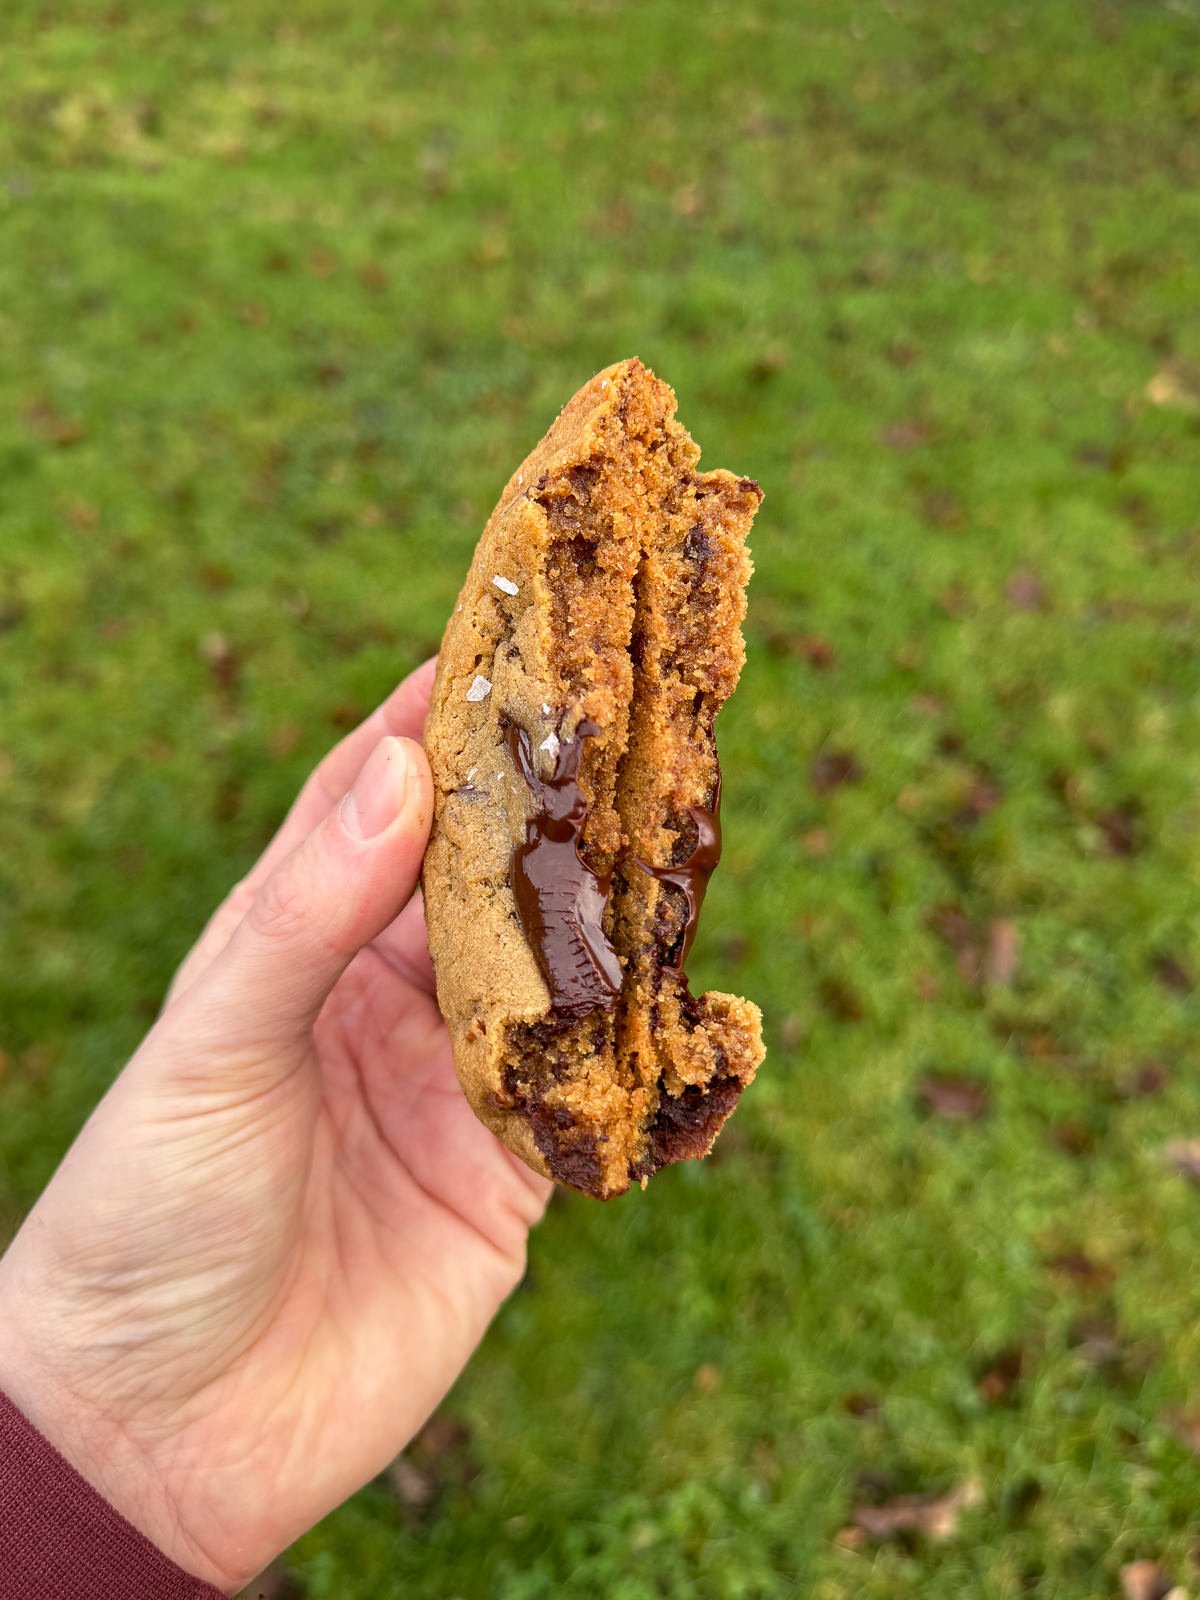
Have you seen the viral date & peanut butter bark on social media? Well this is the chocolate chip cookie version of it! There’s your classic brown butter cookie dough with added peanut butter, chunks of squidgy Medjool dates & plenty of dark chocolate. Plus a pinch of sea salt on top. These are some seriously tasty cookies & they’re super easy to make!
So I made these cookies with a deep roasted peanut butter for a really deep, nutty flavour plus brown butter & dark brown sugar for a rich caramelised flavour. There’s also a pinch of cinnamon in the dough as well, for just a hint of spice which works perfectly with the peanuts & dates. Then for that signature pool of molten chocolate, we’re pressing a chunk of dark chocolate on top of each ball of cookie dough before baking. This is a must if you ask me!
For more cookie flavours, check out our ever growing collection of cookie recipes! There’s a whole load of flavours here, from lemon drizzle, to brown butter oreo & black sesame cheesecake. If there’s a cookie that you’d like to see on the blog, feel free to leave us a comment at the bottom of this post!
What You’ll Need
- Peanut Butter – Using a good quality peanut butter makes all the difference when making cookies! For the best flavour, I’d recommend using a dark roasted peanut butter but the regular stuff will work as well. This recipe uses smooth peanut butter but crunchy would work as well. I use ManiLife peanut butter.
- Medjool Dates – For the best flavour, make sure to use Medjool dates (not dried pitted dates!). Medjool dates have a soft, chewy texture & a rich, buttery, caramel like flavour. The recipe calls for pitted Medjool dates, so make sure to weigh them out once you’ve removed the pits!
- Chocolate – A bar of good quality dark chocolate works best for cookies but you could use milk chocolate if you’d prefer. I use either a 54% or 74% dark chocolate.
- Butter – We’re using unsalted butter for the cookie dough, so that we can control the salt content. Different brands of salted butter will contain different amounts of salt!
- Sugar – You’ll need 2 types of sugar for this cookie dough; dark brown & caster. You can swap the dark brown sugar out for light brown if you’d prefer but you’ll get a richer flavour with dark brown sugar.
- Eggs – We ‘re using large eggs for these cookies. A large egg should weigh around 50 grams out of the shell.
- Flour – You’ll need plain flour (all purpose) for the cookie dough.
- Cornflour – Replacing some of the flour with cornflour in cookie dough gives the cookies a slightly chewier texture.
- Raising Agents – We’re using both baking powder & bicarbonate of soda for the perfect amount of rise & spread in the oven.
- Vanilla – Adding a small amount of vanilla extract into the cookie dough adds flavour. Vanilla complements the flavour from the peanut butter, dates & chocolate fantastically!
- Salt – We’re using table salt in the cookie dough & sprinkling sea salt on top of the cookies once they’re baked.
- Cinnamon – I added a small amount of ground cinnamon into the cookie dough, which pairs really well with the peanut butter & dates. Feel free to leave it out if you’d prefer though. The cookies don’t taste like cinnamon though, they’re just very lightly spiced!

Adjusting Cookie Dough To Use Peanut Butter
I’ve developed quite a few different chocolate chip cookie recipes (check them out here!) & I tend to stick with the same tried & tested ratio of butter, sugar, eggs & flour for the ideal texture & amount of spread. Unfortunately, when you add peanut butter into the mix it likes to mess up these ratios, due to the added fat.
When I was developing this peanut butter cookie recipe, I started by simply reducing some of the butter & replacing it with peanut butter. The texture & flavour of this batch was good but they didn’t spread as much in the oven as I wanted them to. To get around this I reduced some of the flour, added in an extra egg (instead of 2 yolks) & increased the amount of butter. I also shortened the chilling time, to ensure that the cookies spread properly in the oven. I thought adding this insight would be interesting for anyone interested in baking science!
How To Make Peanut Butter & Date Chocolate Chip Cookies
These peanut butter chocolate chip cookies couldn’t be easier to make! Yes, there’s a few techniques involved like browning the butter but that’s pretty straightforward. The one thing I would recommend is chilling the cookie dough for at least a few hours before so that they don’t spread out too much in the oven…
- Brown Butter
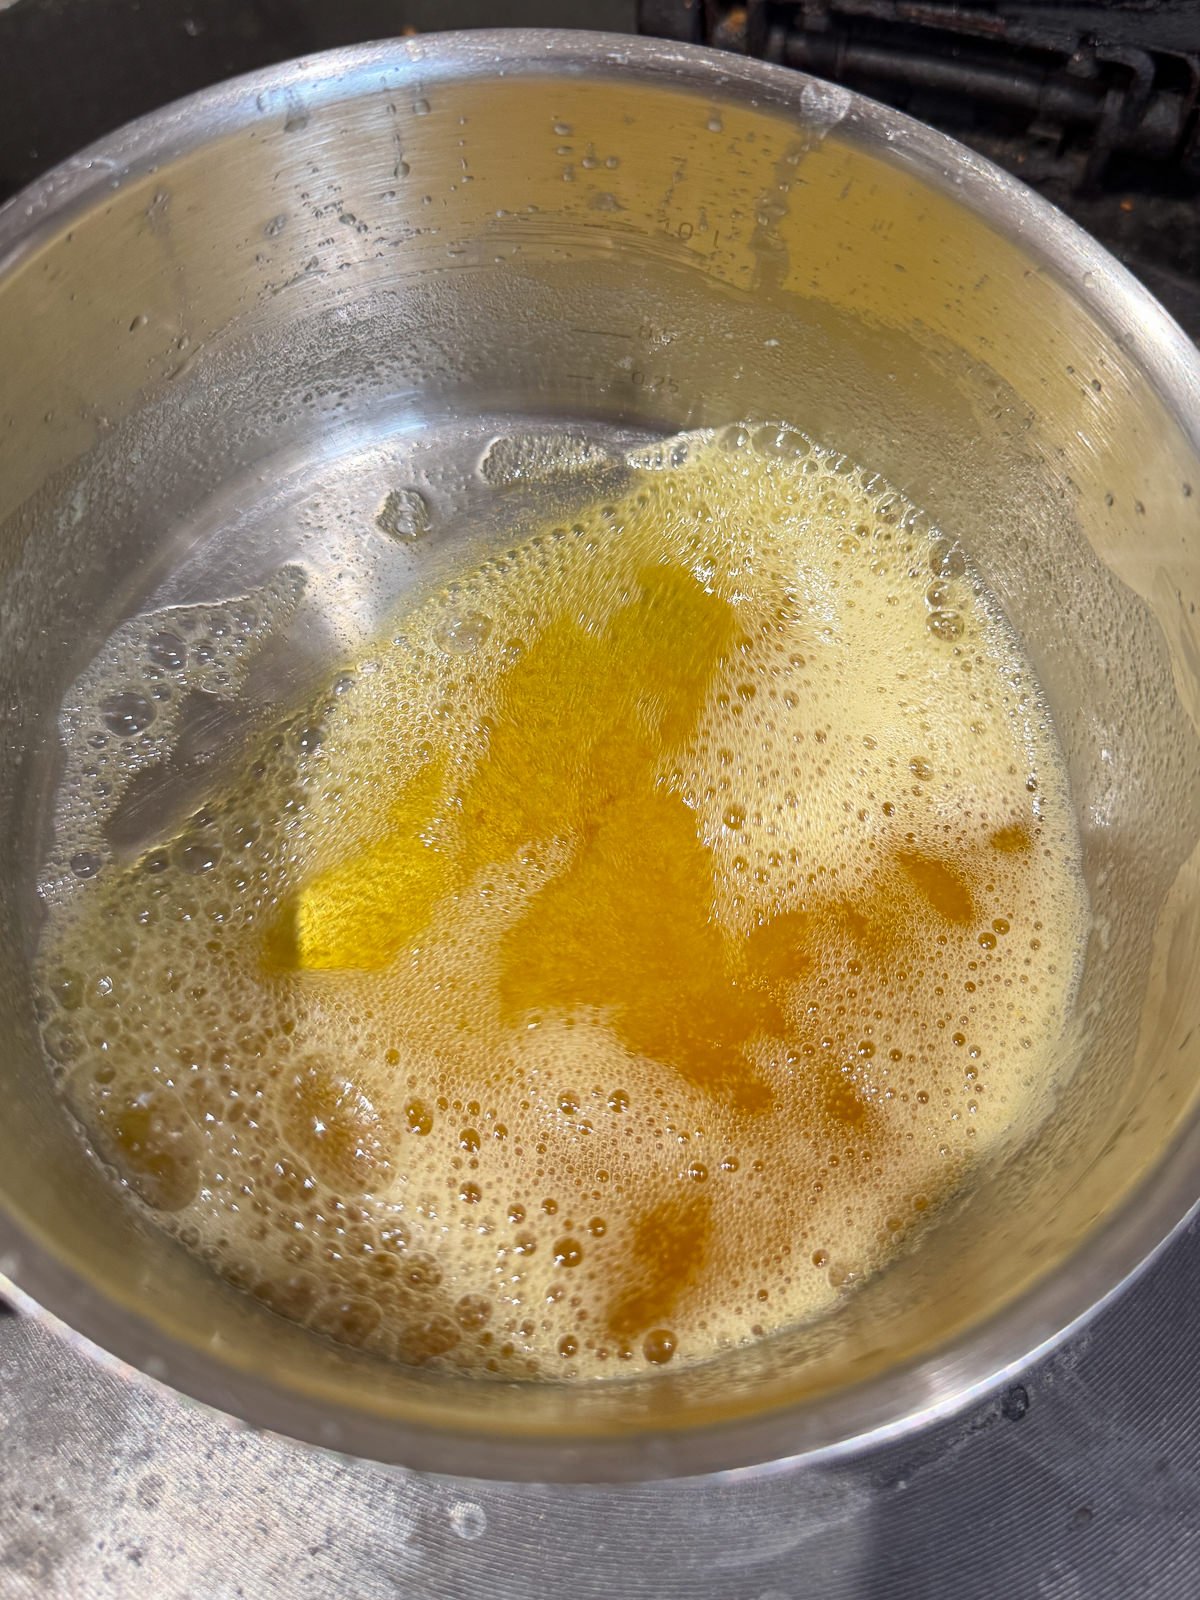
First we place chopped butter into a saucepan & brown over a medium heat. Once cooked, we transfer the butter to a bowl then leave to cool. The brown butter will take around 3-4 minutes to cook & 30 minutes to cool.
Check out our how to make brown butter guide for more info on brown butter! - Mixing Butters & Sugars
To start our cookie dough, we place our brown butter into the bowl of a stand mixer, along with regular softened butter, peanut butter, dark brown sugar, caster sugar & vanilla extract. These all get mixed together until combined & smooth (but not over mixed!). - Cookie Dough
Next, we mix beaten eggs into the butter, followed by all of our dry ingredients (flours, salt, raising agents, cinnamon). When mixing in the flour, make sure to stop once it has mostly all been incorporated. A few streaks of flour is fine at this point, it will get mixed in when we stir in the chocolate. - Mix Ins
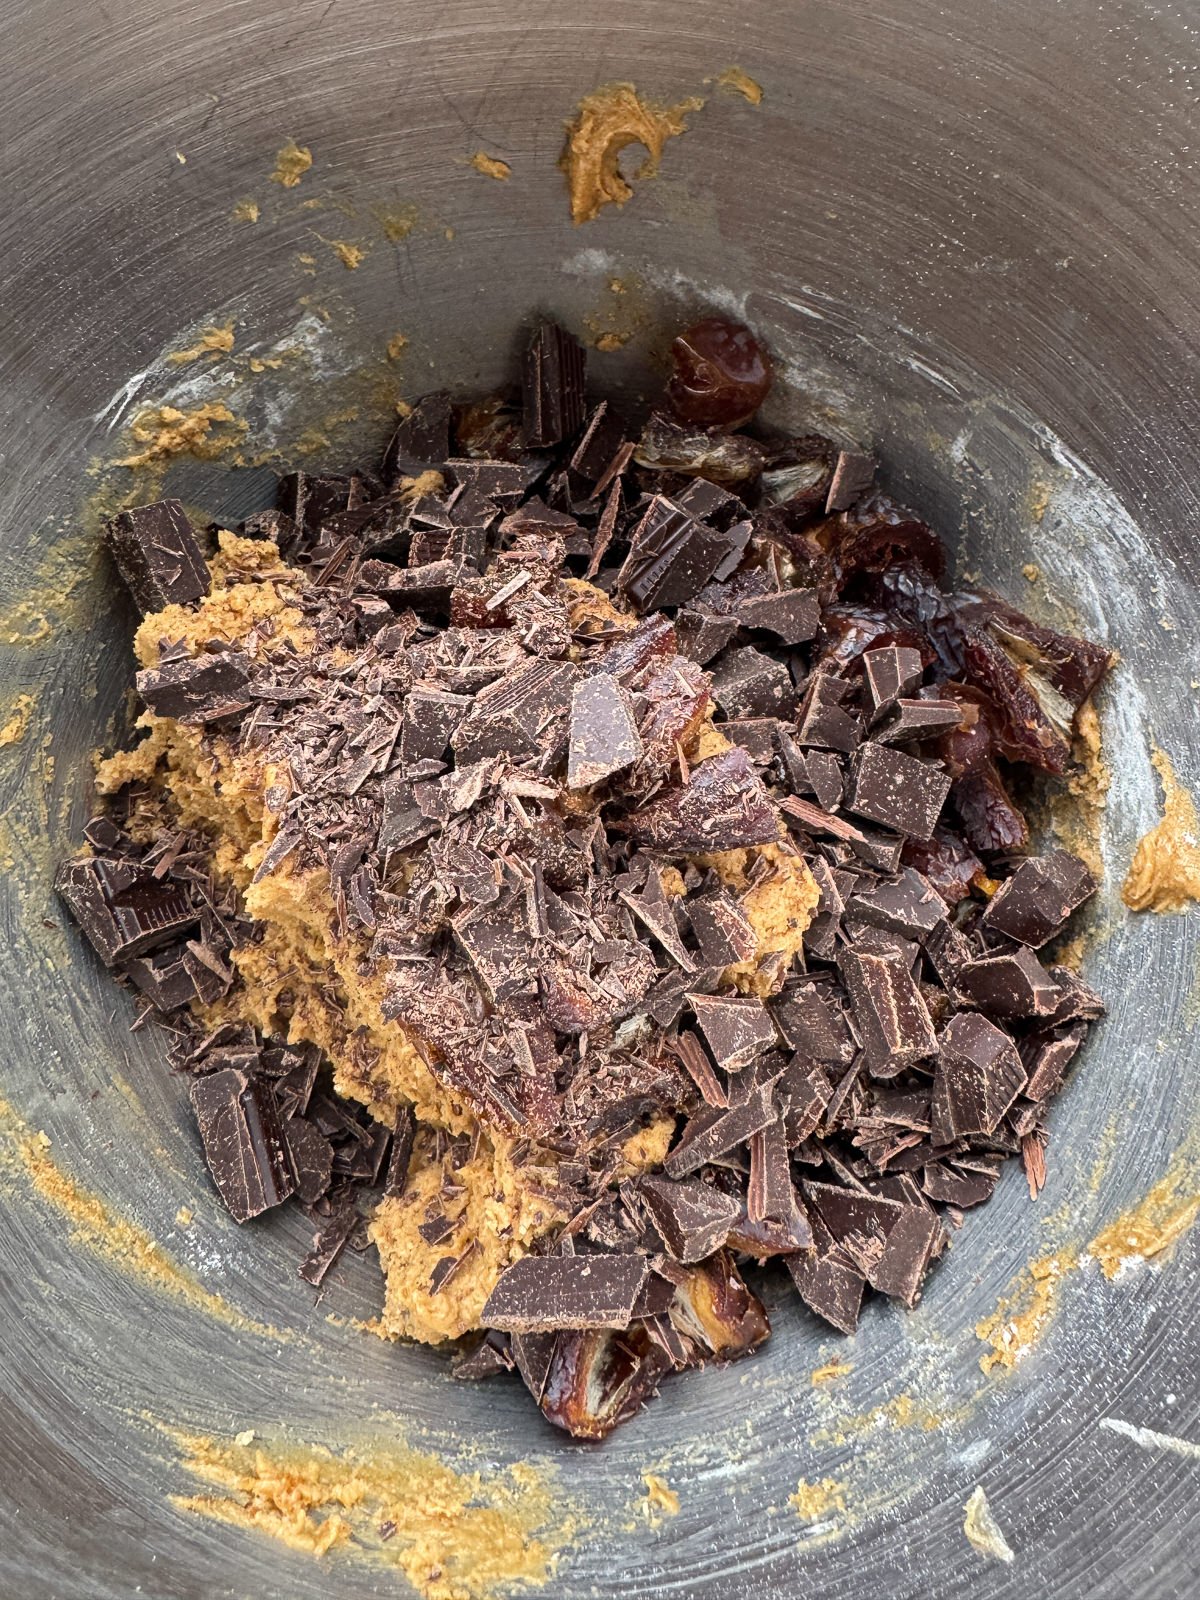
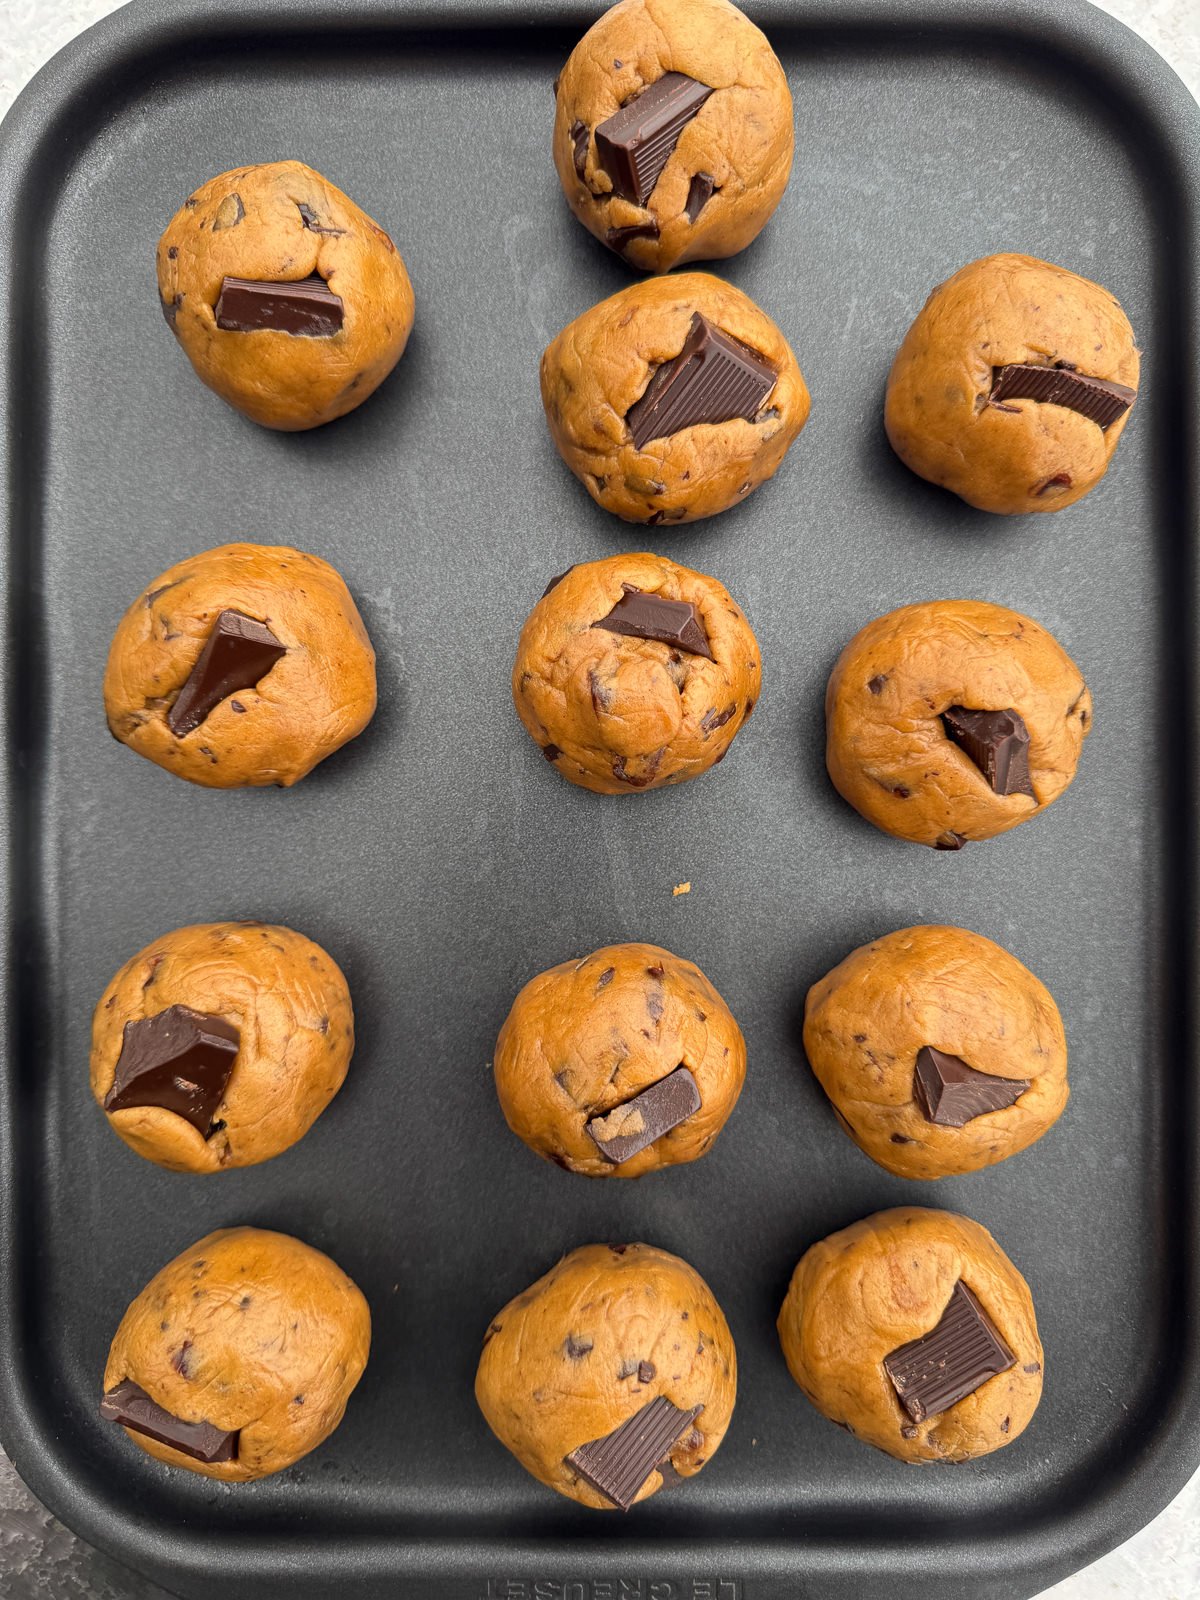
To the cookie dough we add chopped dark chocolate & Medjool dates that have been pitted & chopped into chunks. We stir the mix ins into the dough by hand then chill in the fridge for 30 minutes so that it can firm up slightly (this makes the cookie dough easier to shape!). - Shaping
Once chilled, we scoop the cookie dough into 13 equal portions (each should weigh around 90 grams). We then roll the cookies into balls & press a chunk of chocolate on top. - Chilling In The Fridge
Now that are cookies are shaped, they need to be chilled in the fridge for 3-4 hours, until firmed up slightly. This step is key, so don’t be tempted to skip it! This is what makes sure that our cookies don’t spread out too much in the oven. Usually I’d go for an overnight chill but as this cookie dough is made with peanut butter, it won’t spread out properly if chilled for that long. - Baking
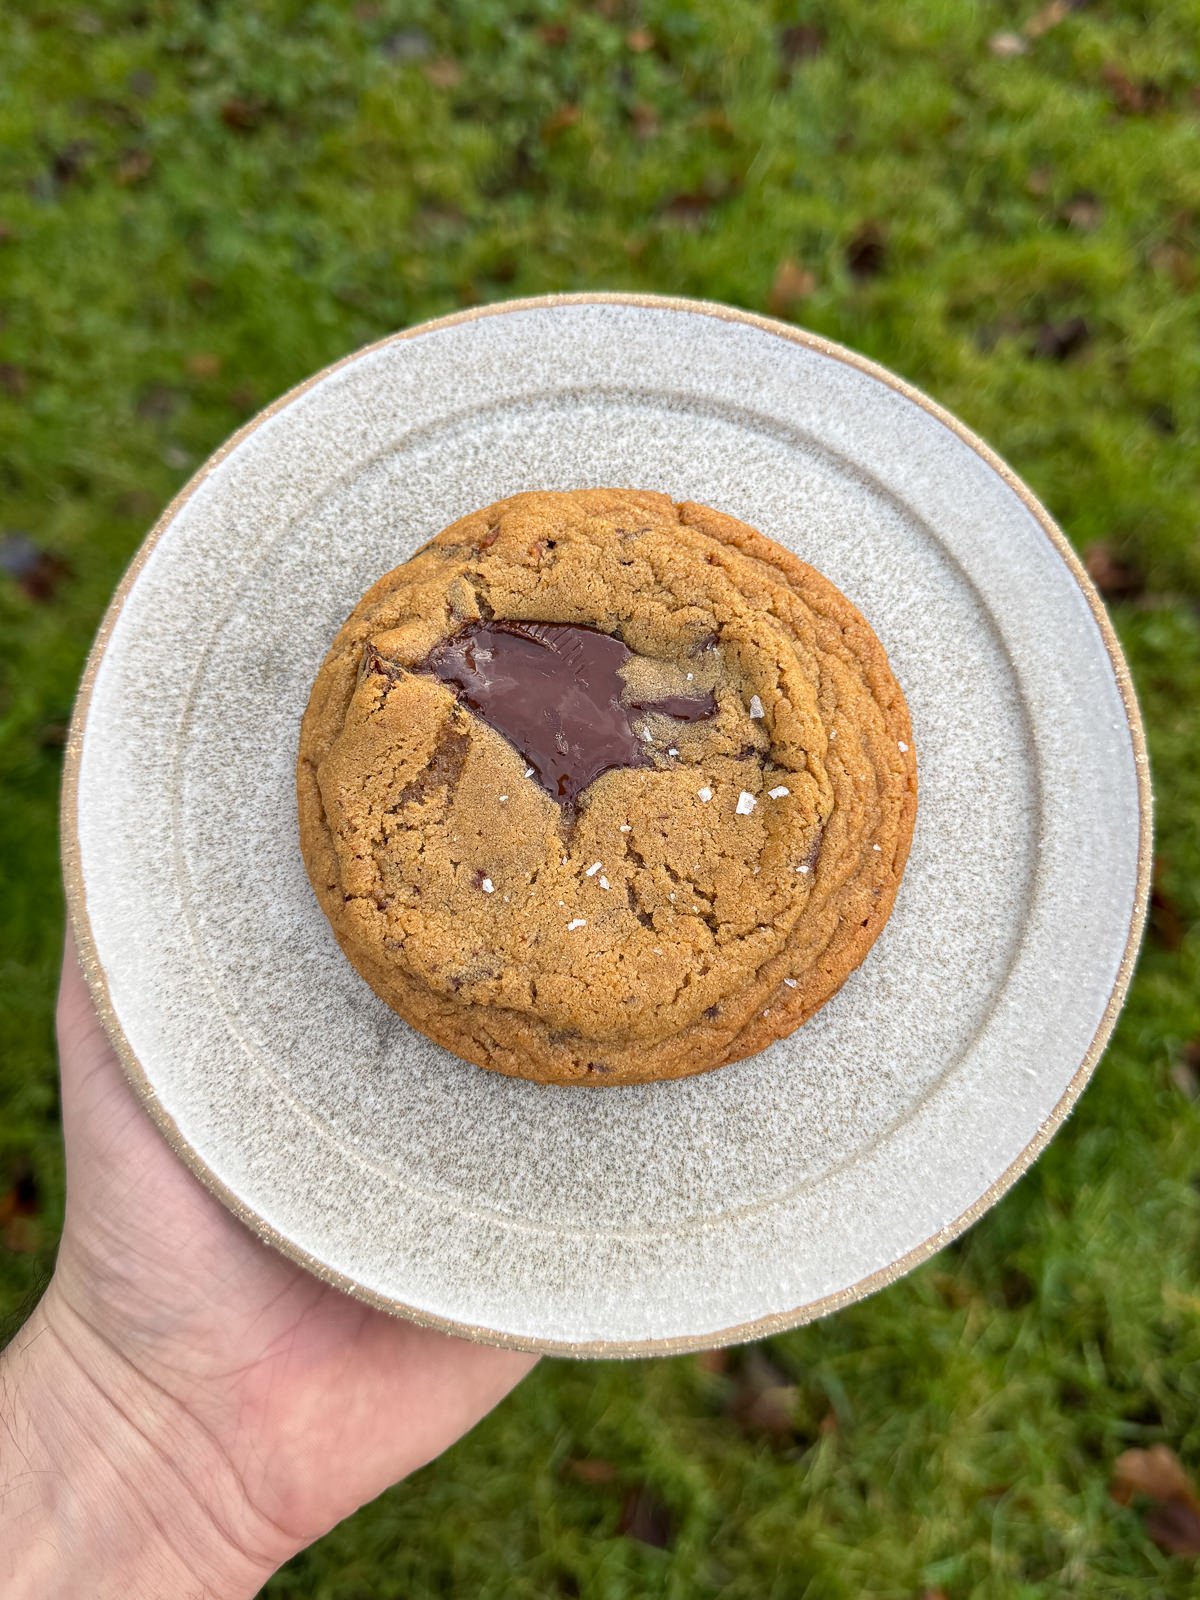
We bake the cookies for 14 minutes (@ 180°c/356°f), until the edges are crisp & set but the centres are still soft. We then “scoot” the cookies into uniform circles with a large cookie cutter, sprinkle with sea salt then leave to cool completely, on the tray. We’re using the “Pan Banging” technique when baking the cookies but more on that below.


The Pan Banging Technique
If you’ve ever searched for a cookie recipe on Google, chances are you’ve come across the pan banging technique by Sarah Kieffer from The Vanilla Bean Blog. This technique involves banging the tray of cookies onto your oven rack towards the end of the cooking process. This causes the cookies to deflate, spreading the chocolate out & giving the cookies crinkly edges.
Here’s how we bake these cookies using the pan banging technique…
- Bake the cookies for 10 minutes (undisturbed).
- Next, open your oven door, lift up the baking tray inside the oven by a few inches then let it drop down against the oven rack. Use enough force so that the cookie starts to deflate.
- Bake for another 2 minutes then repeat the pan banging process.
- Bake for another 2 minutes (bringing the total bake time to 14 minutes) then take the cookies out of the oven.
The Cookie Scoot
The cookie scoot is a technique used to shape cookies into a perfect circle as soon as they come out of the oven. To do this, take a large circular cutter & use it to move (or scoot) the edges of the cookies, to make a perfect a circle. This is the secret to making a batch of uniform cookies.
Tips & Tricks
- Brown the butter for your cookie dough, for an extra nutty, caramelised flavour. This is super easy to do & only takes a few minutes. There’s a full guide on doing this on our how to make brown butter guide.
- Use a good quality peanut butter & chocolate for the cookie dough. You’ll get the best flavour this way.
- Chill the cookie dough in the fridge for a few hours before baking, so that they don’t spread out too much in the oven.
- Use a large circular cutter to scoot your cookies into perfect round shapes as soon as they comes out of the oven.
- Sprinkle sea salt on top of the baked cookies for extra flavour. Sea salt & dark chocolate work really well together!
Frequently Asked Questions
To cook peanut butter cookies in an Aga, bake them on the bottom set of runners in the baking oven. Use the boiling plate to cook the brown butter.
Peanut butter & date cookies will keep for up to 3 days when stored in an airtight container. The balls of cookie dough can also be stored in the freezer for several months then defrosted fully before being baked.
A bar of good quality chocolate is best for cookies as it will melt better than chocolate chips. Using a chopped up bar of chocolate in cookie dough is how you get those molten pools of chocolate in your baked cookies!
More Cookie Recipes To Try!
- Brown Butter & Vanilla Glazed Cookies
- Brown Butter Oreo Chocolate Chip Cookies
- Kettle Chip Chocolate Chip Cookies
- Chewy Ginger Molasses Cookies
- Miso Banana Bread Chocolate Chip Cookies
- Brown Butter S’more Cookies
If you have enjoyed this peanut butter & date cookie recipe, it would mean a lot if you could leave a review & rating. And if you’d like to stay up to date with future recipes, follow us on Instagram & TikTok or subscribe to our newsletter!

Peanut Butter & Medjool Date Chocolate Chip Cookies
Equipment
- Stand Mixer
- Saucepan
- Cookie Scoop
- Baking Trays
- Large Circular Cutter
Ingredients
- 175 g Unsalted Butter
- 80 g Peanut Butter (See Notes)
- 150 g Dark Brown Sugar
- 125 g Caster Sugar
- 1 tsp Vanilla Extract
- 2 Large Eggs (See Notes)
- 260 g Plain Flour
- 10 g Cornflour
- ¾ tsp Baking Powder
- ¾ tsp Bicarbonate Of Soda
- ½ tsp Ground Cinnamon
- ¼ tsp Table Salt
- 180 g Dark Chocolate (54% Or 72% Is Best!)
- 180 g Pitted Medjool Dates (See Notes)
- Sea Salt (To Finish)
Instructions
Cookie Dough
- Start by browning 100g of the butter. To do this, chop the butter into evenly sized pieces then place into a medium saucepan. Place over a medium heat & allow to melt, stirring regularly with a spatula. Keep cooking, until the butter starts to foam, smells nutty & you can see that the milk solids in the bottom of the pan have turned golden brown.
- Once the butter has browned, transfer it to a bowl then leave to cool to room temperature. In the meantime, chop the remaining 75g of butter into small pieces & leave to soften at room temperature.The brown butter should take around 30 minutes to cool.
- Next, add both of the butters, the peanut butter, dark brown sugar, caster sugar & vanilla extract to the bowl of a stand mixer with the paddle attached. Beat on a medium speed for 1-2 minutes, until combined.Be careful not to over mix the butter & sugar, we don’t want to add too much air into the cookie dough as this will affect the baked cookies.
- In a separate bowl, lightly beat the eggs together then slowly pour into the butter, with the mixer running on medium speed. Stop mixing once the eggs are just incorporated.
- Add the flour, baking powder, bicarbonate of soda, salt & cinnamon into a separate mixing bowl, whisk to combine then add into the butter. Mix on a low speed until just combined.Don't worry if there's a few streaks of flour at this point as they will be incorporated when we mix in the chocolate.
- Next, cut the dates into 2 cm chunks then add into the cookie dough. Roughly chop up 120 grams of the dark chocolate then add into the cookie dough as well.
- Using a spatula, stir the dates & chocolate into the cookie dough then chill in the fridge for 30 minutes, so that it can firm up slightly.Make sure that the dates & chocolate are evenly incorporated throughout the cookie dough!
- Whilst the cookie dough is chilling, chop the remaining 60 grams of dark chocolate into 13 evenly sized chunks. Each chunk should be 1-2cm wide.
Shaping
- Using a cookie scoop (or a spoon), portion the chilled cookie dough into 13 equally sized portions. Each should weigh around 90 grams.
- With your hands, roll a portion of cookie dough into a ball then press a dark chocolate chunk into the top. Repeat with the remaining dough.
- Place the balls of cookie dough into an airtight container & refrigerate for 3-4 hours until the dough has firmed up.Alternatively, refrigerate the cookies overnight then let them sit out at room temperature for 20 minutes before baking. This helps them spread out properly.
Baking
- The next day, preheat an oven to 175°c/155°c fan (350°f/311°f).
- Place 3-4 balls of cookie dough onto a lined baking tray, making sure that there’s plenty of room between them.
- Bake the cookies for 10 minutes then open your oven door, lift up the baking tray inside the oven by a few inches then let it drop down against the oven rack. Use enough force so that the cookie starts to deflate. (This is the “Pan Banging” method.)
- Bake for a further 2 minutes then repeat the pan banging process.
- Bake for another 2 minutes (bringing the total bake time to 14 minutes) then remove from the oven. Once baked, the cookies' edges will be golden brown but the middles will still be soft.
- Using a large, round cookie cutter, gently scoot each cookie into a perfect round shape.
- Sprinkle each cookie lightly with sea salt then leave on the tray, to cool completely.
- Repeat the cooking process with the remaining cookies, baking 3-4 cookies at a time.