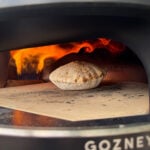
Pizza Oven Sourdough Pitas
The secret to making soft, pillowy homemade pitas with loads of flavour is making the dough with a sourdough starter then baking them in a pizza oven.
Servings: 6 Pitas
Equipment
- Stand Mixer
- Baking Tray
- Pizza Oven
- Rolling Pin
Ingredients
To Feed Sourdough Starter
- 100 g Sourdough Starter (100% Hydration - See Notes)
- 100 g Water (25°c/78°f)
- 50 g Strong White Bread Flour (See Notes)
- 50 g Strong Wholemeal Bread Flour (See Notes)
Pita Dough
- 280 g Strong White Bread Flour
- 70 g Strong Wholemeal Bread Flour
- 200 g Water (25°c/78°f)
- 70 g Mature Sourdough Starter
- 15 g Olive Oil
- 7 g Fine Sea Salt
Instructions
Feeding Your Sourdough Starter
- Feed your sourdough starter using the quantities above then leave to ferment at room temperature until it reaches its peak. This will take around 4-6 hours but you'll know your starter best!The quantities used give you enough starter to make the dough plus enough to continue feeding.
Pita Dough - Autolyse
- An hour before your starter is ready, add the flours, oil and 180 grams of the water into a stand mixer then mix on a low speed (with the dough hook) until just combined.Don't over mix the dough, a few dry streaks are fine!
- Cover the bowl with a damp tea towel then leave to autolyse at room temperature for 1 hour, or until your starter is ready.Don't worry if the autolyse lasts slightly longer than an hour!
Pita Dough - Mixing
- Once your starter is ready, weigh 70 grams of it into the dough then mix on a medium-low speed until combined.
- Add the salt & the remaining 20 grams of water to the dough then continue mixing on medium-low, until the salt is mixed in and the dough is smooth & coming away from the sides of the bowl. This will take around 4-5 minutes of mixing.
- Once mixed, transfer the dough to a lightly oiled bowl then cover with a damp tea towel.I'd recommend using a glass bowl, so you can keep an eye how the dough is fermenting.
Bulk Fermentation
- Let the dough prove at room temperature and perform 2 sets of coil folds, spaced 45 minutes apart.
- Continue proving the dough at room temperature until it has risen in size by 50% & there's lots of tiny bubbles around the edges. The total time for the bulk ferment (including the coil folds) will roughly be between 3-4 hours.You'll know when it's done when the dough has risen in volume & there's signs of fermentation (lots of tiny bubbles).
Shaping & Cold Ferment
- Once the dough has proved, transfer it to a lightly floured work surface then use a bench scraper to divide into 6 equal pieces. Shape each piece into a tight ball with your hands.Each piece of dough should weigh around 100 grams.
- Next, dust a baking tray (or dough tray) with flour then add in the dough balls, making sure to space them at least a couple of centimetres apart.
- Cover the tray with clingfilm (or a lid) then leave to ferment in the fridge for 12-24 hours.The longer you ferment the dough for, the deeper/more sour the flavour will be. It's best not to ferment for longer than 24 hours though, as the pitas won't rise as much when you cook them.
Baking
- The next day, take the dough out of the fridge then leave to sit at room temperature for 1-2 hours, until they no longer feel cold to the touch.
- In the meantime, preheat a pizza oven to 350°c – 400°c (660°f-750°f).Make sure to give your oven plenty of time to saturate with heat.
- Next, place a ball of dough onto a lightly floured surface & use a rolling pin to roll out into an oval, roughly 20cm long & 5mm thick. Use a peel to transfer the rolled out pitta into the preheated pizza ovenIf you are using a gas pizza oven, turn the flame down to medium. If the flame is too fierce, the top of the pitas can burn.
- Allow the pita to cook untouched until it puffs up (this will take around 30 seconds) then turn 180° & cook for around another 30 seconds. Remove from the oven & place inside a tea towel to keep soft.
- Repeat with the remaining pittas, rolling out & cooking them one at a time.
Salt Butter Smoke Magazine
Love seasonal cooking?
Issue 001 features over 20 original autumn recipes, seasonal features, preserving guides and beautiful photography.
Take a Look Inside →Video
Notes
1. Pizza Oven - I use a Gozney gas pizza oven at home but any type will work. It’s important to allow enough time for the stone in your pizza oven to heat up fully. I recommend preheating your oven 30 minutes – 1 hour before cooking.
2. Flour - It's key that you use strong bread flour for this recipe. I like to use a mix of white & wholemeal flour, for extra flavour and because it's what I feed my starter with. You can use just white flour but you may need to use slightly less water. Both flours should have a protein content between 12-14%. I use Canadian bread flours from Shipton Mill.
3. Sourdough - This recipe uses a 100% hydration sourdough starter, which means that it's fed with equal amounts of starter, flour & water. If your starter has been in the fridge, I’d recommend getting it out at least 2 days before using, giving it 2 feeds a day.
If you haven’t got a starter, take a look at our sourdough guide for more info on how to make one! For pita, I feed my starter like normal with strong white & wholemeal bread flour (50/50). If your starter is made with just white flour, that’s fine too.
4. Cooking Indoors - If cooking in a home oven, the best way is to set your oven to its’ highest temperature, preheat with a baking stone or large baking tray placed in the centre of the oven & then cook the pittas in batches (you’ll need to allow an extra minute or two of cook time). Alternatively, cook the pitas in a large frying pan set over a high heat, for 3-4 minutes on each side.
5. Storage - It's best to serve the pitas straight away, whilst they're still warm! However, once cool they can be stored in an airtight container & are best eaten within 2 days. To reheat, you can microwave the pitas or warm them in a frying pan set over a medium heat.
Enjoying This Recipe?
The Prep List is my free weekly newsletter with seasonal recipes, kitchen notes and behind-the-scenes from my kitchen. Add Salt Butter Smoke as a Google Preferred Source to see more of my recipes in Search.