Step By Step Sourdough
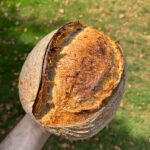
Follow this easy step by step sourdough guide to make a bakery quality loaf of bread, with an impressive ear and soft, open crumb.
Servings: 1 Loaf
Equipment
- Glass Mixing Bowl
- Digital Food Probe
- Digital Scales
- Laser Temperature Gun
- Plastic Dough Scraper
- Metal Dough Knife
- 500g Oval Banneton
- Baker's Lame
- Dutch Oven/Oval Casserole Dish (With Lid)
- Spray Bottle
- Wire Cooling Rack
Ingredients
To Feed Your Sourdough Starter
- 50 g Strong White Flour
- 50 g Strong Wholemeal Flour
- 100 g Water (78°f/26°c)
- 100 g Ripe Sourdough Starter
Sourdough Bread
- 400 g Strong White Flour
- 100g g Strong Wholemeal Flour
- 330 g Water (78°f/26°c)
- 1 tbsp Olive Oil
- 75 g Mature Sourdough Starter
- 11 g Maldon Salt
- Rice Flour To Dust
Instructions
Feeding Your Sourdough Starter
- Feed your starter as you normally would but use the quantities of flour, water & starter above. This makes enough starter for 1 loaf with some remaining so that you can continue feeding it.
- Leave at room temperature until it has risen to its’ peak & just before it starts to fall. This should take between 4-6 hours.
Autolyse
- An hour before you think your starter has finished rising, add the white & wholemeal bread flours into the bowl of a stand mixer along with 300 grams of the water and the olive oil then mix with the dough hook on a low speed, until just combined.Don't over mix the dough, it should be just combined. A few streaks of flour is fine!
- Cover the bowl with a tea towel then let the dough sit at room temperature until your starter has reached its peak. Don't worry if this is longer than 1 hour, a longer autolyse is fine.
Mixing The Dough
- Weigh the sourdough starter into the dough then mix on a low speed until combined. This will take 3-4 minutes.
- Add the salt & the remaining 30g of water into the dough then continue mixing on a low speed until combined.
- Once the dough has come together, turn the speed up slightly (to medium-low) and continue mixing for another 2-3 minutes, until the dough is smooth & coming away from the sides of the bowl.
Bulk Ferment
- Transfer the dough to a lightly oil glass bowl, cover with a tea towel or clingfilm then leave to bulk ferment at room temperature, until the dough has risen by almost 50% This will take anywhere from 4-10 hours.Using a glass bowl helps you keep an eye on how the dough is fermenting.
- During the first part of the bulk ferment, give the dough a set of coil folds every 30 minutes, until it passes the windowpane test (I find that 4-6 set of coil folds tends to do the trick). Then leave undisturbed for the remainder of the bulk ferment.The bulk ferment starts as soon as the starter is added to the dough & will take anywhere from 4-10 hours (depending on room temperature, dough hydration & flour used). When the dough has finished fermenting, it will have increased in volume by roughly 50%, the top will be domed & you will see lots of tiny bubbles in the dough. There's a guide to coil folds in the post above.
Shaping
- Once the bulk ferment has finished, gently tip the dough out onto a clean work surface, with the help of a dough scraper.
- Using a metal bench knife & a hand dipped in water, gently work the dough into a round shape then leave to bench rest for 20 minutes.Don't shape the dough too tightly, to avoid damaging it. The dough will spread slightly as it rests.
- In the meantime, generously dust a 500g oval banneton with rice flour then set to one side.I use an oval banneton that measures 24cm x 13cm x 9cm.
- Next, lightly dust the top of the dough with rice flour then use a bench scraper to gently loosen it from the work surface before flipping it over.
- To shape, pull the bottom side of the dough up & fold it into the middle. Press down lightly to make sure the dough has stuck (press down lightly with every fold).Now take the left side, stretch it slightly & fold it roughly ¾ to the right.Next, stretch the right side slightly & fold over the left side.Take the top side, stretch it away from you then fold it into the centre of the dough.Now “stitch” the sourdough. Starting at the top, pinch a small amount of dough from both the left & right sides. Fold the dough from the right side over the centre, followed by the left side. Repeat this process in the middle section of dough then the bottom section. (Imagine the pattern of a laced up shoe).Finally, starting from the bottom to the top, carefully roll the dough over itself. Use a bench knife to gently pull the shaped dough towards you, dragging the bottom of the dough on the work surface. This seals the underneath & helps create tension.Dust the surface of the dough with rice flour, turn the dough upside down (so that the dough is seam side up) & place into the banneton.
Cold Ferment
- Cover the top of the banneton with clingfilm & chill in the fridge for 12-18 hours. The longer the dough is left in the fridge, the more sour the final loaf will be. You can prove your dough for up to 24 hours but for the best oven spring, 12-18 is the sweet spot.
Baking
- When you're ready to bake, preheat an oven to 230°c/210°c fan (446°f/410°f). Place your casserole dish/Dutch oven into the oven as it preheats, letting it heat up for at least 30 minutes so that it gets screaming hot.Whilst your oven heats up, place your banneton of dough into a freezer. A 20-30 minute freeze makes it easier to score the dough.The casserole dish I use can be used upside down so that the dough sits on the lid & the casserole dish itself acts as a lid. This means there’s plenty of room for oven spring.
- In the meantime, cut a piece of baking parchment roughly the same size as the inside of your Dutch oven. Just before baking, scrunch the parchment up whilst running it under cold water. Then flatten it back out and place onto a chopping board.You'll also need to fill a spray bottle up with cold water.
- Next, remove the banneton from the freezer. Place your prepared piece of parchment over the top of the banneton then the chopping. Flip the banneton/chopping board over so that the dough is now sat seam side down on the parchment.
- To score the dough, hold a baker's lame so that the razor is at an 30°-40° angle to the dough. Starting at the top end of the dough, slash the dough all the way to the bottom end. The score should be off centre to the right & at least 1cm deep. For best results, try to score in one cut. Dipping the razor in water before scoring helps produce a clean cut.Get the loaf into the oven as soon as you've scored it!
- Using the parchment, slide the dough into the preheated casserole dish. Spray generously all over with cold water & place the lid on the dish.
- Bake the sourdough the preheated oven, covered for 25 minutes then remove the lid & bake for a further 20-25 minutes, until the loaf is a deep, brown colour. For the best flavour, the dough should be fairly dark but not burnt.
- Transfer the dough to a wire rack & leave to cool completely before slicing. This will take a couple of hours.
Salt Butter Smoke Magazine
Love seasonal cooking?
Issue 001 features over 20 original autumn recipes, seasonal features, preserving guides and beautiful photography.
Take a Look Inside →Notes
1. Cooking Sourdough In An Aga - Place your Dutch oven/ casserole dish onto the grid shelf placed on the floor of the roasting oven. Cook as above.
2. Storage - Left in an airtight container, sourdough bread will last for several days.
3. Flour - The flours that I use are Canadian flours from Shipton Mill. Most strong bread flours will work though. Make sure to use flours with a protein content between 12-14%.
4. Baking Dish - For the best oven spring, you need to create a humid environment for the dough to bake in for the first 25 minutes. The best way to do this is by using a Dutch oven or a deep oval casserole dish (that's what I use!). I use the lid as the base then the deep part as the lid.
Enjoying This Recipe?
The Prep List is my free weekly newsletter with seasonal recipes, kitchen notes and behind-the-scenes from my kitchen. Add Salt Butter Smoke as a Google Preferred Source to see more of my recipes in Search.