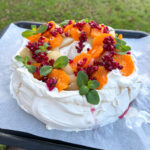
Christmas Pavlova Wreath
A stunning Christmas pavlova wreath that's fluffy & marshmallowy in the middle & topped with vanilla whipped cream, poached pears, clementines & pomegranate seeds.
Servings: 10 People
Equipment
- Stand Mixer
- Large Baking Tray
- Piping Bag
- Saucepan
Ingredients
Pavlova
- 240 g Egg Whites (Room Temperature - See Notes)
- 400 g Caster Sugar
- 15 g Cornflour
- 2 tsp White Wine Vinegar
Poached Pears
- 4 Conference Pears
- 400 ml Water
- 200 g Caster Sugar
- Half A Vanilla Pod
Whipped Cream
- 400 g Double Cream
- 30 g Icing Sugar (Sifted)
- 1 tsp Vanilla Paste
Toppings
- 6 Clementines
- 1 Pomegranate
- 1 tbsp Honey
- A Few Sprigs Of Fresh Mint
Instructions
Pavlova Wreath
- Line a large baking tray with baking parchment then draw a 9" circle onto the parchment with a pen. Flip the parchment over so that the pen is underneath.I used a plate as a guide!
- Add the egg whites into the bowl of a stand mixer then whisk on a medium speed to soft peaks. This will take 2-3 minutes.
- Next, turn the mixer speed down slightly then add in the caster sugar a tablespoon at a time, making sure to let the sugar mix in fully before adding in more. I find that adding a spoonful of sugar in every 20 seconds or so is best.
- Once all the sugar has been added, turn the mixer back up to medium then continue whisking for 15-20 minutes, until the meringue has reached stiff peaks and is thick & glossy.Whilst your meringue is whisking to stiff peaks, preheat an oven to 160°c/140°c fan (320°f/284°f).If you're using a KitchenAid, speed 4-5 is best when whisking the meringue to stiff peaks. To check if the meringue is ready, rub it between your thumb & index finger. If it feels smooth, it's ready but if it feels grainy, more whisking is needed.
- Add the cornflour & vinegar to the meringue then whisk for another minute or so (on medium), until combined.
- Transfer the meringue to a piping bag then pipe 8 domes onto the baking tray, in a ring shape, using the circle that you drew onto the parchment as a guide.I find that cutting the end of the piping bag off 2 inches from the tip is best as this allows us to pipe a large dome of meringue in one go. If you dab a small amount of meringue on each corner of the tray, underneath the parchment then it won't move!
- Next, use a palette knife or spoon to shape the meringue into a rustic wreath shape that's around 6-8cm tall. The wreath should have a flat (ish) top, with a slight channel around the middle so that the filling has somewhere to sit. I like to use a fork/palette knife to give the outside a few decorative swoops/peaks.See the post above for a visual guide on how to shape the meringue!
- Once shaped, place the tray into the preheated oven then immediately turn the temperature down to 110°c/90°c fan (230°f/194°f). Bake for 1½ hours then turn the oven off & leave to cool for at least 4 hours or preferably overnight.Once done, the pavlova should be crisp & dry on the outside but should still be white. If your meringue isn't ready after 1½ hours, give it another 10-15 minutes. The pavlova is cooled inside the oven to stop it from cracking. Make sure to keep your oven door shut!
Poached Pears
- Add the water & sugar into a medium saucepan then scrape the seeds out of the vanilla beans & add in as well. Set over a low heat & warm gently to dissolve the sugar.Add both the pod & seeds into the pan! It's best to make the pears the day before you need them.
- Whilst the syrup heats up, peel the pears then cut in half & use a melon baller (or teaspoon) to scoop out the cores. Cut each pear half in half again (to make pear quarters!) then use a knife to lightly trim the core from the top part of the pears.
- Next, add the pears into the vanilla syrup then cover the surface with a piece of baking paper (a cartouche) then cook gently until just tender. This will take 15-25 minutes, depending on how ripe your pears are.Use a skewer to check if the pears are cooked. They'll feel soft when they're ready.
- Once cooked, take the pan off the heat & let the pears cool in the syrup. Then transfer the pears & syrup into a container & chill in the fridge until needed.
Whipped Cream - Make Just Before Serving!
- Add the cream, icing sugar & vanilla paste into a mixing bowl then whisk to soft peaks. You can do this by hand or with an electric hand mixer.Make sure not to over whip the cream!
Toppings
- Cut the pomegranate in half then hold a piece, cut side down over a bowl. Use a spoon to tap the skin side of the pomegranate half to knock the seeds out. Repeat with the other half then stir in the honey.Pick out any white pith that's in the bowl with the seeds before adding in the honey.
- To prep the clementines, use a small knife to cut off the skin & pith then cut the fruit into thin slices. For the mint, pick small sprigs off the stalks.
Assembly
- First, spoon the whipped cream on top of the pavlova then spread out into an even layer.It's best to assemble the pavlova on the baking tray, as it will most likely break if you try to move it!
- Top the whipped cream with the poached pears & clementine slices then spoon over the pomegranate seeds. Garnish with the mint sprigs then cut into portions & serve!Try not to get too much of the pear syrup on the pavlova as it will make it soggy. It can be saved to serve with ice cream, yogurt or fresh fruit!
Notes
1. Egg Whites – This pavlova recipe uses 240 grams of egg whites which is roughly equivalent to the whites from 8 large eggs. Egg whites will whisk up better when they’re at room temperature, so make sure to let them warm up slightly if they’ve been in the fridge. I've found that it's best to use whole eggs that have been separated not a carton of egg whites!
2. Vanilla – Using a good quality vanilla makes all the difference in the whipped cream & poached pears. You can either use a vanilla pod or a good quality vanilla paste. I don't put vanilla in the meringue, as it will make it less white.
3. Pavlova Style - This recipe makes a pavlova that's tall, with a squidgy, marshmallowy centre! I've found that it's best to shape the wreath so that it's around 9 inches wide. If you'd prefer a crisper pavlova, shape it so that it's wider & not as tall.
4. Making In Advance & Storage – This dessert is designed to be made in advance & comes together last minute. It's best to make the meringue the day before serving & let it cool in the oven overnight but it will keep for an extra day if stored in an airtight container at room temperature, without any toppings on. Any leftover pavlova (with toppings on) will keep in the fridge for a day or two. Pavlova will start to soften if made too far in advance!
5. Toppings - You can top your pavlova with pretty much whatever you like! As this is a Christmas pavlova wreath, I've gone with some festive fruits. Fresh or frozen berries would work as well though. I'd macerate them in a small amount of sugar or cook them on the stove to make a compote.
❤️ Stay connected with Salt Butter Smoke
The Prep List is my free weekly newsletter with seasonal recipes, kitchen notes and behind-the-scenes from my kitchen. Add Salt Butter Smoke as a Google Preferred Source to see more of my recipes in Search.