Chocolate Fudge Layer Cake
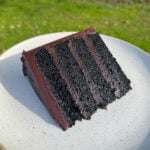
The ultimate chocolate fudge cake! There's layers of moist chocolate sponge that's made with black cocoa, rich chocolate fudge frosting & an intense dark chocolate ganache.
Servings: 12 People
Equipment
- 2 8" Round Cake Tins
- Stand Mixer
- Mixing Bowls
- Wire Cooling Racks
- Sieve
- Stick Blender
- Palette Knife
- Cake Stand
- Blowtorch
Ingredients
Chocolate Fudge Cake
- 85 g Black Dutch Processed Cocoa Powder (See Notes)
- 2 tsp Instant Coffee
- 160 g Boiling Water (From The Kettle!)
- 250 g Plain Flour
- 200 g Caster Sugar
- 200 g Dark Brown Sugar
- 1 tsp Bicarbonate Of Soda
- ½ tsp Baking Powder
- ¾ tsp Table Salt
- 125 g Unsalted Butter
- 75 g Vegetable Oil
- 250 g Sour Cream
- 4 Large Eggs
- 2 tsp Vanilla Extract
Chocolate Ganache
- 350 g Double Cream
- 75 g Unsalted Butter (Roughly Chopped)
- 75 g Golden Syrup (Or Light Corn Syrup)
- 360 g Dark Chocolate (72% Is Best - See Notes)
- A Pinch Of Sea Salt
- 100 g Mascarpone (At Room Temperature)
Chocolate Fudge Frosting
- 100 g Double Cream
- 40 g Black Dutch Processed Cocoa Powder
- 120 g Dark Chocolate (72% Is Best)
- 120 g Unsalted Butter (Softened)
- 200 g Icing Sugar (Sifted)
- A Pinch Of Table Salt
- 100 g Mascarpone (At Room Temperature)
- 50 g Golden Syrup (Or Light Corn Syrup)
Instructions
Chocolate Fudge Cake
- Preheat an oven to 170°c/150°c fan (338°f/302°f). Grease 2, 8 inch round cake tins with butter then line just the bases with a disc of baking parchment. Set aside for now.Make sure to give your oven plenty of time to preheat. The cake batter is quick to make!
- Add the cocoa powder & instant coffee into a bowl, pour over the boiling water (from the kettle) then whisk to combine. Let the cocoa bloom & cool down slightly whilst you make the batter.
- Next, add the flour, both of the sugars, bicarbonate of soda, baking powder & table salt into a large mixing bowl then whisk to combine. Set this to one side.
- Chop the butter into small chunks, add into a heatproof jug (or bowl) then microwave to melt. Add in the veg oil, sour cream, eggs & vanilla then whisk to combine.Alternatively, melt the butter in a pan on the stove then transfer it to a jug.
- Next, add the wet ingredients & the cocoa mix into the flour then gently whisk by hand until smooth & combined. Be careful not to over mix the batter though!
- As soon as the batter is mixed, equally divide it between the lined tins then bake in the preheated oven for 30-35 minutes, until a skewer inserted into the centre comes out clean.The bicarb will start to react as soon as the batter is mixed, so the cakes need to go into the oven straight away! If you'd like to weigh the batter into the tins, each one should have around 775g in.
- Once the cakes are baked, let them cool in the tins for 15 minutes. Then run a small, sharp knife around the edge of each tin before turning each cake out onto a wire cooling rack. Carefully remove the parchment then leave to cool until just slightly warm.Place the cakes top side down onto the cooling racks. This will give the cakes a flatter top!
- Once cooled, wrap the cakes in clingfilm then chill in the fridge overnight.Wrapping the cakes up when they're still slightly keeps them moist. Chilling them makes it easier to cut them in half when we assemble the cake.
Chocolate Ganache
- Add the cream, butter & golden syrup into a medium sized saucepan then set over a low heat & warm, stirring frequently until the butter has melted & the cream is steaming hot. But not boiling! If you take the temperature of the cream, it will be around 80°c/176°f when ready.Make the ganache the day before assembling the cake, so that it has time to set. Or at least a couple of hours before!
- Whilst the cream is warming up, chop the chocolate into small pieces then place into a heatproof mixing bowl, along with a pinch of sea salt.
- Once the cream is hot, pour it over the chocolate then let the mix stand for 2 minutes, without stirring.Don't skip this step!
- Next, use a spatula to gently stir the cream & chocolate together until melted & smooth, starting from the middle, working outwards.
- Once the chocolate has melted, add in the mascarpone then use a stick blender to blend it into the ganache. The mix may look split at first but keep blending & it will come together, to make a smooth, shiny ganache.
- Transfer the ganache to a shallow dish then cover the surface with a piece of clingfilm & leave to set at room temperature until thick enough to spread. This will take an hour or two. You can speed this process up by putting the ganache in the fridge but it will lose some of its' shine!As the ganache contains mascarpone, it will need to be stored in the fridge if you're making it ahead of time. To make it more spreadable after being chilled, you'll need to let the ganache sit out at room temperature for around an hour.
Chocolate Fudge Frosting
- Place the cream into a small heatproof bowl then microwave until steaming hot (but not boiling). Add in the cocoa powder, whisk to combine then leave to cool completely.Make the frosting just before assembling the cake! If you don't have a microwave, warm the cream up in a small pan then transfer to a bowl.
- Roughly chop up the dark chocolate then place into a small, heatproof bowl. Melt the chocolate (either in a microwave or over a bain marie) then leave to cool completely as well.Wait for both components to cool before continuing with the frosting. This will take around 20 minutes.
- Next, add the softened butter, sifted icing sugar & salt into the bowl of a stand mixer then use the paddle attachment to beat on a medium speed until light & fluffy and the icing sugar has dissolved fully. This will take 4-5 minutes.Make sure to scrape the sides of the bowl down regularly with a spatula.
- Once the butter is mixed, add in the mascarpone, golden syrup and the cooled cocoa mix & melted chocolate then mix on a medium speed for another 2-3 minutes until you've got a smooth, fluffy frosting. Make sure to scrape the bowl & paddle down frequently to avoid streaks in the frosting.
Assembly
- Unwrap the cakes then use a sharp serrated knife to cut each sponge in half, so that you end up with 4 layers. Or if you'd prefer, use a cake leveller cutter tool. Stack the layers up separated between parchment paper as you cut them.Once cut it's best to flip the top layers of cake upside down, as this will give us a flatter surface for the frosting.
- Next, spread a small amount of frosting onto the middle of a serving plate/cake board then place a layer of cake on top. The frosting stops the cake from sliding around. If you've got one, place the plate onto a turn table with a non slip mat underneath.
- Add 2 generous spoonfuls of frosting on top of the cake layer then use a palette knife to spread it out into an even layer that reaches the edge of the sponge. The aim is to use just under a third of the frosting per layer, which will leave us with a small amount to use as a crumb coat on the outside of the cake.
- Place another cake layer on top of the frosting then repeat the frosting & cake layers twice more. You'll end up with 4 cake layers & 3 frosting layers. Make sure to stack the cakes up straight otherwise you'll have a wonky cake!
- Next, spread the small amount of remaining frosting onto the outside & top of the cake, to make a thin crumb coat. This doesn't have to be neat, it's just gives us an even surface to spread on the ganache. At this point, it's best to chill the cake in the fridge for 1 hour, to let the frosting firm up slightly.
- Once the cake has set, coat the cake in the ganache. To do this, give the ganache a gentle stir to give it a more spreadable consistency then spoon it on top of the cake. Then use a palette knife to spread the ganache all over the sides & top of the cake, in an even layer.Make sure to bring the ganache back up to room temperature if it's been in the fridge!
- To finish the cake, I like to give a the ganache a quick blowtorch to give it a glossy finish then use a palette knife to make a few decorative swoops. You can decorate yours however you like though!If you're using a blowtorch, be careful not to melt the ganache! You only need a gentle heat to finish the ganache.
- The cake is now ready to serve! The best way to cut the cake is to use a large knife that's been dipped in warm water & dried between cuts.
Video
Notes
1. To Bake In An Aga - To bake the sponges, cook them on a grid shelf placed onto the floor of the baking oven, with a cold plain shelf placed on the top runners. Use the simmering plate to warm the cream for the ganache.
2. Cocoa Powder - To give the cake & frosting that signature dark colour, you'll need to use a black cocoa powder (Dutch processed). I ordered this online as most supermarkets don't sell it! I used "Callebaut Noir Intense" cocoa powder which I bought from amazon. However, regular Dutch processed cocoa powder will also work but the cake & frosting won't be as dark.
3. Chocolate - I developed this recipe using 72% dark chocolate so it's what I would recommend using! It's best to use a bar of chocolate (not chips) as it will melt better.
4. Golden Syrup - Golden syrup is added to both the ganache & frosting to add sweetness & to give them a glossy finish. I you can't find golden syrup, light corn syrup will work instead.
5. Other Ingredients - It's key to stick to the exact amounts & type of sugar, sour cream, mascarpone, etc. I wouldn't recommend changing sugars or any of the other ingredients as this will affect the cake's texture & flavour.
6. Serving - Chocolate cake is best served at room temperature otherwise the cake & ganache will be firm. At room temperature, the cake, frosting & ganache will be soft & fudgy! If chilled, you can give a slice of cake 5-10 seconds in the microwave to soften it. Be careful not to melt the ganache & frosting though!
7. Storage - As the frosting & ganache contain mascarpone, it's best to store the cake in the fridge & it's best served within 3 days. However, make sure to bring the cake up to room temperature before serving though! The cake will happily sit at room temperature for an hour or two once assembled but it's best to chill it after this time.
❤️ Stay connected with Salt Butter Smoke
The Prep List is my free weekly newsletter with seasonal recipes, kitchen notes and behind-the-scenes from my kitchen. Add Salt Butter Smoke as a Google Preferred Source to see more of my recipes in Search.